
We have prepared this guide for those who want to get ahead in s.p.l.i.t and are looking for a simple step-by-step guide to the console hacking process.
Table of Contents
s.p.l.i.t Console Hacking Walkthrough
If you’re stuck in s.p.l.i.t and wondering how to progress, this step-by-step guide will show you everything you need to know for real in-game hacking operations!
Pro Tip: For players who want to finish the game quickly, the absolutely necessary steps are marked with a ★. Keep in mind that all in-game codes are randomly generated per playthrough. The ones shown in this guide are examples only. You will need to find your own!
Starting the Game
After the opening dialogue, you’ll be asked to boot up the console and transfer files from the Field Kit onto it.
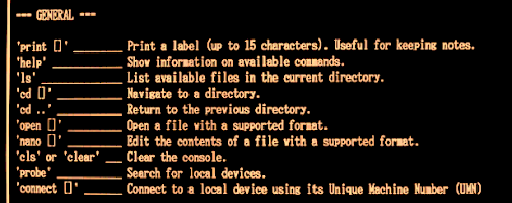
Basic Controls:
- A & D = Turn your head
- ALT = Unfocus window / Distance view
- Use the print command in-game to write notes, such as short codes or reminders.
Accessing the Field Kit
- Hold ALT to move away, then look to your right where the Field Kit is located.
- Activate the Field Kit by following the typing prompts.
- Return your focus to the console.
- Now you’re faced with an almost empty console. Type help to view available commands.
Step 1: Connect the Field Kit to the Console
★ Type probe into the console to scan for devices.
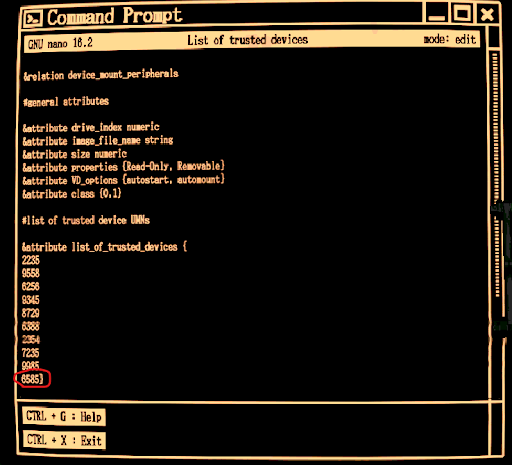
Scroll to the bottom of the output you’ll see the Field Kit information, including its Unique Machine Number (UMN).
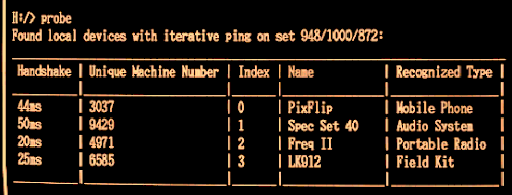
Example: 6585 (Yours will be different!)
★ Write down or print your UMN using the print command.
Step 2: Attempt File Copy

If you try to copy files now, you’ll get an error because the Field Kit isn’t trusted yet.
To fix this, you need to add it to the trusted devices list.

Step 3: Add Field Kit to Trusted Devices
Exit the current menu by typing 5.
The game shows that trusted devices data is in the tools/HoleMounter directory.
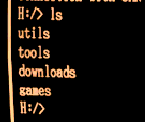
Type ls to view directories.
★ Navigate to tools:
- cd tools
- ls
- cd HoleMounter

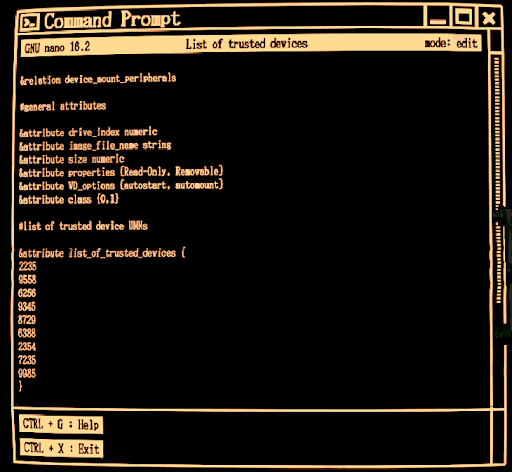
You’ll see trusted_devices.data. If you try to open it normally, you’ll get an error.
★ Use the nano editor:
- nano trusted_devices.data
Add your Field Kit’s UMN to the file, save changes, and exit (CTRL + X).
Return to the main directory:
- cd ..
- cd ..
Step 4: Reconnect and Copy Files
★ Use the connect command with your UMN:
connect [Your Field Kit Number]
Now that it’s trusted, you can copy files:
- 3
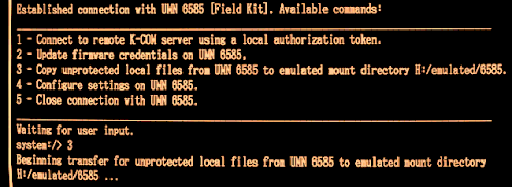
Congratulations! Files are now on your console.
Step 5: Find the Streaming ID
After a conversation with your team, you’ll need to provide an ID. Sarah mentioned it’s in the config folder.
Navigate to the emulated directory:
- cd emulated
- cd [Your Field Kit Number]
- cd config
★ Open system_config.json:
open system_config.json
Inside, you’ll find the Low-Latency File Streaming ID. Note it down!
Step 6: Generate Auth Key
Next, you need to create an authorization token. Sarah will send you a REF number—write it down. Example: 13660.
Go back to the downloads directory:
- cd ..
- cd ..
- cd ..
Launch the AuthKeygen tool. If you try generating the token, it will fail because you need three arguments:
Server Address
Unregistered Inmate Number
REF Input Number
A. Get the Server Address
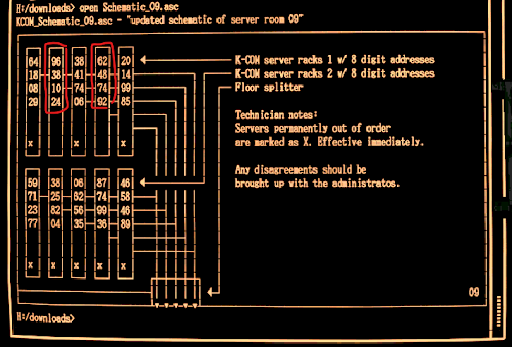
★ Open Schematic 09 from Viktor:
open Schematic09
Pick a server address without an ‘x’. Example:
- 96381024
B. Find an Unregistered Inmate Number
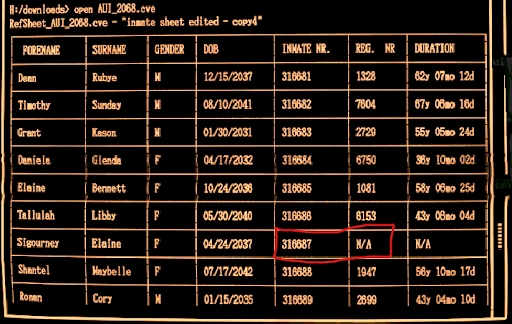
★ Open AUI 2068 from Sarah:
- open AUI2068
Locate an inmate with N/A in the REG. NR field. Example:
- 316687
C. REF Input Number
This is the code Sarah sent you earlier. Example:
- 13660
Auth Key
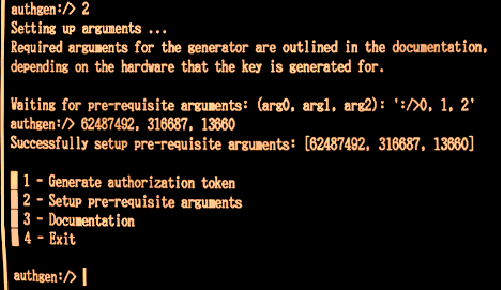
You now have:
- Server Address: 96381024
- Inmate Number: 316687
- REF Number: 13660
Open AuthKeygen.exe, press 2 for setup, and input:
96381024,316687,13660
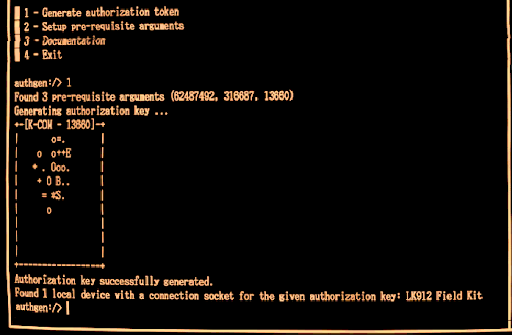
Finally, ★ generate your authorization token.
Step 7: Final Connection
Exit AuthKeygen, reconnect to your Field Kit:
connect [Your Field Kit Number]
Then ★ press 1 to connect to the remote K-COM server.
Wait for the process to finish, then return to your friends. Enjoy the ending!
Achievements & Alternate Ending
- Ending 1 (Trust Achievement): Follow all steps as above.
- Ending 2: At the final dialogue, do NOT type “POTENTIAL BETRAYAL”. This unlocks the alternate achievement.