Import MMD Model to DesktopMMD
STEP
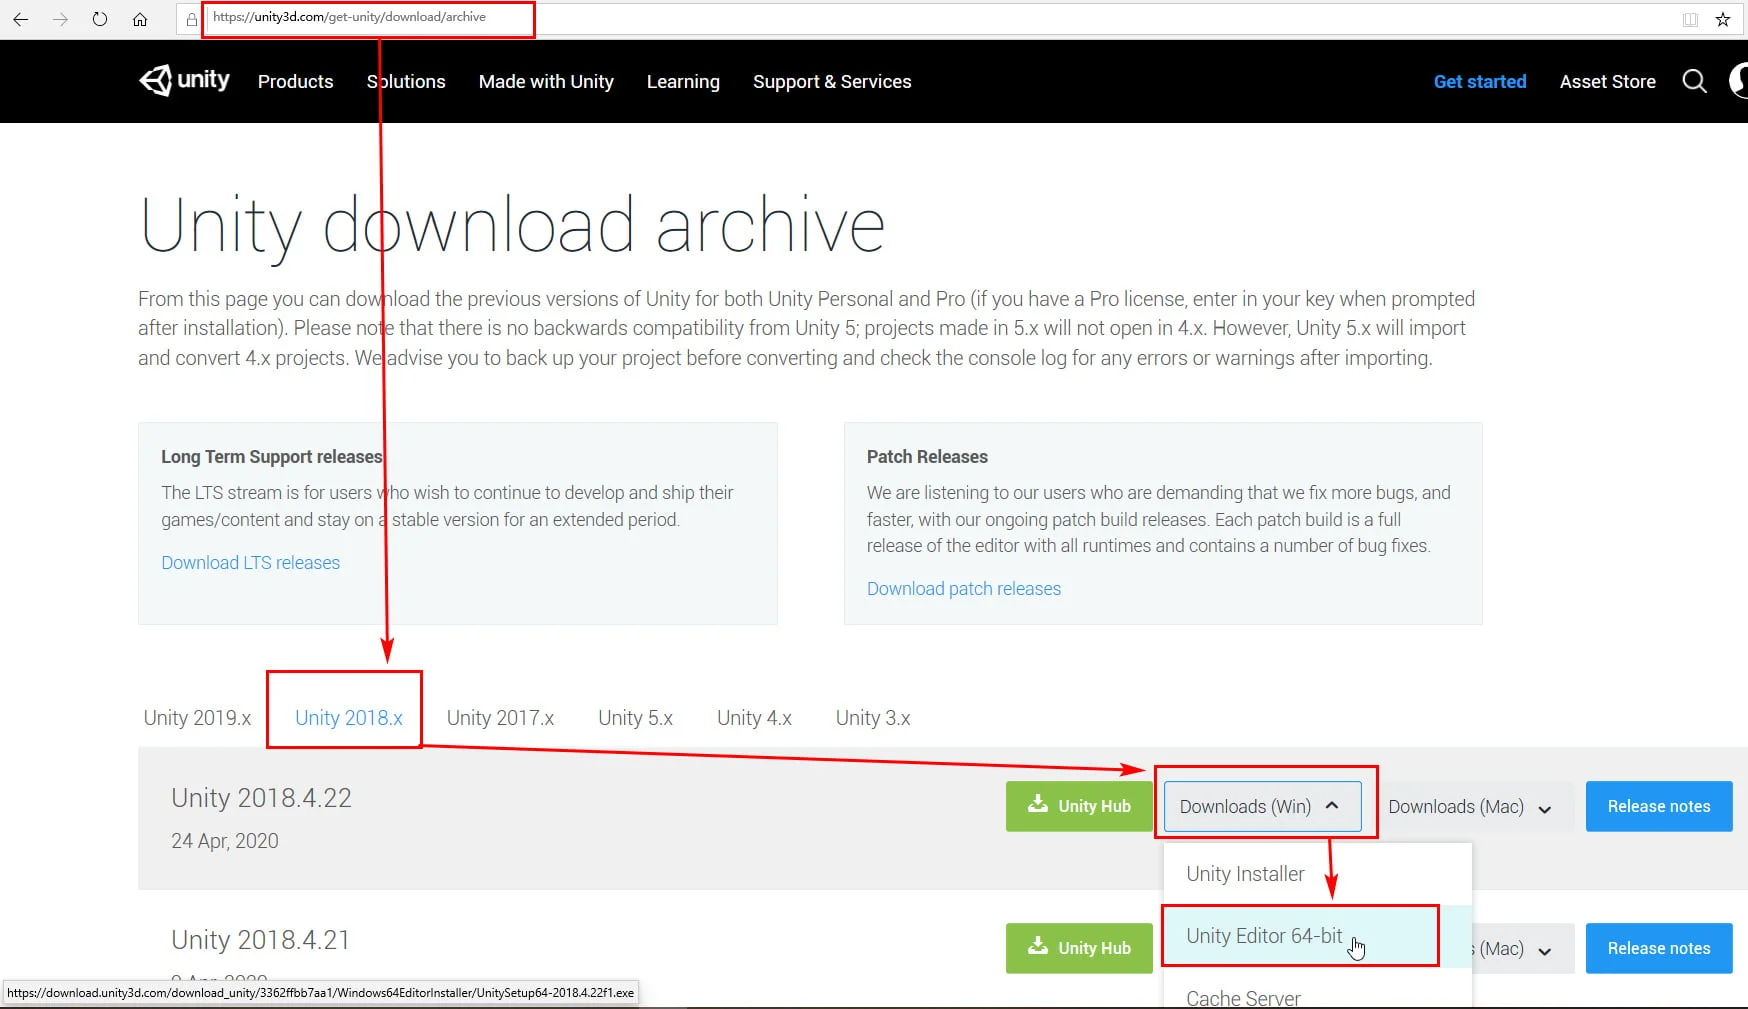
1. Download and Install Unity:https://unity3d.com/get-unity/download/archive
2. Download the Unity Template Project “DMMD_Model_Convert_UnityProject” and unzip into folder:http://xdesktop.com/file/DMMD_Model_Convert_UnityProject.rar
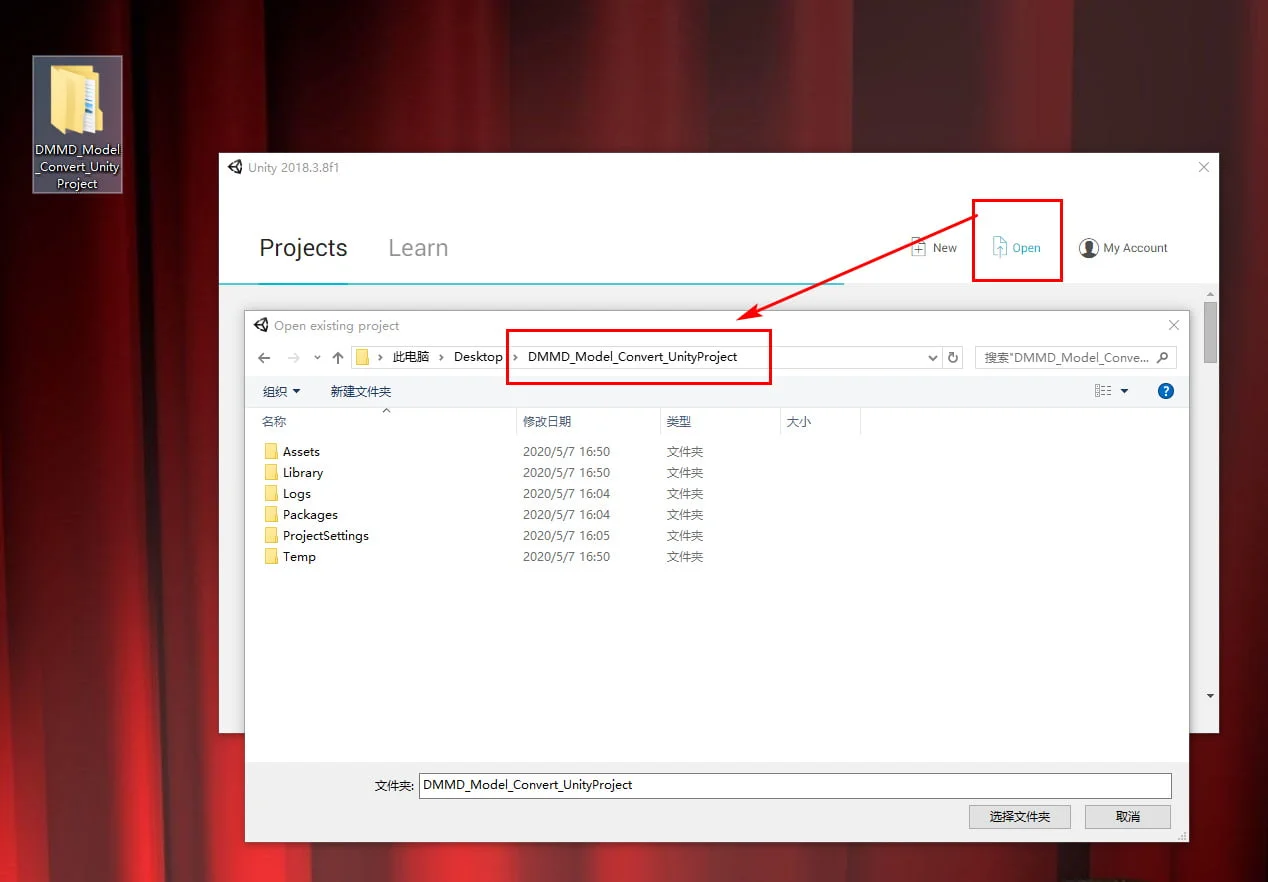
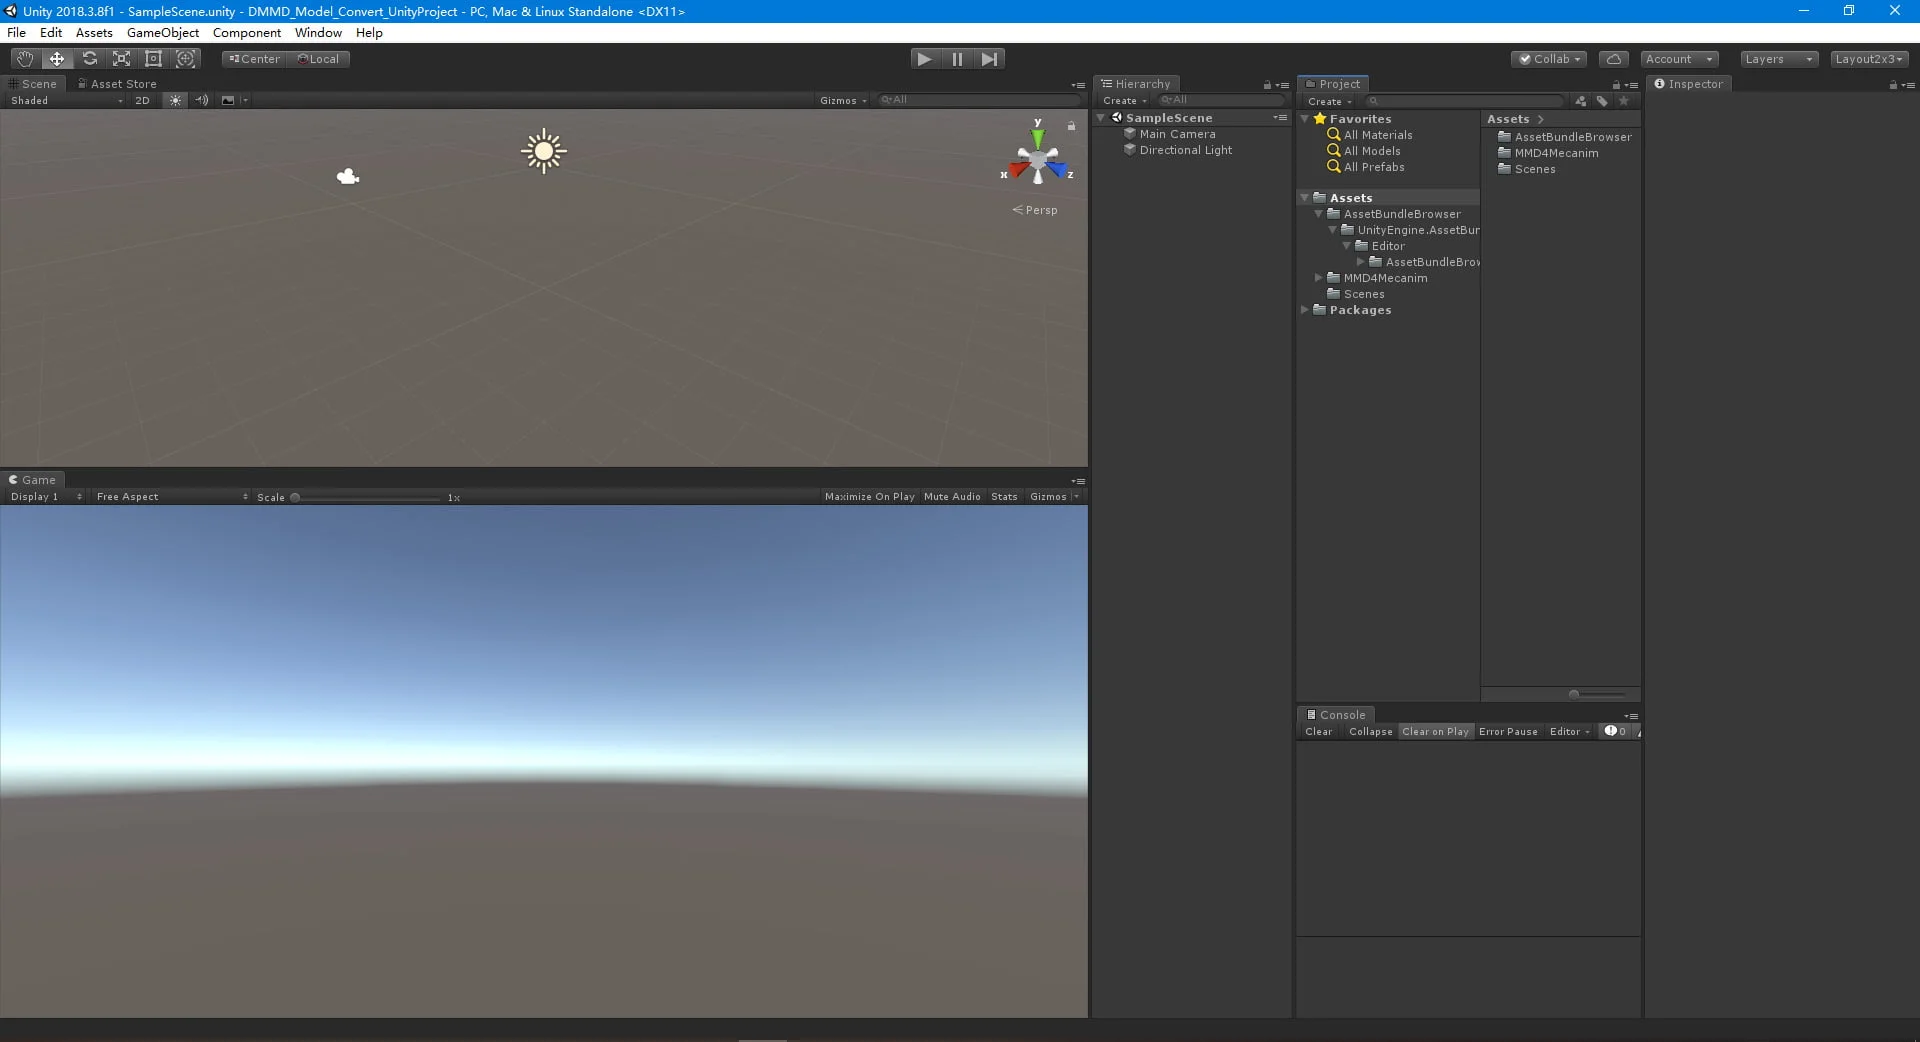
3. Run Unity and open the template project “DMMD_Model_Convert_UnityProject”
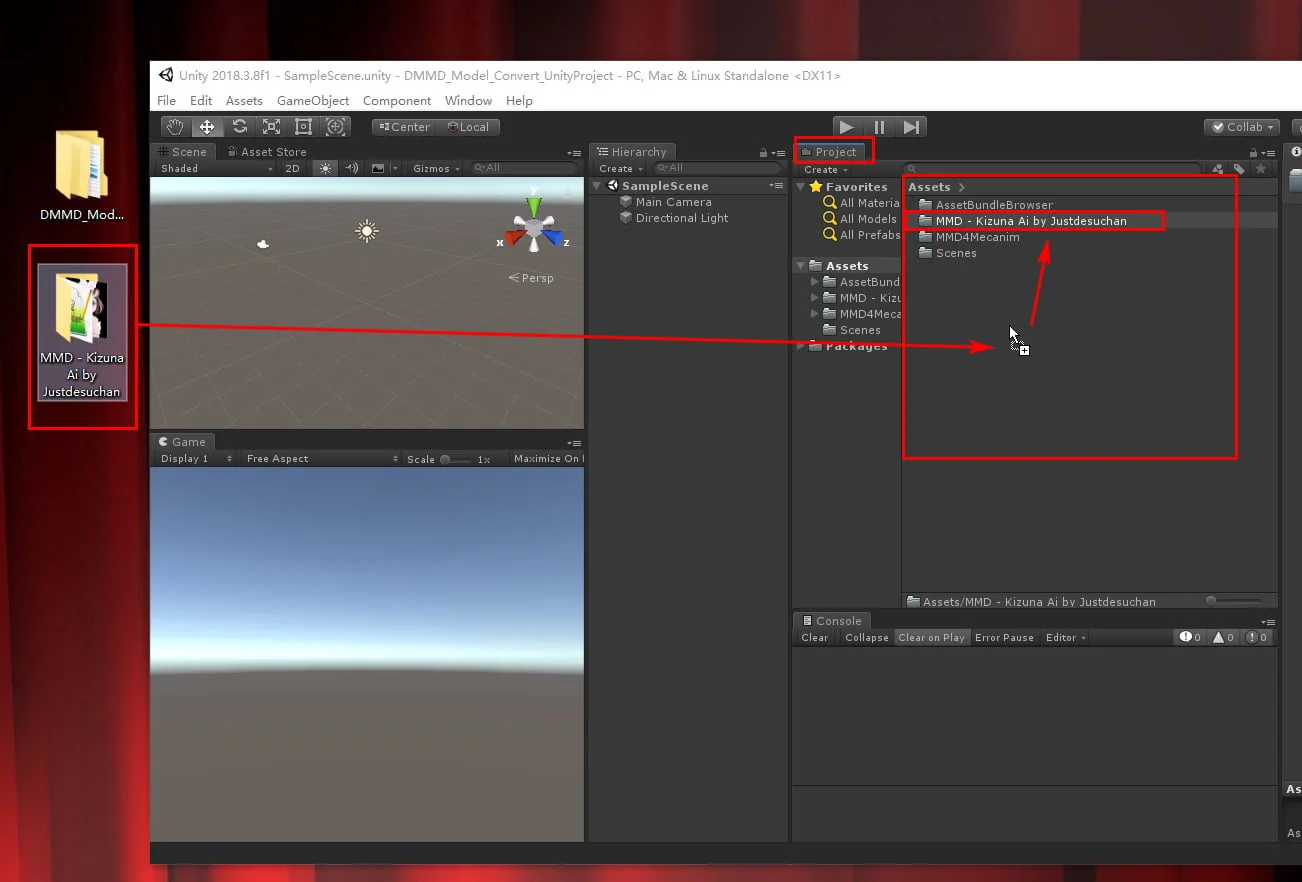
4. Download some MMD Model .PMX files from web,I download this “MMD – Kizuna Ai by Justdesuchan” model from web as a Demo. unzip it and Drag and drop the MMD model file folder “MMD – Kizuna Ai by Justdesuchan” into Unity project view .
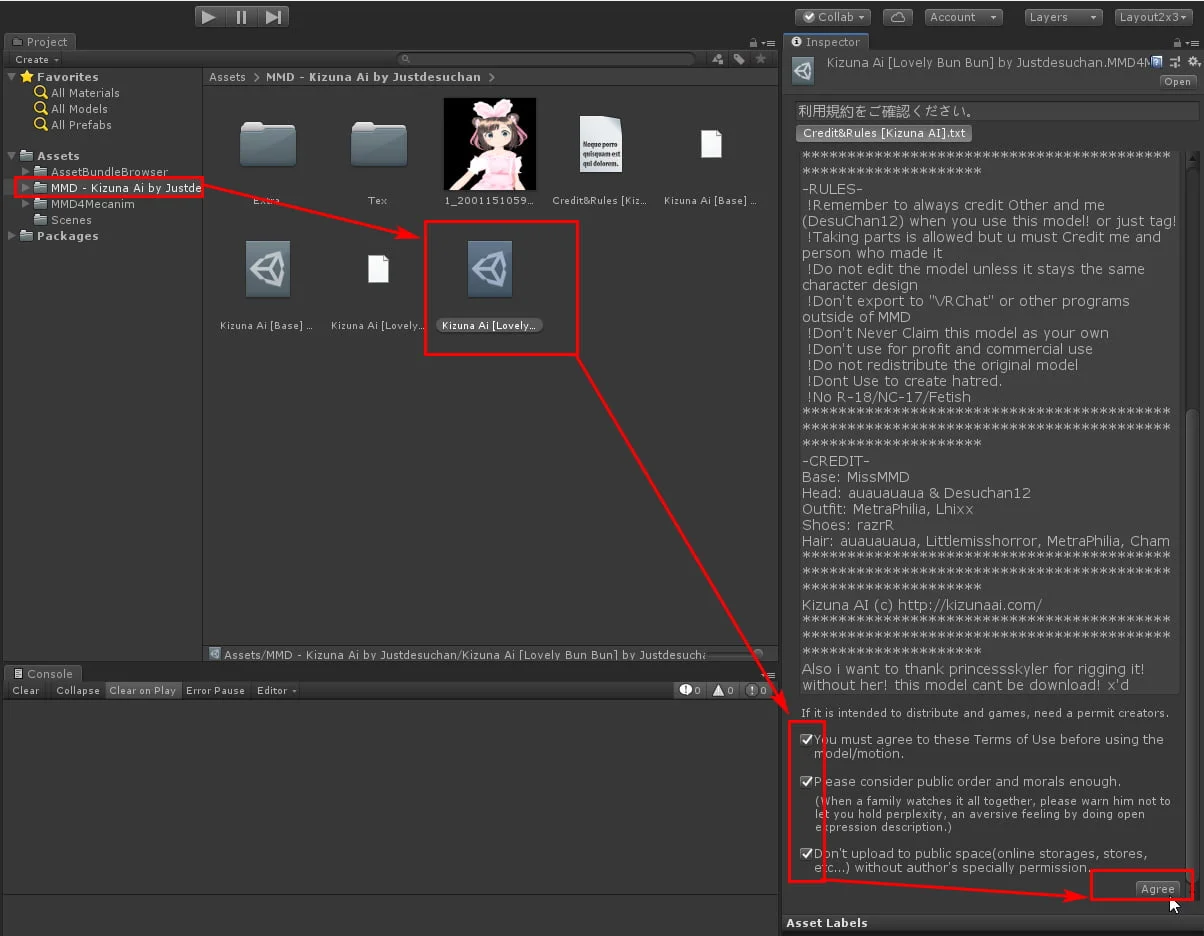
5. Select the MMD model PMX file, and check the three checkbox at right-bottom,and click button “Agree”
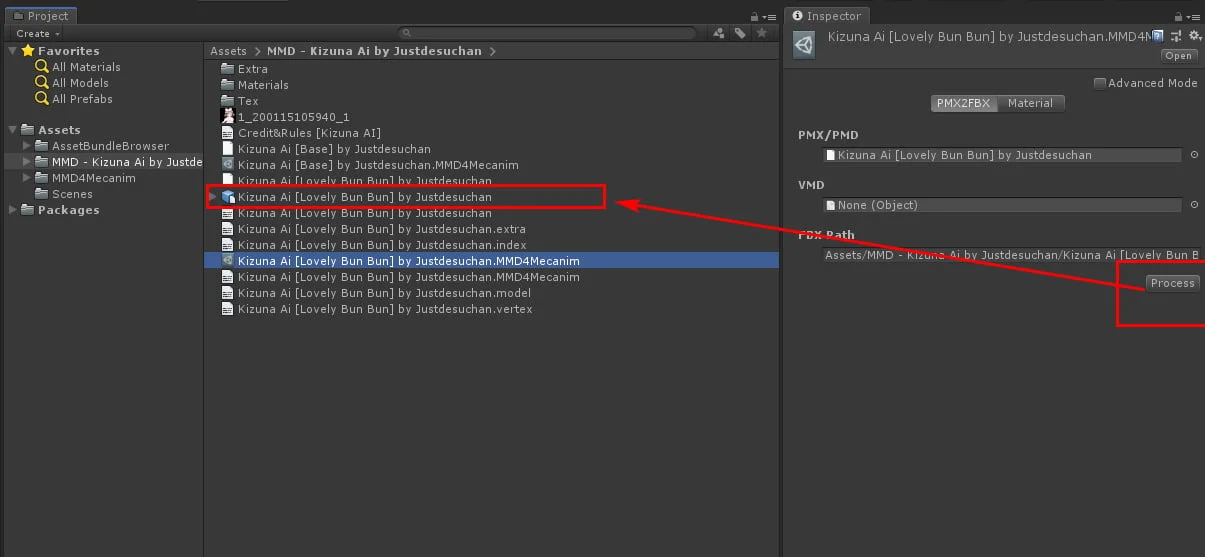
6. then click the button “Process”, wait for 5 minute ,unity will generate FBX file (Blue square icon),select this FBX file:
7. Selecting the FBX file with this blue square icon, select “Humaroid” from the “Animation Type” drop-down box in the Rig column on the right side of the property window, and then click the “Apply” button
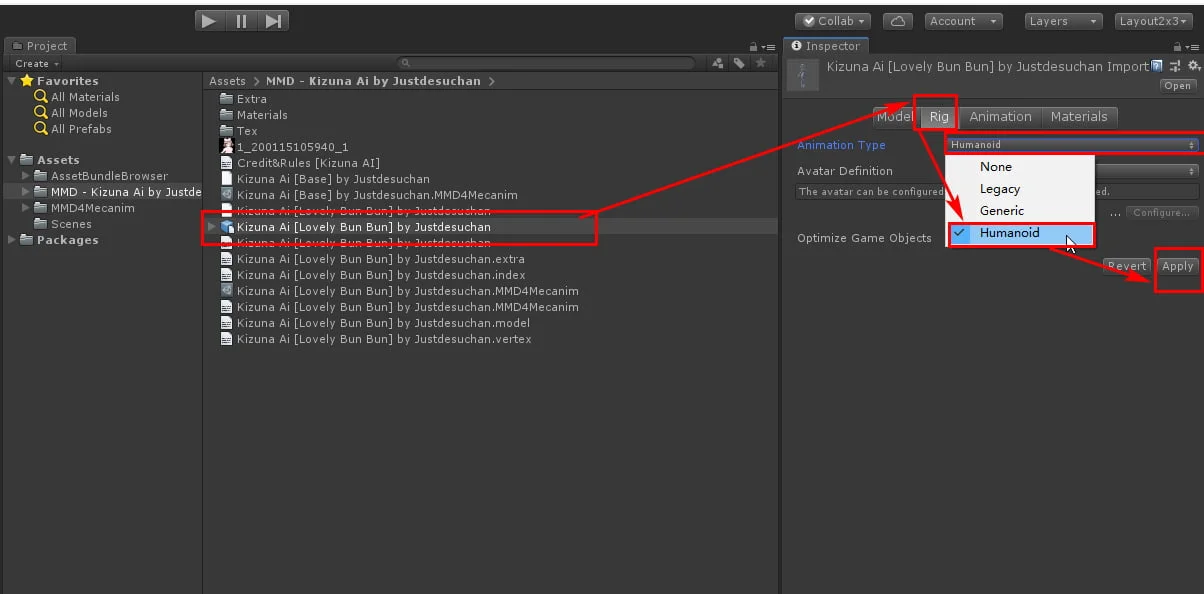
8. Then click the “Configure” button in the lower right corner

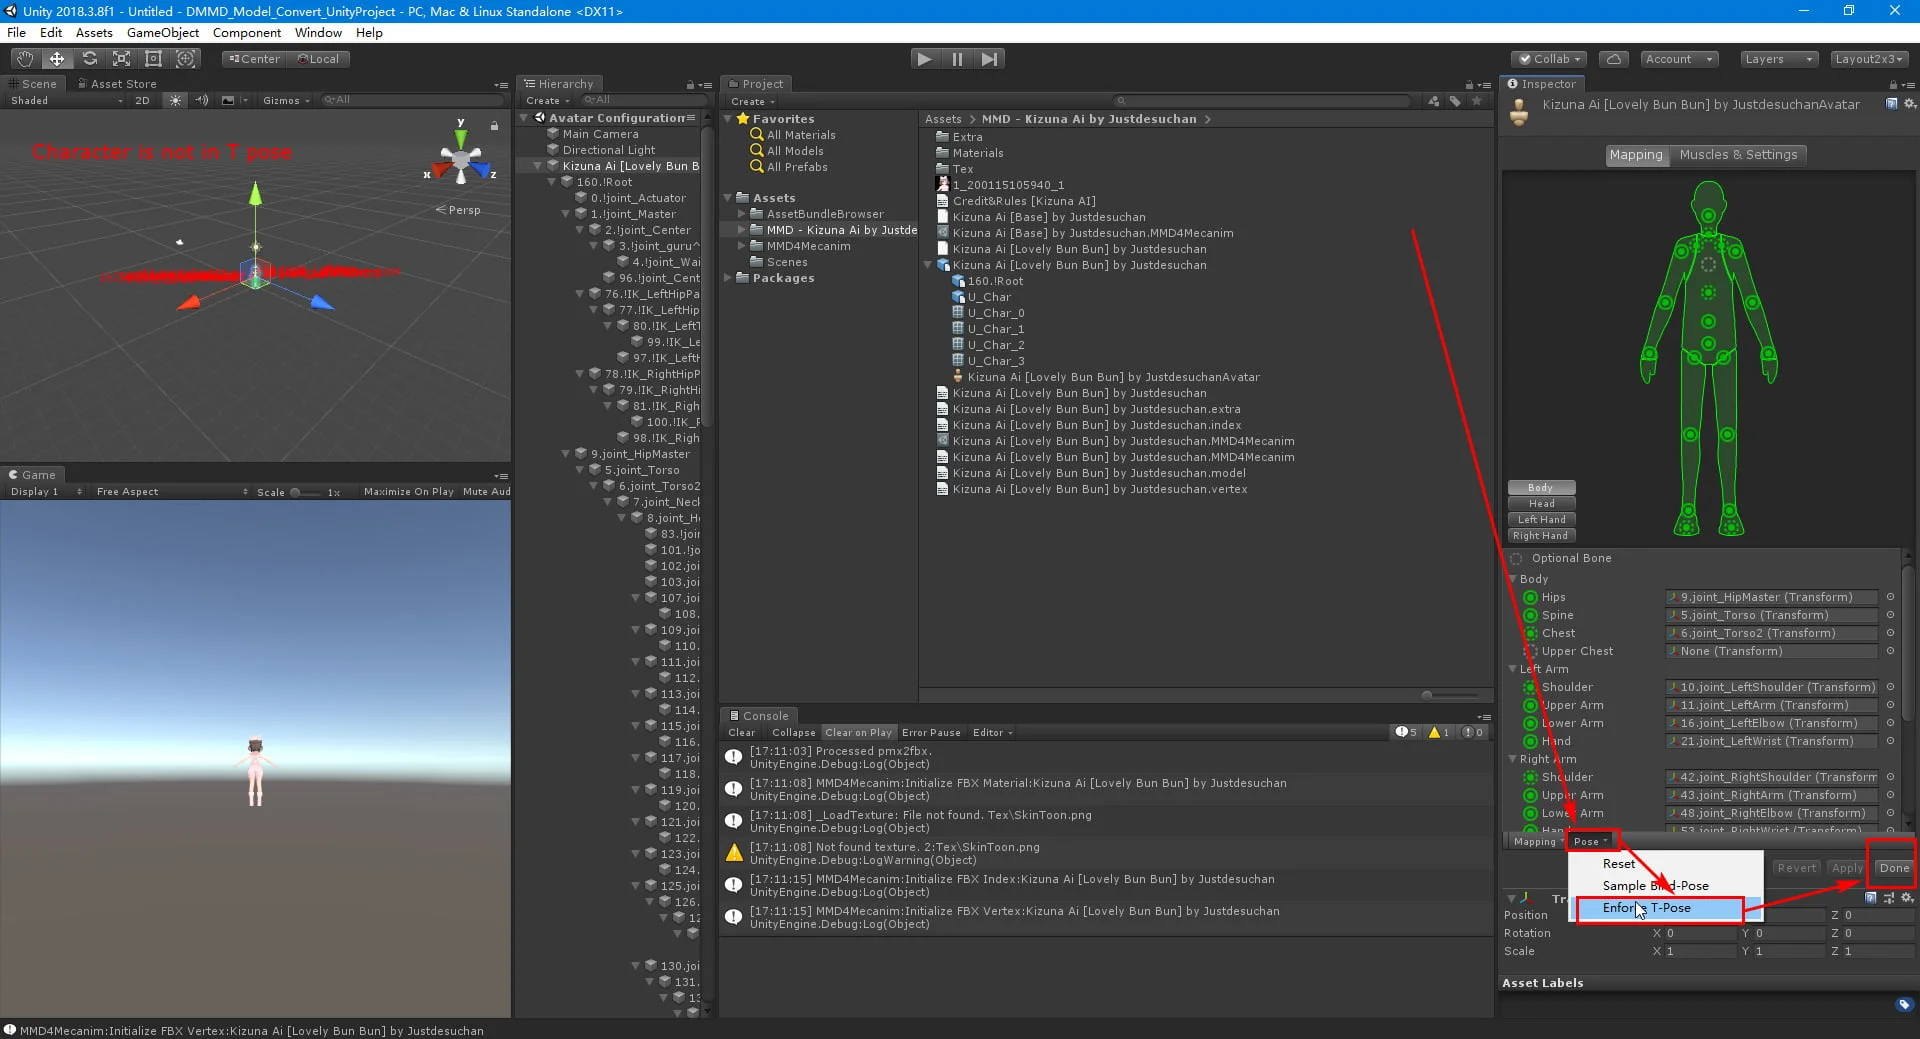
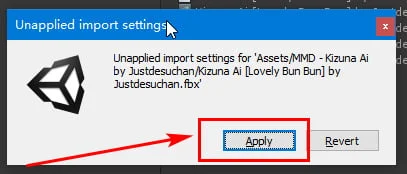
9. Click “Enforce T-Pose” in the “Pose” drop-down box in the lower right corner, then click the “Done” button on the right, click “Apply” in the pop-up dialog box, and wait a moment.
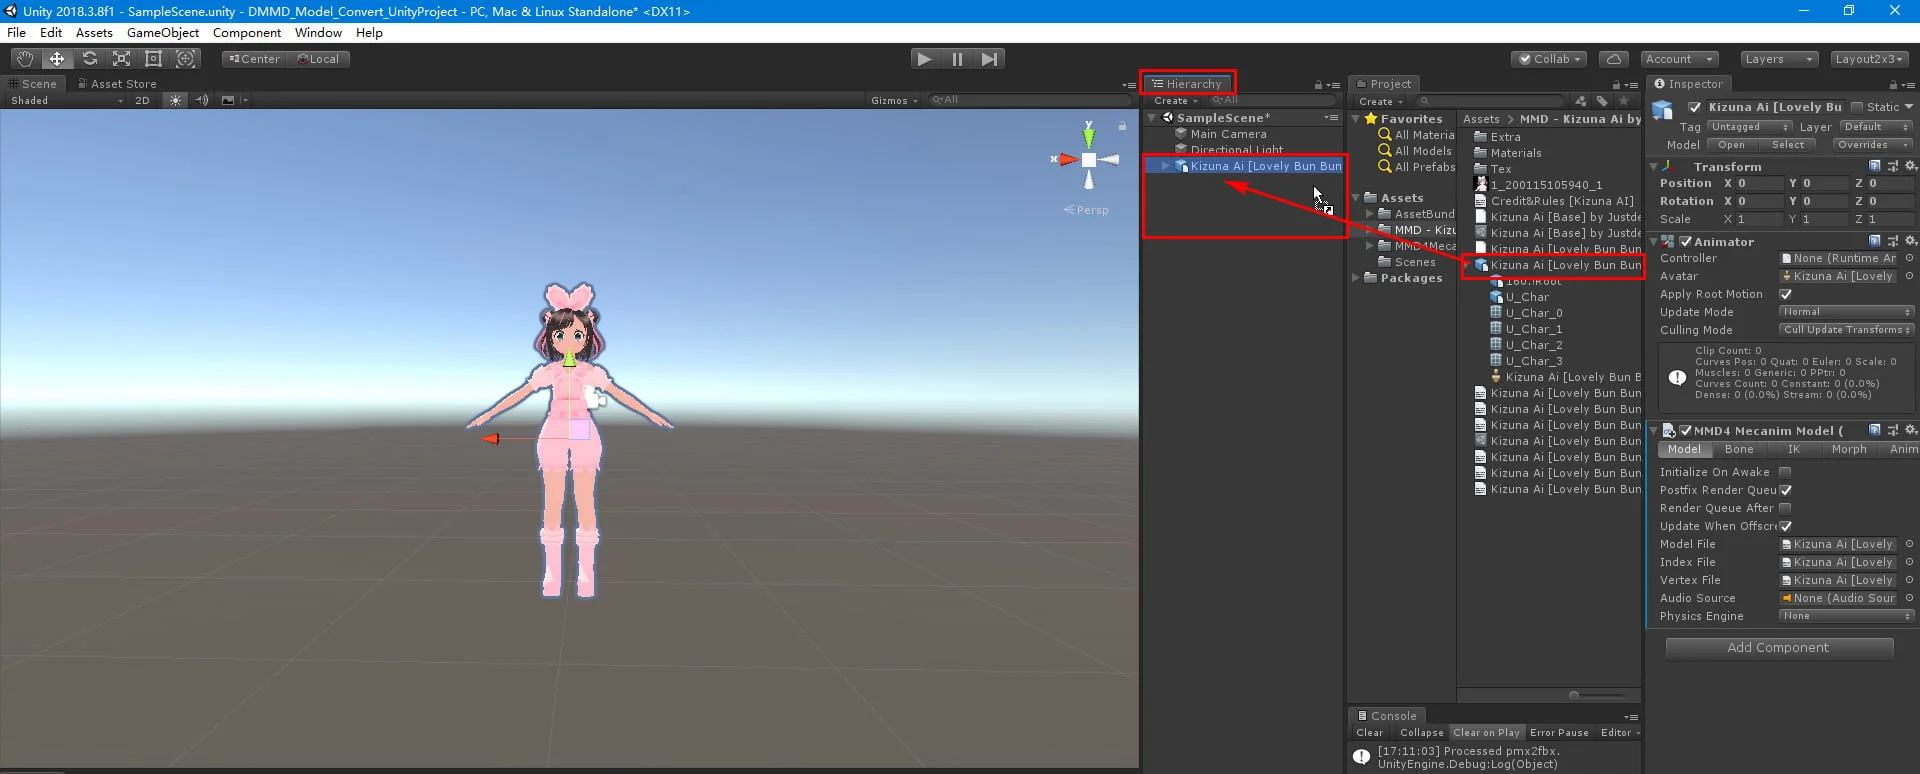
10. Wait for Unity finish processing, drag the FBX file with the blue square icon to the “Hierarchy” window on the left, double-click the blue icon, and you can see the model in the “Scene” window on the left
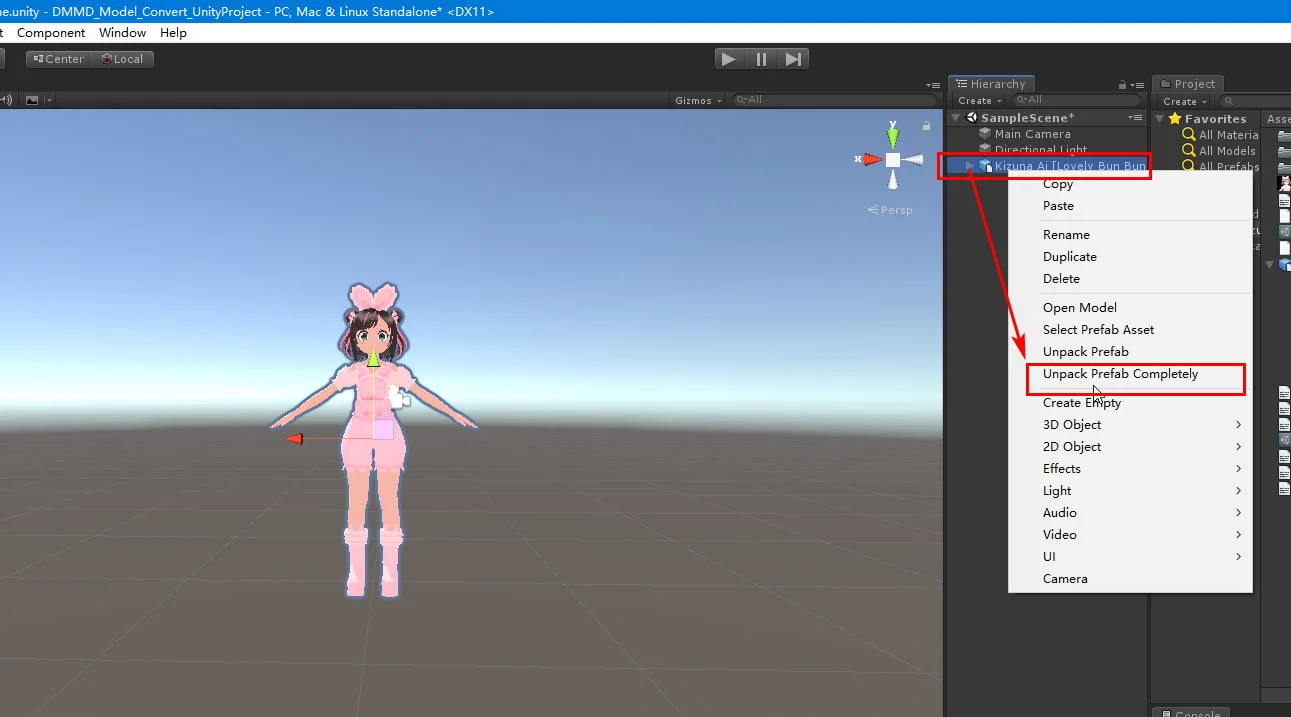
11. Select “Unpakc Prefab Completely” in the right-click menu, and then change the name of this object to a simple and short name. It is best not to have a decimal bracket in the symbol brackets, for example, “Kizuna AI”
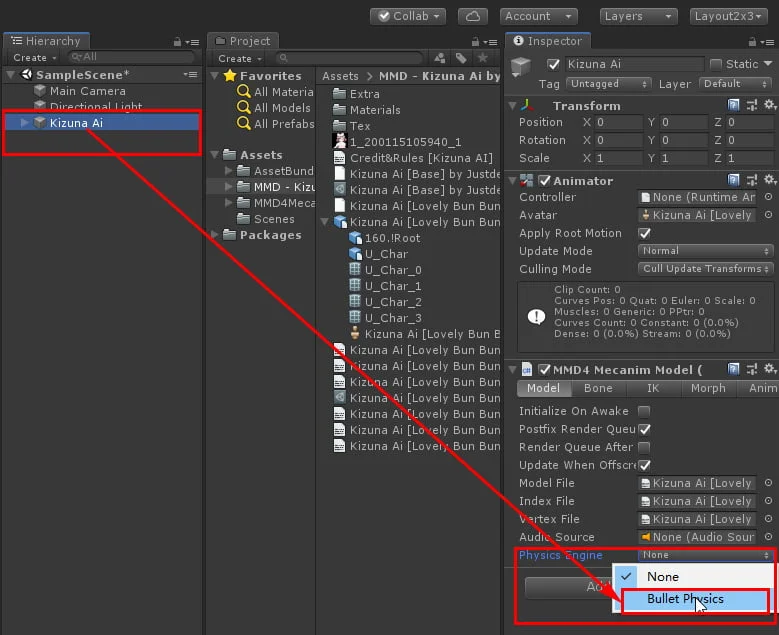
12. In the properties on the right side, select “Bullet Physics” from the “Physics Engine” item on the Model page under the “MMD4 Mecanim Model” column.
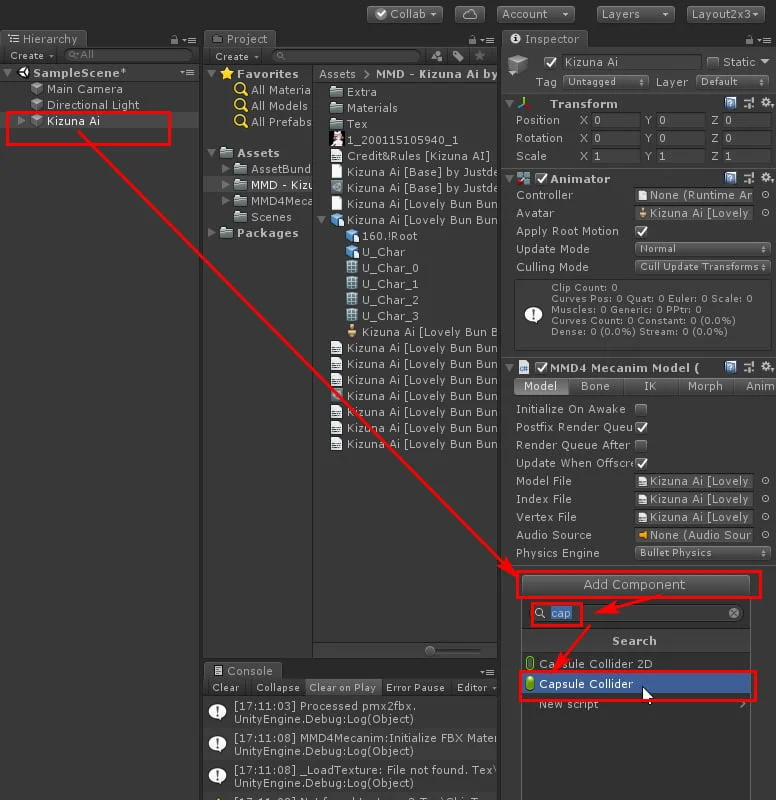
13. Click the “Add Component” button in the lower right corner to enter text “cap”,then select “Capsule Collider” in the list to add it
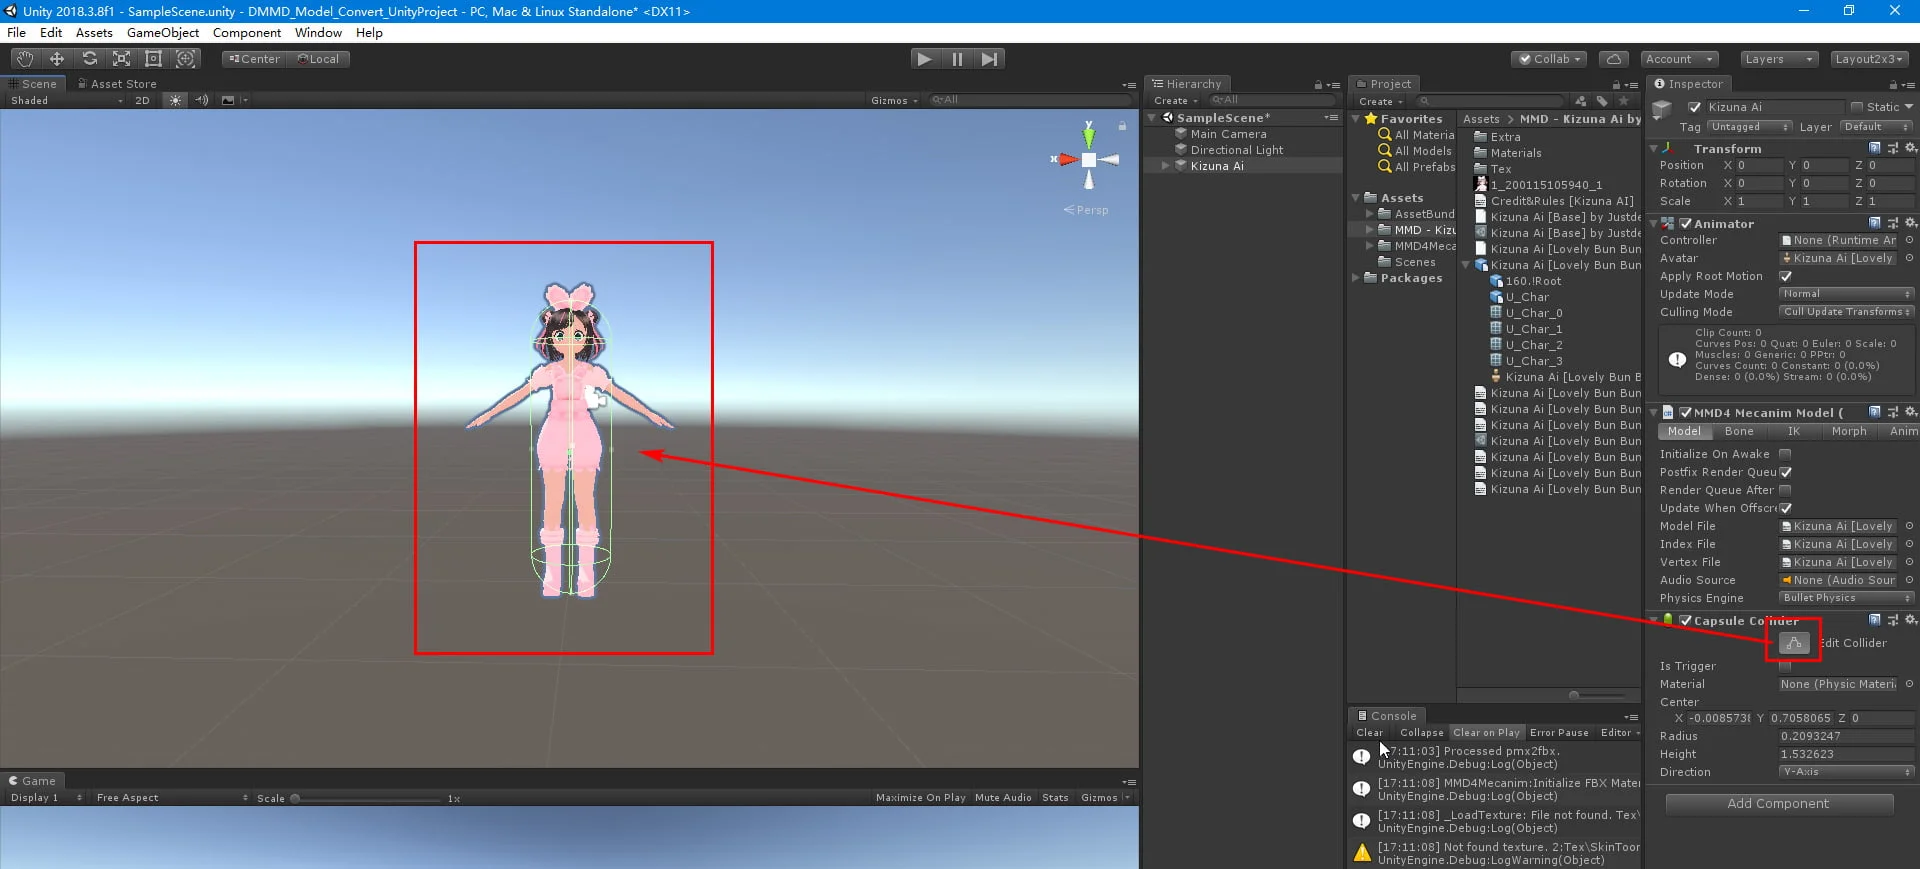
Click the “Edit Collider” button in the added “Capsule Collider” column to adjust the four point of the green ball in the Scene window on the left side of the screen
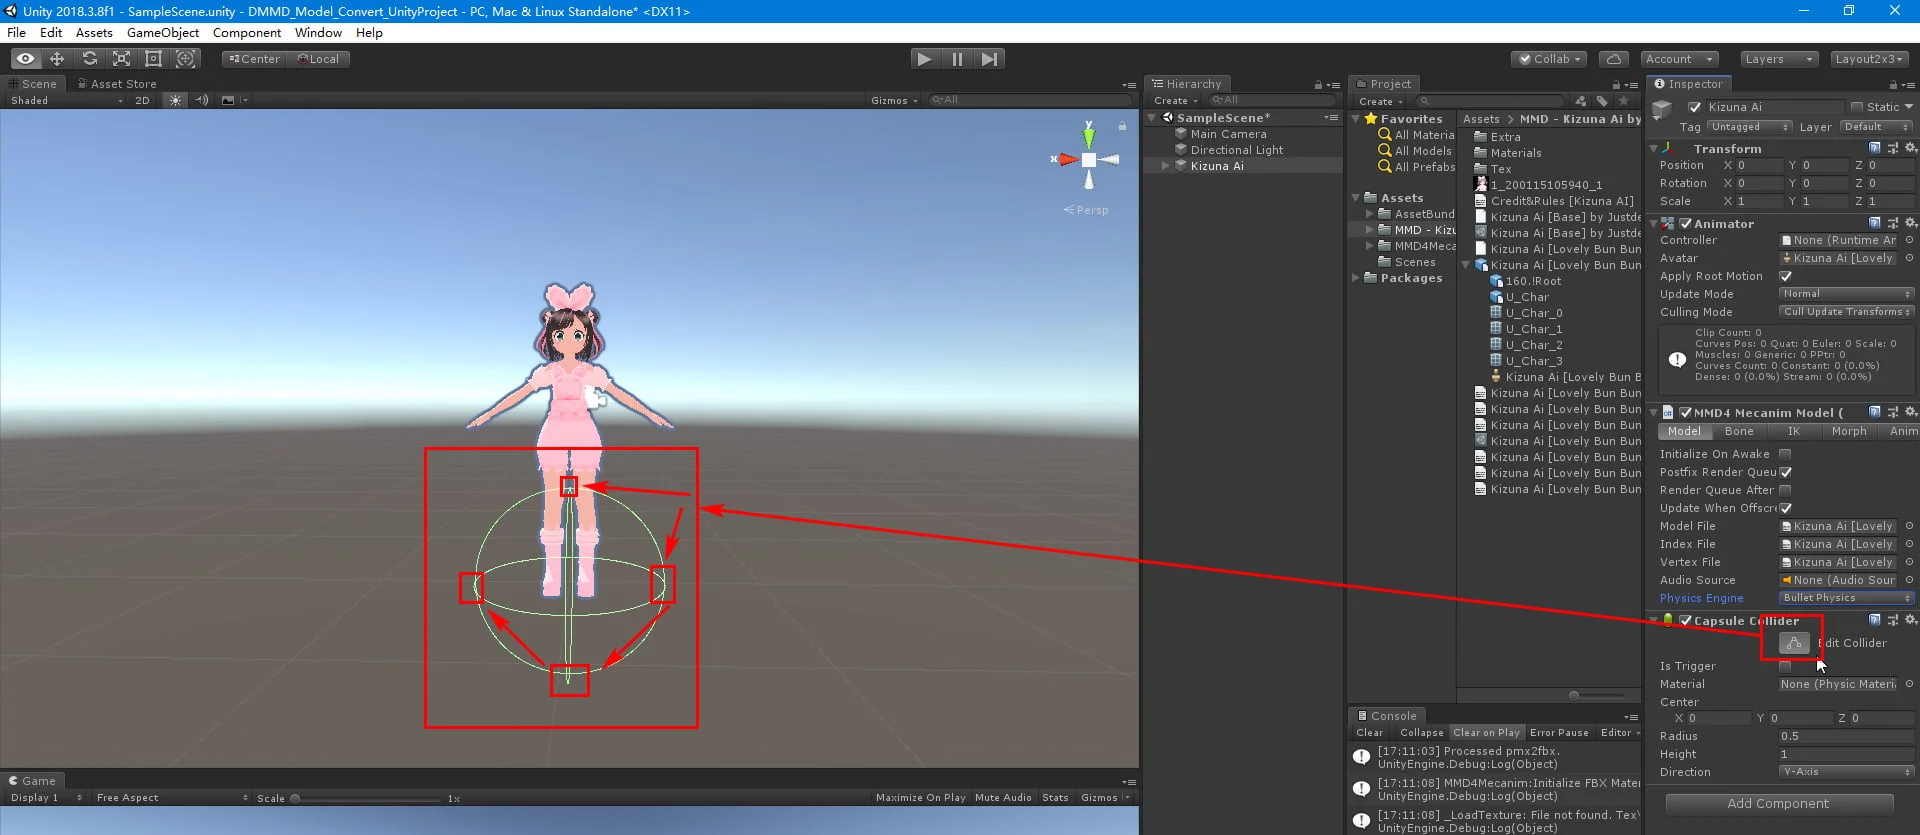
Adjust the four point of the green ball in the “Scene” window on the left side of the screen so that the lower point is exactly at the bottom of the model’s foot, the upper point is just at the top of the model’s head, and the left and right sides are just attached to the sides of the model’s body Just the capsule shape that wraps the model.
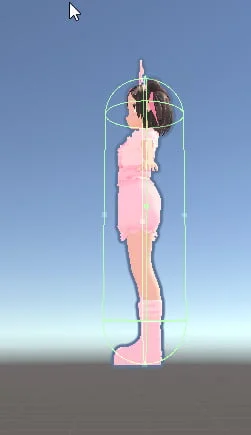
You can hold down the Alt key on the keyboard, use the left mouse button to hold and drag the Scene view blank space to rotate the model to see if it fits
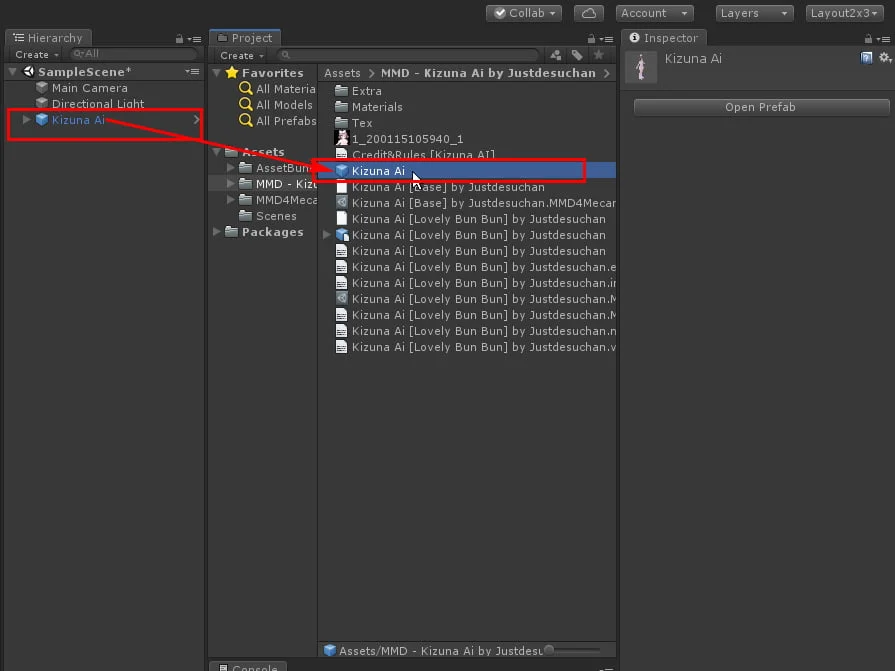
16. Drag the “Kizuna AI” object in the “Hierarchy” column to the “Project” column to generate a blue square icon Prefab file, as shown below:
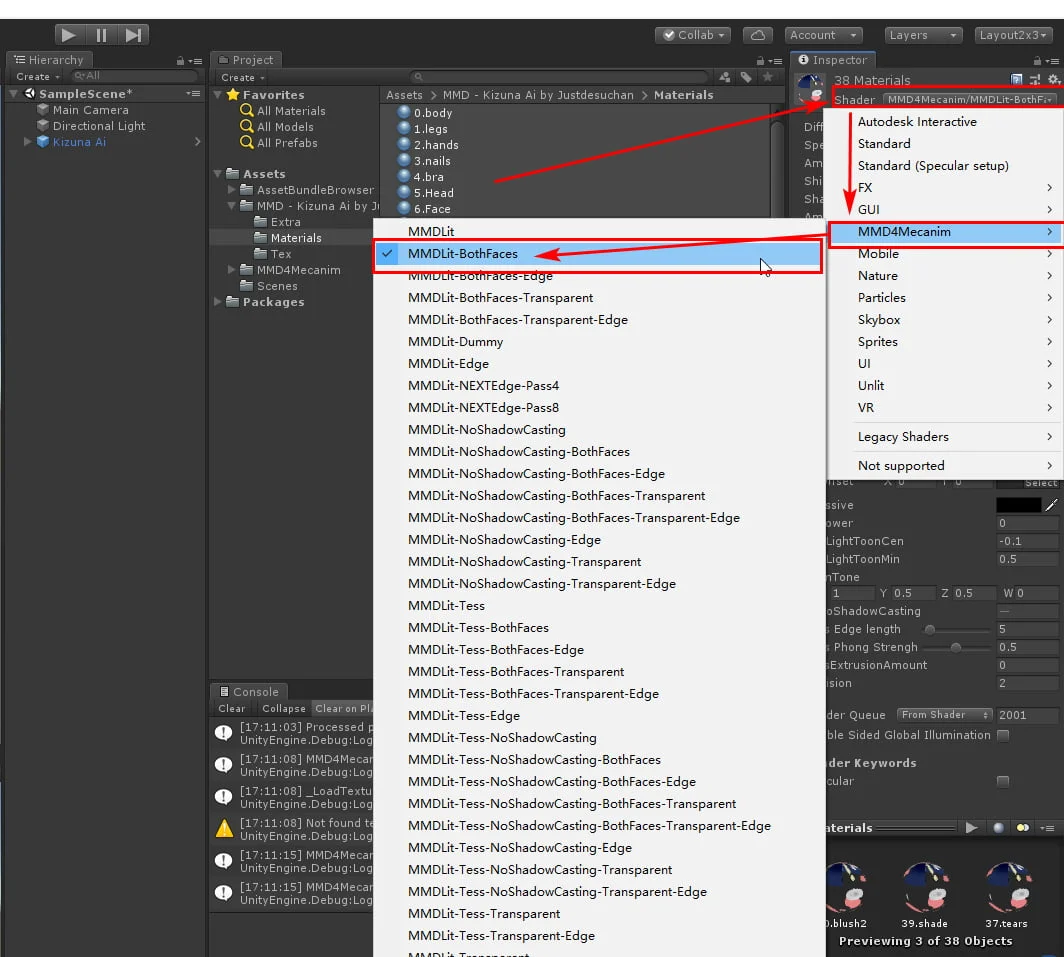
17. In the “Project” column, switch to the “Materials” folder under the MMD model folder, select all the material ball files inside, exclude the “Eye”, “Eye Hi”, “Eye HL”, “Hair Shadow” Class files, and then click the Shader drop-down box on the top right
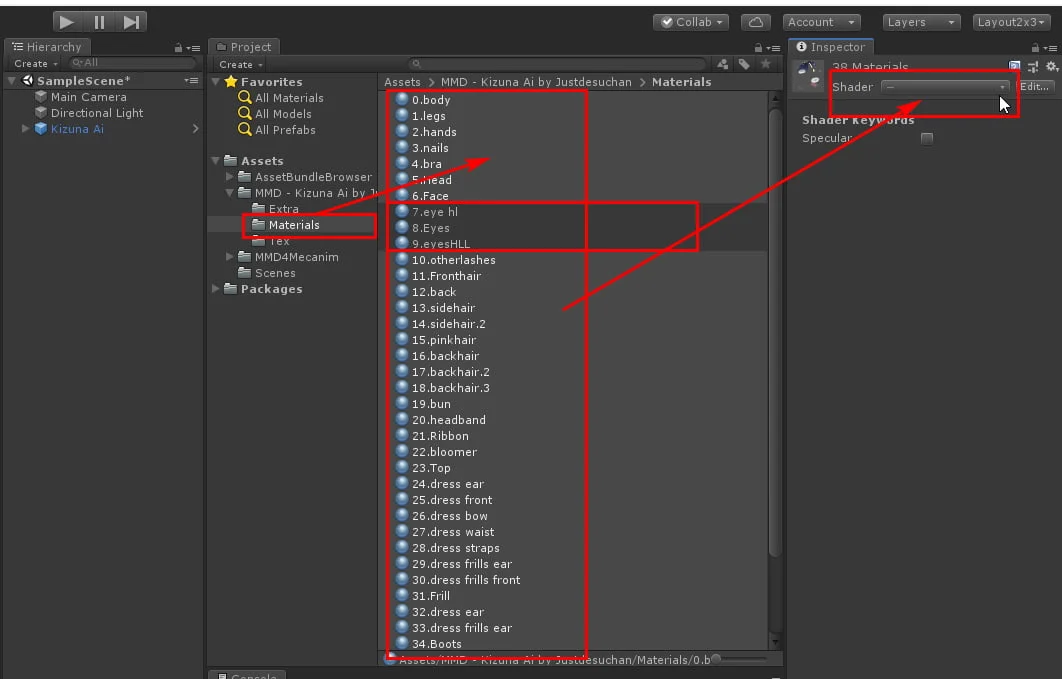
Select menu item “MMD4Mecanim”>>”MMDLit-BothFaces”
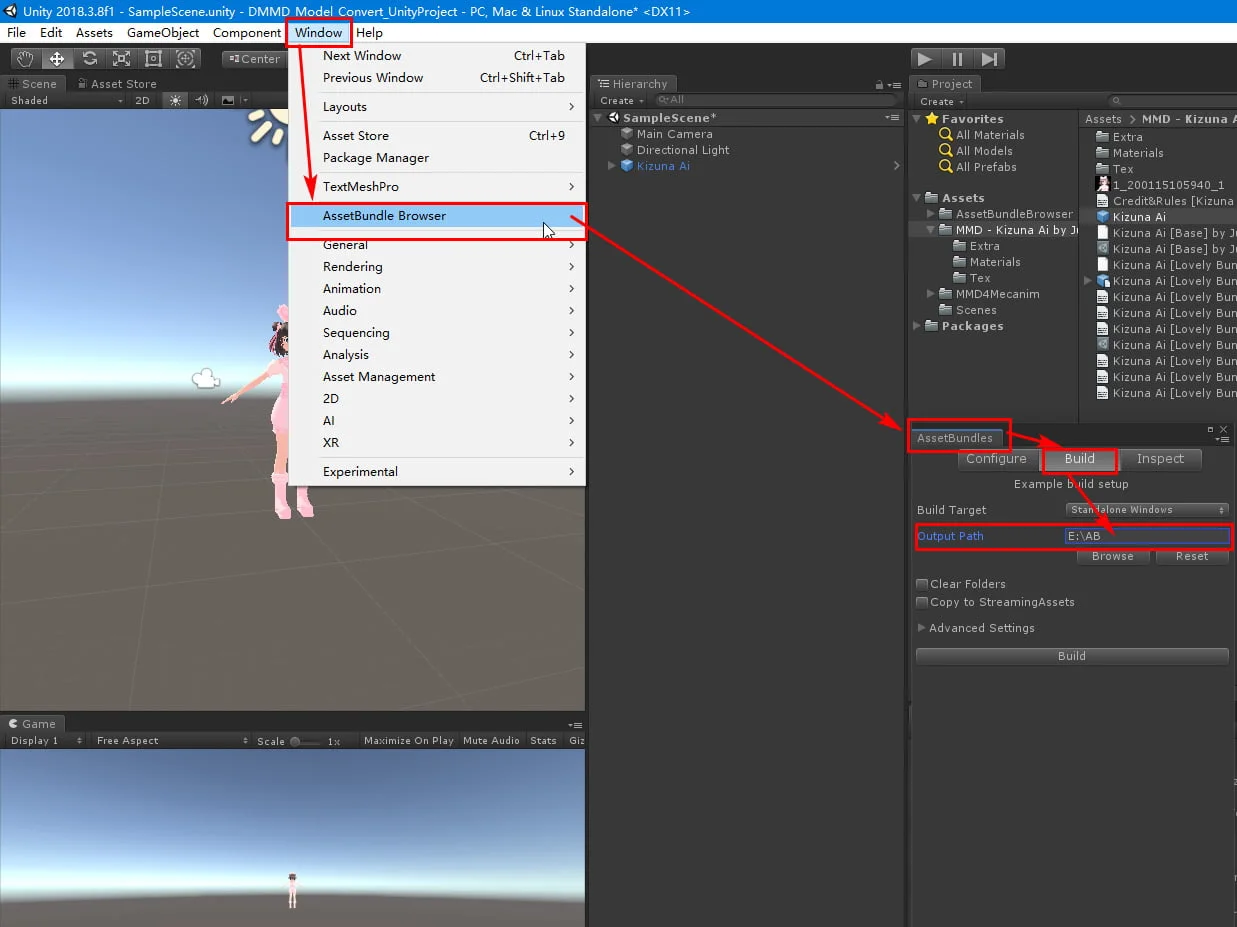
18. Click the main menu “Windows” >> “AssetBundle Browser” at the top of the window to open the “AssetBundle” window, switch to its “Build” page, and enter an existing folder path in your computer in the Output Path to store the package for later For the model files that come out, the “E: \ AB” folder is set here, which will be easy to find later.
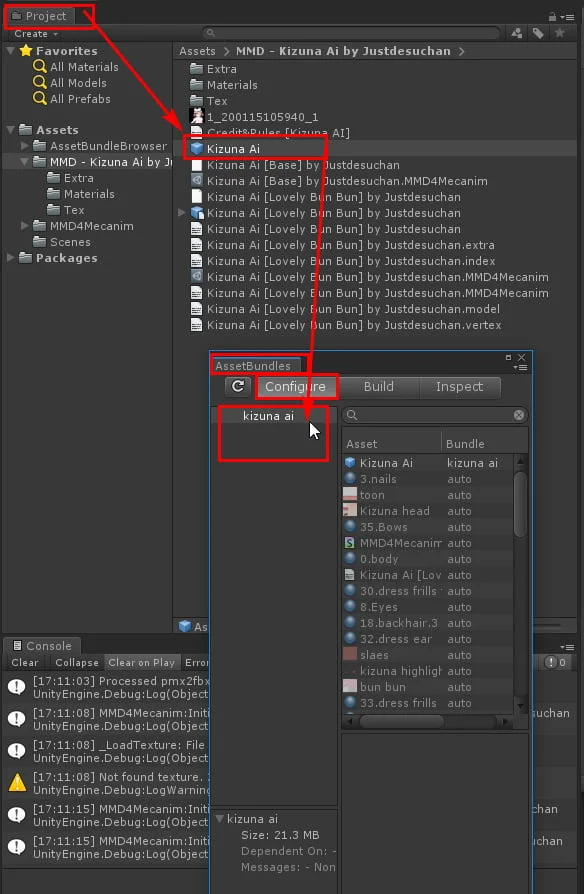
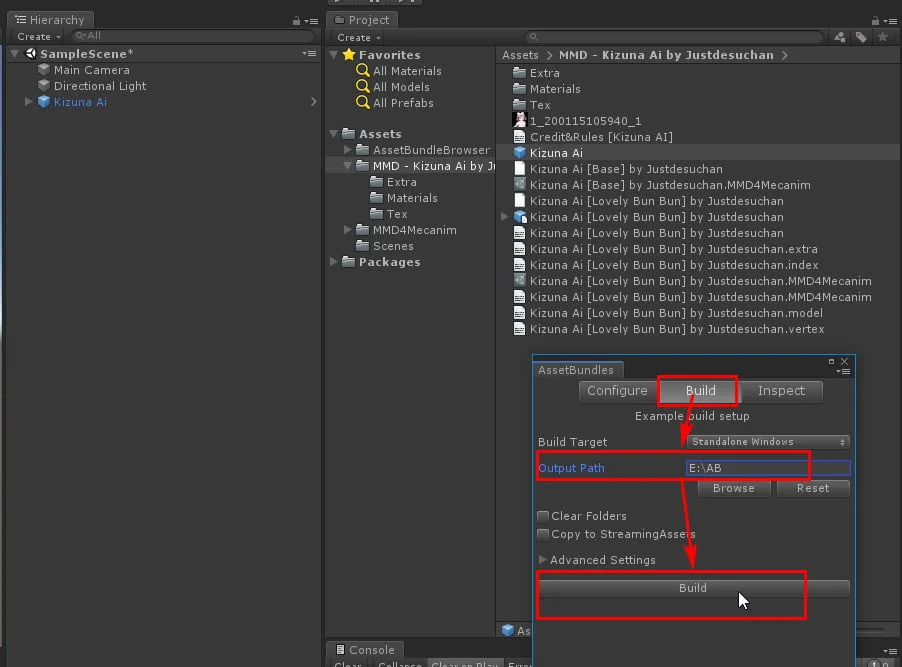
19. Drag the “Kizuna Ai” prefab file of the blue square icon just generated in the “Project” column to the “Configure” page of the “AssetBundle” window, then switch to the “Build” page and click the “Build” button. See the generated model file in the E: \ AB \ folder
20. Find the generated model file in the path “E: \ AB”, be careful not to uses the “.manifest” file, which is only 1K in size.
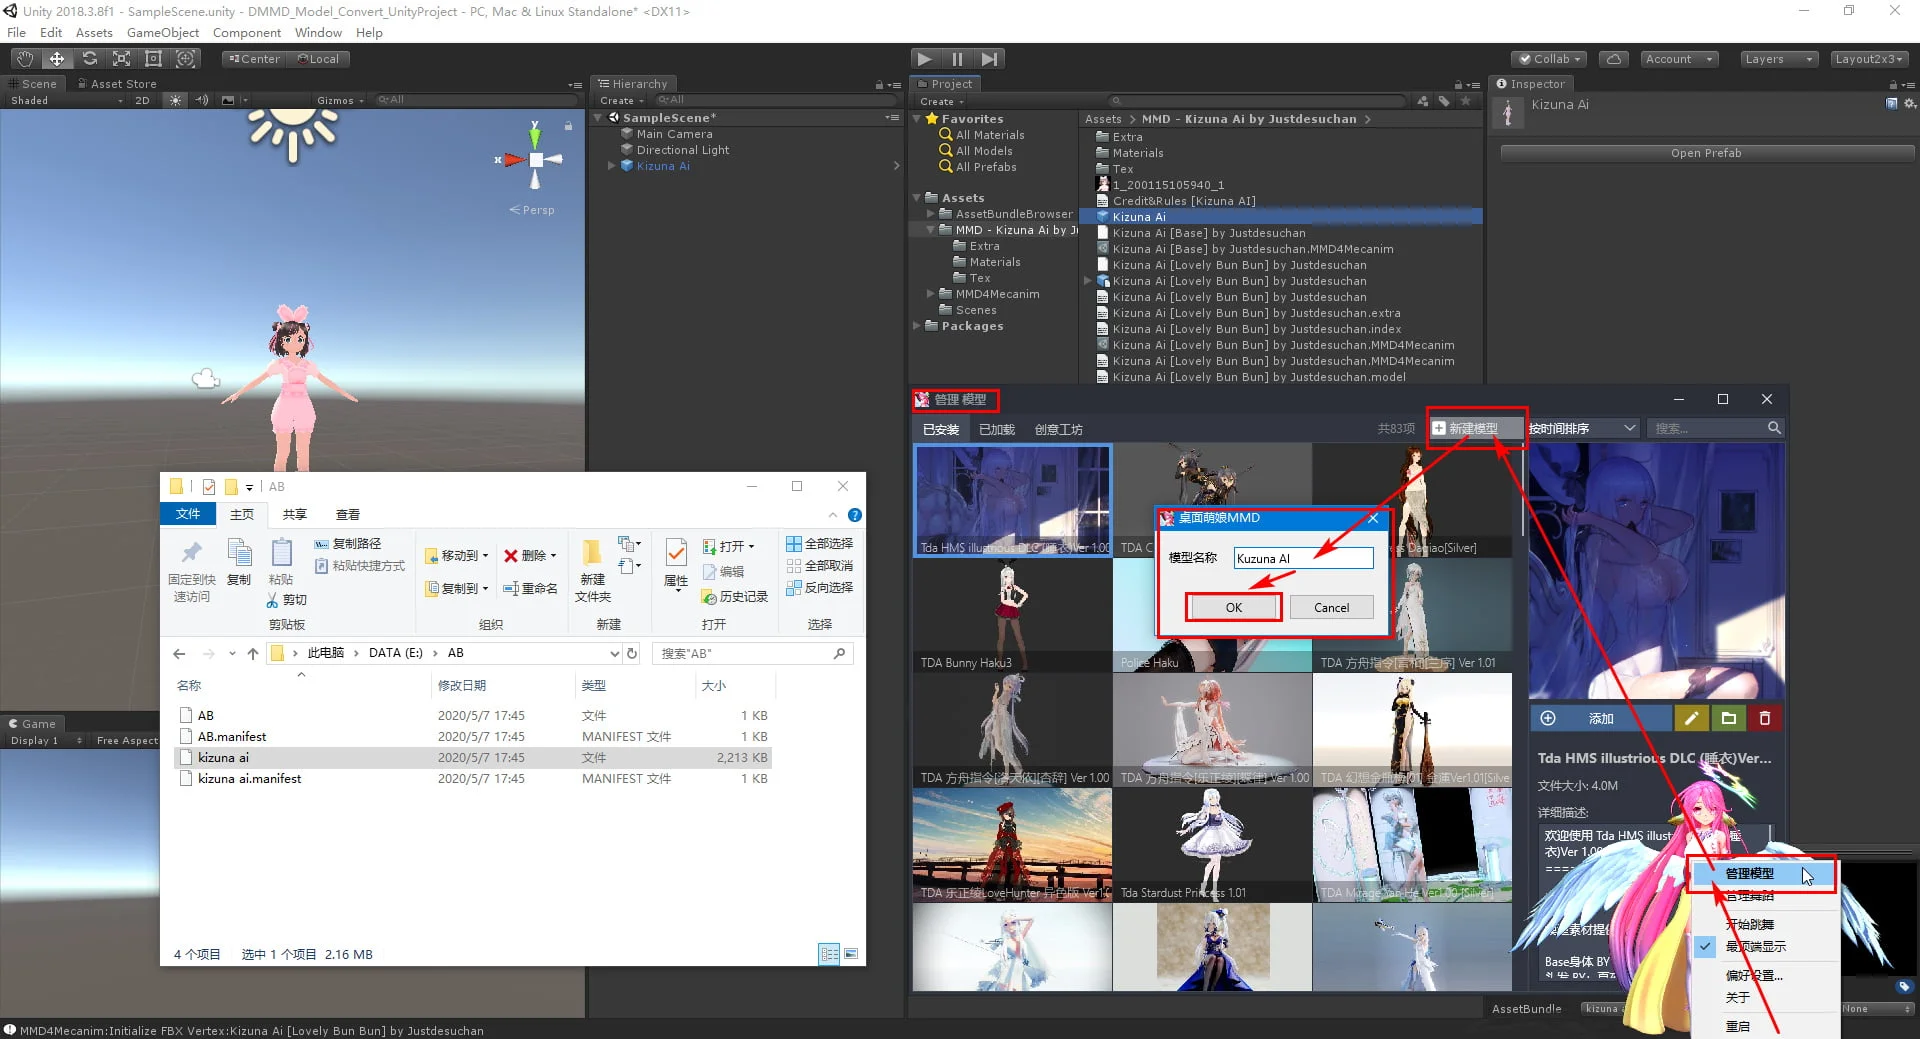
Run DesktopMMD , open the “Manage Model” in its tray menu, then click “New Model” at the top of the opened window, enter the model name “Kizuna AI” and then click “OK” button
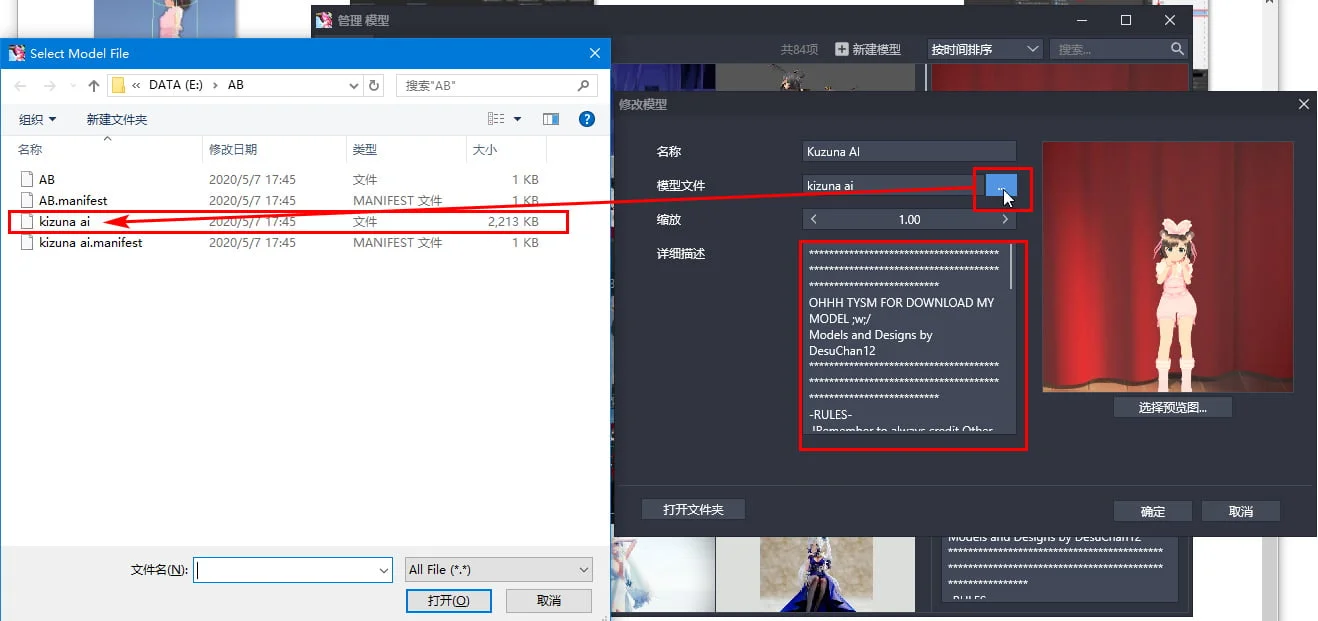
Then select the model file just exported in the model editing window, and copy the contents of the readme.txt file in the MMD model folder to the “description”, select a preview jpg image file, click OK, Done!
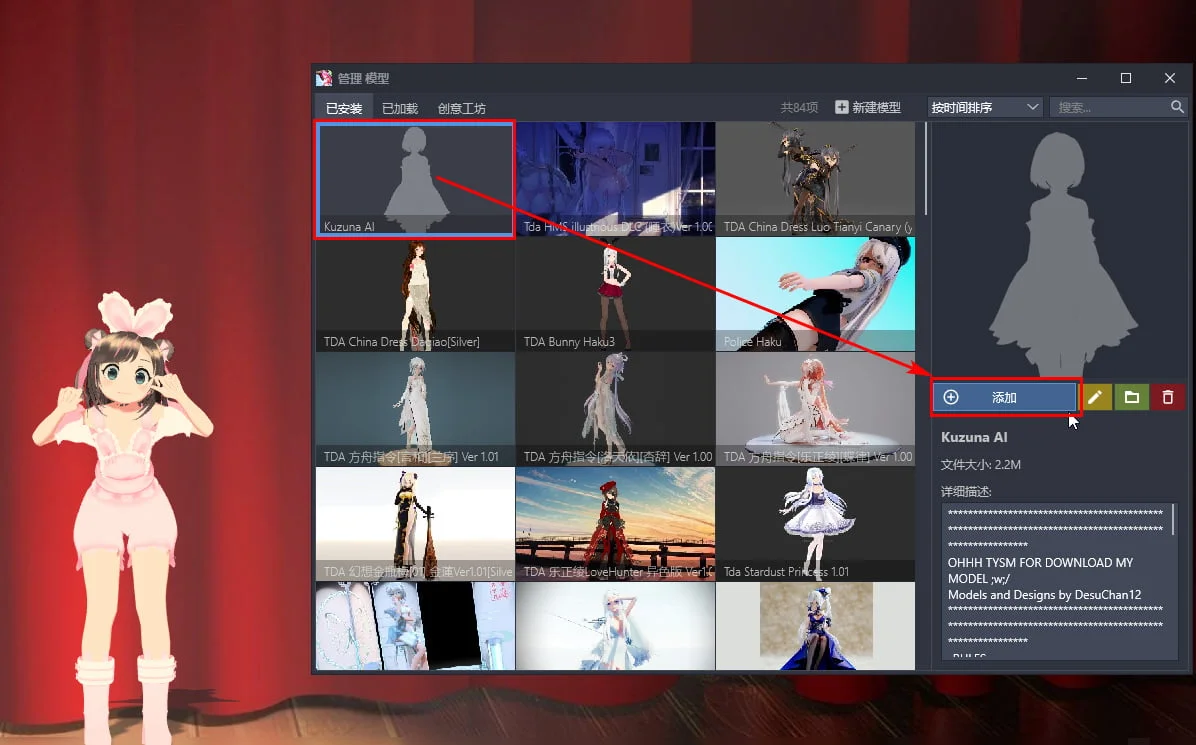
21. Now you can add the newly created model to the desktop:
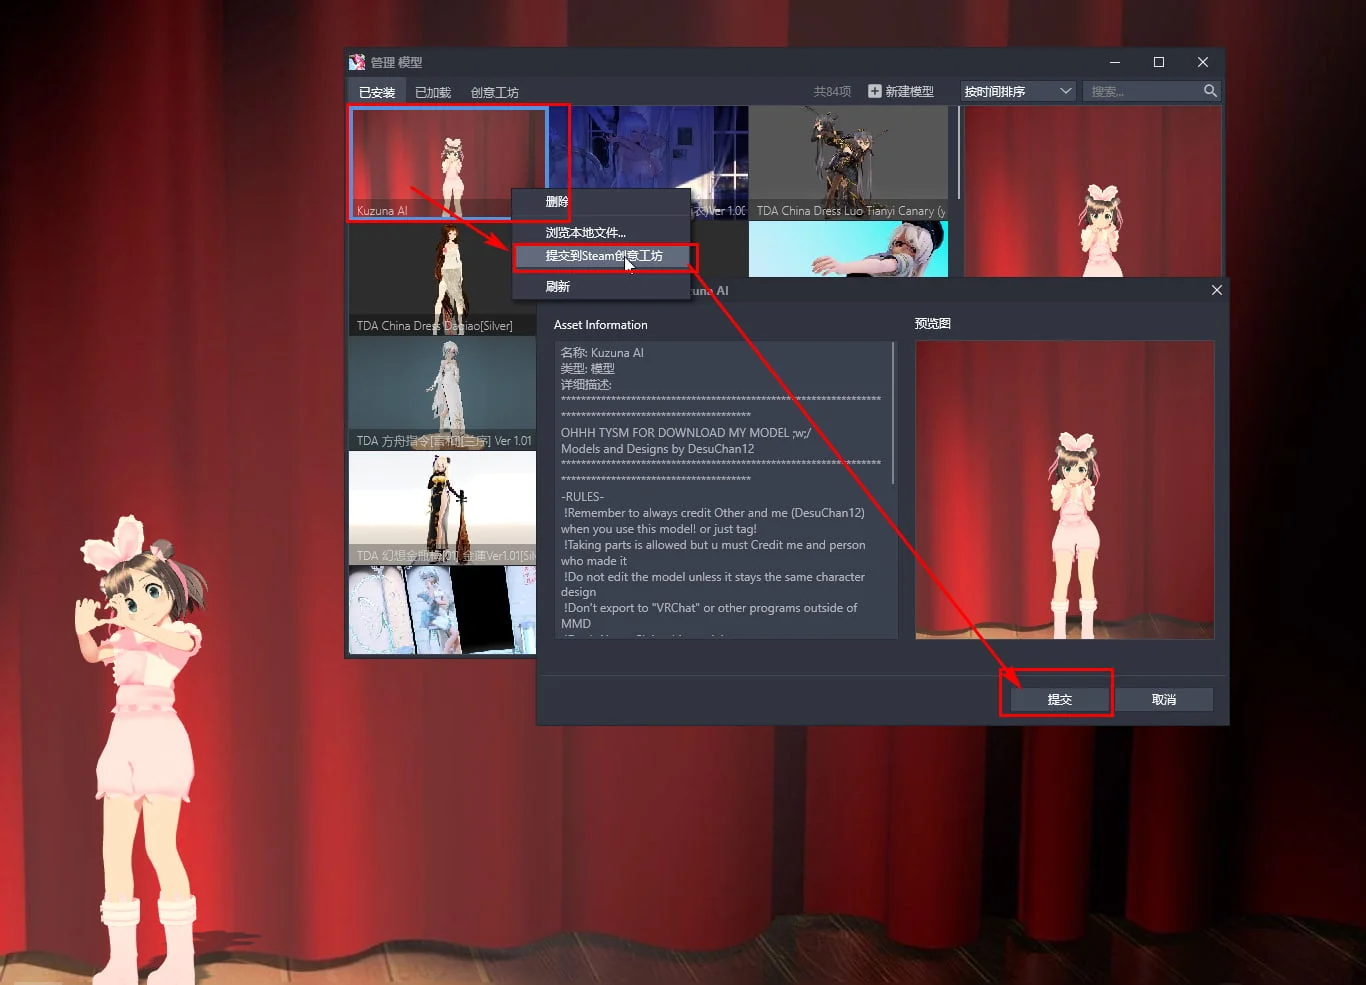
You can also click “Submit to Steam Workshop” in the right-click menu to share it.
How to Choose a Dance for Your Favorite Song with One Click
1. Click DesktopMMD’s tray icon menu and opens the “Manage Dance” window
2. Click the “New Dance” button at the top center
3. Set the name of the dance to the name of the song you want to adapt, for example “ABC”
4. Click the drop-down button in the dance action column, select a dance according to the rhythm of the song, click the test button next to it to see her dance this dance
5. If you have an mp3 file of this song, you can choose to import the mp3 file, and then click OK
6. If you are monitor with a third-party player such as CloudMusic, then when the third-party player starts playing “ABC”, her will automatically start the dance you just created.
