
Freight System Guide
Fortress Craft Evolved’s freight cart system can greatly simplify the logistics of a large and modularized base.
This guide is written in four major sections. I encourage newcomers to avoid section 4 until they’ve experimented with the freight system.
1-Comparison to other systems
2-Key concepts and blocks
3-Example implementations
4-Advanced details and other minutia
Comparison of Logistic Mediums
This section could be it’s own spreadsheet or even developed into a whole guide. I do not intend to develop this section any further.
- Conveyor Belts: Low to medium throughput, no power, cheap to make, very flexible layout. Only medium in this list that slows in Cold Caverns, and is also susceptible to Mynocks.
- Transport Tubes: Medium to high throughput, no power, moderately expensive, very flexible layout.
- Cargo lifts: Upgradable high throughput, low to medium power, initially cheap to make with very expensive upgrades, extremely rigid layouts (vertical 3×3 shaft only).
- Matter eMitters (MM): High throughput, very high power (scales with throughput), MM are themselves cheap to make but the power network may be expensive, flexible layout (must be laid out similar to Laser Power Transmitters (LPT)
- Logistic Falcors: Low throughput, no power, cheap to make, semi flexible layout, beacons require sky clearance.
- Mine carts system: Upgradable high throughput, no power, moderately expensive, simple layouts recommended. (see following section)
- Freight system: Upgradable high throughput, no power, moderately expensive, flexible layouts. Very complex settings. Can directly pull and push from Mass Storage (MS) without the need for MS ports.
Minecarts vs. Freight System
This guide does not focus on the minecart system. Minecarts are implemented similarly to Minecraft’s minecarts, if not simpler. Minecarts have no complex intelligence and can only make routing decisions based on “Do I have any materials?” or “Do I not have any materials?”.
The freight cart system is materially built upon the minecart system. It uses the same track pieces and carts, but different stations.
Research that is minecart system only (not used by freight):
Requirements (W.I.P.)
- The freight cart system is a part of The Adventure Pack DLC.
- Scrap-tier minecarts require X research and access to X ore
- Regular track and minecarts require X research and access to X ore
- Fast and Large minecarts require X research
- Bulk minecarts require X research
Key Components and Concepts
The section is meant to give you a quick understanding of the fundamentals of the system. Nuances and real implementations are discussed in later sections.
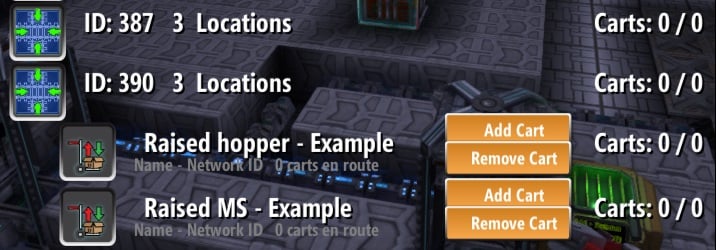
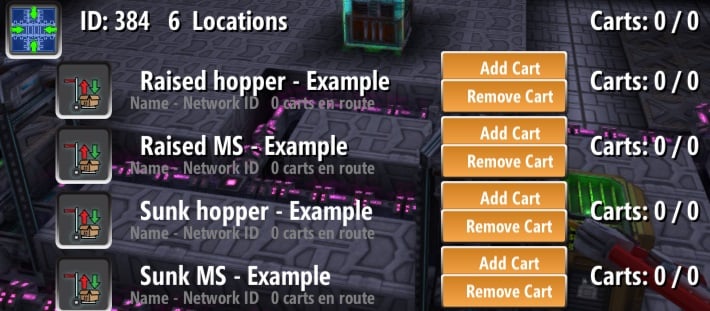
The Freight Network Monitor
The freight network monitor is key to understanding the health of the freight system, and for troubleshooting issues. Many problems can be solved by thoroughly analyzing the information that the monitor provides.
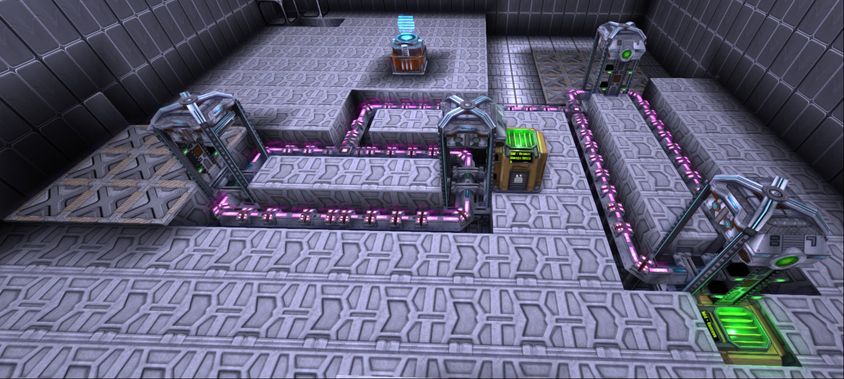
Physical Track Grids
Track is what the carts move on. You can have as many grids of track as necessary, it is not required to have everything on one uber-grid.
Physical track grids should not be confused with freight-networks. Multiple networks can exist on a single grid. However, you should never have a network that spans multiple grids.
Below you can see screenshots of two separate grids. The game helpfully colors grids so you can tell when you have a disconnect. Dead-ends of track will not be lit.
Two disconnected tracks:
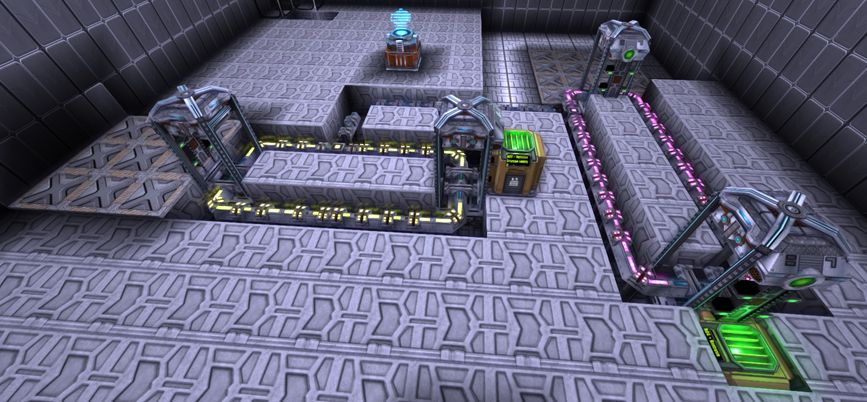
One connected grid:
Depots
Depots are where your carts spawn and de-spawn. A depot simply makes carts in any hoppers connected to it available to the grid. Any networks on the grid may request a cart to be spawned.
Carts
Carts are couriers, bringing goods to where they need to be. They will always try to take the shortest route between destinations, while trying to avoid passing through non-destination stations.
There are various tiers and types of carts. Tiers affects max speed, acceleration and capacity of carts. Ore-type carts can only carry ores (& crystal deposits) and fluid-type carts can only carry gas-canisters. Ore and Fluid carts have a capacity and transfer bonus over all-purpose carts.
Stations
Stations are the interface between a track-grid, carts, and storages. They are also how you control most of the settings in the freight system.
A station must be associated with a network. Naming stations (and storages) are optional.
A station monitors the storage that it is attached to, and reports to the network.
Freight stations must transact with either hoppers or Mass Storage (MS) grids. Stations cannot transact with any other machine or block, nor the player.
Storage
The freight system is only compatible with two methods of storage: hoppers, and Mass Storage grids (MS). The item transfer rate is the same for either storage method.
A storage has it’s own ideal stocking limits per network that it is associated with. To connect a storage to multiple networks, simply connect more stations to the storage.
Stocking Limits
Through stations, you can set a storage’s stocking limits for a network (referred to in-game, as “Set Freight”). The stocking limit is the storage’s “ideal amount for X item” within that network. If one of a storage’s network-limits is set to 100 nickle bars, but has 140, then it has s surplus of 40 bars, and will offer them to that network. Similarly, if it dropped down to 70 bars, then it would demand 30 bars.
There does not need to be a limit for every item in a storage, but if an item doesn’t have a limit, then the storage won’t demand of offer it. Setting a stocking limit to “0” is common: it means you don’t want any of an item in that storage: offer it to be transported elsewhere.
It’s useful to remember: a storage be connected to many networks, and have different stocking limits for each network.
Networks
A network is a conceptual grouping of storages (and attached stations) that should share items.
A network will attempt to match stocking demands with offers, and tell depots to spawn carts for related stations when matches are found.
A network should never span multiple track-grids, because carts won’t be able to reach every storage in the network.
Details and Other Minutia (W.I.P.)
- Wait for Full / Any.
- A Network mustn’t span multiple track-grids.
- Tiers and types of carts.
- One-way, junction, booster, corner, slope.
- 4-lane system.
- Stations can access storage in-front or behind, at the same height of the base or one space higher. Scroll up to the “Physical Track Grids” section for examples.
- Cart settings only affect what carts the station will request (spawn). Any kind of cart may visit a station.
- Stations must connect to a single storage source (hopper or MS-grid)
- Carts collide, but aren’t aware of eachother (They don’t route with consideration of eachother)
- Auto upgrader
- Rooms. Straight track ignores air-clearance. Slopes require air-clearance else derail.
- World re-load minutia
- Stuck carts will periodically try to reverse course / re-route in order to break traffic jams.
- Stations will search at height and height +1, front and back for a storage. (if two storages are in range, a station might pick something else on world reload)
- Advice on when stations should have 0 carts assigned (requestable)
- Depot placement and airlocking, request steveman0 to add resistance to depots.
- Avoid slopes immediately before or after a station. One-ways, corners, and straights are fine.
Troubleshooting Tips (W.I.P.)
- Check freight monitor:
- How many grids are there?
- Does the storage names and contents match your expectation
- Does the network-inventory match expectation
- Do the stations have proper cart tier, type, and count settings? Wait for full/any?
- Ensure the path from the station to the grid is complete.
- When in doubt, re-make the stations connected to a storage.