The Greenhorn Guide
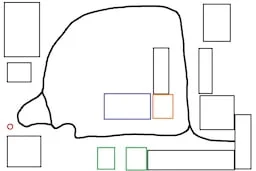
Pretty much every building is marked in black, meaning it’s really not important for a need to go place. the marked areas are, by color:
- The red circle is, as you might guess, your trailer. where you begin and end each day.
- The twin green square are your tool shops. One sells tools, the other sells supplies.
- You’ll be seeing these storefronts a lot.
- The blue rectangle is the local anchor bar. it’s where you’ll be generating your house-building income, and where you can talk to the shadiest ‘scouse around, who will give you a lot of info on what to do and where to find the right items for any given job. This is also where everyone in town spawns after 19:00. no real use, just some flavor of the locals.
- The orange square is the job centre. while it’s not a major element at current, you do use it to gain access to the full suite of options required for you house repair, so make sure you clear all the cards that show up. Don’t worry it’s only about three as of now.
- The map isn’t incredibly proportional, but it gives you a basic idea of the roads that snake around the town. Not of note is the bus stop, since it’s directly in view of you when you exit the mobile trailer. It’ll bring you from your housing site to the bar, and back again for .10 british money (I don’t know the vernacular) one way, and it’s a great help when you need to lug tools back to your house without wasting close to an hour on the trip down.
Now, to the status bars. Energy is your most important, that’s the stat that will allow you to do pretty much anything in the game. Anything that isn’t walking or moving a cart at normal speed drains energy (Running, Jumping, any tool actions on valid objects, etc) and when you run out of energy you keel over asleep. Not only will this set you back the next day, as you’ll wake up at 11 instead of 8, after the first time passing out, doing so again will lose you a variable amount of money. Seeing how at max, you can only net 36 a day from dish-washing, and I’ve seen myself lose up to 20, it’s never really a good idea to pass out.
Next, the less important bars, being Hygiene, Bladder, and Soberness. Hygiene is, as far as I can tell, completely useless. While it will go down upon doing various activities, it doesn’t actually block you off from anything that I’ve seen. (Tested walking into buildings at 0 to see if I was kicked out, even working the dishwasher job at 0 hygiene incurs no penalties.) but then again, you can make it go up for free in your shower so, how well you maintain it is up to you. Bladder only fills up when you drink, and the only purpose seems to be urinating suspiciously glowy liquid onto surfaces. According to the resident disability drunk in the bar, you can fill the cement mix you make with urine instead of water. I’ve never tried, seeing how it only costs 3.48 to get a bucket and you know, not make -crete.
Finally, there is Soberness. This will go down the more you booze it up, and correlates to the screen going blurry enough that you could be forgiven for mistaking the canal out back as a solid road. If you’re looking to really larp that british lifestyle and get, it is rather entertaining to attempt the run home down a winding road when you can barely see the road. Still, barely affects gameplay.
Excepting items I’ll be going over in future sections, the last things you should keep an eye on are time and weather. Time is simple, and important to watch. You’ll pass out from exhaustion regardless of energy if you stay up past 02:00 in the morning, so be mindful. In addition to that, you’ll need to check the time for the various buildings opening and closing. The job centre, as well as both tool and supply shops will be open right when you wake up. Convenient for morning orders and work check ins. The job centre closes at 5, and both tool and supply shops close up at 7, or 19:00 in game. the watch will ding on the hour and notify you of the passing time so, it’s not terribly hard to keep track. Still, don’t let it get away from you. As for weather, it’ll affect you more than you might think. In addition to rain giving you little bits of hygiene when you stand in it, rain and snow will make any incline harder to walk up. Yes, any incline. While this rightfully includes your roof when you get up there for tiling, it also includes the little dip to get into your property, the stairs to get to the church, pretty much any incline that isn’t part of the roadway and is, y’know, outside. Keep that in mind when you appear to be stuck on something and don’t know what’s happening. If it’s raining, you may just be trying to walk up a tiny, but very slippery slope.
Master your Finances (And Shake It Up)
So, starting off, you’ll be positively dirt poor and saddled with debt. Fortunately for you, you happen to be living in the same town as a remarkably helpful old man! The one that’s currently trying to pick the lock to your worksite. Ain’t he a charmer? This is the ‘scouse, a shady old codger that is nonetheless more than willing to help you out with your house-building project. While you don’t need him to complete any given step, he gives you quite a lot of info on each building process, as well as some less than legal ways to snag the tools and supplies. In order to grab the rather helpful wheelbarrow he’s got with him, you’ll need to do a simple job for him. He posts it at the centre, all you need do is snag it and head to the twin rows of houses. Just make a left up the bridge and you’ll see him picking another lock. Complete his request, and you’ll have to wait a full day for him to give you your very own wheelbarrow. took him long enough.
That’s one roadblock of three done, nice. Next, you’ll also want to snag the driver job from the job centre. When you do, a charming bloke by the name of Winston will accost you outside, saying that the driver job was ‘his.’ While you could refuse him, you don’t actually have a license, so might as well just hand it over. Do that, and head over to the befuddled man standing outside the green shopfront. He’ll at this point tell you he appreciates you helping him out with a new driver, and will give you a catalog to order supplies. you can do this at the phone booth, and in less than five real minutes winston will come down with your order. Make sure you grab all the stuff off the cart before you tell him to go. Also, as you may guess, he’s the only delivery driver, so you have to wait for him to come back into the bay to order again.
Last but not least, there’s the pesky matter of you not actually having any money. While helping winston out will give you the skip to sell any excess materials and trash you pick up, that’s not nearly enough dough to build a house. Lucky for you, sleeping after you’ve done the first two job tasks will give you a third, and if you’re really in need of a hint, you’ll even get mail about a new job posted at the centre. Grab that card and head to the bar when it opens. Talking to the barmaid will open you up to the fabulous world of washing dishes! While you can do this for as little as you want, it’s most efficient to get there when the bar opens with a full energy bar and work till you’re out. it takes 10 energy to work an hour shift, and you get paid 4 hourly, meaning if you go for the longest possible time, you’ll be netting 36 dosh a day from dishwashing. While this may not seem like much, it’ll quickly add up. Not to mention it’s only necessary to buy about 100 bucks worth of tools and supplies, as you can get a lot from your surroundings. you can reach the bar while still maintaining above 90 energy by running up the winding path along the same road as the buststop, or you could use the bus. Either way, get to the bar and wash dishes, you’ll be on your way to fixing your house up in no time!
The Goods and Where to Get Them
Alright, now you’ve cleared all the early game blocks to building your brand new rental property! Congratulations. Now comes the meat of the game: mainly the completion of building tasks to make your place presentable to a prospective tenant. While you could follow the instructions of a certain bar-dwelling drunk, you can do these in any order that pleases you, so long as they’re all complete. You’ll be able to tell when an item has been finished when your notebook updates. First up is probably the most in-depth of the tasks. that’s right mixing concrete and mortar! Super exciting I’m sure. Anyway, if you haven’t done any town exploring, first off you should, and second, here’s where to grab all the goods for your first two tasks.
- Firstly, the tools for the job. You’re going to need pretty much all the expensive items right off the bat to complete both bricklaying and foundation construction, unless you’ve managed to find the single half-brick buried in the bar pile. In any case, you’re going to at bare minimum need the hammer, the trowel, and a cement mixer. Now you may read that the hand mixer is less expensive and think “gee whizz, that means I can save money!” Well think again! Do you see a gas station around anywhere? No! The fact is, as of this guide there isn’t a limit to how much you can use the tools that are petrol powered. (That I’ve found. I mean honestly you barely need either the stonecutting saw or the powered mixer, but they do save you on precious energy.) So do your poor tired arms a favor and buy the petrol power cement mixer. Once you’ve gotten all those tools and hauled them back, you’ll need to procure supplies. Now for me, having patchy brickwork is an eyesore, so I buy the sparkly red bricks. They’re the most expensive for sure, but, pro-tip, you can buy the pallet lifter to grab all those bricks, use enough to fill the holes, then dump the rest in your skip and get a nice tidy refund!
- For supplies, you’re going to need concrete, bricks, and foundation outlines. You can snag all of those things in the trusty wheelbarrow! there’s a bag of cement mix and sand behind the bar, and you’d be hard pressed not to see the big pile of dark red bricks laying all over the place in the bar’s parking area. That’s mortar and brick down, now for foundation. If you go to the same row of houses you went with the old drunk, you’ll find a big old sign on the left end about anarchy or pipeworking or something. The sign doesn’t matter, but the house behind it does! Head up the backlot to the right of the parked car and turn left at the first opening, you’ll find a tidy pile of all the materials you need. While I’d recommend snagging all of the resources, you really only need one bag of each of the cement mix, sand, and aggregate, and a single foundation stake, along with a single board to wall that foundation off. Snag those, and wheel them off, yippee!
Now that you’ve got your big pile of stuff to work with, time to get it done! You’ll need to plant a foundation in that pesky little hole in the front of the house to seal it up. Plant a stake in any corner, and right click the arrow so it’s aiming to another corner of the little empty space. Then, the next stake will want another direction, and you’ll do the same thing! aim it to another corner of the hole, and slap the last stakes down in the remaining corners of the hole. Now take any old board and nail it into place so it’s walled off, and blam, you have a foundation! it’ll turn into a nice looking grid if you’ve done it right.
Now it’s mixing time! if you took the smart path and got the petrol mixer, then all you need to do is pour in your ingredients and mix it up! The hand mixer will do the same, but it’s quite the drain on your energy to mix a good formula. Speaking of formula… the game does label certain mixes of concrete as “weak” and I’m sure that’ll not be good to add to your foundations, so for everyone’s safety, buff that up to at least standard. How? Well it’s easy! For concrete, Aggregate is the leading factor in psi or strength. so get a nice even mix of all three and the water, then add another helping of the green bagged stuff. like, double the dosage. getting up to at least psi 3000 will make it standard concrete, and while you could shoot for higher, standard is good enough to get those floors nice and even. once you’ve mixed it, wheel that thing over to the grid and pour it in. viola, a concrete patch! It’ll dry in about a day or two, depending on weather.
For mortar the same rule applies, only instead of mixing all three, you just mix sand and cement. Sand is the factor here, so buff that sand ratio up to standard and scoop up a big helping of it with your trowel. then all you have to do is spread the mix, flatten it down, and plop down your bricks! while you’re at it you can easily do the mortar for the inside too. Those bricks are a little harder to get, but you can still snag enough to fill the gaps. They’re located atop the right-hand high rise on the road to the factory. It’s easiest to get there by hopping over some lower bushes, but you can also loop around to the bar, hop the fence to the left of the parking area and slip through the hole cut in the chain link fence. Head down the left side of the canal and you’ll get to a toilet, a locked gate, and some scaffolding filled with bricks for the inside! what luck.
Oh, final note, for the inside bricks, and for a later task, you’ll be needing a work platform to boost yourself up and get the higher up patterns. it’s in the supply shop, order and enjoy!
And The Rest is a Matter of Dosh
For all the other tasks you’ll be needing to buy your supplies from the store. (I know you aspiring kleptomaniac you, it sucks) But again, far as I’ve been able to make out you can’t really pilfer the supplies needed for the roofing, windows, doors, and panelling. The ‘scouse does make mention that the factory down the road has windows and doors, but for the life of me I can’t wrangle a way to hop in, and unless you can too, it’s the route of the wage-slave for you. A few shifts of dishwashing will earn you more than enough dosh to pay for the doors, windows, panels, all that jazz.
Before moving to the easier tasks of doors, windows, and other ground-related things, first let’s touch on the baleful roofing tasks you have to do. Like I mentioned before, weather affects how easily you can stand on slopes. As in, not at all. This is true for the roof, and unfortunately for you, this is a game set in britain, meaning it’s going to pour a lot. On one of the few days when it isn’t foggy and drizzling, you’ll need to stack up a ladder on top of the work platform. Doing so will give you enough leverage to get to the top and install the roofing panels. Tacking them on is pretty simple, you just need to patch the holes with tarred boards and affix the shingles. No need to hammer them in, in fact hammering actually dislodges them, so just place and move on. Now, you could attempt to build scaffolding. You could. I wouldn’t, as scaffolding in it’s current form is the biggest mess of glitchy improper coding I’ve ever seen. Seriously, it;s 23 and change to get a work platform and a ladder, not to mention the piles of ladders laying about the town, and that’s all you need to get to the roof. I tried scaffolding. It did not go well.
Now, after you’ve finished up the roof, it’s an easy time of installing the rest of your pieces! It’s just a matter of installing all of them right honestly, from here on out it’s mostly common sense. you use a screwdriver to screw in the doors and windows, you match up the plankboard numbers with the numbers on the walls, and you nail them in like you’d nail in a real plankboard. At this point you’ll be in the home stretch of the current state of building your house up, so feel free to take your time. Seriously, it’s early access, if you’re voraciously tearing through the content to the end you’ll end up disappointed. Or maybe not, do you my man. Anyway, once you’ve done all of the listed activities, you’ll get a neat furniture catalogue, and you can start decking out your house!
Interior Decor!
Alright, you’ve made it to the furnisihing sections of the game, go you! You’ve gotten the furniture catalog and you’re on your way to making your rudimentary house shine! First things first though. Why pay for furniture? Good question! you really don’t need to, you can get most of the items needed for the house around town, sans a table, shower, and sink. The TV, couch, and fridge are all laying in a pile down by the factory, you’ll see the green couch if you head towards the big place. The gas range is in the backwoods area to the right of that, along with a drawer. The other floor drawer well be on your right heading up the winding road to the town, and the wall-mounted drawer is tucked on a hill after you pass the factory, on your left. Now for the remaining pieces, all hidden in the same area. If you read about how to find the rest of the big gray bricks, you’ll know about the hole in the fence behind your place of work (the bar). If you don’t, just hop the fence to the left of the bar and head behind, they’ll be a big hole in one section that you can slip through. Along the right of that canal, you’ll find a bed, dresser, and chair, and the left will give you the toilet!
Look at that, almost all your furnishings stolen for free! Now all that’s left is to order your sink, shower, and table of any size, and place them all down! Most of the furniture requires a few screws to place in, so make sure all of them are nice and tight, and you’ll be good to go! Oh, and do remember not to close the game once you get any of the furniture, or if you have to try to place down all the items you’ve swiped in your house somewhere. I’ve noticed that, upon loading in, the game wipes out all the furniture that isn’t in it’s spawned location, and also isn’t placed down in your house. I had a whole pile of things to place and they went poof. So make sure your things don’t go poof.