War doesn’t feel like garbage if you have the right disc and combinations! This guide will show you the combat and disk information you need in Neptunia Sisters VS Sisters.
Neptunia Sisters VS Sisters Combat and Disk Guide
Welcome to our Neptunia Sisters VS Sisters Combat and Disk Guide. If you have the right disks and combos, the combat won’t feel like garbage!
Neptunia Sisters VS Sisters General Combat Tips
Before we get into the nitty gritty, I wanted to point out some things about the combat you may or may not have noticed. They’re rather simple so don’t expect anything too mind-blowing.
When you activate a chain attack, the character you swap to will target the enemy you’re currently locked on to. When you defeat an enemy, your target automatically changes. Knowing this, when an enemy is at low health, wait until they’re dead and *then* swap to be able to target the full health enemy and continue the chain attack, you have some leeway to choose when to chain before the combo is over. This logic also applies to your character’s combo string; if you wait just a little bit to use your next move after killing the enemy, you can then use a Rush move to home in on the next enemy targeted if they’re within range.
Try to have a mixture of physical attacks and magic attacks on your team; this is much easier with the Combo Striping disk skill (that’ll be explained later). Some enemies are only weak to one of those two types, and elemental weaknesses can cause absurdly high damage. Rom and Ram aren’t the only ones who can do magic attacks, if you look at the stats for everyone’s moves, they’ll tell you if they’re physical or magic. Physical attacks can also be elemental as well, not just magic. However, be aware of everyone’s stats when doing this, because if someone has low INT, then their magic attacks won’t do much damage, and vice versa for STR and physical attacks.
The game never actually tells you this. Some party members have Tactical Gauge skills that give stat buffs of some kind. If you use the default Left Stick + Y/Triangle button prompt, they will only ever buff themselves. To use that skill on other party members, you need to either assign that skill to a shortcut (LT/L2), or pause during battle and select “Tactical Skills” on the character you want. To add to that, you can only pause to use skills/items when you’re not actively attacking. You also need a full tactical gauge to use an item which will then consume the entire gauge. Think twice before performing an attack skill if you think you need a heal.
Don’t button mash. Pressing an input while a combo is being performed will “queue” that input for the next combo move in your list, and you might accidentally use a move when you’d rather be dodging or guarding. Enemies might also move unpredictably, meaning you might need to use a different move that won’t miss. Also, you have a bit of time to stall on using your next move before the combo is broken, so don’t feel pressured to use it immediately.
Experiment with all the different moves and find out which ones best connect with each other. You can kinda sorta get away with just randomly assigning moves, but some moves just flat out won’t connect with each other when performing a combo, and that’d just be a waste of AP. In a very general sense, it’s a good idea to have the combo chain be in this order:
Lunge Attack/Ranged Projectile > Rapid multi-hit > Slower but more powerful hit
The EXE Drive gauge is used for both EXE Drive moves and CPU Transformation. You only need half the gauge full to use an EXE Drive which is a screen nuke, but you need a full gauge to transform. The transformation only lasts for a short amount of time, but you have unlimited AP, do more damage, and you can still perform an EXE Drive before the gauge empties. The status of the gauge also carries over from each battle, so it’s best to save up a full gauge to transform when you need it because you can perform an EXE Drive move alongside transforming. If you choose not to transform though, you *can* perform 2 EXE Drives in a row at the expense of completely emptying the gauge if it’s full.
You can activate a chain at any time after you’ve used 2 or more sequential combos on the character you’re currently controlling; you don’t need to complete an entire 4-way combo for a chain to happen. Also, you can perform a tactical gauge skill at the end of a 4-way combo to make it into a 5-way.
The damage ratio bonus from sequential chains is broken when you flinch from taking damage, step dash, guard, or simply fail to chain before your combo ends. Basically anything that interrupts an ongoing combo.
If an AI-controlled party member is currently taking damage, performing a chain will instantly teleport them next to the enemy you’re targeting, it doesn’t matter if they’re currently stunlocked. This could potentially save them from being KO’d.
Disks that are Borderline Required
Do not neglect the disc development feature. This will single-handedly transform the combat from being garbage to good. I’m gonna rank them based on their importance.
Before I go into that, I also want to urge you to complete as many quests as you can. The vast majority of them give you new scouts to aid in disc development. Each scout has a dedicated skill that will always be there on the disc they’re developing. After they’ve completed a disc for the first time, their skill will always be shown when developing in the future.
Rank GET THESE ASAP AND USE THEM
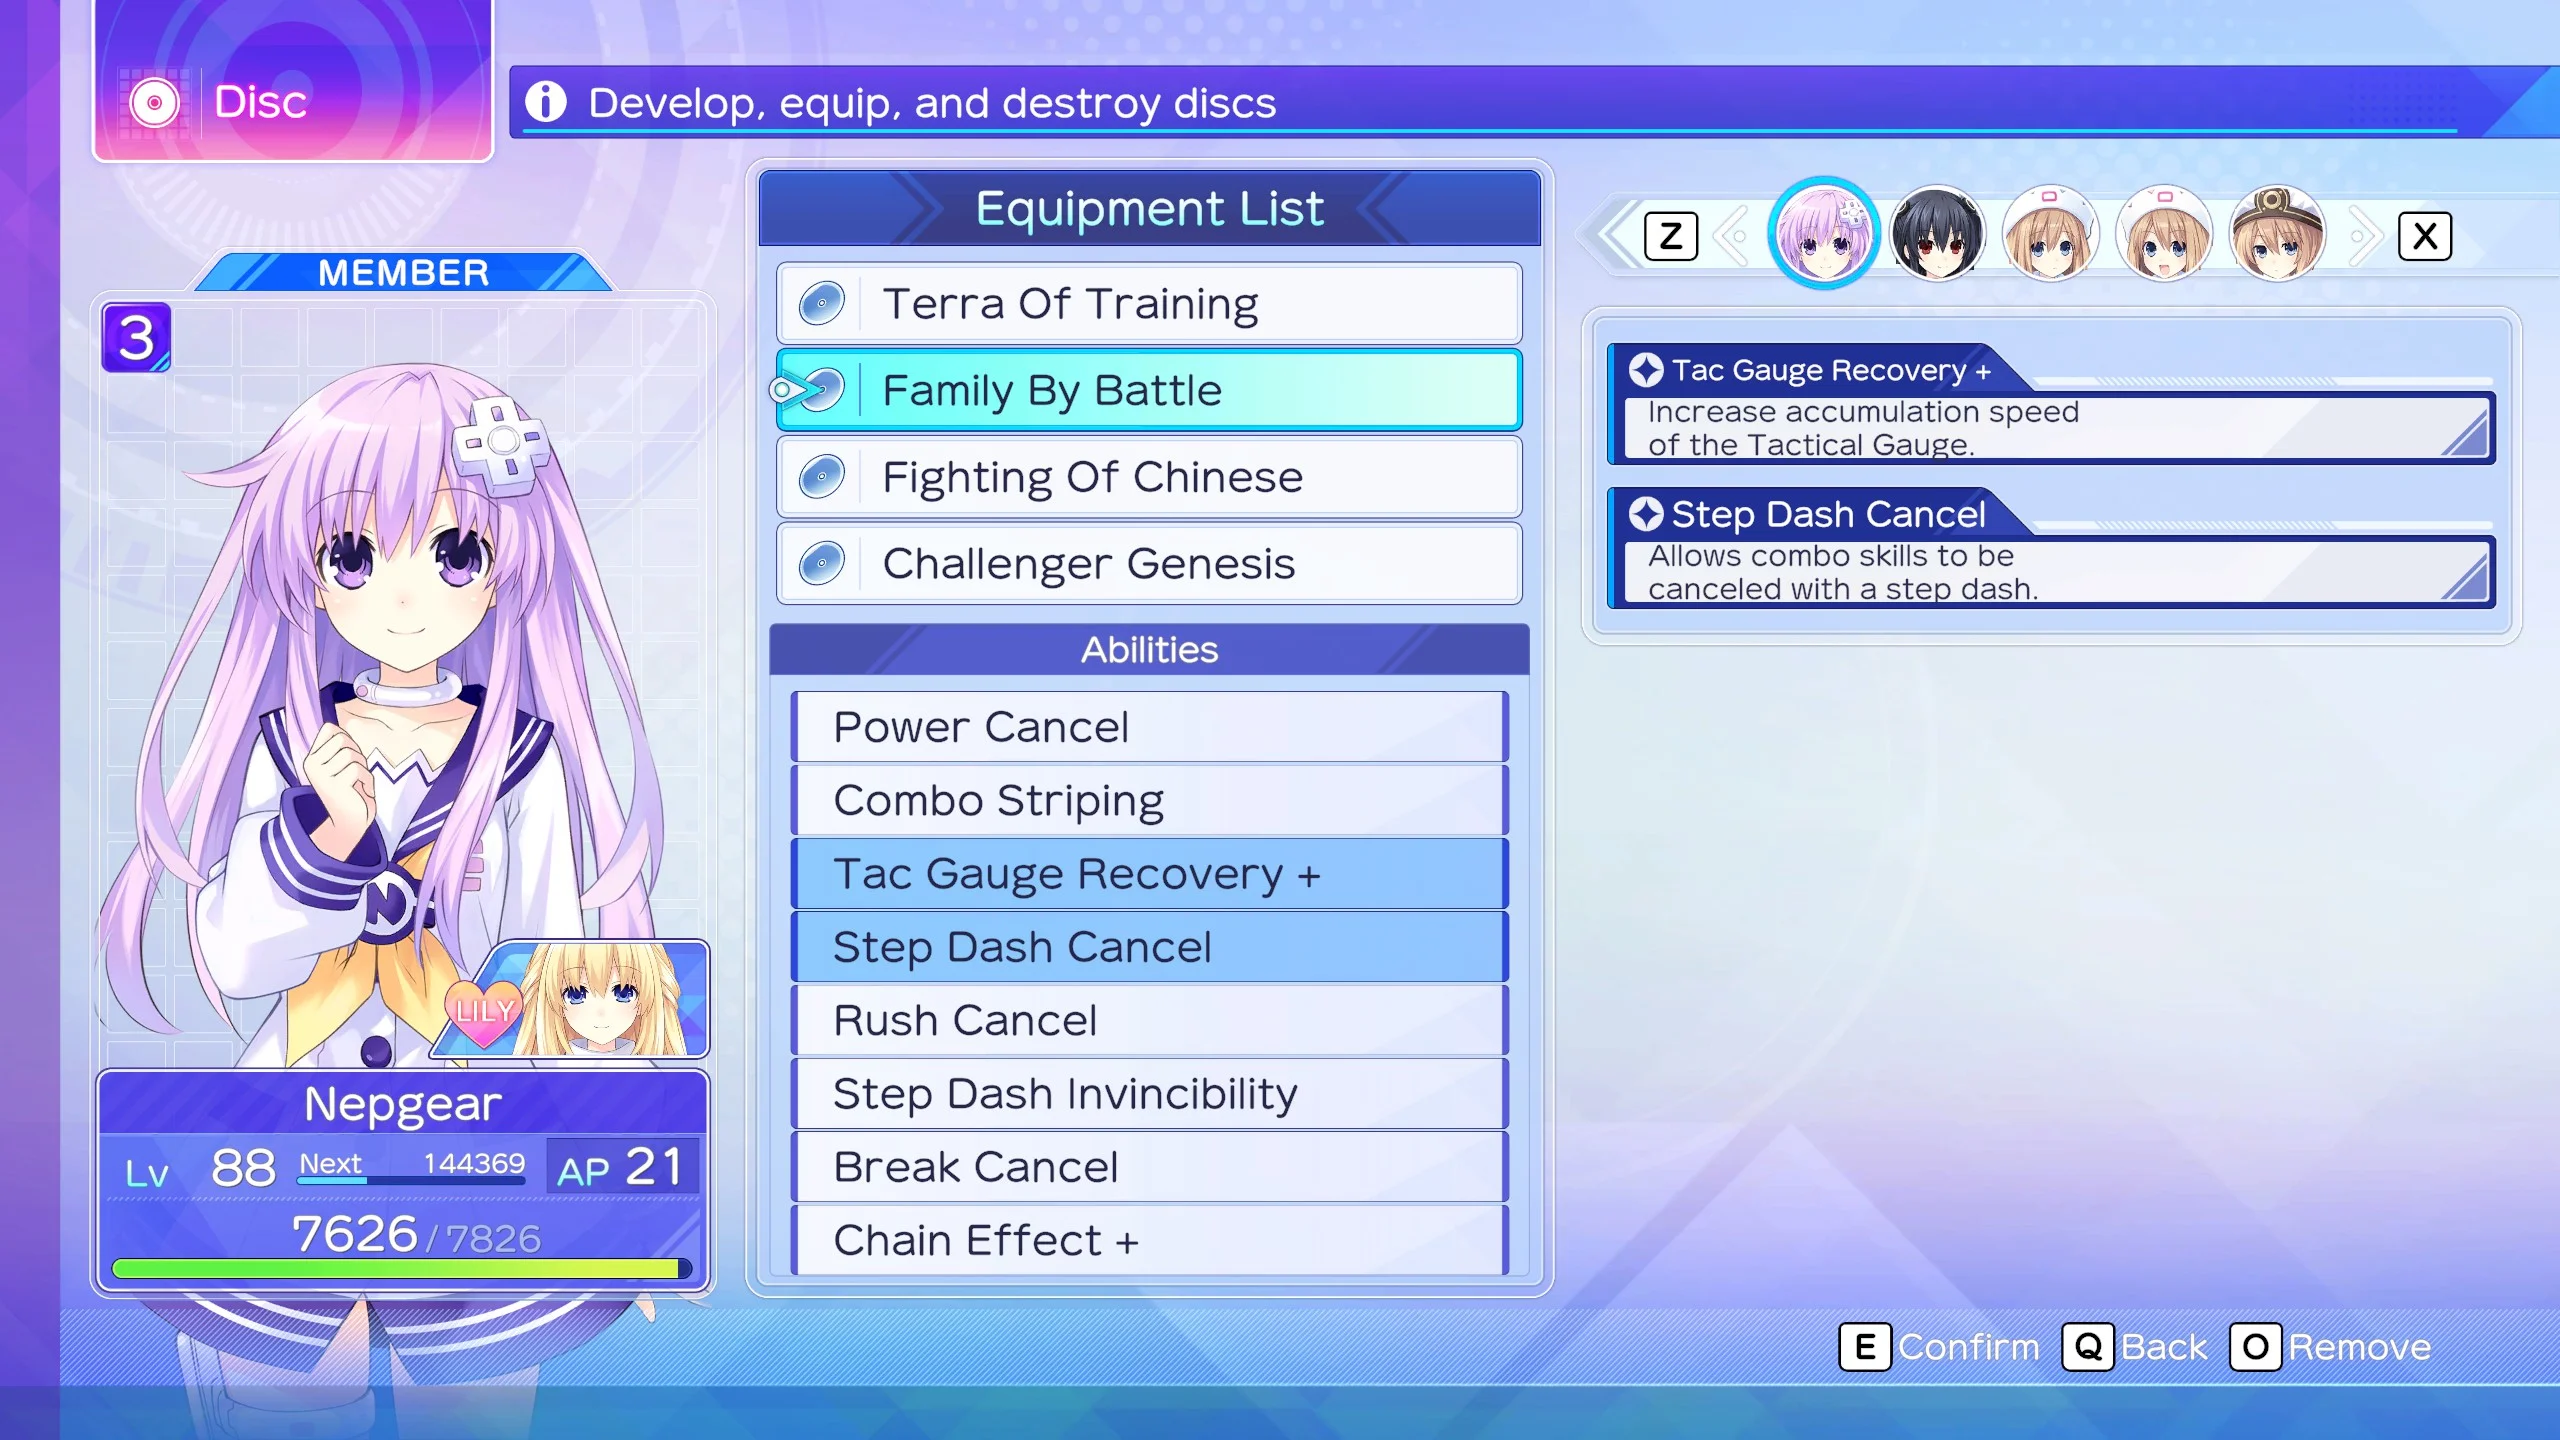
Step Dash Cancel: The single most important skill in the entire game. This allows you to cancel a combo attack early to be able to step dash. This is absolutely invaluable because the default endlag on most moves are painfully long, and you will NOT be able to dodge a lot of moves even if you see them coming. You’ll be infinitely more efficient with just this skill alone. While step dashing does break your chain damage ratio, being able to effectively dance around the enemy and dodge most attacks means you’ll be dealing much more damage on average and you’re able to get yourself in more advantageous situations.
And if that wasn’t good enough of a reason? You can’t switch characters if you’re currently being attacked/stunned/knocked down, so you’re forced to sit there and wait until you have control again before you can switch. This makes dodging attacks that much more important.
Power, Break, and Rush Cancel: These are 3 different skills, but they all serve the same purpose. It’s a bit misleading using “cancel” in the name, but what these do is drastically speed up the endlag on the corresponding combo type to be able to use your next combo move much, much faster. This not only makes you less vulnerable, but your combos will flow into each other much easier and you’ll be much less likely to miss sequential attacks. Being able to attack faster is just good for every situation, and you’ll be able to attack stunlocked enemies much easier to deal massive damage.
Also, in case you needed a reminder on what combo type is what color:
- Power is Red (High damage, slow execution)
- Rush is Green (Fills EXE gauge faster, quick execution, weaker damage)
- Break is Blue (Fills break gauge on bosses easier, average damage and execution)
Of course, depending on how you structure your combos, you might not need all 3 of these on one character, but having a varied amount of moves is always beneficial if you can help it.
Rank S
Combo Striping: This skill only applies after the character is level 15 so it’s not immediately needed. What this does is add a second string of combos you can potentially use alongside your default string. The second string uses a different button (X/Square for String 1 and A/X for String 2), but both strings will progress at the same time. For example, if you press X to use the first part of String 1, String 2 will also be at it’s 2nd move despite not using it. While it doesn’t give any sort of stat buff, this simply gives you more options and more moves to be able to use in general. Certain enemies may require certain tactics or moves to be used, and this makes you ready for any situation. Not only that, but you may want a different move you might be able to perform if one of them won’t work out. The easiest example is having a Power move for String 1 to use on enemies you know you can damage, and having a Rush move on String 2 to chase down enemies that may have slipped your grasp or you can’t perform a Power move without being hit.
Combo Loop: This lets your character continue their combo past using all 4 moves and “loops” back to the first part of the string. While you might be spending most of your time trying to do chain attacks, this is a very good skill to have when one of the girls has a large amount of AP and can just go to town on a stunlocked enemy to perform obscene damage. If you have someone you know can do particularly high damage on enemies uninterrupted, give them Combo Loop.
Rank A
Combo Power+: Self explanatory, combos deal more damage. If you have room for it, you can never go wrong with just a raw damage buff.
Tac Gauge Recovery+: The tactical gauge fills up faster. In order to use an item, you must have a full tactical gauge, so having a full bar on hand will always be helpful since you never know when you might need it. Healing aside, having more opportunity to perform attacking tac skills will just add to your overall damage.
Chain Effect+: Any character with this skill equipped increases the chain damage ratio even more than usual. The fact of the matter is you won’t be able to do consecutive chains all the time, you will HAVE to dodge or stop attacking eventually, so it’s a pretty good idea to squeeze out as much damage as you can in a short amount of time to get more out of it. This is more helpful for the latter half of the game since the higher damage numbers mean a more significant increase in damage when the multiplier is active.
Critical Correction+: Increases crit rate. The game doesn’t say how much it increases it, but from my experience, it gives a significant boost to the rate so you’ll be pretty likely to land crits. Critical hits are especially good on EXE Drive moves or power hits; combine that with enemy weaknesses and it can trivialize some fights.
Rank B (Situational)
These ones aren’t a priority by any means, but can be useful in some fringe cases.
Step Dash Distance+: The distance of a step dash is increased. In most cases, a normal step dash is enough to evade just about any attack, but I can see this being potentially more helpful if you’re playing a ranged character like Uni or Rom/Ram who prioritize staying away from enemies.
Double Step Dash: Perform two consecutive step dashes. Pretty much the same case as Step Dash Distance+, but if you combine those two you can cover a lot of ground with step dashes really fast.
Step Dash Invincibility: You’re invincible when a step dash is active. This can actually be rather helpful if you constantly find yourself barely being able to dodge attacks by the skin of your teeth. If you feel you need a bit of extra assistance with dodging, then can be a nice ability to have.
Goddess Time+: You last longer in CPU form. It takes quite a long time to fill up the EXE gauge, and it’s not at all necessary to transform for non-boss battles. I can only really see this being useful for longer boss fights to truly take advantage of that extra time.
Item Drop+, Money+, and Experience+: I’m sure you don’t need me to tell you that these are for the purpose of lessening the grind. You’ll probably only want these if you’re trying to get everyone to max level, looking for specific items, or trying to buy high-end gear.
Neptunia Sisters VS Sisters Make AAA Disks!
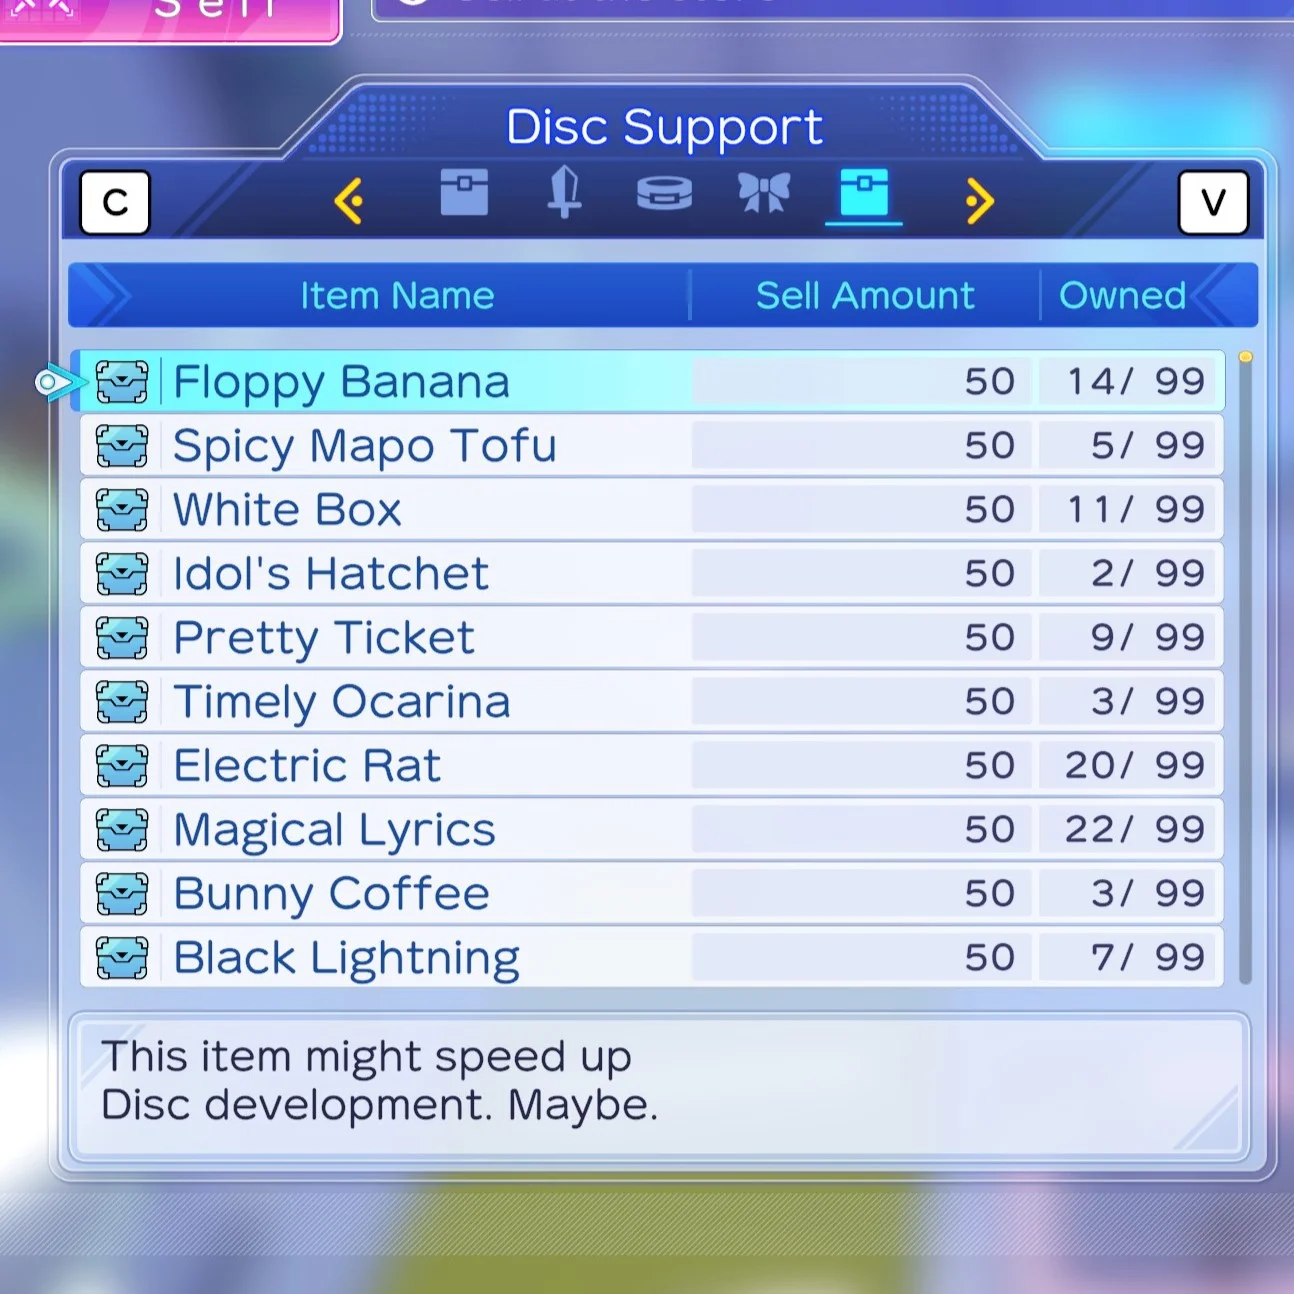
That’s a lot of skills to keep in mind, right? With only 4 slots, how are you gonna fit all those in? Well, it’ll take some luck, but it is possible. If you make an appropriate match with the scout and the game genre, there’s a chance they’ll develop a AAA game, which gives you two skills on the disk instead of just one. You’ll know it’s gonna be AAA quality if an event happens right after you begin development where the scout will ask for more money to complete the game. Say yes to this, obviously, and make sure you got enough DC to fund it.
I’m not gonna claim I know everything about this system, but as far as I know, it’s never a guarantee a AAA game will be made even with the appropriate genre match. On top of that, I believe the extra skill gained from the disk is random. I also believe the extra item you can add to the game only speeds up the timer to finish the disc, at least that’s what the item description for the game says. I don’t know if matching the right item to the right scout guarantees a AAA, but I think it’s safe to say it only decreases the timer.
(This is the description for every single disc development item.)
But with enough trial and error, you will be able to fit most of the skills on a single character.
Proper Combo Flow
I touched on this a little bit in the general tips, but the flow of your combos is very important. If you assign moves with reckless abandon, it’s not gonna yield good results. Some moves just flat out WON’T connect with each other no matter how hard you try… or at the very least it’ll be less than ideal. If you’re fine with a bit of experimenting, you’ll be able to deduce which ones flow best.
I did mention earlier a good rule of thumb is Lunge > Rapid hit > Slow hit, but this can vary. Some moves might knock the enemy back, the character will back off from the enemy at the end of the move, or some other variation. An example of bad combo flow is using a move that knocks an enemy back, then using a close-range move that won’t hit because of the previous one. Instead, a good flow will be to use a Rush move that closes in on the enemy after using the move that knocks them back.
You’ll also want to be aware of the range at which you begin your combo. Most starting moves will lunge at the enemy, but some may be ranged. Actually, just be aware of what effective range your moves are in general. It wouldn’t make sense to use a ranged attack after using a close-range attack because it’s effectiveness will be much less compared to another more powerful close-range hit. Some ranged attacks will just flat out miss if you use them too closely.
I wanna show an example of some of my combo loadouts so you can get a more visual example of my thought process. It will also show why I feel the Combo Striping skill is so important. Let’s start with Ram since I think she’s the easiest one to understand.
Also quick note: The girls get more combo moves as they level up, you’ll know when you got a new move when you see the notification telling you that after a battle.
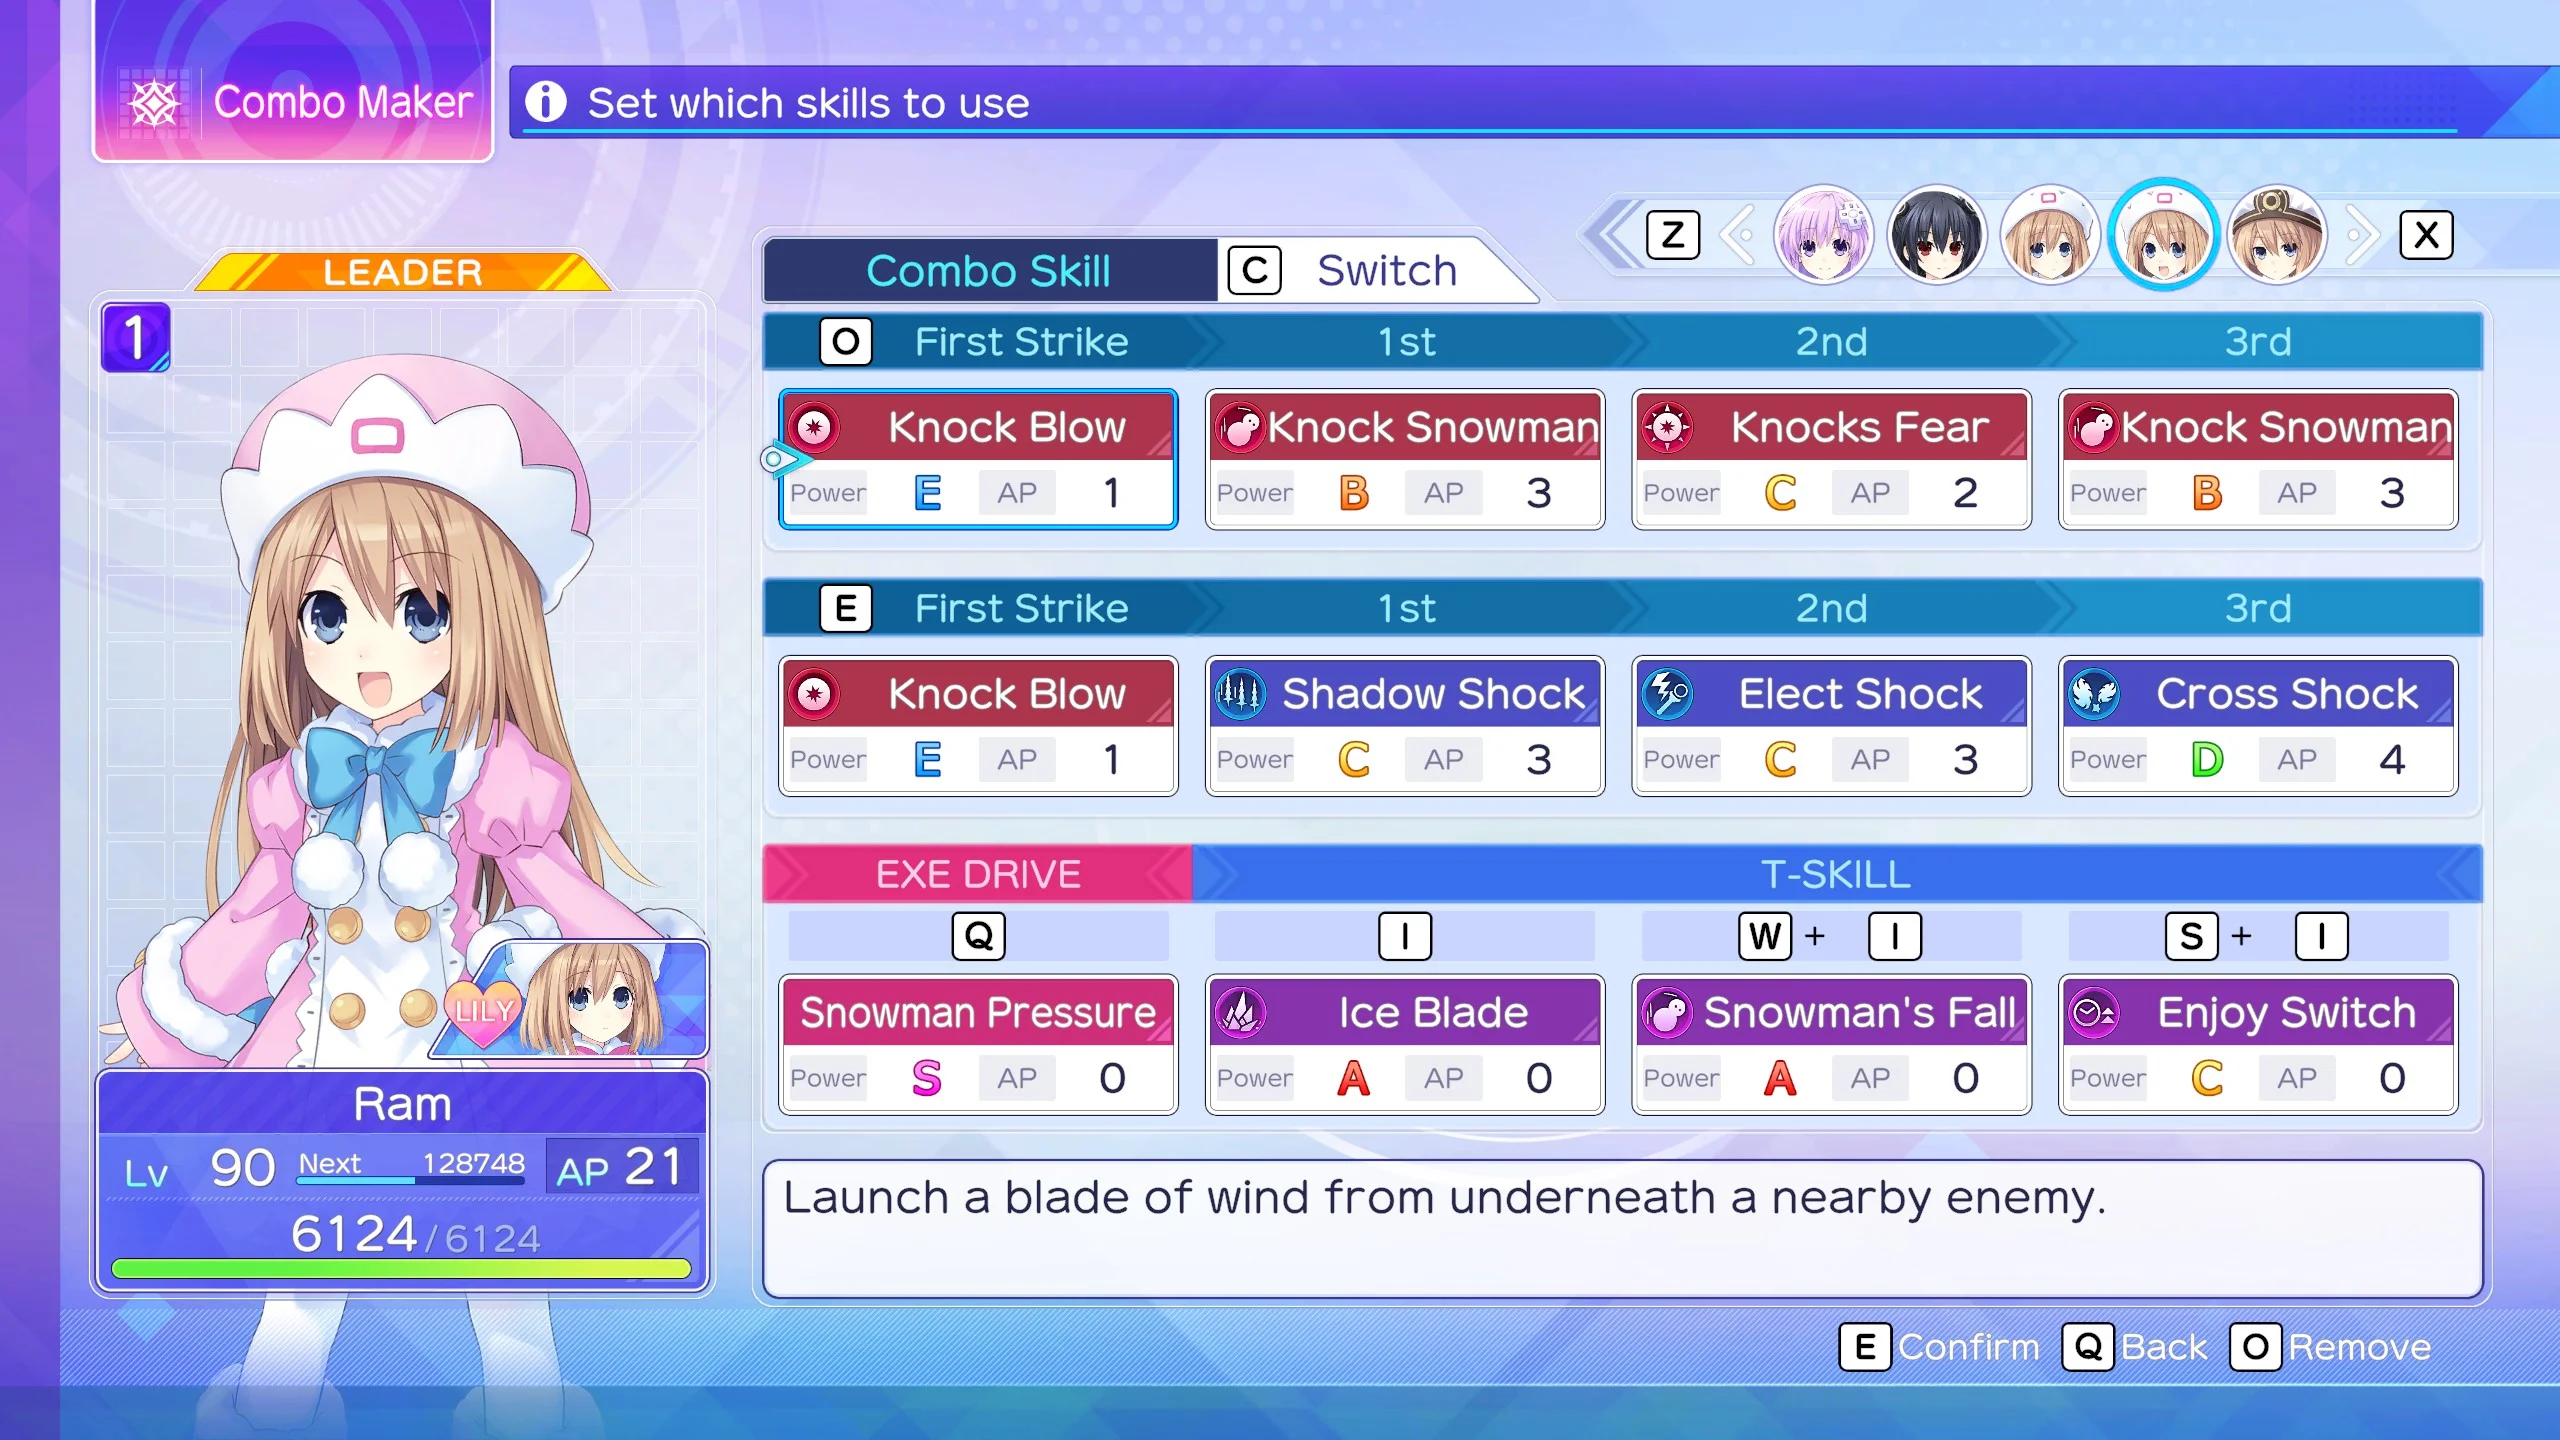
So, Ram’s first combo string is a series of Power moves. Ram throws the snowman overhead and it takes a second to actually land on the enemy. While the snowman is flying through the air, she can perform “Knocks Fear” where Ram charges up a projectile that explodes upon touching an enemy doing damage over time. At that point the first snowman will have landed on the enemy, then it ends with the same Snowman move since the enemy should still be stunlocked and within range. This string works well for enemies that don’t move around much or are just very big, and is ideal at a range.
In contrast, Ram’s second string is completely close-range oriented. Shadow Shock, Elect Shock, and Cross Shock are all extremely damaging moves as long as Ram is within range. Elect Shock in particular requires Ram to be right up in the enemy’s face. It’s dangerous, but the payoff is immense when all moves land. It absolutely tears up certain enemies where they’ll die instantly, including high HP ones.
As you can tell, I like to differenciate my combos depending on the situation. Also, the initial starting move for both strings is Knock Blow. Why? Well, the other two variants make Ram lunge at the enemy to close in on them. For Knock Blow, Ram stands in place. It’s actually better for Ram to be close, but not necessarily directly up close since her moves are prone to missing if used too closely.
Not only that… but all of Ram’s moves on the first combo string are water elemental. She’s got a lily rank pair with Rom, who increases the power of water-based attacks.
To take advantage of the combo striping, I sometimes like to do Shadow Shock into Knocks Fear If Ram is within range to do Shadow Shock, but not close enough to perform Elect Shock. Makes me be able to land a hit regardless of where she is. Knocks Fear into Cross Shock can work well too.
Now, let’s look at someone who’s melee-oriented, like Nepgear.
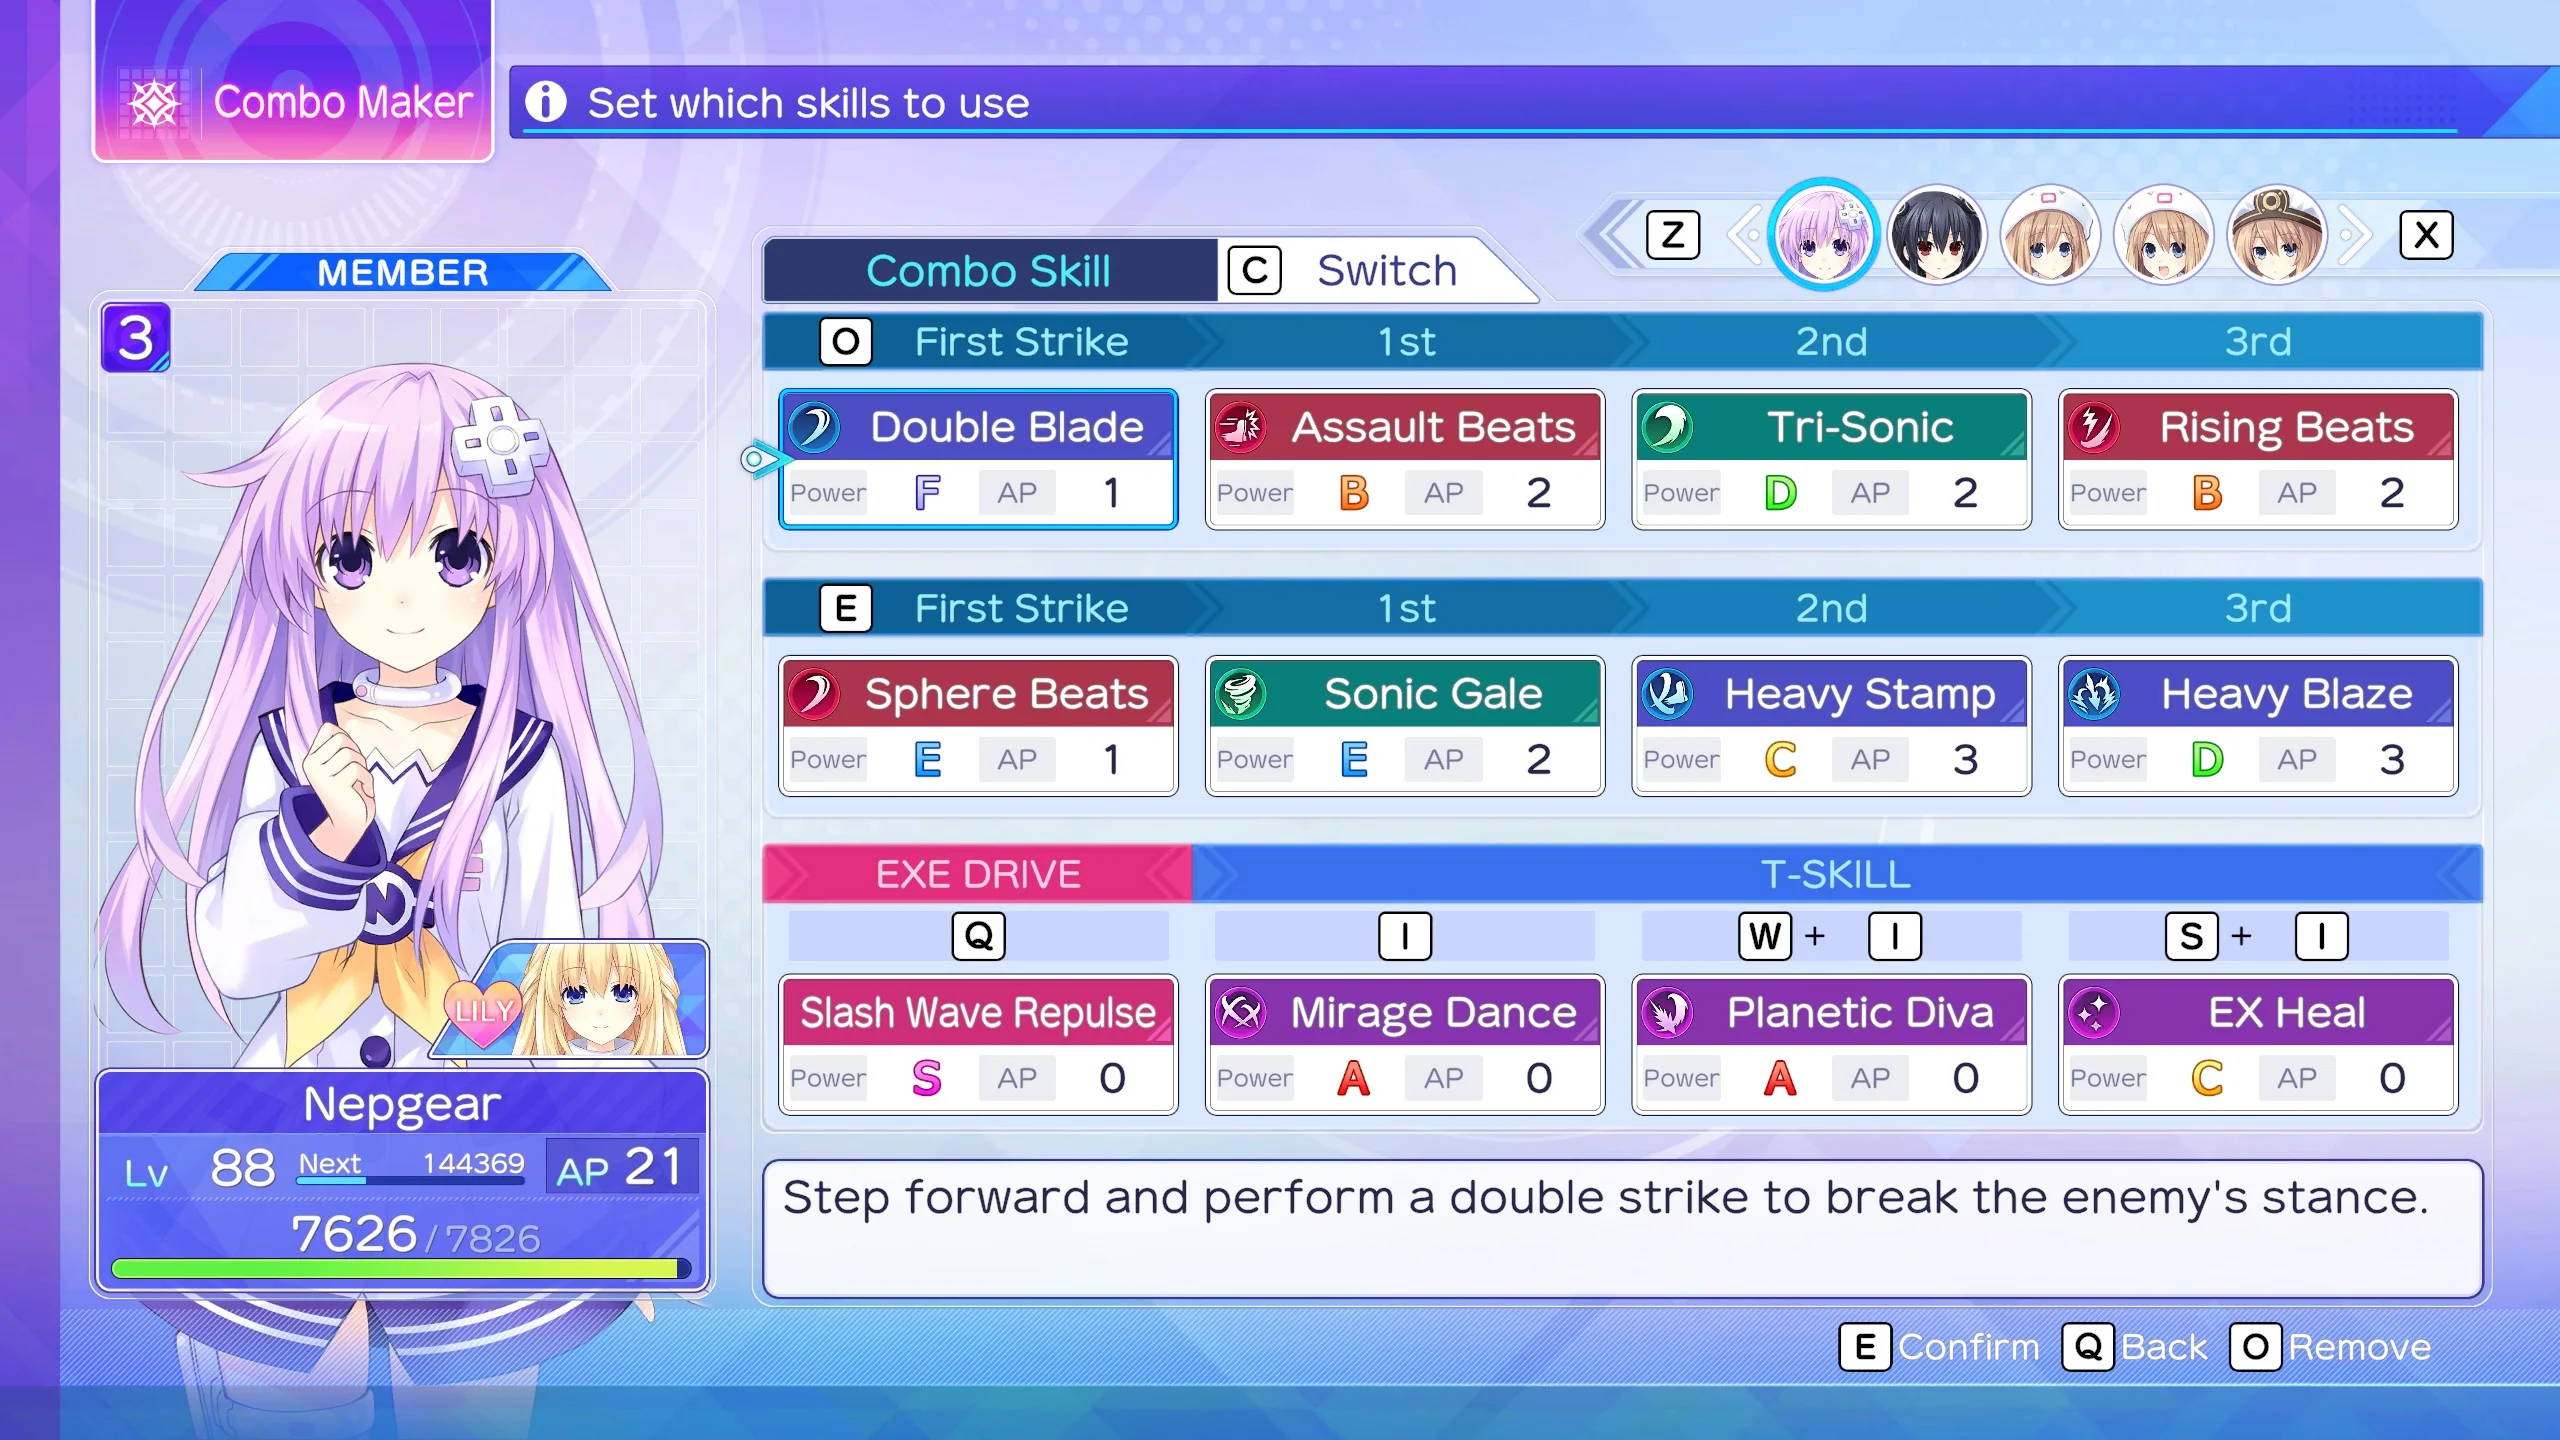
Unlike Ram, Nepgear’s combos are more overall general use since she can be very versatile. I also believe she needs a good variety of moves to be ready for any situation, since being in melee range of enemies leaves her in more danger compared to inheritly ranged users like Rom and Ram.
The first combo string is all nicely damaging moves that go well together. Double Blade has a fast startup to lead into Assault Beats which knocks the enemy back slightly. Because of that, a Rush move like Tri-Sonic is good to keep Nepgear on the enemy’s tail, then ending with Rising Beats which is another powerful move.
The second string starts with Sphere Beats which has a slow startup but does a decent amount of damage. Sonic Gale follows that which has an extremely fast startup and recovery, which then leads into Heavy Stamp and Heavy Blaze which are just good safe moves to perform if I’m not sure Tri Sonic or Rising Beats can hit.
I also specifically chose these moves to be able to flow nicely no matter which move I choose, so I often go across both strings in a 4-way combo. For example, Sonic Gale into Tri Sonic into Heavy Blaze is a good combo string to stay directly on the enemy’s tail since Nepgear lunges at the enemy in each of these moves. Not only that, but I also made it a point to have Sonic Gale and Rising Beats in my list since Nepgear is lily paired with Vert who increases the power of wind-elemental moves, much like Rom with Ram.

Hi, do discs like ‘exerience+’ and item drop stack.
There’s a surprising number of possibilities.
1) If one character has experence+, do other characters get more experience or just the one?
2) If 1 character is equipped with 2 experience+ discs, does she get more experience.
3) Do characters not in use still get extra experience with experience+ equipped.
4) Do characters who are only in the Lily formation get extra experience with experience+ equipped.