Brother Lieutenant! Welcome to Space Hulk Tactics Space Marines Guide! Find attached the datafiles you requested concerning basic tactics for Terminator Squads entering a Space Hulk. Remember that these are instructions to be followed. Also keep in mind that in the fight against the Xenos, you always need to be flexible and adapt to the situation. Let the Emperor be your guide!
Space Hulk Tactics Space Marines Guide
Welcome to our Space Hulk Tactics Space Marines Guide. You can find all the information you need about Space Marines in this guide!
Heed the Plan!
Brother Marines!
Before you embark on your mission, your Brother Lieutenant will study the environment you will fight in and formulate a battle plan. This plan will be flexible enough for your squad to adapt to the situation you will be in and will include:
- A map of the expected hulk layout in the vicinity of the mission objective/s.
- Waypoints which you will reach in order to fulfill your objective/s.
- Positions which are probably easy to defend against the Xenos waves.
- Positions the enemy may use to surround or split the squad.
Your squad will be expected to stick to the plan and not be distracted. Should the situation critically change, mandating a change of plan, don’t hesitate to do so and pray to the Emperor for inspiration!
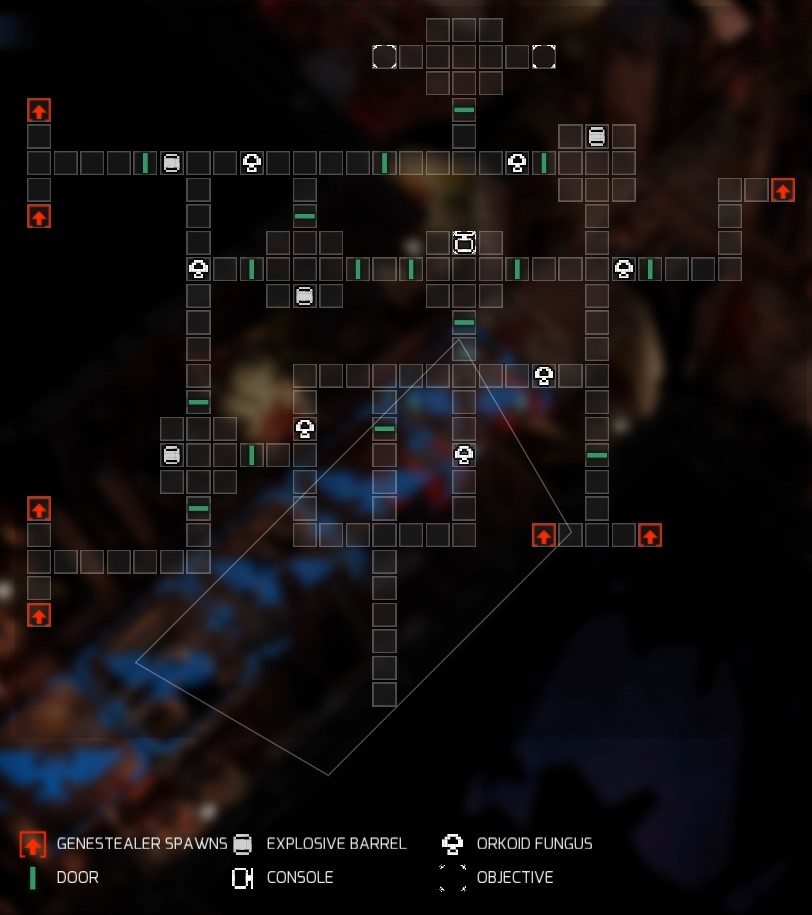
Consider the following example from a campaign our Brothers once fought aboard a small Orc hulk. The infesting Xenos was to be destroyed by locating two control panels which should be able to release enormous amounts of poisonous Orc fungus into the hulk. While our Brothers held a perimeter aboard the hulk, a Tactical Squad was sent deep into the hulk searching for the controls. The first critical part was an old Orc frigate dubbed “Khitor”. Here’s the map the scanners created as well as the original battle plan:

The squad will enter from the corridor in the south. It will move north through the corridors leading to the console in the center of the map which will open the doors to the northern edge of the map. At the crossing, Marines will cover each other to avoid being surrounded. Heavy Weapons may be used to clear the console room from the Xenos.
From there, the squad will proceed through the western room and exit the room through the northern door while covering each other and staying close together. Again, Heavy Weapons should be used to clear the junction beyond the door if necessary.
Squad members will then move through the corridor in eastern direction, eliminating Xenos blocking the way to the objective positions. Against Xenos closing in from either western or eastern directions, Marines will make use of the environment – our scanners detected growths of Orc fungus as well as scattered explosives which will be used to slow down the Xenos while the squad proceeds further to the north.
Moving Forward
Brother Marines!
Each and every Space Hulk is a deadly environment. Your squad will confront its dangers by keeping the following basic principles in mind:
Use the environment to your advantage!
Your squad will eliminate any cover, i.e. doors and rubble, the Xenos may use to gain an advantage. There may be situations where your Brother Sergeant will decide to keep cover intact, but these will occur on rare occasions only.
Depending on the hulk’s original crew, your squad will find different features for it to use and/or to take care of:
- Orc Hulks often contain Orc Fungi as well as old barrels filled with oil and explosives. Your squad will use these to slow down the Xenos waves.
- Eldar Hulks are often filled with tricks and traps. Your squad will be careful of warp tunnels and bubbles left by the elder race which the Xenos will use to encircle your squad. Depending upon the warp feature’s exact locations and your mission objective/s, your battle plan will use these rifts in realspace to your squad’s advantage.
- In Imperial Hulks, your squad may find old but still functional Scorpion turrets, often linked to a console nearby to switch its mode of operation. Be aware that a Scorpion may simply be disabled by entering its space, as it will retreat into the wall for as long as its space is blocked. Old shredders which work by pressure will be used by your squad to slow down and break the Xenos waves.
Stride purposefully forward and choose your steps wisely!
- While moving towards fulfilling the mission objective/s, your squad will not waste time. As the elite warriors of the Emperor, you will know exactly when and where to tread. Even a single misstep may be your doom against the Xenos. Always think one step ahead when moving to or abandoning position.
Always stay together!
- A lone Brother Marine is no match against even a single Xenos. It is therefore critical that your squad members will cover each other whenever necessary! Your Brother Sergeant will keep an eye open for possible flank and rear attacks the Xenos may try and will always strife to order your squad members to positions which enable you to cover all incoming routes with as few Brother Marines as possible.
Defensive Positions
Brother Marines!
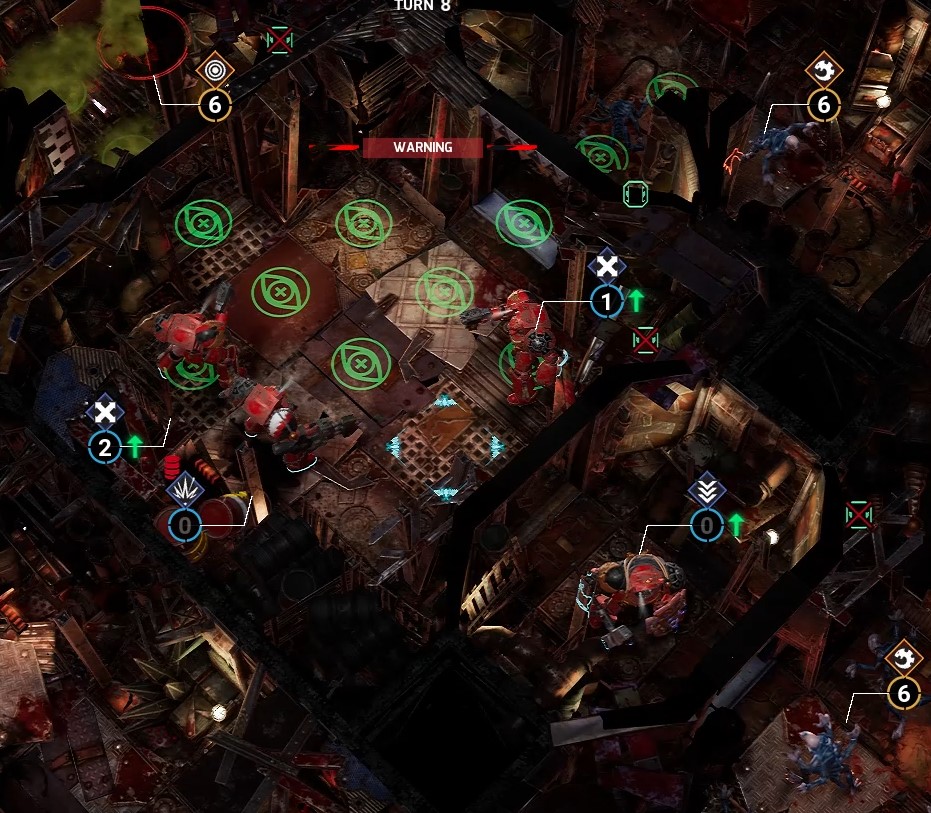
Whenever your squad takes a defensive position, no matter how long it may last, your Brother Sergeant will order the squad members to position themselves in such a way that there is no gap the Xenos may be able to exploit. This is of course not always possible, but trust your Brother Sergeant to find the best position.
Look at an overview constructed by our computers from data from the aforementioned “Khitor” mission:

As you can see, all three incoming routes the Xenos may take are covered by our Brothers supporting each other.
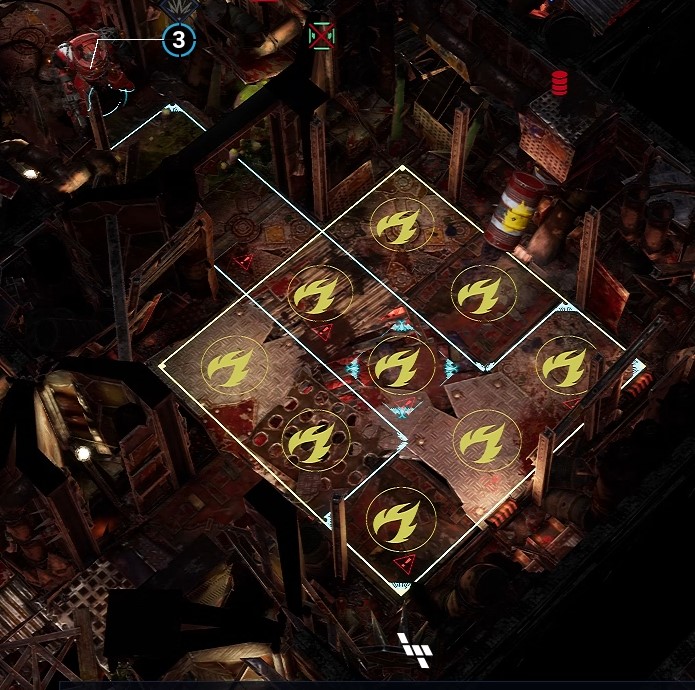
Here’s another example:

The Brother Marine here is going to block an incoming route. Unwisely, he targets the whole room to be burned, thereby allowing any daring Xenos to try to cross the room by keeping to the wall in the southwest corner of the room. If he’s unlucky, he will be dead soon and with him probably his squad members which relied on him to cover their back.
The Brother Flamer Marine should better burn only the western part of the room including the corridor leading to his position. In this way, incoming Xenos from the south must not only cross the burning parts of the room but also the burning parts of the corridor.
Afterword
Brother Lieutenant!
As time is of the matter, I included only the most helpful datafiles I found in such a short time. There are of course more files concerning Terminator tactics in the database, but some are old and difficult to translate.
I appended one curious file I accidently found in some long forgotten archive. I’m not really sure what the author talks about, but the data is clearly labeled “Space Hulk” and “Tactics”. Be careful when perusing it lest it contains traces of Chaos.
Let me know if your Brother Marines need more instructional data. Several labels which are indicated by the directory read “Tactical Retreats”, “Hunting Genestealers” or “Deploying Weapons” among others. Send me a note what you need and I will have a look what I can find.
Death to the Xenos!
For the Emperor!
Appendix – RNG : Understanding the Numbers
Oftentimes, people are lamenting when they are playing games which use chance as an important part of the mechanics. They say they always got bad luck, the Random Nethack God…. erm, Random Number Generator is faulty, God hates us all, or whatever.
In truth, the only thing happening in those instances is people having wrong expectations when dealing with (computer-generated or not) probability – that’s at least what I observed over the years (yes, also on myself).
To not getting frustrated by unlucky die rolls, here are some hints. Maybe even some helpful ones.
Understand the Random Number Generator.
A little secret some of you may already know: computer-generated random numbers are not random! They seem to be random, but in truth they are created by a quite un-random algorithm which uses a given number as a starting point for the numerical sequence.
The meaning of this for the game? When you save, do something, load and do the same something again, in both cases the same numbers come up. The real meaning of this for your game? Just accept the numbers as the random-seeming numbers they are and enjoy the game instead of hating some algorithm. 🙂
Have a clear idea what the numbers mean.
So, after having accepted the not-so-quite random numbers as random for the sake of enjoyment, what exactly does it mean that you hit a Genestealer with a Storm Bolter when you score at least one “6” on any one of two dice? It means that on average you will hit in 11 out of 36 cases. Here’s a visual help for this, showing “Result Die 1” – “Result Die 2”, striking results which miss the target:
| 6-1 | |||||
| 3-4 | |||||
This is shown in-game this way:

So, on average, your Brother Marine will make roughly one kill for every three rounds he fires. (Assuming that he does not get any boni, i.e. he’s striding boldly forward, shooting at the enemy!)
It’s just statistics!
Now, this of course does not mean that you can be assured that the Stealer is dead after three shots. It may be that your Brother Marine needs four, five, six or even more shots. It may also be that he scores three hits with three rounds. Remember, “one dead Stealer for each three rounds fired” is just a statistical average.
Coming back to your mental health: Whenever the dice roll badly for you, calm down, take a <insert favourite drink/food>, and adjust your plan to the situation.
These things happen! Really! Maybe try an example to get a feeling for this. Take two real six-sided dice, roll them and note down if the Stealer is dead or not. Then do it again. And again. And again. Do it as often as you like, the more the better. Then calculate: (number of dead Stealers) divided by (number of shots). The more results you have, the more the kill-ratio will resemble 0.3055555…(in-game shown rounded up as 31%). And have a look for long sequences hitting several times in a row or hitting a long time nothing, going against statistical expectations. You will find them. If not, take more rolls and note them down. Another advice: always appreciate it when luck is on your side and your Marines live where they statistically should have been dead. Focusing on these moments instead of those going badly helps staying relaxed.
How to incorporate this in your tactical decisions?
Some easy-to-use methods: More of the same makes the statistics more reliable.
- Three Brother Marines overwatching the same space and firing at the same time at a running Stealer should kill it… on average. If it’s not 100% certain, think about what you’ll do if you fail.
- Even if the chance to kill is 99%, be prepared for the failure. If you really need to make the kill, make sure that its chance is 100%. Never count on luck being on your side, if you can avoid it. Especially not in critical situations. This of course is true for other situations involving chance as well: The Assault Cannon will explode. It’s just a matter of time. Plan to use at least as many attempts as you need to achieve a statistical average.
- If you’ll try to kill a Stealer while moving, you should be able to fire at least three times. Even then, success is not guaranteed.
