All Bosses Strategies and Tips
First Boss: Lu Wu
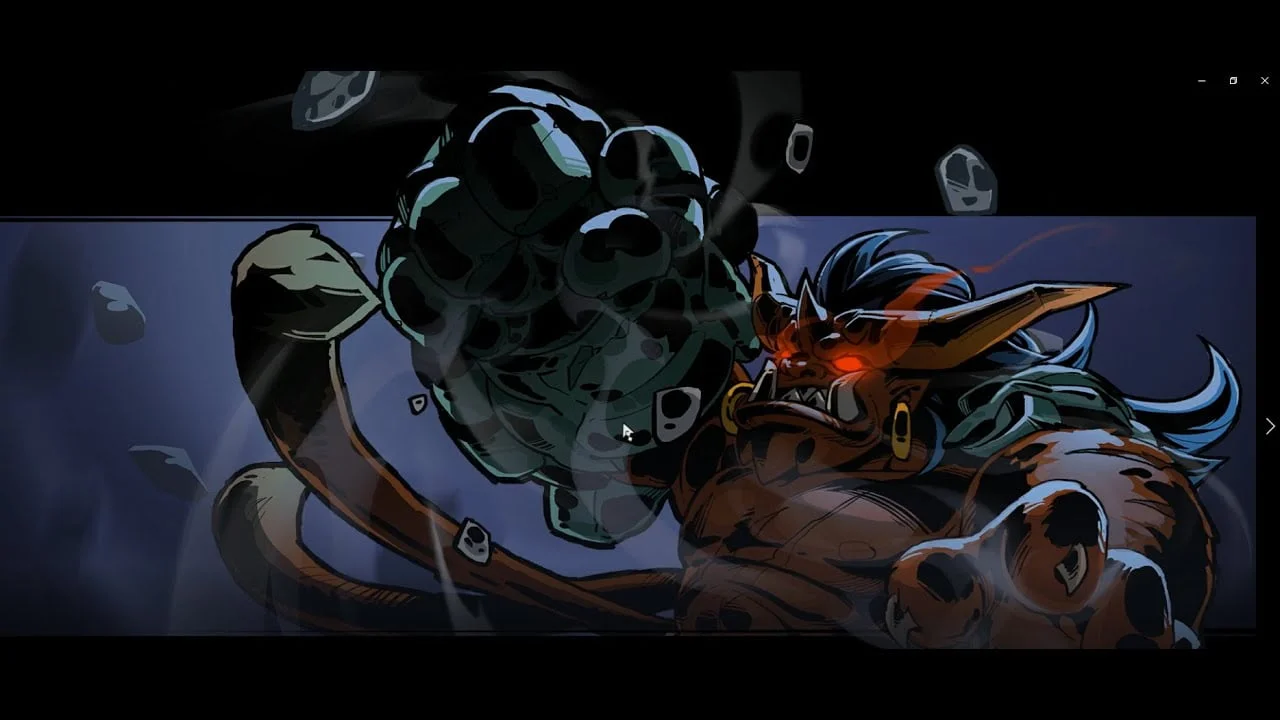
Lu Wu is the first boss you’ll encounter and is, in essence, more of a tutorial boss that shouldn’t give you too much trouble even with no talent upgrades unlocked.
Lu Wu’s Arena is made up of a giant square room with 2 pillars near the entrance, each with an exploding barrel, with an outside area straight ahead where the boss jumps down from and will occasionally go back to to regen his shields.
Lu Wu starts of by jumping down into the arena with the player and will then proceed to do a few different attacks ;
- Laser Shot
The boss will very briefly power up his fist to shoot a laser towards the player ( indicated by a glow around his fist ). Very easy to avoid by dodging, can also be avoided by jumping while moving to the side ( although abit inconsistent ). Damage = LOW
- Boulder Throw
The boss will pick up a giant boulder and throw it at the player. A white circle will appear below the player for a brief moment before the boss throws the boulder to that specific location. The trick to avoiding this attack is all about timing your dodge. Too early and you’ll get clipped, just barely, at the outside of the damage AoE. Too late and you’ll take the attack straight to the face. You have to wait to dodge just a split second after the circle shows up underneath you. Once you master the timing it’ll rarely hit you again ! Damage = MEDIUM
- Leap Attack
The boss will prepare himself to leap towards the player and smash the ground when landing. I’ll have to edit the tell for the this attack since I can’t remember how to recognize it, but as far as avoiding is concerned as soon as the boss jumps in the air you just dodge. I’ve never been hit by this attack on purpose yet ( I let myself get hit to test the damage done ) since you’ve got plenty of time to react so it shouldn’t be too much of a concern. Damage = MEDIUM.
- Triple Laser Shot
The boss does the EXACT same thing as the first Laser shot attack, except this time he shoots 3 lasers one after the other. He only does this if he’s low enough HP ( Around 30% I’d say ). Completely avoiding this attack IS possible, but very unlikely. Each shot does so little damage however that even if you get hit by all 3 lasers ( which you shouldn’t ) you’d still live with a comfortable amount of HP left. The way I avoid all 3 shots is dodging the first laser and keep jump strafing the other 2 shots.
Lu Wu will occasionally jump back up to his outside spot where he originally came down from at the beginning of the fight to regen his shields and send a wave of minions out from both the left and right side of the outside hole he jumped through. The minions can be either beatles, kamikaze bombers ( the guys carrying the exploding cubes ) or a mix of both, NEVER anything else.
WEAKNESS: Electric to strip his shield, Fire to drain his health.
WEAKSPOT: His head.
Second Boss: Ichthyosaurus Offspring

Ichthyosaurus Offspring ( I’ll call him saurus as a reference to make things easier on me ) is the second boss you’ll encounter, and this is where the game makes a real big jump in difficulty compared to the first boss.
The arena is made up of a big circle-ish sand area, completely open with no cover at all !
Attacks ;
Phase 1
- Laser Beam
The boss will always start the fight using this attack. He’ll come out the sand with his head sticking out and tilt his head towards the left or right and start firing a laser beam in the direction of the player. Avoiding this attack can be real tricky BUT there’s 2 ways to do it. 1st way is to stand still until the boss tilts his head, then circling the other direction dodging when nescessary for the little boost in distance the dodge gives you. 2nd way is to keep circling the boss in a specific direction, if the boss tilts his head the other way – GOOD ! If not and he tilts his head towards you then quickly dodge through the laser attack as soon as it starts to take as little damage as possible.
- Slam Attack
The boss will melee slam the player and will only do this if you come too close to the boss. Avoiding this attack is just a matter of staying away a comfortable amount from the boss.
When you get his armor down to about 50% the boss will submerge into the sand and 2 minions will spawn in the arena that you have to kill for the boss to reappear. These can be either fire lizards or hyenas. I’ve never had the minions be a mix and I’ve always had the hyenas spawn first, then the lizards ( sometimes skipping the lizards entirely with enough damage done to the boss ). After the minions are killed the boss wil emerge from the sand again and phase 2 starts.
Phase 2
The boss will be emerged from the sand, this time with only his tail visible. A few new attacks will be added to his roster ;
- Poison Bombs
The boss will lob a series of poison bombs into the air that will explode into a poison AoE field when they hit the ground. Both the explosion and the damage AoE field can hurt the player. The trick to avoiding this attack is having either a good AoE weapon OR a rapid fire weapon and shooting the orbs before they have a chance to hit the ground. If some orbs got through and hit the ground you’ll have to be wary of your positioning, however the AoE damage fields will disappear after a short while ( +- 10 seconds ).
- Tail Shockwave
The boss will whip this tail onto the ground creating a shockwave of sand going towards the player. This attack can easily be avoided by jumping over it. When enough damage has been done ( 30-40% HP remaining ) he’ll do 3 shockwaves one after the other instead of 1. Jumping over each one does the trick. IF you get caught by the first shockwave however it’s incredibly difficult to recover and you’ll most likely end up eating all 3 shockwaves which can easily put you in a dangerous low HP situation.
WEAKNESS: Corrosion to strip the armor, Fire to drain the health.
WEAKSPOT: Head in phase 1 ( although the hitbox seems incredibly wonky and shooting towards the throat seems more consistent ). Tail in phase 2.
NOTE: I’ve had the boss swap from phase 2 to phase 1 ONCE in my multiple runs which seemed more of a bug rather than an intended game mechanic, just be aware that this CAN happen.
The most dangerous attack this boss can do has got to be the laser beam. The hitbox for the laser and his weakspot are so wonky that I’ve gotten killed by his laser multiple times while I was on the complete opposite side of the laser !
Third Boss: Yoruhime-Maru

Yoruhime-Maru is the third and currently final boss and feels like an epic raid boss from an MMO game ! An absolute blast of a boss to finish a run with.
The arena is made up of an old boat dock with 3 giant guns mounted near the entrance.
Phase 1
a) The point of phase 1 is to destroy all the cannons of the ship while they’re constantly shooting ghost skull type bullets at you. When a cannon is destroyed it’ll fire of 1 last volley of ghost skulls.
b) Once you’ve destroyed about half the cannons a big water shield will cover the ship making it immune to damage. During this time the ship will stop firing ghost skulls at you but instead will fire a straight horizontal line of exploding cannonball volley every 5 ish seconds or so. A big enemy with a rapid fire water gun ( the same type you’ve encountered during the normal stages of world 3 ) will spawn and killing it drops a cannonball that you have to pick up using your interraction key ( default F ) and put inside the middle turret back at the entrance of the arena to destroy the water shield. The key to not getting killed here is to keep moving up and down, towards and away from the ship, to avoid getting caught in the volley it shoots. Eating a volley can be lethal ! Once you’ve broken the shield it’s rinse and repeat the same thing from section a).
c) Do the same thing as in section a) killing the cannons, but this time there will be poison orbs floating around the arena that will emit a poison field. You can either ignore or kill them. Ignoring them makes it harder to get the next cannonball so I’d advice clearing one side before you destroy the final cannon.
d) Once all cannons are destroyed you’ll repeat the same thing from section b) but with an added minion to kill besides the big guy who drops another cannonball. The poison orbs will stop spawning during this section so it’s advice to clear them all out while you can. Once you’ve fired off the 2nd cannonball a cutscene will play and phase 2 starts.
Phase 2
a) The boss will now be inside a giant head that repeatedly shoots fire balls at you. Keep shooting the head while either avoiding the cannonballs, or better yet, shooting them out of the air like the 2nd boss’ poison balls. Knowing you can shoot down the fire balls makes this part of the fight insanely easy. Once enough damage has been done a third and final water shield will appear.
b) Do the exact same thing like in section b) from phase 1, but this time more minions will spawn AND the straight line volley the boss shot during that phase will now change into a random pattern, making it alot harder to avoid. Just keep an eye out on the ground for the circles and dodge out of them ASAP !
c) Once you’ve fire off the final cannonball it’s a straight shot to victory. Keep firing at the head and clearing out the fire balls he shoots and you should be good to go !