Economic Loadouts (Patch Notes 1.1.3)
The Guns
Primary
- Springfield 1866
- Romero 77
- Vetterli 71 Karabiner
- Sparks LRR
Sidearms
- Caldwell Pax
- Bornheim No. 3
Why these weapons?

This gun was just added to the game in Patch 1.1.3 and it has been an amazing addition. You can use this gun at Bloodline Rank 1 and it is basically a “mini Sparks”. It is very cost effective at $38. It does 132 damage so you can kill a player in the body with two hits. It can head shot kill up to 150m.
Where this gun shines is in the reload speed at 2 seconds. While it needs to reload after every shot, it reloads very quickly. The quick reload speed also allows you to be mobile during fights, making it a strong option for the run and gun player. The gun takes medium ammo, so it pairs nicely with the Caldwell Pax as the sidearm.

The Romero 77 is the second strongest shotgun in the game (after the Crown & King Auto-5). It is so strong that I suspect I will have to edit this guide someday after a nerf. It does 200 damage with a range of 15m. This is a sniper rifle in shotgun terms. If you hit a player in the body, you will kill them in one shot. The handling is 92% so it is a very steady weapon. You get this weapon at Bloodline Rank 1 and it will cost you $34.

This weapon almost did not make my list, but I decided I needed a comparable option to the Springfield 1866 for players who want more than one bullet in the chamber. You can unlock the gun at Bloodline Rank 6, so it is a good early prestige option, however it is more expensive at $105. You should take the Vetterli (more often referred to as “Kar”) ONLY if you have an issue with reloading after every shot, otherwise the Springfield is the better option every time. The Kar handles a little smoother (87%) than the Springfield (80%). In my honest opinion, I don’t notice the difference.
Here is why the Springfield is better in almost every way.
- Cost ($38 Spring vs. $105 Kar)
- Damage (132 Spring vs. 130 Kar)
- Head Shot Range (150m Spring vs. 95m Kar)
- Reload Speed (2s Spring vs. 12s Kar) *This is a full reload when the weapons are empty.
- Muzzle Velocity (490m/s Spring vs. 410m/s Kar).

This is the most expensive gun on my list at $130. It is also the only long ammo weapon I have chosen. Like the Springfield 1866 the gun has to reload after every shot. It hits significantly harder than any other guns on this list and it has a very clean iron sight. It does 149 damage and has a head shot kill range of 250m.
Out of the long ammo rifles, the Sparks was the cheapest option until the Martini-Henry IC1 was introduced in Patch 1.1.3. The Martini costs $122 ($8 cheaper) but does not hit as hard (143 damage vs. Sparks’ 149 damage) and has a lower muzzle velocity (400m/s vs. Sparks 533m/s).
To me the Sparks performs better due to these factors and that is why I prefer it. Long ammo also penetrates more surfaces than other ammo types, so if you can pay to use a Sparks, you should use it more often than other guns on this list. It also unlocks at Bloodline Rank 26 and so it is a great early prestige gun as well.

In my opinion the Pax is the second best handgun in the game after the Caldwell Conversion Uppercut. The Pax costs $100, but you get a lot of bang for your buck with this gun. It also unlocks early at Bloodline Rank 10.
It does 110 damage, with a head shot kill range of 74m. If you have fanning with this weapon you will kill pretty quickly up close as it hits hard and handles well. It shares ammo with the Springfield and the Kar making it a good partner to those weapons (more ammo in your loadout).

The “mini Dolch” is a great sidearm. It only does 65 damage per shot, but with such a fast rate of fire you can kill someone in 3 bullets quickly. The rate of fire is where this gun shines. It maxes out at 210rpm, making it one of the fastest shooting guns in the game.
The 210rpm makes this gun great for up close fights against shotguns or players who may have fanning. It also makes it a great follow up weapon because you can squeeze off a bullet so fast. Example: Tag a player with the Sparks (149 damage) and quick swap to the Bornheim to finish them off with a very fast shot.
The Bornheim has a great iron sight as well. The drawback to this gun is you will run out of ammo fast if you are too “spammy” with it, and it does not penetrate as many surfaces as other weapons. If there is a bullet in the chamber when you reload, you will lose it without Bullet Grubber.
The Guidelines
My loadouts have a few guidelines they follow. You are welcome to step outside the box and tailor them to your needs.
- One “large” slot weapon (primary), and one “small” slot weapon (sidearm). I am not doing Quartermaster loadouts in this guide.
- These loadouts all include a knife instead of dusters. If you prefer dusters, subtract $5 from these loadouts as dusters cost $15 and a knife costs $20. I decided on knife because you get it at Bloodline Rank 1 and I personally find it more effective against AI and players.
- All loadouts have a First Aid Kit.
- The other two tools will be up to you. I did not want to start a “tool debate” in the comments, so I decided to leave these blank for that reason. You will have to do the math on those next two slots if you add more tools. (I am not going to add tool prices to this guide.)
- I always take two vitality shots, so I have included two WEAK vitality shots. I decided to do weak shots because we are going for cost effectiveness. If you want to take a different number of vit shots will l provide you with cost numbers below so you can do your own calculations. I suggest taking two, but I know many players who only take one. (Taking zero is not smart in my opinion.)
- All loadouts include a small dynamite and a fire bomb. These are cheap and effective throwable options.
- As I said before, I am not going to discuss weapon variants in this guide.
- These loadouts all will cost less than $400 Hunt Dollars.
- Loadouts will be organised from cheapest to most expensive. Remember that costs are variable depending on what tools/consumables you decide to use.
The Loadouts
**These loadouts are organized from cheapest to most expensive.**
Loadouts include:
- Primary weapon.
- Sidearm.
- Knife for melee. (This is personal preference. Dusters cost $15 and a knife is $20. If you prefer dusters, subtract $5 from the final loadout cost.)
- First Aid Kit and TWO weak vitality shots for healing. (We are assuming players using this guide are too poor to afford the regular vit shots or have not unlocked them yet.)
- A small dynamite as an offensive throwable.
- A fire bomb for killing out downed players or zoning.
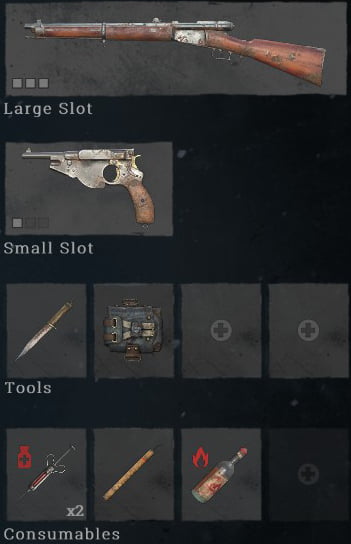
Romero 77 / Bornheim No. 3
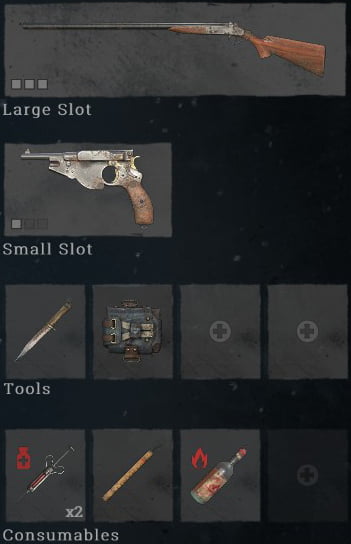
Cost breakdown:
- Romero 77 – $34
- Borinheim No. 3 – $80
- Knife – $20
- First Aid Kit – $30
- Weak Vitality Shot x2 – $10×2 = $20
- Fire Bomb – $18
- Dynamite – $18
TOTAL COST = $220
Pros:
You will be extremely effective from close range and if you miss with your Romero, you can spam players down with the Bornheim. This loadout is great for a slower and sneakier style of play.
Cons:
You will not have the range to compete with rifles and this loadout is not a good one for run and gun players. You need to monitor the Bornheim’s ammo more carefully than other weapons as it runs out quickly. The Bornheim also requires Bullet Grubber if you don’t want to lose a bullet in your chamber upon reload.
Springfield 1866 / Bornheim No. 3

Cost breakdown:
- Springfield 1866 – $38
- Bornheim No. 3 – $80
- Knife – $20
- First Aid Kit – $30
- Weak Vitality Shot x2 – $10×2 = $20
- Fire Bomb – $18
- Dynamite – $18
TOTAL COST = $224
Pros:
A great balance for range fights with the Springfield and up close combat with the spammy Bornheim. Good two tap potential using the Bornheim’s quick rate of fire after a successful Springfield hit. Also a good loadout for the quick moving players.
Cons:
You will need to monitor ammo more carefully. The Bornheim can empty fast if you’re not paying attention. The Bornheim also requires Bullet Grubber if you don’t want to lose a bullet in your chamber upon reload. The two guns use different ammo types.
Romero 77 / Caldwell Pax
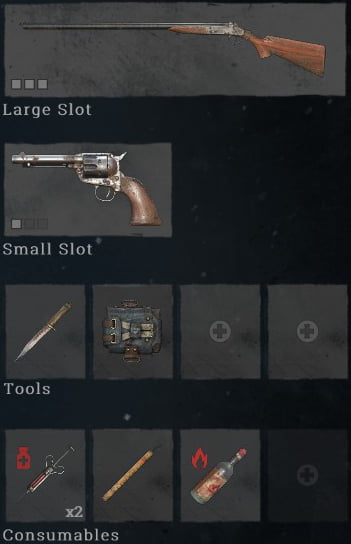
Cost breakdown:
- Romero 77 – $34
- Caldwell Pax – $100
- Knife – $20
- First Aid Kit – $30
- Weak Vitality Shot x2 – $10×2 = $20
- Fire Bomb – $18
- Dynamite – $18
TOTAL COST = $240
Pros:
Decently balanced loadout for medium range and up close fighting. The Pax is a powerful handgun that can net you kills at a medium distance. If you have fanning, the Pax is a great option if you miss with your Romero shot.
Cons:
The Pax is a slower shot and you will have to take your time to aim your ranged shots with it. This loadout will get outclassed by rifles in a fire fight so don’t fight at long range. Don’t start fights you can’t finish quickly with this loadout (like a long ranged fight or starting a fight with pot shots.)
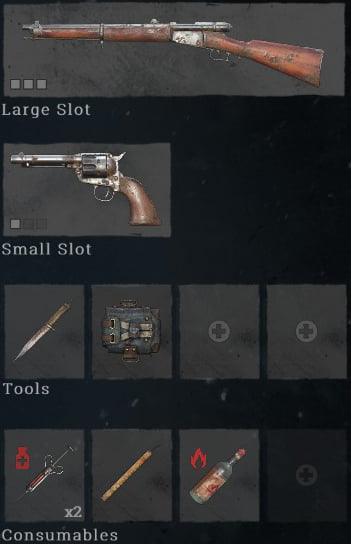
Springfield 1866 / Caldwell Pax
Cost breakdown:
- Springfield 1866 – $38
- Caldwell Pax – $100
- Knife – $20
- First Aid Kit – $30
- Weak Vitality Shot x2 – $10×2 = $20
- Fire Bomb – $18
- Dynamite – $18
TOTAL COST = $244
Pros:
Excellent ranged loadout. Great two tap potential hitting with the Springfield first and then a Pax follow up. Very mobile loadout for the run and gun player. Both guns use medium ammo so you will have plenty of ammo for drawn out fights.
Cons:
You will suffer at close range if you get rushed and miss your shots. Keep players at range or take fanning with this loadout to help mitigate the up close issue.
Vetterli 71 Karabiner / Bornheim No. 3
Cost breakdown:
- Vetterli 71 Karabiner – $105
- Bornheim No. 3 – $80
- Knife – $20
- First Aid Kit – $30
- Weak Vitality Shot x2 – $10×2 = $20
- Fire Bomb – $18
- Dynamite – $18
TOTAL COST = $291
Pros:
A decently balanced loadout with the Kar for medium range fights and the spammy Bornheim for up close fights. Great two tap potential hitting with the Kar first and then a Bornheim follow up.
Cons:
You will need to monitor ammo more carefully. The two guns use different ammo types. You will be outclassed in fights greater than 95m. Trying to close the gap will help against long ammo weapons. The Bornheim can empty fast if you’re not paying attention. The Bornheim also requires Bullet Grubber if you don’t want to lose a bullet in your chamber upon reload. The Kar takes 12s to reload if it is fully empty.
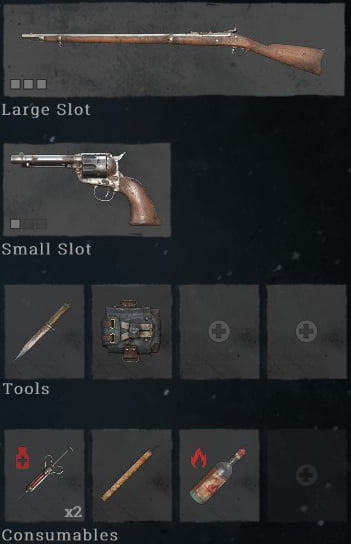
Vetterli 71 Karabiner / Caldwell Pax
Cost breakdown:
- Vetterli 71 Karabiner – $105
- Caldwell Pax – $100
- Knife – $20
- First Aid Kit – $30
- Weak Vitality Shot x2 – $10×2 = $20
- Fire Bomb – $18
- Dynamite – $18
TOTAL COST = $311
Pros:
A solid medium range loadout. Great two tap potential hitting with the Kar first and then a Pax follow up. Both guns use medium ammo so you will have plenty of ammo for drawn out fights.
Cons:
You will suffer at close range if you miss your shots. You will be outclassed in fights greater than 95m. Taking fanning with this loadout can help mitigate the up close issue. Trying to close the gap will help against long ammo weapons. The Kar takes 12s to reload if it is fully empty.
Sparks LRR / Bornheim No. 3
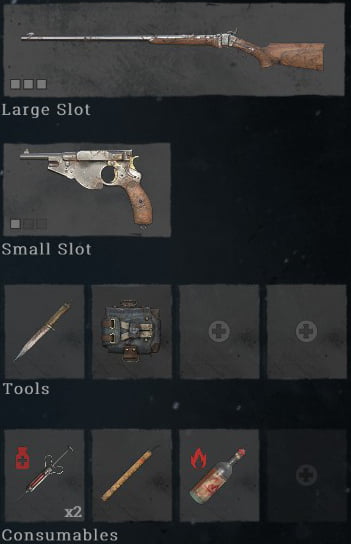
Cost breakdown:
- Sparks LRR – $130
- Bornheim No. 3 – $80
- Knife – $20
- First Aid Kit – $30
- Weak Vitality Shot x2 – $10×2 = $20
- Fire Bomb – $18
- Dynamite – $18
TOTAL COST = $316
Pros:
A great balance of range with the Sparks and up close with the spammy Bornheim. Good two tap potential following up a Sparks hit with the Bornheim’s quick rate of fire. Long ammo penetrates most surfaces.
Cons:
You will need to monitor ammo more carefully. The two guns use different ammo types. The Bornheim can empty fast if you’re not paying attention. The Bornheim also requires Bullet Grubber if you don’t want to lose a bullet in your chamber upon reload.
Sparks LRR / Caldwell Pax
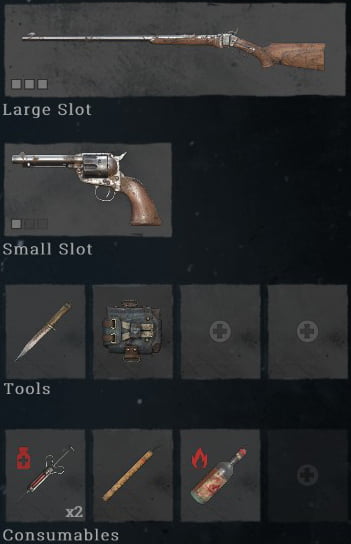
Cost breakdown:
- Sparks LRR – $130
- Caldwell Pax – $100
- Knife – $20
- First Aid Kit – $30
- Weak Vitality Shot x2 – $10×2 = $20
- Fire Bomb – $18
- Dynamite – $18
TOTAL COST = $336
Pros:
Excellent ranged loadout. Good two tap potential following up a Sparks hit with the Pax. The Pax is capable of killing quickly at medium range without the need of the Sparks (if you don’t have time to reload the Sparks, for example). Long ammo penetrates most surfaces.
Cons:
You will suffer at close range if you miss your shots. Taking fanning with this loadout can help mitigate the up close issue. The ammo types of the two weapons are not compatible, so you will need to monitor ammo more carefully.