Mechs Customize
The interface may be a little confusing at first, but it won’t take long to figure out exactly how to get your mech loaded out exactly how you want.
There are three ways to reach the loadout screen:
- Press the Tab key to open the hub, then select the Battlemechs tab
- Use the Battlemechs panel on the bridge
- Use the computer station next to Fahad in the mechs bays
The first way is likely going to be your go-to method of working with your mechs, but all three methods reach the same place. Your first screen will ask you which mech to work with. For this wiki page, all the screenshots will be of the starting Centurion mech that you can use beginning with the third mission of the campaign, Takedown.
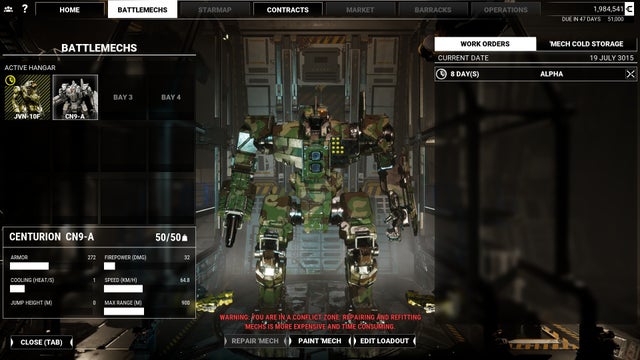
Three buttons will be near the bottom the screen: Repair, Paint, and Edit Loadout. Painting your mech is a free action and will happen instantly. Repairing is a one-click command that creates a work order that, if confirmed, will take time and C-Bills to complete. The third command, to Edit Loadout, also will take time and money scaled to how much of an overhaul you have ordered.
Editing Loadouts
After clicking the Edit Loadout button, you’ll see your mech on the right side of the screen and a panel on the left. The panel on the right doesn’t offer much information beyond just seeing the weapons and visuals of your mech. Unless you absolutely need to see the visuals, it’s best to toggle the “Weapons/Detail” switch at the top center of the screen. This will take you to a modular view of your mech, including all its armor points and body part slots. The screenshot below shows the Centurion stripped of all armor and weapons, which are commands that can be executed with the buttons in the top-right corner.
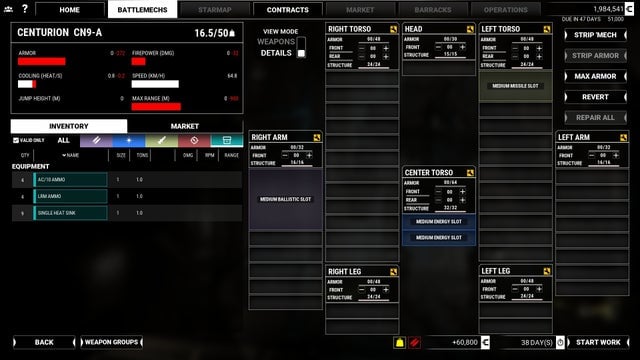
Using the Centurion as an example, weapons cannot simply be mounted anywhere. Each mech’s specific arms, legs, torso, and head can only take specific types and sizes of weapons. This Centurion can take a medium ballistic weapon on its right arm, a medium missile weapon on its left torso, and two medium energy weapons in its center torso. Weapons that are smaller can go in larger slots, but not vice versa.
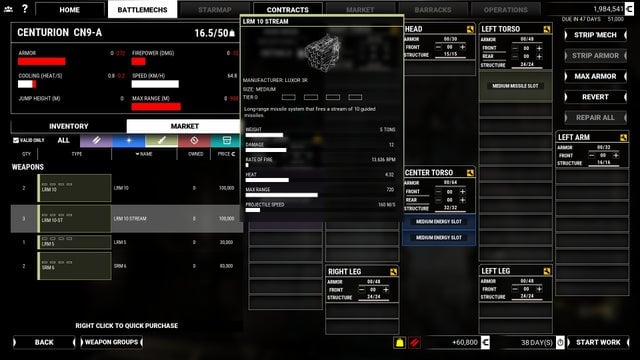
The panel on the left shows the mech’s stats at the top. Below it is a list of all the gear you may have or buy based on the tabs. In the screenshot above, it’s filtered by “Valid Only” (only showing what can be mounted on the current mech), “Equipment” (the light blue tab with an icon of a little box), and stuff currently in the inventory. If you wish to buy new gear, you can switch to the Market tab, then right click a piece of gear. Note that there is no confirmation when you do this; be sure you know what you’re buying so you don’t accidentally mis-click! For the screenshot below, the player is looking at the missile weapons in the market and is mousing over the LRM 10-ST; if the player right-clicks now, they will purchase the weapon, but it will not be immediately mounted.
Once you’re ready to mount weapons and other gear to the mech, be sure you’re in the inventory tab. Then, simply left-click-and-drag items to their appropriate slots. You can right-click items to quickly put weapons where they need to go, but you may want to consider being exact with your placements. For example, when starting the campaign you’ll have 9 Single Heat Sink items. You can place all 9 wherever you wish on the Mech. However, if you place all 9 on a single limb and that limb gets blown off, your mech will suddenly have no heat sinks at all. Therefore, it’s best to spread your heat sinks around to make sure that if any single part of your mech takes critical damage, the rest of the mech should operate as expected.
Also, consider placing ammo cache items on your torso. Especially on harder difficulties, arms tend to be the first things blown off, and there is a chance that enough damage to any given part of the mech will result in an ammo explosion on that part. If you put all your ammo on the arms, it’s highly likely that an ammo explosion will blow the arm off even if it would have otherwise survived.
Note: All ballistic- and missile-type weapons need at least one ammo pod on the mech! A small yellow icon on the Edit Loadout screen will tell you if the mech has an equipped weapon with no equipped ammo.
The final aspect to consider is armor and weight. The maximum weight of the mech is shown at the top of the left panel. For the Centurion, its maximum weight is 50 tons. Each piece of armor raises the weight, but ammo pods will substantially raise the weight as well. Pressing the “Max Armor” button in the top-right corner will add as many armor points as possible with more armor given to the body and arms than the legs. Depending on what you’ve put on the mech to that point, it may not be very much if you put too much ammo or heat sinks on it.
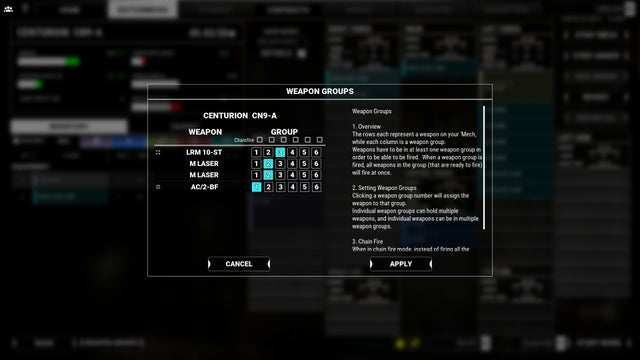
Weapon Groups
The final aspect of your mech you should consider is its weapon groups. After you set your weapons and other modular pieces, you can click the Weapon Groups button in the bottom left corner to set which weapons fire when you press specific buttons. Assuming you have default controls, Weapon Group 1 is left-clicking the mouse, and Weapon Group 2 is right-clicking the mouse. All weapon groups can be activated by pressing their numbers on the keyboard number row, and some weapon groups may fire if you have thumb buttons on your mouse.
Early on, you might get away with putting all your weapons on the same group, which would do a lot of damage in a short amount of time. However, this may also waste ammo or, in the case of laser weapons, quickly overheat your mech. Consider your tactical strategy: do you want to lay down a bunch of bullets and follow up with some missiles? Or do you want to have each weapon fire individually? Maybe for the above Centurion, it wants to tie its ballistic gun to one laser, and its missiles to the other laser.
Note that weapons can be slotted to multiple weapon groups as well. You could have one group dedicated to “fire all weapons,” while another group is just a single weapon. Also note that if you edit only weapon groups, it will be a free action and not take any cost or time.
There is no “wrong” answer to this as long as it works for you and doesn’t overheat the mech or waste ammo so fast that you lose control of the mission. The only way you can find out how well it works for you is to experiment and do some field testing. Remember, you can save any time between missions, and you have infinite save slots to work with. MechWarrior 5 encourages experimentation!