Beginner’s Guide

Breaching: Chimera Squad begins every Mission by setting up Breach points to get the jump on enemies. Preview the Enemy Presence at each Breach Point and modifiers that will be applied, then assign Agents to the available slots to determine the order they’ll enter the fight.
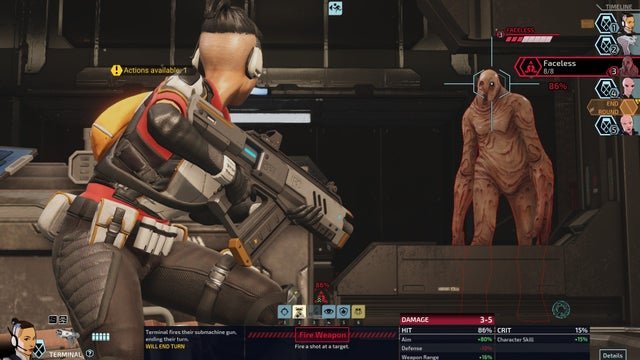
Turns & Moving: Agents and enemies take their turns one at a time. Their current place in the turn order can be seen on the unit flag above their head and next to their portrait in the Timeline, which both update after each turn.
Agents have 2 Action points each turn to use for movement, shooting, or Abilities. Look for a blue shield to move into Cover for defensive bonuses before shooting, or move out to Flank the enemy for a better chance to hit.
Use the Timeline to determine when enemies will take their turn in order to neutralize them or protect teammates. Some advanced Abilities and equipment will allow you to manipulate the order of the Timeline.
Some actions, like shooting, will end the turn regardless of how many Action Points are available.
Agent Abilities: Each Agent has a unique Ability they can use every turn, eventually gaining more abilities from their class and equipment. Most Agents also have the Subdue Ability, a non-lethal attack that is low damage but guaranteed to hit. Use it to earn additional rewards and for certain missions objectives. Cherub, for example, uses the Charged Bash ability instead of Subdue.
Multiple Breach Points & Turn Order: Some encounters offer more than one Breach Point, with different risks and benefits. Consider whether to split the squad or send them all through the same location. Agents entering from the same Breach Point will enter the encounter together and be closer in the Timeline. The order to Breach Points will enter is shown next to their name, and can be changed using the arrows.
Special Breach Points: Some Breach Points can only be accessed with special Equipment or Abilities. Once an Agent with the required asset is in the first slot, other Agents can then be assigned.
Bleeding Out: Agents that lose all their HP will begin Bleeding Out several turns, indicated by the number in the timer. The Mission will fail unless the Agent Bleeding Out is saved with the Stabilize Ability, or the Encounter is completed before the timer expires.
Mission Results: After each mission you’ll be able to see Agent Status for the entire squad, mission stats including rounds to complete, number of encounters, enemies killed, enemies captured, civilians rescued, and civilians casualties. In addition, based on the number of captured enemies, you’ll be given details about how much % chance you have to earn Intel, and how much. Lastly, this screen will also showcase a rating based on your performance.
Team Up: Once per mission an Agent can be moved on the Timeline so that they take the next turn. This ability is shared by the entire squad.
Preparation: Preparation grants a defensive bonus and moves the Agent’s next turn earlier in the Timeline. Use this when an Agent is caught in a dangerous situation or to coordinate tactics.
Android: These versatile soldiers are valuable back-ups to your main squad Agents. On any mission where one of your Agents is evacuated, an Android can take their place for the remaining encounters. Androids accompany the APC but do not automatically engage. Instead, they can take the place of an Agent that is wounded and evacuated. You can assign Androids to breach with the squad in place of the evacuated Agent. Once committed, Androids remain for the rest of the mission. Androids can use any type of weapon and utility item. They can also be upgraded with special parts to improve their core statistics. Android Upgrades are unlocked in the Assembly.

Field Teams: You can now build Field Teams in City 31 districts. Field Teams help control District Unrest and generate resources. Field Teams are your main tool, aside from Missions and Situations, to influence the City Map. Continued investment in them will reward powerful map effects, extra resources, and improve the capabilities of your HQ in general.
There are 3 types of Field Teams: Security, Finance, and Technology. Each is focused on a different resource. You’ll be able to upgrade Field Teams to increase their income value and unlock other effects, or switch to a different type. Field Teams cost Intel and increase in price as you build and upgrade more Field Teams of the same type.
With the Intel price increasing as more of the same Field Team type are built, it is more cost efficient to diversify rather than focus on one type. Free Field Teams can be earned as a reward and can be used to build a new Field Team or upgrade an existing one.
Field Team Abilities: The Vigilance ability is ready immediately, which can lower the Unrest in a targeted District. More unique Field Team Abilities can be unlocked by upgrading and purchasing more Field Teams. Field Team Abilities target a District or City 31 overall, each with a unique and powerful effect. They have no cost but require multiple days to recharge before they can be used again. The requirements to unlock each ability and cooldown time can be found in their descriptions.
Agent Scars: If an Agent was badly hurt in combat they can receive a SCAR. Scars hurt an Agent’s core stats. The effects are permanent until the Agent completes Training to heal them. Agents earn scars, which will lower a core stat, when they start Bleeding Out in combat. They also have a small chance to earn a scar if they are wounded below half HP.
Scars can deepen if an Agent is scarred again, which lowers the stat even more. They can also start deepening if an Agent is left behind on a mission while bleeding out. Every scar also unlocks a Training Program which can be used to remove it, no matter how deep it is.
Scavenger Market: The Scavenger Market is like XCOM Supply, but the items it offers are a lot rarer and more powerful. The market is available for one day at a time, and only after completing a Mission with the Scavenger Market reward.
Unrest Rising: District Unrest is how we tell how bad things are getting on the streets. It makes missions harder as it rises, and when it fills up it starts to add City Anarchy. City Anarchy is the ultimate measure of City 31 stability. If that gets out of control, you will fail the campaign.
A District’s Unrest rises when its targets are ignored. We can’t respond to every target every day, so we must choose our targets carefully. District Unrest falls when we complete Missions in that district. If a District reaches full Unrest, it starts to hurt City Anarchy: when any District is at max Unrest, 1 City Anarchy is added at the start of each day.
Dark Events: On some Investigation missions, the enemy faction will bring especially powerful forces to the battle. These are called Dark Events. You can see what Dark Events will be present on a Mission when you are preparing to respond to it, or in the Investigation screen. Dark Events become more likely the closer you get to taking down the faction, and later investigations will start with more Dark Events already active. You can view all Dark Events the current faction has available in the Investigation area.
Mission Types

- Investigation: These appear purple, whether a Groundwork, Operation, or Takedown, and will advance the game story.
- Side Missions: These appear yellow, they are optional but provide valuable rewards.
- Emergency Missions: These appear red, showing up in districts with Unrest problems.
The current Investigation’s main mission is always on the map, but is sometimes hidden. Hidden missions add Unrest to their district every day they are active. They are gradually revealed over time, but you can accelerate this reveal with lead missions. Lead missions appear unpredictably while a hidden mission is active. Leads are optional but can provide a large boost to the reveal progress. SIDE missions are ideal for gaining resources and helping control Unrest in the districts.
Base of Operations

City 31 Map: The Map is where we see the status of City 31 and any current targets we can send our squad to respond to. Chimera Squad can respond to one Target per day, after which the day automatically advances.
Targets come in two types:
- Missions are tactical targets: The Squad will go into combat on these.
- Situations are strategic targets: The Squad takes care of these without entering combat.
The current Targets change every day, so watch the City carefully for new priorities.
City 31’s districts are:
- Angler’s Point
- Riverside
- Renova Heights
- Switchyard
- Downtown
- Highland Square
- The Fringe
- Old Town
- The Stacks
Tackling Investigations
Every Investigation has three stages:
- Groundwork: From the first Mission, learn about the faction and their methods
- Operations: Hidden missions that must be revealed, then completed to knock out the faction’s main plans
- Takedown: Stop their final attack and end their threat to City 31
Assembly
Assembly projects are how you get access to new or better items and equipment. Each project can unlock new items for XCOM Supply, new weapon or armor upgrades, or a variety of other useful things. Agents assigned here decrease the time it takes to complete a project. You can advance one Assembly project at a time, which takes multiple days to complete and usually cost resources such as Elerium.
The Armory
The Armory is where you manage your Agents:
- Loadout: Manage weapons, armor, and other items Agent Abilities: unlock new Abilities by Promoting Agents that have earned enough XP
- Agent Biography: Learn more about the Agent’s background Tint armor: change colors on your Agent’s uniform
More slots become available in Loadout by completing Assembly projects. Promotions are awarded to Agents based on their performance in combat. New ranks come with increased stats, new abilities, and new training programs — all of which you see and manage here.
Supply
The XCOM Supply is where you buy all your core items and equipment. Items you unlock from Assembly projects become permanently available here, too.
Spec Ops
Spec Ops are solo-Agent duties that help Chimera Squad and City 31 overall. They can improve Unrest, gain resources, or reward temporary advantages on missions. Each Spec Op provides a different reward: some each turn, some only when the Op is complete.
Advanced Spec Ops become available as your Agents rank up. These higher-level Spec Ops require higher-level Agents to undertake. Agents can cancel Spec Ops early to reassign to other duties, but all progress will be lost.
Training Duty
Training is a solo-Agent assignment like Spec ops. Each Agent has their own list of training programs they can do, including healing scars, improving stats, and even adding new abilities. Each agent has their own set of Class Training options they unlock as they rank up. Each can only be completed once to earn stat improvements or new abilities. Getting a scar also gives access to Training to heal that scar. These can be repeated for each time a scar is earned. Agents can cancel Training early to reassign to other duties, but lose all progress.
Lastly, there’s three resources in XCOM: Chimera Squad:
- Credits are spent in Supply to both buy new items and upgrade existing ones.
- Elerium is spent to complete projects in the Assembly.
- Intel is spent to buy or upgrade Field Teams on the City Map, and to buy exotic items in the Scavenger Market.
