Ghostrunner Collectible Guide Day 1
All Levels Collectibles
General Tips
- All items are shown as yellow questionmarks in-game.
- You can view your collected items with t.
- T also opens the upgrade menu, which contains an upgrade that shows collectibles on your minimap as a yellow dot.
- If you already managed to complete a level you can quit it the moment you get the last collectible it will still count.
- The items don’t do anything for gameplay. The audiologs only add a bit of story.
- None of the items can be found in the simulated worlds.
Level 1 an Awakening
This level only contains a single item.
In this spot with the russian writing where you have to duck:
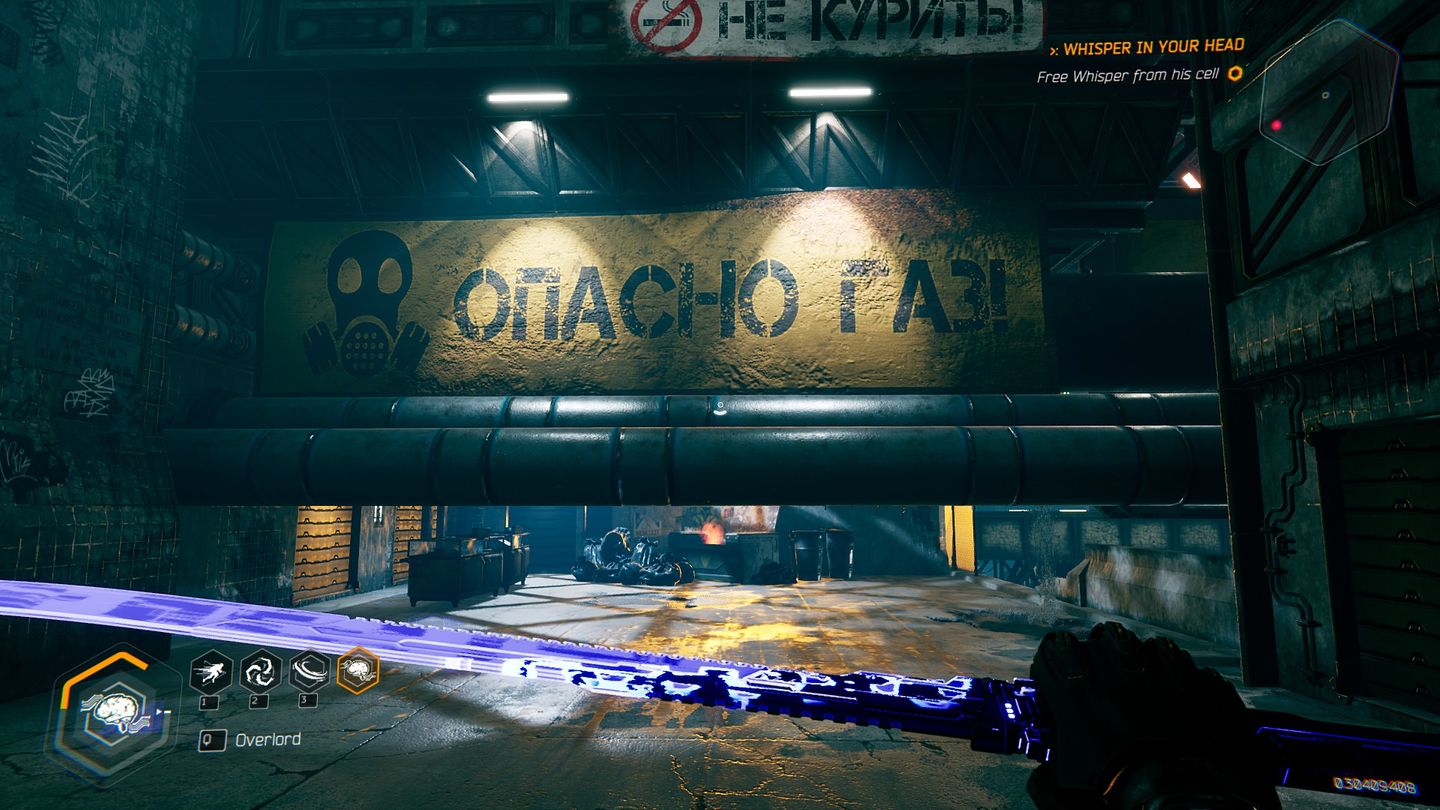
Behind it there is a wall where you wallrun but instead of jumping to the left jump to the right on this pipe:

Level 2 a Look Inside
This level only contains a single item.
In the spot where you have to do this jump:

Just look to the right instead and walk a step or two.
Level 3 The Climb
This level contains four items.
This is the area where you find the first:

Instead of doing that jump you want to turn to the right and run along this wall:

Then land on the pipe and walk to the back.
The second item is behind this huge laserwall:

If you make the jump just drop down in this hole:

The third item can be found after a long downwards parkour section right before you go through this door:

Just turn around 180 degrees jump over the stop sign and you have it.
And well the fourth item is part of the 5% that i don’t have yet, check the comments.
Level 4 Jacked Up
In this level there are 4 items.
The first one is on the platform in the middle here on the very right:

Just jump behind this junk:

The room with the second item has a bunch of enemies in it you need to take care of first.
Minus the enemies it looks like this:

And if you turn to the right it is behind this trashpile:

Ok for the next one i need to make an addition. This game has the fun habit of not showing collectibles anymore once you collected them and i didn’t record it the first time around but if my memory is correct then you want to be in this spot:
Then turn to the left and look behind this:
If this happens to be incorrect the one thing i can tell you is that it is really close to this spot.
The final item now with a guarantee again is also in a room filled with enemies. On initial entering it looks like this:

Then at the very end at the ecit there are platforms going up and up there:
Behind some boxes in the very corner is the last collectible here.
Level 5 Breathe in
This is where the fun begins the level has 9 items (and i even found 8….)
The first is behind the huge fan on the left here:

If you pass it get the timeslowing powerup here:

And run right back.
In that image with the timeslow you can already see the next powerup on the other side of the chasm.
You can’t get there yet first you want to murder everything in slow motion then arrive at this button:

Once pressed you can progress thorugh the level with your grappling hook but on the other side you can also grapple to the collectible now.
The third item is on the left side of the metal bar in the middle here:

Do the grapple wallrun etc towards the right then turn around:

And do it backwards but get on top of the metal bar this time and walk to the back.
The fourth item is at the part with the spinny platform in this tunnel:

Just take the platform past the exit go further and jump into that tunnel.
See the ceiling here:

Well on top of that is the next item and you really just have to use the vent in front of you.
The sixth one is at this spot where you turn the two grappling hooks:
And if you look to the right you see you need to grapple but when going up go to the right on this pipe:

And just walk around to the back
The seventh is a matter of timing. It is here where you spin the crane:

On the other side theres a platform with the item and you gotta jump and grapple towards it the moment you press the button and the crane starts spinning.
You can find the eigth item on the way back at this moment where you get the timeslow:

Instead of advancing look to the right like this:

And all the way back there jump through that vent instead.
You can do it without the upgrade that extends pickups but you might need it.
And well the ninth item is missing still.
Level 6 Road to Amida
This level has five items again.
The first one is here where you fight the new enemy:

And it is below the ramp in the picture, just drop down on the side.
The second item is in a room full of enemies that should look somewhat like this:

And where you see the shield orb originating its near that.
Specifically up there on the boxes:

The third item is in this spot with the 3 laserwalls:

Just walk back a few steps and there is a chasm on the left but you can see the item from there and you can wallrun towards it with the wall on the right side of the chasm.
The fourth item is in this spot where you stop the last wheel:

Just.. Turn around and its right there behind some junk.
Annnnnd the fifth item is missing again. Sorry (kind of)
Level 7 Run-Up
This level has three items.
The first is in the room with the moving blocks of molten metal.
Before you do this wallrun:

Turn around and look to the left and you will see this spot:

Where there is a spot to go instead of a laserwall. Well.. Go there.
The next item is after the section downwards with the death waltzes. Walk through the green door and you will see this corridor:

Walk a few steps forward turn around look up and you will see a grappling spot taking you to the item.
The final item is right before this jump:

Instead of jumping look to the left and down there is a platform on the side you can drop down onto containing the final item.
Level 8 The Gatekeeper
You are in luck there are no items here.
Can you imagine? Haha this level is awful enough without them.
Level 9 Dharma City
This level contains five items.
After some jumps from ropeway to ropeway you reach this spot:

Dont do that wallrun instead turn around and take this ropeway again:

You will see that it turns and it will through you into an alley with the item.
The next one is right before this superjump:

Pick it up but dont use it yet instead turn around and walk towards these umbrellas:

Then superjump up onto the platforms behind them.
After you do the superjump normally and murder 2 goons you can see the next item through a fence.
On the left of the this ropeway:

You can see an opportunity for wallrunning. Do that go round the corner navigate between the obstacles and finally at the other side of the fence lies your reward.
The fourth item is on the right side of this ropeway:

When you get there go into this hole and look right:

The next one is hard to show or write from your normal pespective but see if this helps as orientation:

Well when you are here turn around and you see the item:

Just turn that panel and wallrun
Level 10 Echoes
This level contains six items.
The first is here in that corner down there in the far back:
The second is within the room full of enemies that starts with this ramp:
At the exit door turn around look up and you see this:
Just wallrun along the right.
The next one is at the end of another murder room. Right here youd normally find a big murderbot:
On top of that pipe is your goal. Take the ropeway up and drop down here:
In this same area is also the next goodie. Before you walk through this door:
Turn around and you will see that square hole up there:
On the other side is the goodie.
You will collect the fifth item under sniper fire at this spot with the movable wall:
Follow it to the left look left again and in this corner behind this box you will find it:
The final item is on that little platform visible up there:
You will need to collect a superjump to progress anyway just use it to get up there instead.
Level 11 Faster
This level only has one item and you find it almost instantly.
After you shank 3 weaboos it is on the left side of the train cart right before you go to the side for the first time right here:
Level 12 in Her Own Image
Ok so this ones weird and i genuinely need help with this:
It only has one item and the first time i beat the level i didnt get it but the second time i suddenly had it but i have no idea where from.
Is it from killing the boss? But then why didnt i get it the first time?
Well… To be determined.
Level 13 The Forbidden Zone
This level contains five items.
The first item is directly in the first room with the first turret:
Kill the turret then before exiting look right:
And there it is, just go there.
The second is in this area where you are sandwiched between two walls under fire:
Once you shank the dude look up to the left. On top of this metal railing thingy is the item:
Just walk in a circle gather momentum from walljumping from the other side and get up there.
The third item is in this spot with the many turrets:
After killing all of them right in front of the exit door look to the right walk a few steps and look up and youll see this grappling point:
Thats also where the item is.
The fourth item is in this area where you get literally jumped from both sides:
Take care of that then on the right platform walk towards the front and you see this platform in the distance:
Just look up and youll see a grappling point to. Go up and jump over and theres the item.
I believe the fifth item was in this area too? But its another victim of the fact that items cant be collected twice and i failed to record it the first time around.
Level 14 Reign in Hell
This level has six items.
The first one is at this spot where some creature scurries past you:
After it! Towards the right. You will find a dead end and this lightning ™ port that you need the suriken for.
You will get the shuriken shortly after this moment in the level, instead of using it like you should drag it here.
Again you can do this without the upgrade that extends the time of pickups but you shouldnt.
Anyway once you shoot this a door opens with the item in it.
The second item is in this spot where you try to go up.
Why would you do that go down instead. Beneath your starting platform is a hidden platform with the item.
After you get chased onto a ropeway by creatures you will find this area:
Dont go there turn around and take this ropeway again instead:
And that will get you the third item.
This room contains the fourth item as well.
When you reach this spot:
Just turn to the left and you should see it.
The fifth item is at the end of this ropeway:
However a deathsquad of murdertoddlers wait for you as well. Just rope right back up watch them explode then come down again. Now with calm look to the right and there it is.
The sixth item comes way later in this calm section with a few wallruns:
After that first wallrun look to the right and youll see the item:
Level 15 Things you wouldn’t Believe
This level has five items and also the last items in the game. After this the levels dont contain items and will therefor also not be listed.
The first item is in this spot:
You can already see a ropeway in the image. After you grapple up just take that ropeway.
The second item is in this area:
If you follow that ropeway then turn around you will see there is more level hidden in the back:
Go back there do hardcore parkour and get on top then you will find the item.
The third item is here after some ropeway jumps:
I will actually tell you what it is for once! I dont remember for any of the others but i do remember that this one gives you a really cool rgb sword skin. For gamers.
Anyway, turn around and youll see this:
Jump over there and behind the boxes is the skin.
The fourth item can be reached here right before you drop down:
Instead of dropping down there look and go to the left and look down and youll see a superjump. Drop down to it.
Then once you have it jump up on that tower:
The final item in the game (if you consider the missing ones collected) can be found by first getting on top of this grate in the section with the ropeway and shurikens:
Then using the superjump you can see there to get on the very top of this same tower and then you will be done.