Welcome to our Inscryption Tips and Tricks for Part 1 guide. Some general good advice for getting through Part 1. Contains minor gameplay spoilers for Part 1.
Inscryption Tips and Tricks for Part 1
Tired of getting your Vibe Checked by Leshy? Keep making the same bad plays? Can’t create a good deathcard to save your life? Yeah, same. But, I’ve played this game for long enough to amass some knowledge that those of you coming in may not possess. This guide’s purpose is to lay those things out for public viewing.
Combat Tips
-Health in this game runs on a tug of war system: damaging your opponent will also increase your health, and vice versa. This means that no matter how low your side of the scale is, you can still claw your way back by doing a load of damage. When the scale is balanced (needle at the top pointing straight up) it takes about 5 points of damage to defeat either opponent.
-Always pick Cat at the start. Adder is useful for certain things (see Map section below) but Cat is by far the most versatile card, being an infinitely reusable free sacrifice. Touch of Death is nice, but the Adder card itself is so weak that it’s unlikely to see much use.
-Leshy will, on occasion, just forfeit a fight and extend an olive branch to you. This seems to be random (I’ve had fights where he literally almost killed me only for him to go “aww shucks you got me i give up”), and happens mostly in early runs.
-Always hit up a Lost Pack if you’re low on items. You can only carry three, so plan accordingly.
Useful Items – Inscryption Tips and Tricks for Part 1
Squirrel in a Bottle: ALWAYS have one of these. They literally allow you to draw free squirrel cards during your turn. Unless you’ve managed to make your squirrels OP (see below) then you should always have one handy because they are useful in basically any situation.
Boulder in a Bottle: Not as useful as the squirrel, but still has good strategic use for blocking cards. If nothing else is good, pick this.
Pliers: A crutch item, really. Good in the early game for edging out tough encounters, but ideally you should be planning to do Overkill damage for the extra cards by the later game (more on that later).
Scissors: Lets you instantly destroy any of the opponent’s cards. Very powerful when used wisely.
Hourglass: Lets you force your opponent to skip his turn. Seems rarer than the other items, and for good reason. Keep this pocketed for boss encounters.
Dagger: A tool of the discerning challenger. Must be unlocked by completing the Wolf/Squirrel puzzle (see Puzzles section below). Contrary to popular belief, it does not instantly win the fight for you, but it does come pretty close (worth 4 points of damage, one point away from victory if done when the scale is balanced). However, it DOES involve you cutting out your own eye, which will obscure your vision for the rest of the fight. Thankfully, Leshy will always provide you with a new one at the end of combat. Another item you should keep pocketed for bosses. Using both the Dagger AND the Pliers will actually win the fight if the scale is balanced, which is a good way to cheese hard encounters.
Bone Token Jar: Essentially a piggy bank of bone tokens. Useful if you have a lot of Bone cards, otherwise best ignored.
Black Goat: Honestly kind of overkill unless you use a lot of 3+ blood cards for some reason. Just stick to squirrels….Unless you’re running a lot of Bone cards. Sacrificing the Black Goat at one of the Bone God altars will give you an upgraded version of the Boon that gives you eight bones at the start of combat.
Deathcard Tips
- Deathcard creation is divided into four stages: Cost, Stats, Sigil, and Name.
- ALWAYS PICK LOW COST. There is zero benefit to making your deathcard cost more. A deathcard should not cost more than 2 blood unless you literally have no other options. Similarly, always pick high stats. Any choice of Sigil is valid, but especially useful ones are Touch of Death, Infinite Lives, Bi/Trifurcated Strike and Unkillable.
- If a Pelt card shows up when picking cost, choosing that card will make your deathcard free. This is the first step to making ridiculously OP deathcards.
Map Tips – Inscryption Tips and Tricks for Part 1
-Avoid Totem fights (icon is a skull with branches and a bird head) unless they’re in the way of a map tile you need to visit. They are incredibly difficult and don’t provide any inherent benefit over normal battles.
The Trapper/Trader
The Trapper will sell you pelts in exchange for teeth. Teeth are gained by doing Overkill damage. Example of overkill damage:
Opponent is 2 points from being defeated.
You deal 5 points of damage.
You get 3 teeth (5 – 2).
Essentially, doing more than the damage required to defeat your opponent will give you the difference in Teeth.
Also, doing overkill damage to cards will deal the difference to any cards behind them.
You have 3 types of Pelts in ascending order of value: Hare, Wolf and Golden. You get one free Hare pelt each time you visit the Trapper. Depending on how much teeth you have, you should buy your remaining pelts in descending order of value. (so buy gold pelts first, then wolf, then hare)
Having a good stock of extra teeth will ensure you get a lot of pelts at this stage.
The Trader can usually be found up the road from The Trapper. She will buy your pelts in exchange for new cards. Hare pelts will give you common cards, Wolf pelts will give you better cards enhanced with multiple sigils, and Golden pelts can be exchanged for Rares, which are quite powerful.
IMPORTANT NOTE: Pelts will take up space in your deck and can appear in your hand during combat. They are worthless in a fight, so reaching the Trader should be a high priority if you have a lot of pelts and don’t want them getting in the way every time you draw a card.
Campfires and How to Beat Them
Campfires are quite useful, as they allow you to increase the Power or Health of one of your cards. However, they are initially occupied by human “survivors” who are all ravenously hungry, and who make no effort to hide their desire to scarf down your Stoat with barbecue sauce.
The first couple times, you will automatically pull your card away before the animal can be eaten, but you will eventually be tempted with the offer to keep them there to potentially enhance the stat further, at the risk of losing the card.
However, if you use the Adder card, and it gets eaten, then all of the survivors will die (because, duh, poison). For the rest of that run, all future campfires will be unoccupied, allowing you to upgrade your cards at no risk.
(Thanks to Mimic for that bit of advice, he has a guide somewhere about it)
Puzzle Tips (AKA literally the solutions to each puzzle)
You can get up from the table at any time when the map is unrolled. Despite what Leshy says, you can touch his things all you want and he won’t do about it.
Cabinet Puzzles – Inscryption Tips and Tricks for Part 1
The first ones you’re likely to tackle. After the Stoat tells you about the safe combination, you’ll find a key inside with the Stinkbug card. This key will unlock the cabinet nearby, which contains four puzzles.
Each puzzle is meant to be laid out like a combat scenario. The idea is to line up the tiles (cards) then hit the bell button to start the round. They need to be in the right configuration to deal 5 points of damage in one round. Solutions below:
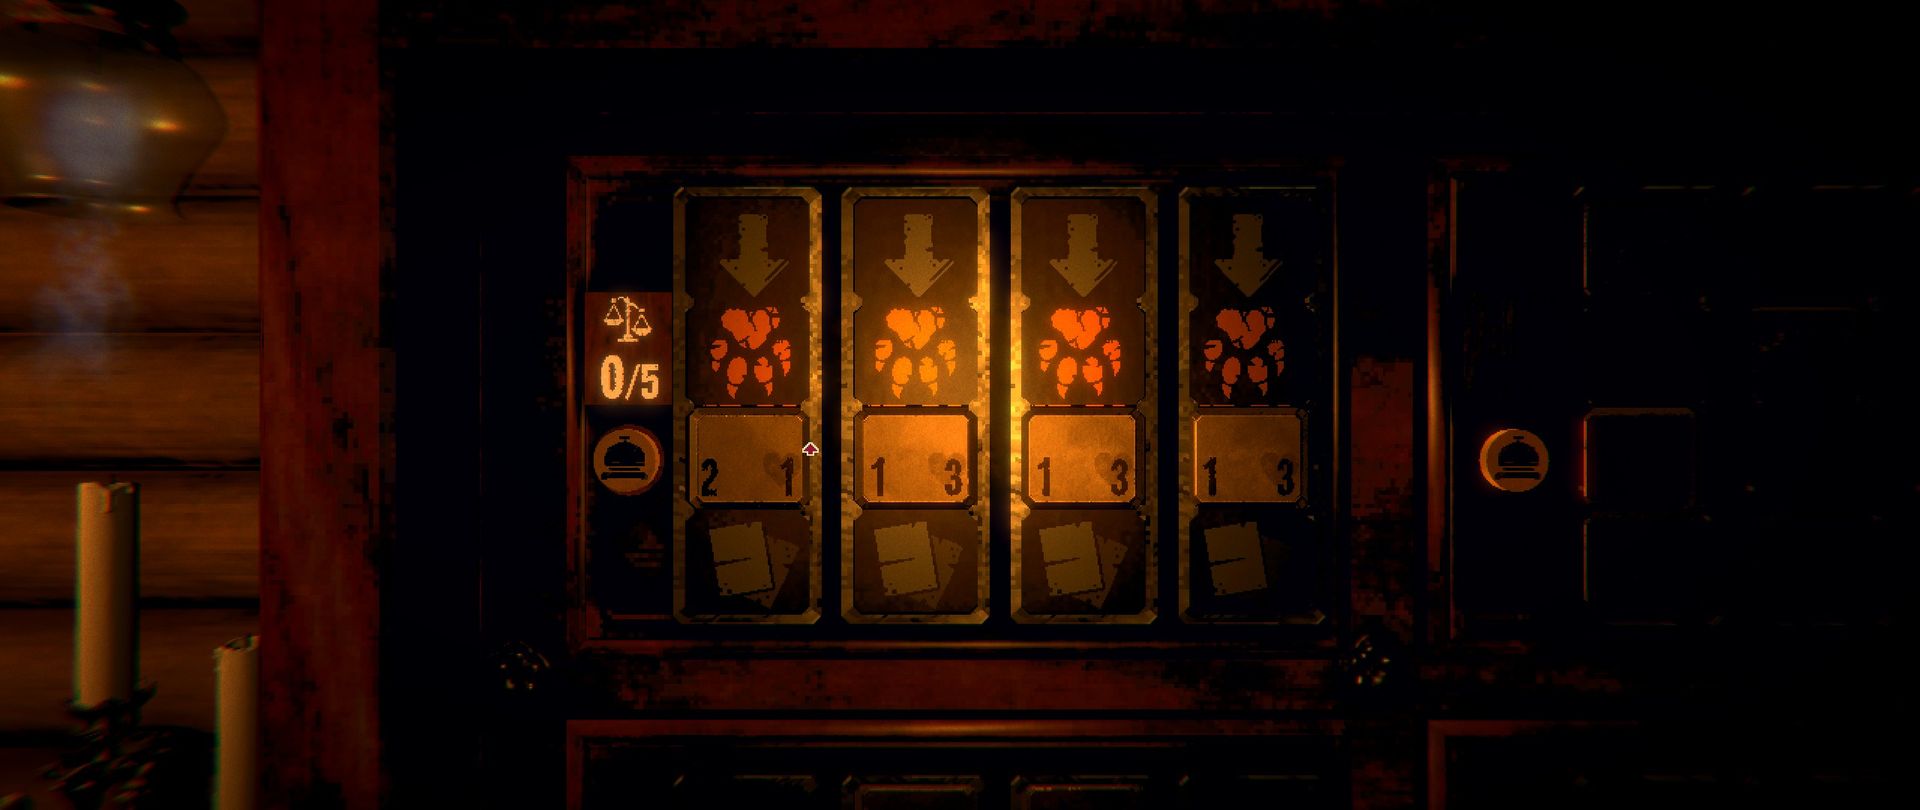


The top two cabinets give you new cards, while the bottom two give you the Caged Wolf card and the Squirrel Totem head. The latter is a very useful woodcarving, which you’ll keep between runs and which allows you to give powerful sigils to your squirrel cards, including ones like Unkillable and Infinite Lives. The Caged Wolf is important for the next puzzle.
Wolf/Squirrel Puzzle
Now that you’ve got the Caged Wolf, you must kill it. This is not as easy as it sounds, both due to its high health and Leshy seemingly not being too keen on actually damaging it (he won’t let you sacrifice it either). Easiest way I’ve found to get the job done is to put it on one of those Bone God shrines.
Either way, when it’s dead, you’ll hear a commotion. Get up from the table to find that the wolf statue has broken out of its own cage. Pick it up and put it next to the Squirrel statue to make it release the Dagger.
Victory! You now have the ability to gouge out your own eye.
Clock Puzzle
The old cuckoo clock seems broken, but it’s still hiding some secrets.
After you’ve stabbed out your eye a few times, you might notice a strange, shiny one in the trunk full of spares Leshy offers you. Putting it in will make your vision go slightly odd, and cause you to see things you cannot normally see. Among those things is a hint written on the trunk as it closes:
FIND SALVATION
IN
CUCKOO CLOCK
From there, get up and go to the clock. You’ll find that it has glowing marks for the hour, minute and second hands. Just fiddle with the dials until it lines up, and the compartment will open, containing the Stunted Wolf card and the film roll required to reach Part 2. Thankfully, you keep both of them through successive runs.
Also if you set the clock to 11:00, you get a ring. No clue where the game hints at that though.
Painting Puzzles
This is the simplest puzzle, and the one which (rather embarrassingly) took me the longest time to figure out.
There’s a painting on the wall by the safe. It shows two cards (one squirrel and one random card). Place those two cards in those exact spots during combat (doesn’t matter what cards are on your opponent’s end, just yours) and the painting will change to show a potted clover. Take the potted clover out of the painting, then sit down with it. You can use it during Card Picking events to reroll the cards you can choose, but only once.
At some point, the painting will show a new card configuration. Replicating this one will allow you to access a third candlestick, giving you 3 lives instead of the usual 2.
After that, the final configuration will appear. Replicate it to gain the ability to turn your Squirrel cards into Bee cards. Bees are useful as they’re squirrels with 1 Power who can fly, but keep in mind that they will not be affected by the Squirrel Totem.
Greater Smoke Puzzle
Next to the wolf statue (caged wolf, not the wolf and squirrel) is a candelabra with three candles. Each run, one of them will be lit. Put the lit candle out and once you’ve snuffed out all three (right, left and center respectively) the Greater Smoke card will appear, which is a more potent version of The Smoke (see Bosses section below).
Boss Tips – Inscryption Tips and Tricks for Part 1
-Bosses are All or Nothing. They have two lives and you need to beat them in one. If you arrive with both lives, Leshy will take one of them and give you a 0/1 card called The Smoke, which will award you with 4 bones when it dies (assuming you unlocked Bone Tokens at that point, otherwise it’s useless).
-On their second life, they’ll often throw out some kind of surprise to shake up the fight. Be prepared.
-If you beat the boss’ first life, and the game glitches and spawns a load of super-powered Grizzly Bears on their side, this is a sign that you’re too good at the game and need to slow down and progress the story (see Puzzles section above). Be sure you have the Stinkbug before you fight the Angler and the Film Roll before you fight the Trapper. Prospector will never do this. You can still win in this state if you use the Dagger+Pliers right from the start of the round, however.
The Prospector
An old sourdough who’s absolutely mad for Gold.
First phase: Stoat’s advice is golden here. Kill the mule. It has 0 attack and will dispense a load of cards into your hand when it dies. LEAVE EMPTY SPACE ON YOUR SIDE BEFORE PHASE 2!
Second phase: The Prospector will hit all of your active cards with his pickaxe, turning them into Gold Nuggets. If you didn’t leave empty space before starting the phase, you’ll be stuck unable to play more cards until his Bloodhound or the other enemies destroy the obstructions. Leave empty space before phase 2. This is advice I often neglect to follow myself, and it always screws me over.
The Angler
A dull fisherman on the hunt for a fresh catch. Defeating him unlocks his hook, which you are given at the beginning of all future runs and can use only once to steal one of your opponent’s cards.
First phase: Will attempt to steal one of your cards every so often. Always picks the “freshest” card (ie, the one played last). Just throw a Squirrel or other useless card down to protect your valuable cards.
Second phase: Throws Bait Buckets in front of all your active cards. Killing a Bait Bucket will spawn a dangerous Great White. Another reason to keep empty spaces open before Phase 2.
The Trapper/Trader – Inscryption Tips and Tricks for Part 1
The friendly Trapper has become your adversary, for one reason or another. Defeating him will cause him to lower his prices when you encounter his non-hostile version in future runs.
First phase: Spawns several Strange Frogs. Killing these cards will turn them into Leaping Traps, which kill the card in front of them when they perish, giving you a pelt in the process.
Second phase: The Trader will fill up all of the spaces on their side of the board. You can trade the pelts you’ve gotten from the Trapper (plus a freebie they give you when the phase starts). Once you’re out of pelts, the remaining cards will fight on the Trader’s side and the fight proceeds as normal. The goal of this boss is to farm pelts from the Trapper so you can steamroll the Trader during the second phase.