Mount & Blade 2 Bannerlord is an action role-playing game that features a complex trading system. To help players navigate this system, a trading and goods guide has been created. The guide provides information on the different types of goods, their prices, and where to buy and sell them for a profit. It also includes tips on how to transport goods safely and avoid bandits and other hazards. By using the trading and goods guide, players can become successful traders and amass a fortune in the game.
Supply and Demand are the tools of the Merchant King. Better understanding these in Bannerlord will help you become the next Musa of Mali.
Bannerlord 2 Trading Guide
This guide will present an overview of resource flow in Mount and Blade 2 Bannerlord as of early access release. It will also go into how to use this to trade using your party, with a focus on early to mid game, and the implications this has on building workshops and caravans.
It is based on my observation from trading different goods around Calradia and creating a large horde of wealth early game. In future updates I would like to add more details on caravans, workshops, fiefs, and how resources play into the prosperity and success of different regions and factions.
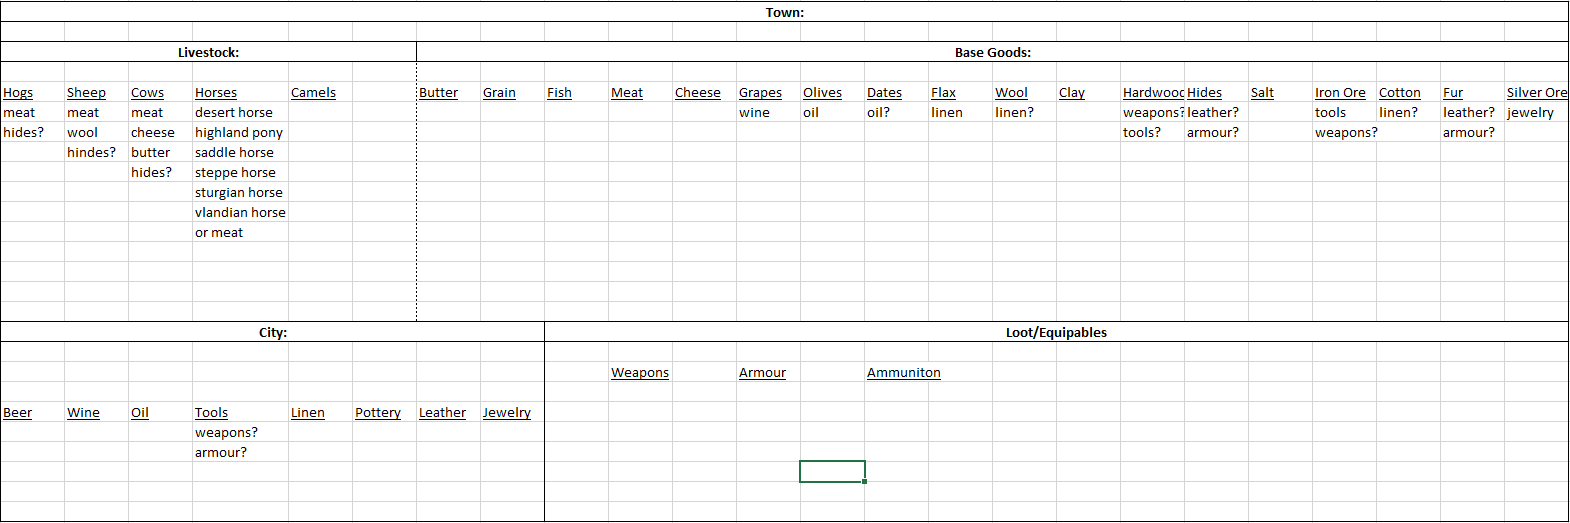
Item Categories
The game contains 3 categories of items in regards to trading. All items are produced at a town or city, with the exception of weapons, armour, and ammunition which can all only be bought, plundered, or sometimes crafted. Each town specializes in one base item, which can sometimes have related items (i.e. towns that raise cows also produce butter and cheese). The item categories are:
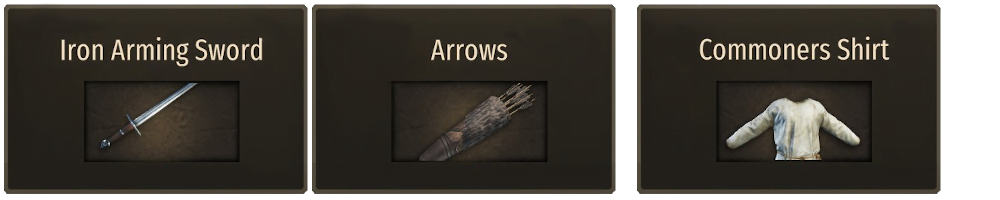
- 1. Loot/Equipables
- 2. Livestock
- 3. Goods
1. Loot/Equipables
These are items that are often plundered off the battlefield. It consists of all weapons, armour, and ammunition. Mounts and food not included.
These are often best used to upgrade your player and companions and then either sell at the nearest town or in the case of weapons smelt at the smith’s for crafting resources.
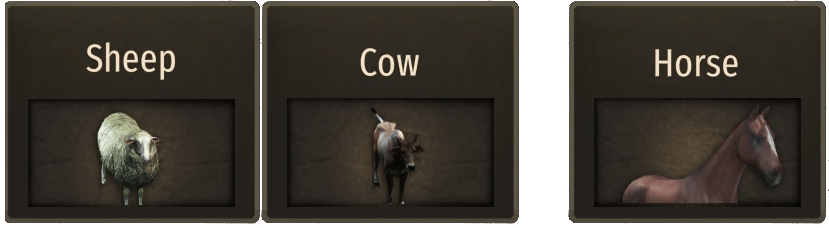
2. Livestock (2 Sub-Categories)
Livestock includes all animals and mounts.
2.1. This first subcategory includes traditional livestock animals that are used for food and resources. These are hogs, sheep, and cows. They are all raised in towns around the Calradian countryside.
2.2. The second subcategory includes all mounts. They can be used for food, although this is obviously ill-advised and costly. Their primary purpose is increasing travel speed, increasing carrying capacity, and providing mounts for knights and war.
Livestock is important in that they have a couple different purposes and usually create related goods through their raising.
3. Goods (2 Sub-Categories)
This includes food items, as well as purely trade items that may boost certain town and city stats (need to test).
3.1. Natural Goods:
These are items produced in towns and are reaped directly from the natural resources of the land. Examples include: Iron, Flax, and Grains.

3.2. Manufactured Goods:
These are items produced in towns and are created by processing Natural Goods into more complex and valuable items. These are also far less abundant than Natural Goods. Examples include: Jewelry, Tools, and Linen.
Goods are important as they are your primary source of income, and their supply and demand are more impacted by natural abundance than other items.
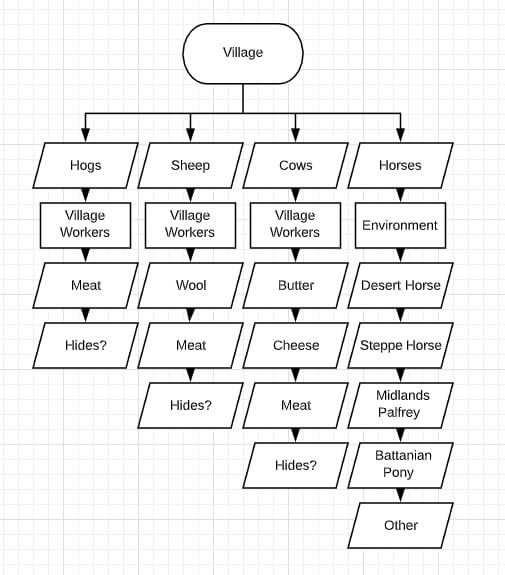
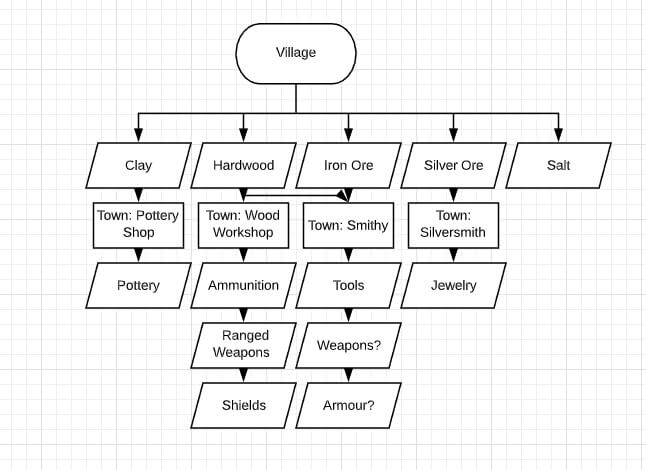
It is important to understand the good chain, so as to know where goods will be abundant or scarce. See Chart below. Good chains are speculative and not yet proven*. Any marked with a question mark may be outputs or not.


Supply & Demand: The Arbitrage Potential
Each area is abundant in certain goods and scarce in others. By understanding where goods originate from you can understand where they will sell cheap and where they will demand a hefty price, it’s all about arbitrage. Remember too, there are other merchants and caravans, as such, to get the highest price for your goods you have to go far from their destination of origin as many caravans help spread the goods further outward. Another option is to go where they are in exceeding demand, often large prosperous manufacturing sectors looking for inputs or kingdoms at war.
Keep in mind, villages have the lowest prices for Base Goods, especially in provinces with many villages producing the same good. Towns, therefore, also have the cheapest prices for Manufactured goods they produce, especially in provinces that have the Manufactured Good’s Base Good input in large abundance. The vice versa is true for where things will be very expensive.
Prices:
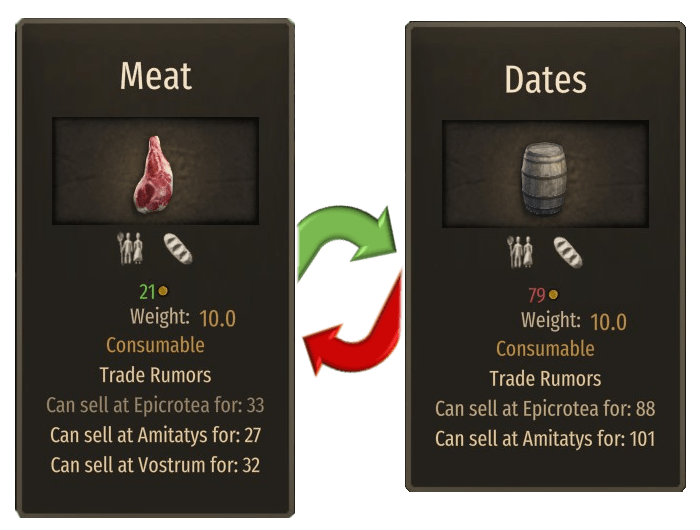
The game will highlight prices* in green that are cheap and highlight prices in red that are expensive. With yellow prices being a range between the two. This is important to note as generally when you buy you want prices to be green, and when you sell you want prices to be red. It can be confusing, as when you go to sell it shows a red price. This means the price is high not that your profit will be negative. While this is very helpful, it is by no means perfect, and does not currently help you understand average price or profit potentials. The yellow range is also quite large, and I have bought many goods for near half the yellow price, and then sold them in the yellow price range for good profit.
The best way to learn what to trade is through experience. Eventually, after pursuing trade for some time you will naturally learn what you can roughly buy and sell goods for, and this will help you maximize profits. At the start of your game using the green (low price) and red (high price) indicators is good enough and will help you learn prices and become a true master merchant.
Note: Only trade goods are shown green and red prices. This does not include hogs, sheep, cows, and horses. For these items you must learn by experimenting yourself, however, arbitrage possibilities exist and are huge. I recommend looking at the production maps for where these goods are produced, for they are some of the easiest goods to see where there will be supply and demand based on production areas. In future updates I will also include a rough list of prices you can expect.
Trade rumours are also incredibly valuable and you should always look at prices that show up listed under the good. These rumours give you a better idea of average prices and where you can buy low and sell high. They are great for capitalizing on wars and other events that create huge demand and skyrocket prices just outside your normal trade route, these allow you to adjust and make the most profit. You gather these rumours from towns as you visit them, as well as from your caravans or workshops depending on a trade perk.
As such, it is very valuable to have caravans or workshops gathering this information for you. Lastly, I believe that the prices fade as the rumours become older, and thus actual prices may vary depending on how long ago you heard the rumour, so if you see sky-high prices for good you have in your inventory try to beat other merchants there before they steal your profits.
Note: That in towns the more of a good you buy the higher the price will tick, and vice versa for goods that you sell with the price slowly lowering. Keep an eye on this to prevent erosion of profits. Villages on the other hand will sell and buy all their goods for the stated price, however, they have limited coin purses and cannot purchase much off you. They are the best place to buy Natural Goods form.
You can also trade with other trade caravans. They can sometimes have great deals, and do not seem to change the price no matter how much you sell or buy. Their prices seem to be based of local town prices.
The trader skill tree also has perks that say it will show your average price, and profit and loss. I have yet to find where these are actually displayed, if someone knows and could comment below that would be amazing. It seems that if you hover over the price it will tell you the average, yet to find profit and loss though.
Resource Abundance, Lore, & Faction Preferences
Calradia’s Kingdoms:
The above map shows Calradia’s Kingdoms. Each roughly encompasses a different environmental region with different regions having different natural resources.
- Red: Vlandians (e.g. Western Europe/Normans)
- Green: Battanians (e.g. Celtic Tribes)
- Blue: Sturgians (e.g. Slavs)
- Teal: Khuzait Khanate (e.g. Turkish Tribes/Mongols)
- Yellow: Aserai (e.g. Arabic Tribes/Caliphs)
- Red-Purple: Western Empire (e.g. Western Rome/Military Party)
- Pink-Purple: Northern Empire (e.g. Rome/Republic Party)
- Blue-Purple: Southern Empire (e.g. Eastern Rome/Monarch Party)
Each one shares similar characteristics to their historic influence. As such, they share similar natural resources as their historic counterparts, and similar trade patterns. Their behaviour and differing preferences may also lead to changes in goods supplied and demanded.
Vlandians:
They have very cheap hogs, however, cattle can be very expensive. They have less manufacturing capabilities and thus their prices are low for most Base Goods and high for most Manufactured Goods. Their wine and oil are often very cheap in some more mediterranean locations. Their military favours heavy mounted knights and thus has a high demand for war horses, particularly desert horses.
Battanians:
Overall very cheap prices. Abundance in natural resources like grain, sheep, hogs, hardwood, iron ore. Lacks manufacturing sector and thus Manufactured Goods tend to be more expensive, with Jewelry commanding extremely high prices.
Sturgians:
Furs, Furs, Furs, and some flax and linen. Terrific for cheap furs which are in large demand the more south you go and the harsher the land you find yourself in (looking at you Aserai). Similar conditions as Battanians and Vlandians, with some demand for wine, dates, and olives.
Khuzait Khanate:
Lots of herding animals in the far eastern regions past the mountains. Very good for hides, cows, sheep, and meat. Some areas demand salt. Other really like olives and wine. Iron ores are fairly abundant and tools appear to be quite cheap in the South Eastern parts. Steppe horses can sometimes command a decent price in lands with few available mounts (Cough* Battanians). Some good sources of linen and pottery. Sometimes demands silver ores and leather. Almost always wants some amount of furs.
Aserai:
Dates, grains, salt, horses, and fish. That is about all they have, for the trade-off of having it all! Sometimes oil can also be quite cheap. Manufactured goods seem to demand high to medium prices depending on recent caravan activity. Generally most food items are cheap, however, items like hardwood and iron ores can garner profits in a land with no trees. If you ever wanted to be a horse merchant this is the place to gather your stock. Can re-sell to horse hungry Vlandians for double the price.
Empire:
The Empire has a lot of goods and similarities in common, with less pronounced difference between the three. They have a mixed bag of Base Goods and Manufactured Goods demand and supply. Often their territories have the most volatility in ownership. As such, you can profit off of short-term demand spikes while passing through to faraway lands. Overall, there is more city by city variance and thus opportunities for arbitrage at shorter ranges but with generally less consistency and magnitude (unless you get lucky and can sell to a city after a siege :)).
I suggest experimenting and finding your preferred trade route. It can be fun to role-play and run with the lore of the game, specializing in certain products or trade niches. However, some diversification is always healthy for profits. This is doubly if you are trading in food, as it can be slowly eaten at by your soldiers. Speaking of soldiers, as of March 2020, it is fairly easy to maintain a personal party of at least 25-35 men. You barely, if at all, need to level them up to keep most hostile parties at bay (actually fighting them is a different matter).
Keeping them low level is very advantageous in the beginning as you are often operating on a shoe string budget and don’t have the ability to be footing large monthly expenditures between origin and destination. A final note, it can be worthwhile to buy cheap horses and mules to increase your speed, item turnover, and thus profits. It is also a good idea to become a part time horse merchant, as horse are always useful, often valuable, and walk themselves.
Item Production Maps
Maps show where each item is produced by province, or which cities manufacture which items. A province being either a town and its bound villages or a castle and its bound villages. Order shown is input Base Goods and then Manufactured Goods where applicable.
*These are a perfect guide to understanding where supply and demand will be. With cheap supply near village producers or town manufacturers and expensive demand being far away where these goods are hard to access. I recommend you draw your own trade routes and try them out using these as a guide. Below each map are simple directions to travel to make profit.
*I.e. Hogs go East and South means you should buy Hogs in The North West where there are producers (Vlandia and Battania) and you should sell them far away where the good is in low supply and high demand. In this case based on the map and experience it would be to the East and South, specifically Souther Empire and the Aserai.
All maps have been made by myself, you are free to download and use them as you like, although I always appreciate credit too 🙂 . I have tried to compare relative goods, reflect the flow charts, and ensure visual clarity. I apologize for my poor image editing skills.
If anyone has any interest in my data files listing villages, towns, and their resources let me know. I’ll look for a way to share them with you and others online.
Hogs, Sheep, and Cows:
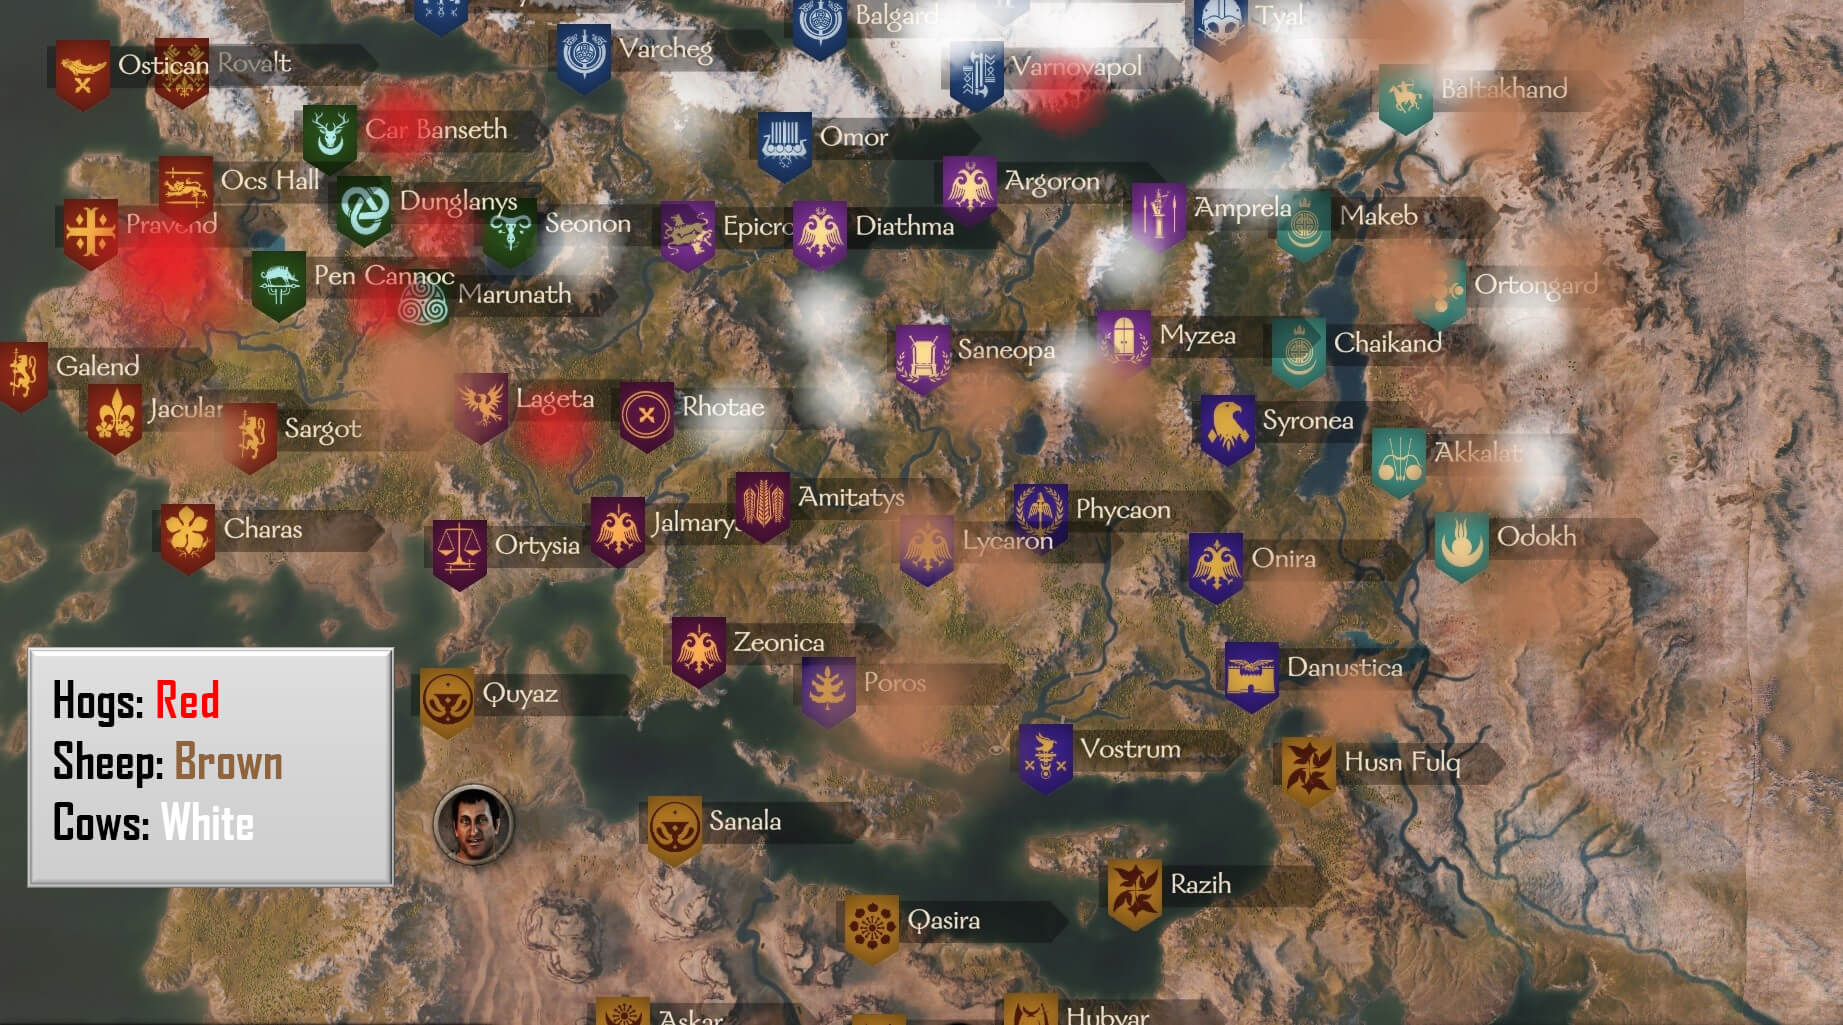
- Hogs go East and South.
- Cows go West and South.
Horses:
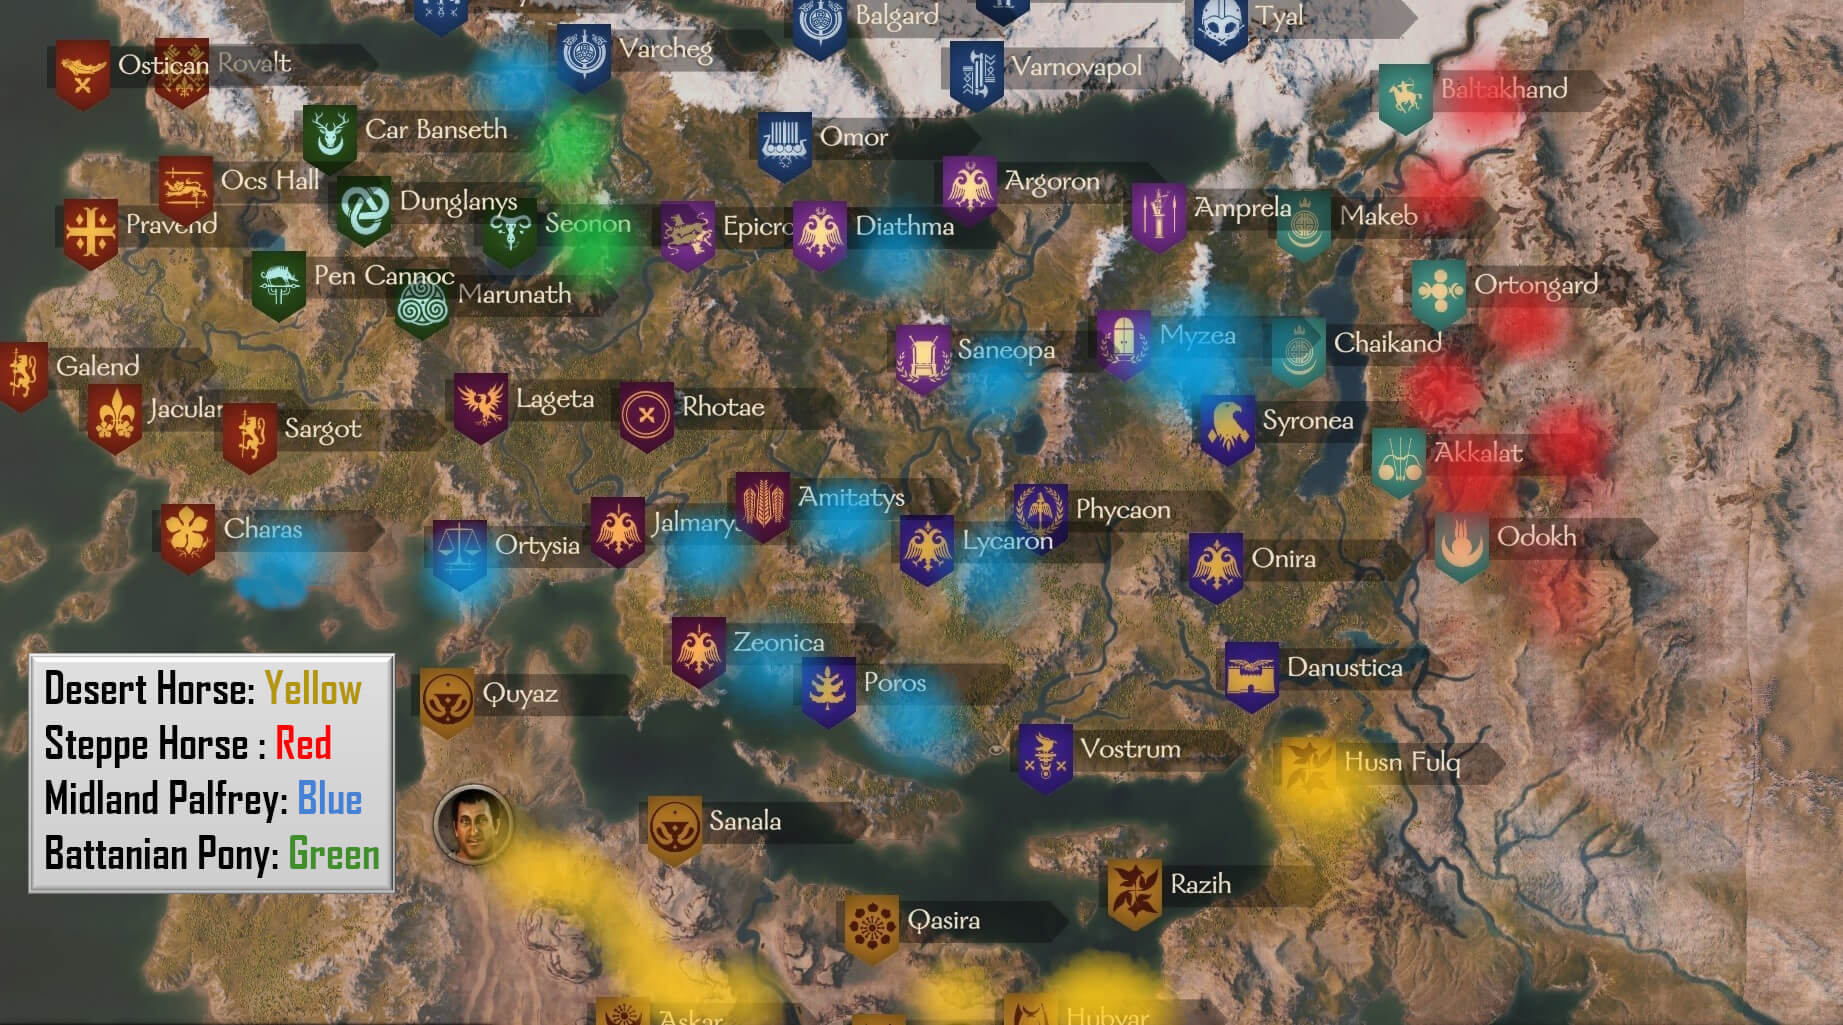
- Desert Horses go North and West.
- Steppe Horses go West.
Grain, Olives, Grapes, and Dates:

- Olives go East for consumer and South for manufacturer demand.
- Grapes go East for consumer and South for manufacturer demand.
Brewery, Olive Press, and Wine Press

- Oil goes North and to the Centre of the map.
- Wine goes North East.
- Beer is difficulty but can go to the Centre of the map.
Furs, Cotton, and Flax
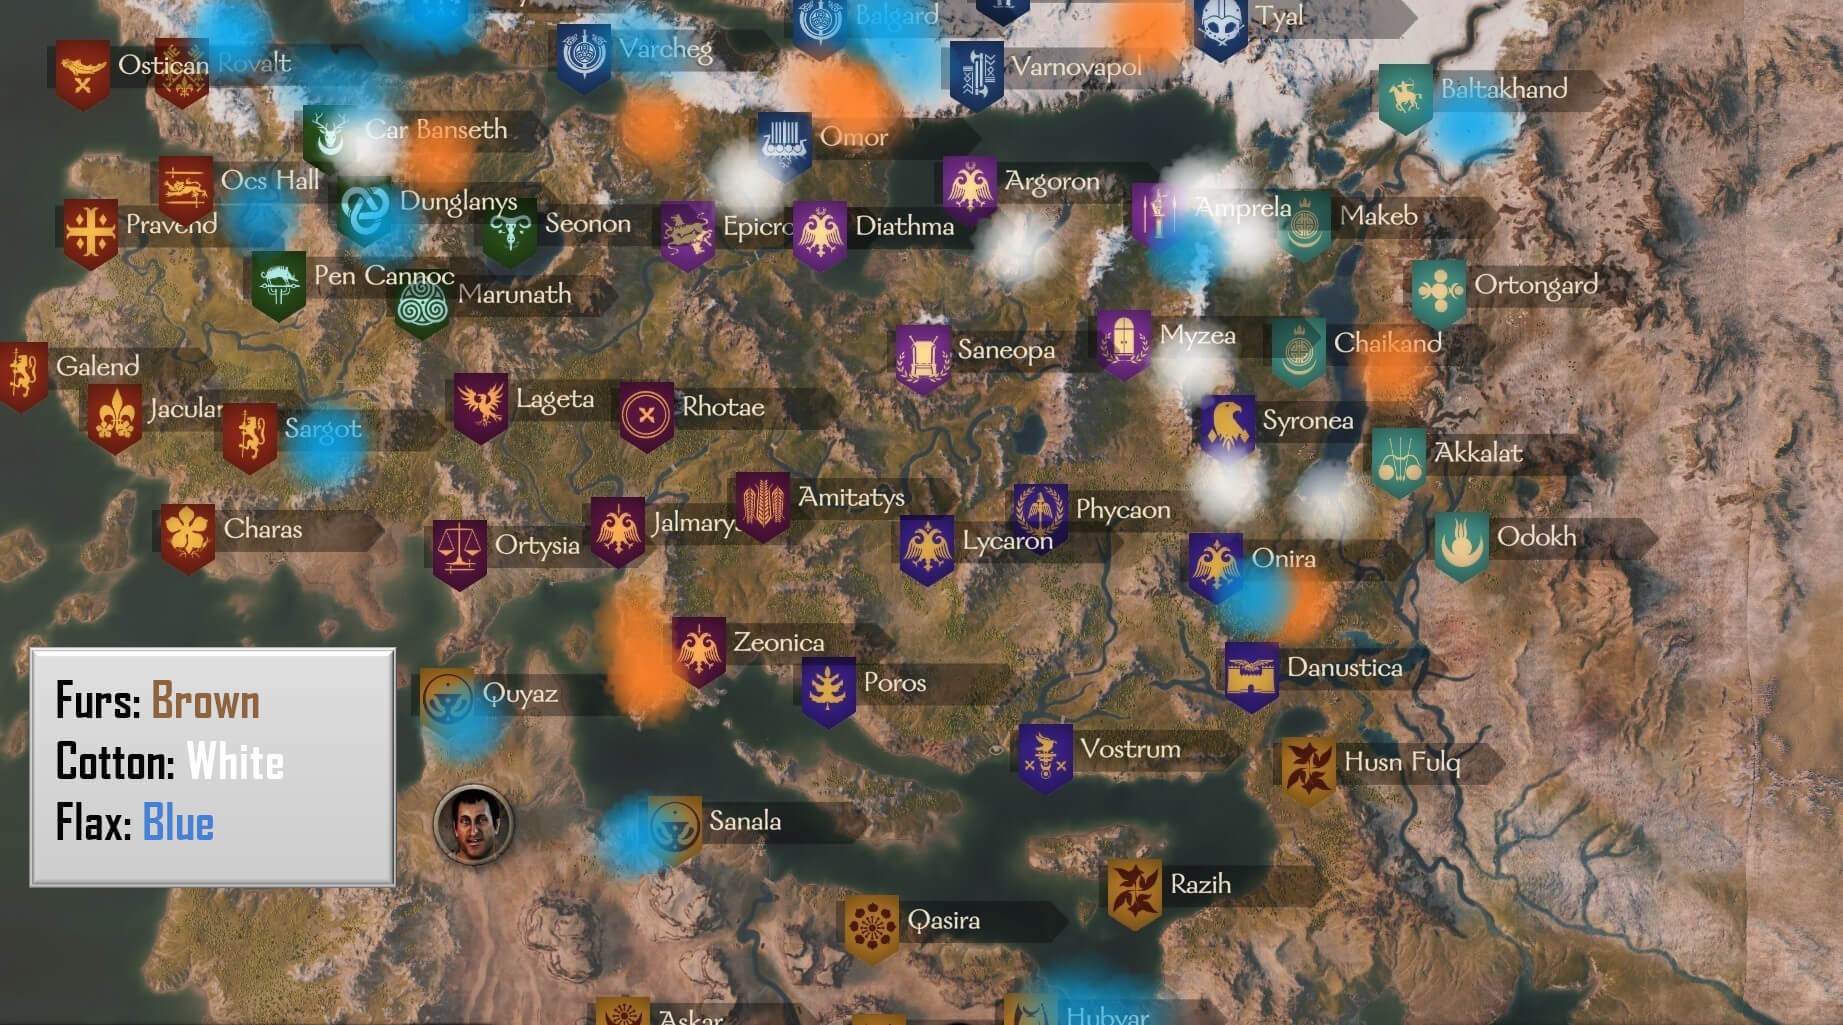
- Furs go South as far as possible.
- Cotton goes South West.
- Flax goes Central or to Manufacturers.
Velvet Weavery, Wool Weavery, Linen Weavery, and Tannery
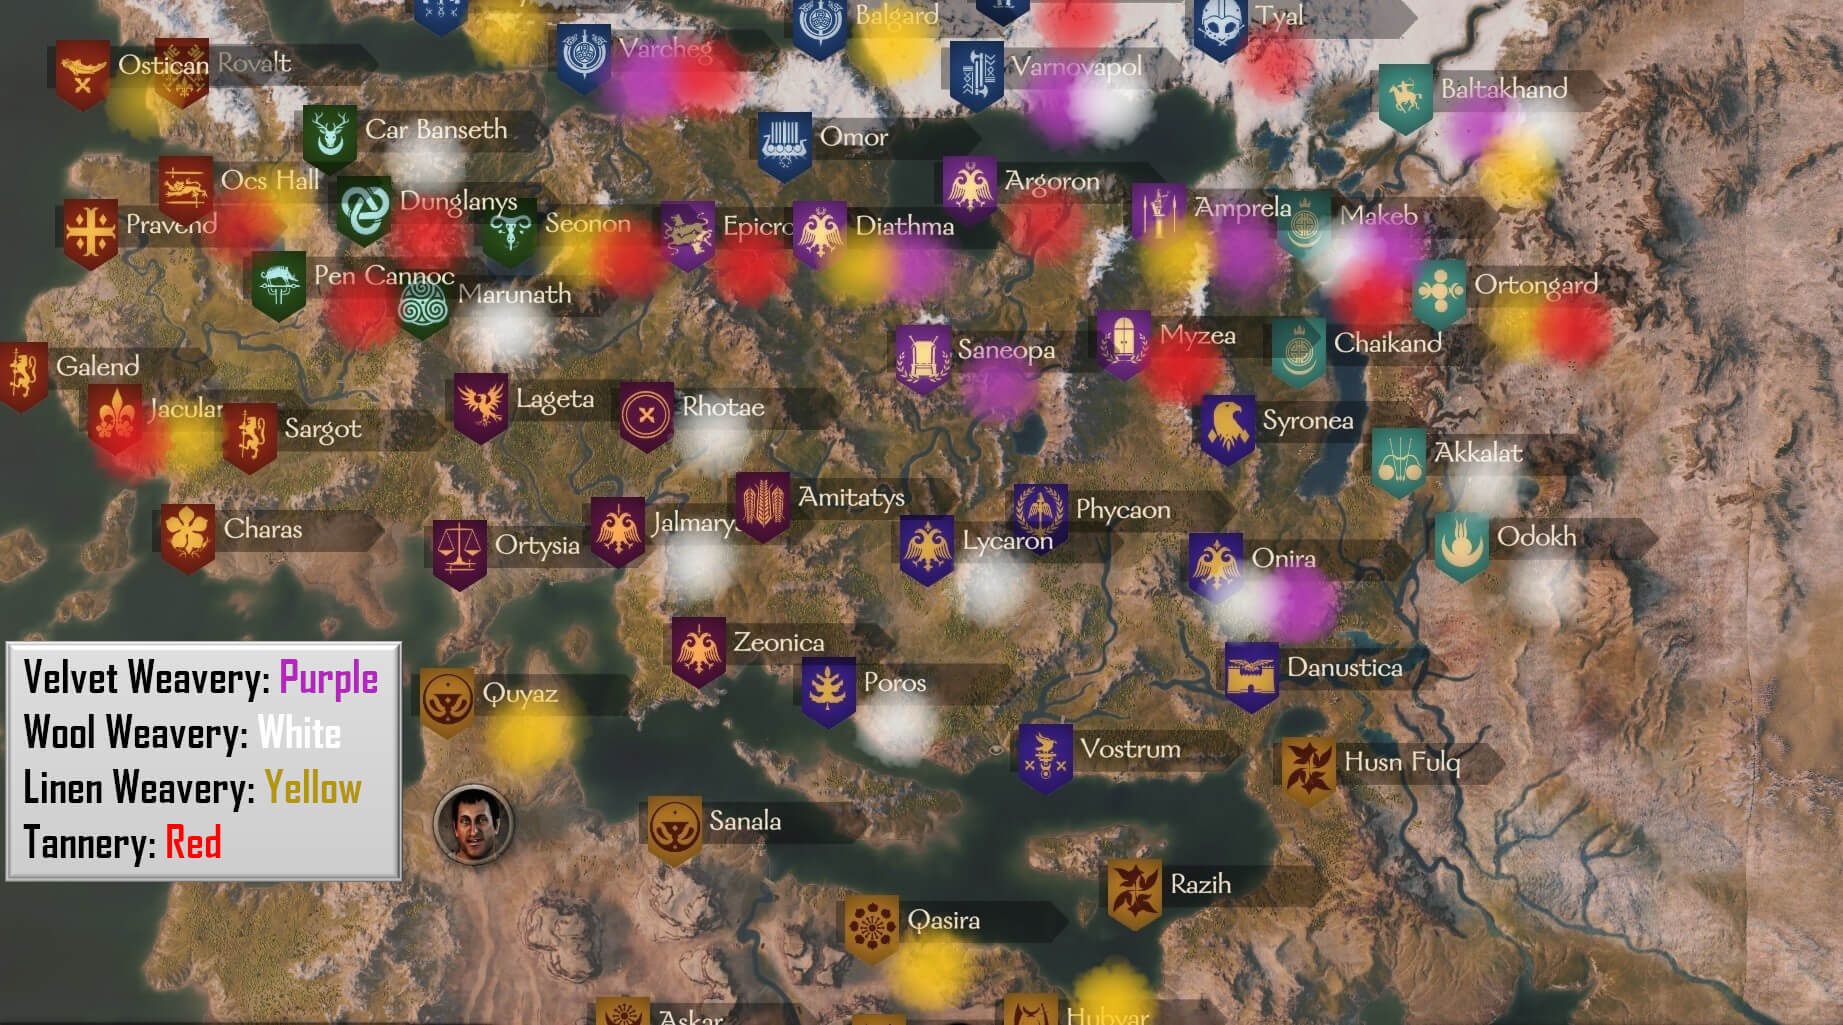
- Velvet goes West and South.
- Linen goes West and Central.
- Leather goes roughly South.
Clay, Hardwood, Iron Ore, and Silver Ore
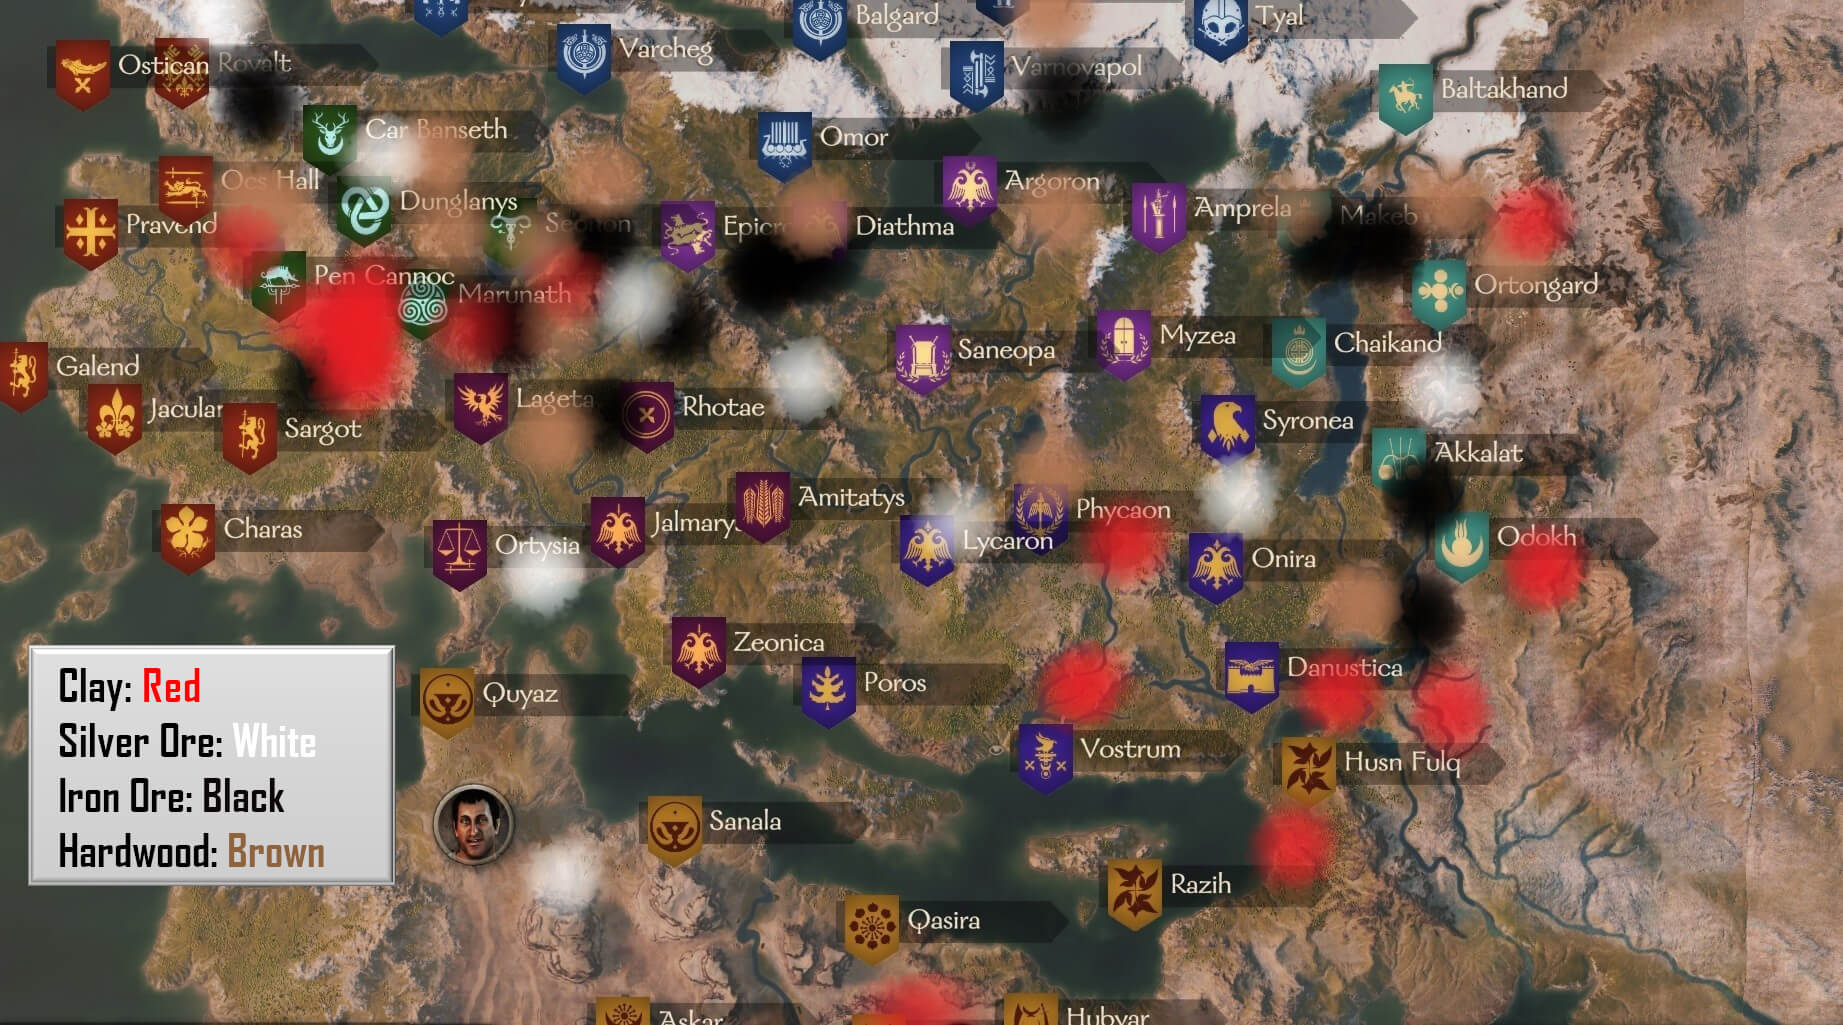
- Clay goes Central, or to areas with Pottery Shop.
- Silver goes to Manufacturers with shortages, or to the South or West.
- Hardwood goes South.
- Iron Ore goes South.
Pottery Shop, Wood Workshop, Smithy, and Silversmith
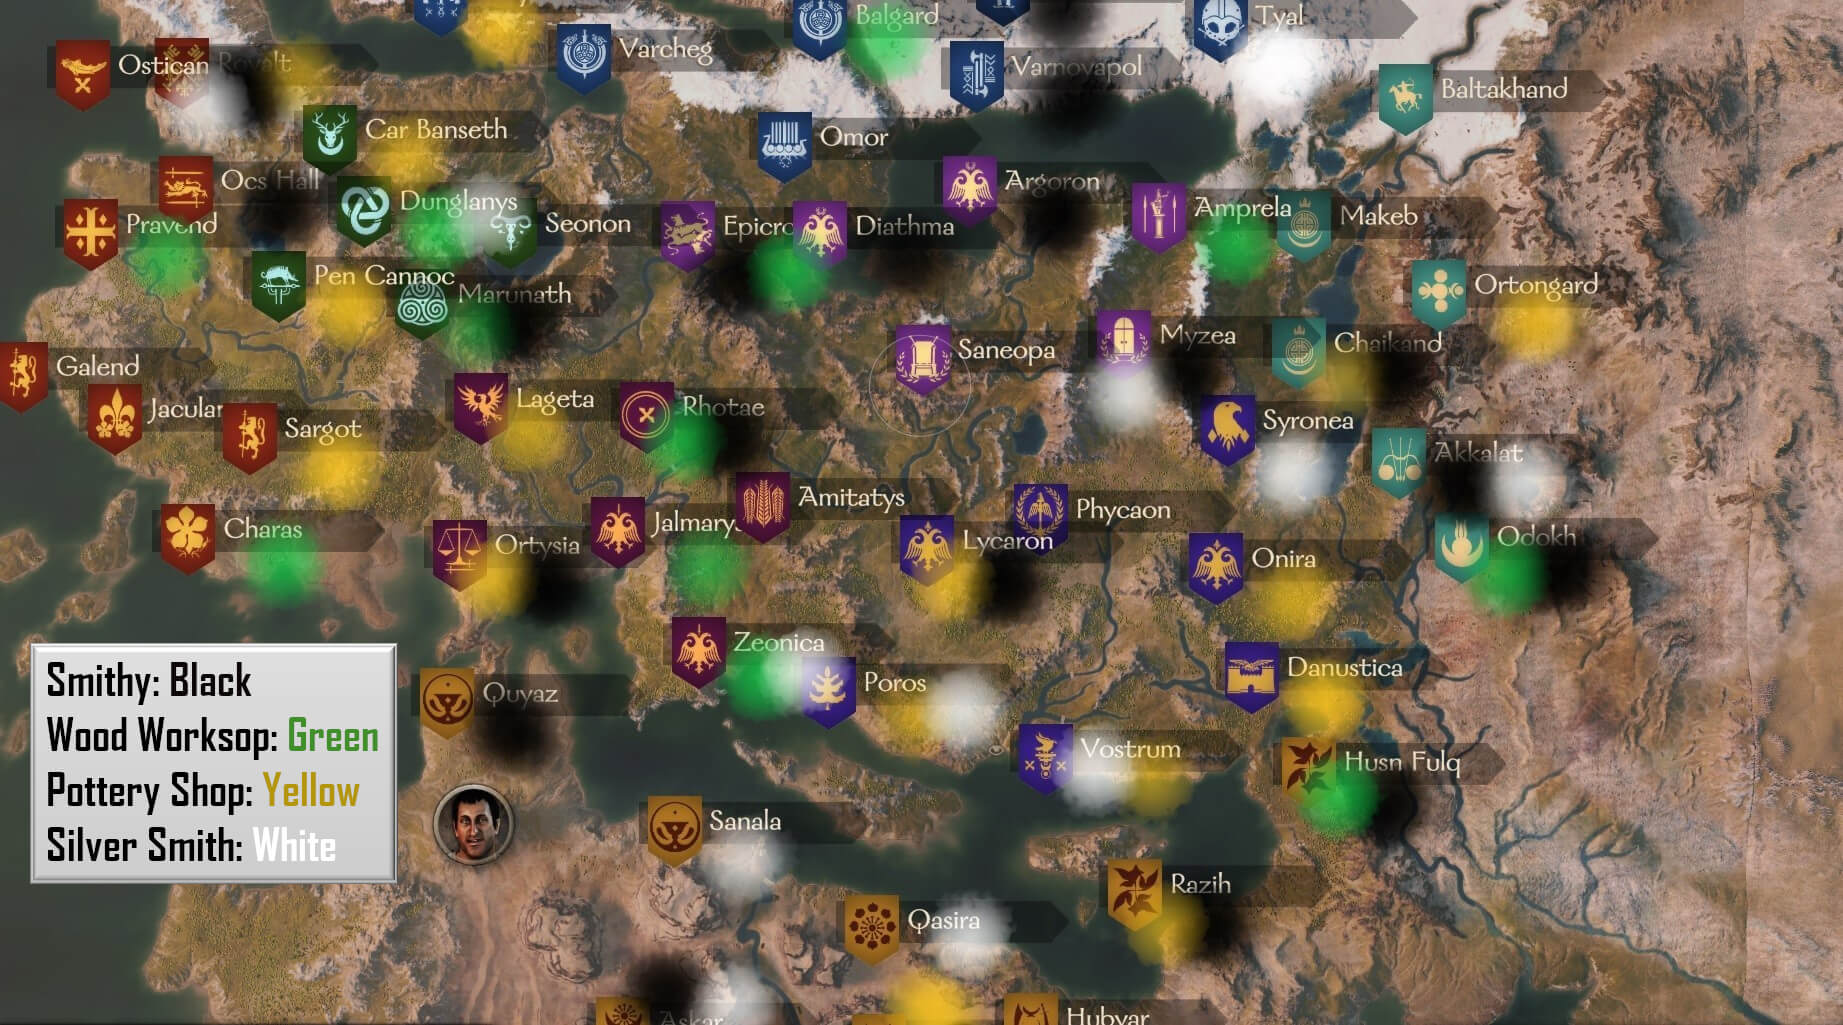
- Pottery Goes North and Central.
- Tools go to wars, before, after, or during.
- Jewelry goes West.
Fish and Salt
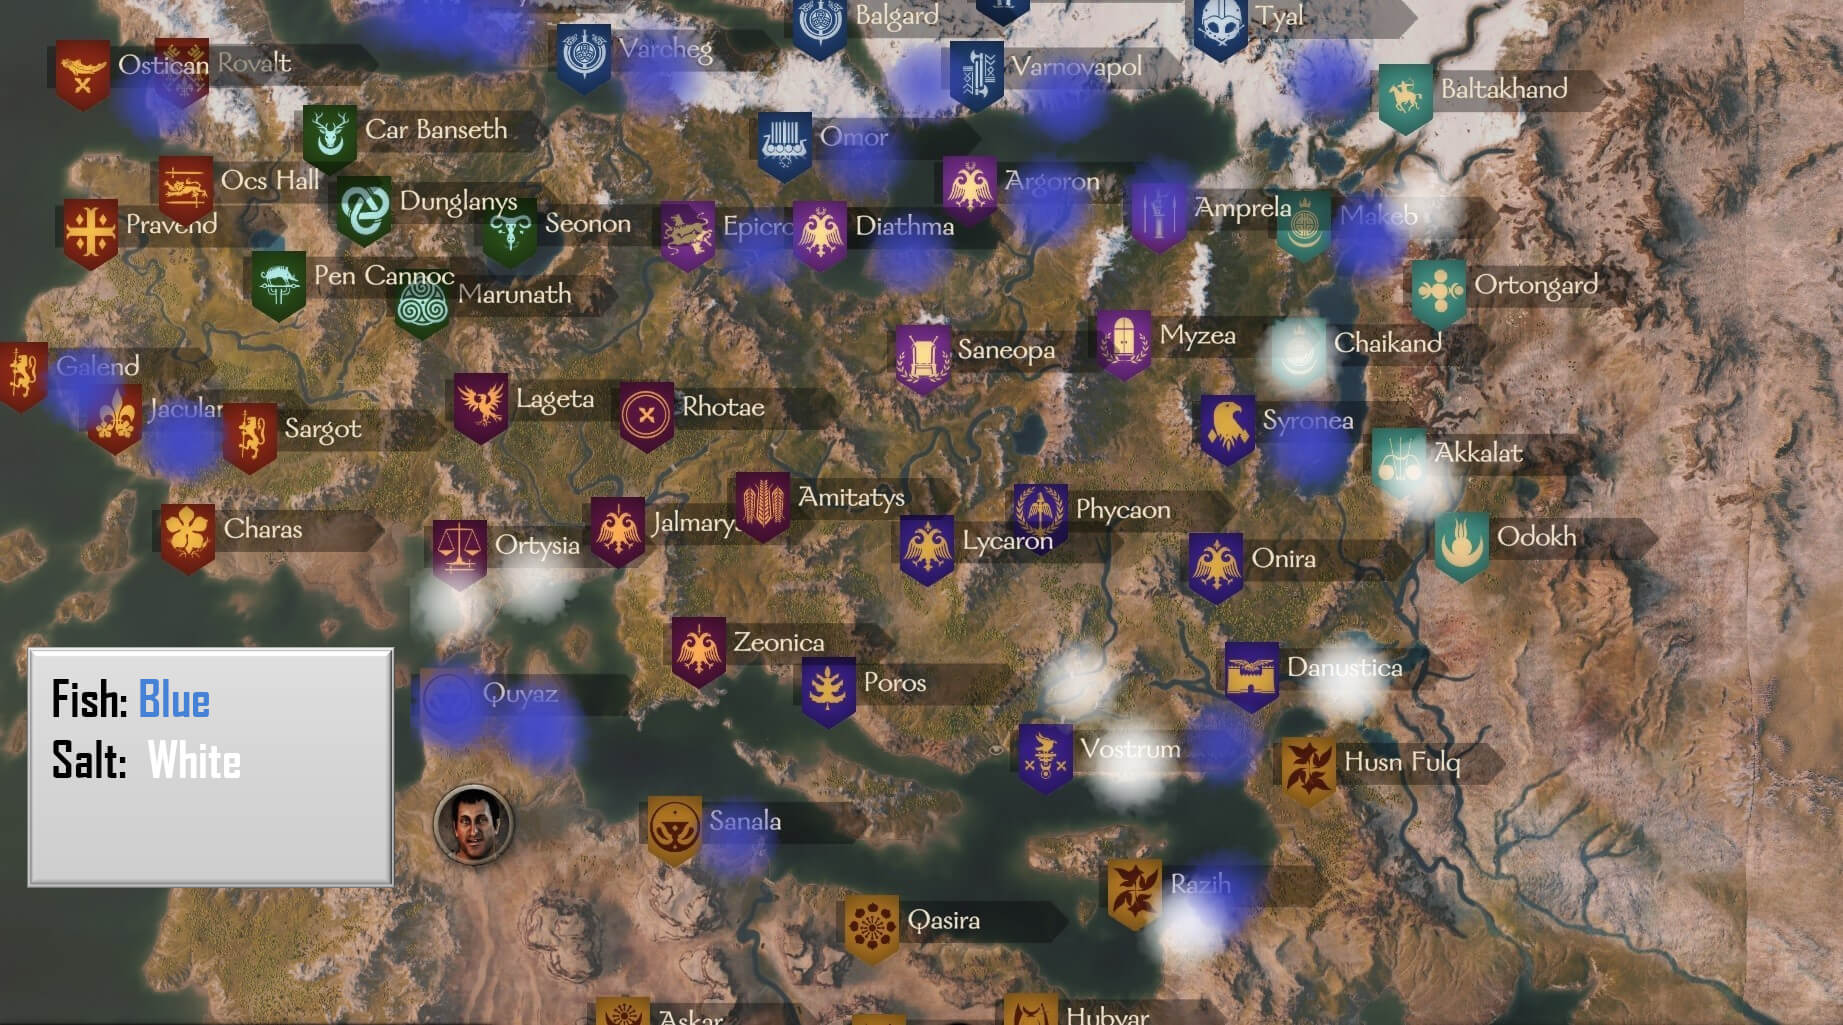
- Salt goes West.
- Fish can go Central, somewhat difficult.
Caravans, Workshops, and Fiefdoms
Caravans are likely best started at the edge of the map, so that they are more likely to travel to farther lands and experience more extreme changes in environment and resources. Haven’t tested, however, it may be the case that the area you start them in is their home turf/specialty area and will more likely be served and traded with.
Workshops should be placed in territories where input goods are cheap and available. Greater risk can be achieved by placing in territories that have fewer input goods (but still some) and have a lack in manufacturing for that good, monopoly opportunities :). An example could be manufacturing Jewelry in the Western edge of the continent, however, this is untested and may require you to buy silver and transport it there. Considering their may be caps on workshop profit this may further reduce the gains from taking risk and opening up manufacturing in capital low areas*.
Another thing to consider is competition. Each town has 1-3 workshop slots, you should pay attention to what is being produced there and if it will compete with your workshop or allow you to monopolize. As well, you may be able to setup workshops that benefit your trade routes and allow you to more easily connect certain items from producers, to makers, to consumers. Finally, wars and sieges on towns with workshops shuts them down and turns their profit to zero until over. Perks in the skill tree seem to suggest there may be a chance they are also destroyed. Therefore, it may be best to open workshops in stable regions.
Cap on workshops may have been removed, needs testing. I have a silversmith in Onira that produces about 180-280 profit per day.
Workshops tend to be low risk and low reward while caravans are the opposite. Both take some time to start up and begin making average profits, with profits slowly improving over their lifetime. As of now, April 2020, Caravans appear to make double the profit of workshops, the removing of the workshop cap may change this.
I have yet to have much experience with fiefdoms, so I cannot say much. However, where you own fiefdoms it may be advantageous to also own manufacturing. It might also be in your interest to ensure a healthy good supply into your towns and cities to promote development and prosperity. Especially food, keep their stomach full and they will serve.
As a kingdom you make want to focus on conquering provinces with goods that you need, or towns that contains 3 workshops slots and will thus be able to produce more than towns with only one or two. This may heavily influence the success of certain clans and nations.
Profitable Trade Route Examples
Western Trade Route
Some routes I have found useful have been to trade between western Calradia (Vlandians, Battanians, and Western Empire) and the Aserai. You can sell Aserai horses/desert horses for great bank, and western Calradia has many low-value goods that Aserai cannot produce like grapes, hardwood, wine, olives, furs, and hogs.
Eastern Trade Route
Another is travelling between Eastern Aserai, The Khanate lands, the Empire, and the Sturgian north. You can buys furs in the north and sell them in the south for double or triple profit. You can then buy horses, oil, linen, tools, pottery, etc. along many stops and trade with Empire, the Khanate, and sometime head more west to sell off livestock like cows form the Steppes and other products you pick up for cheap along the way.
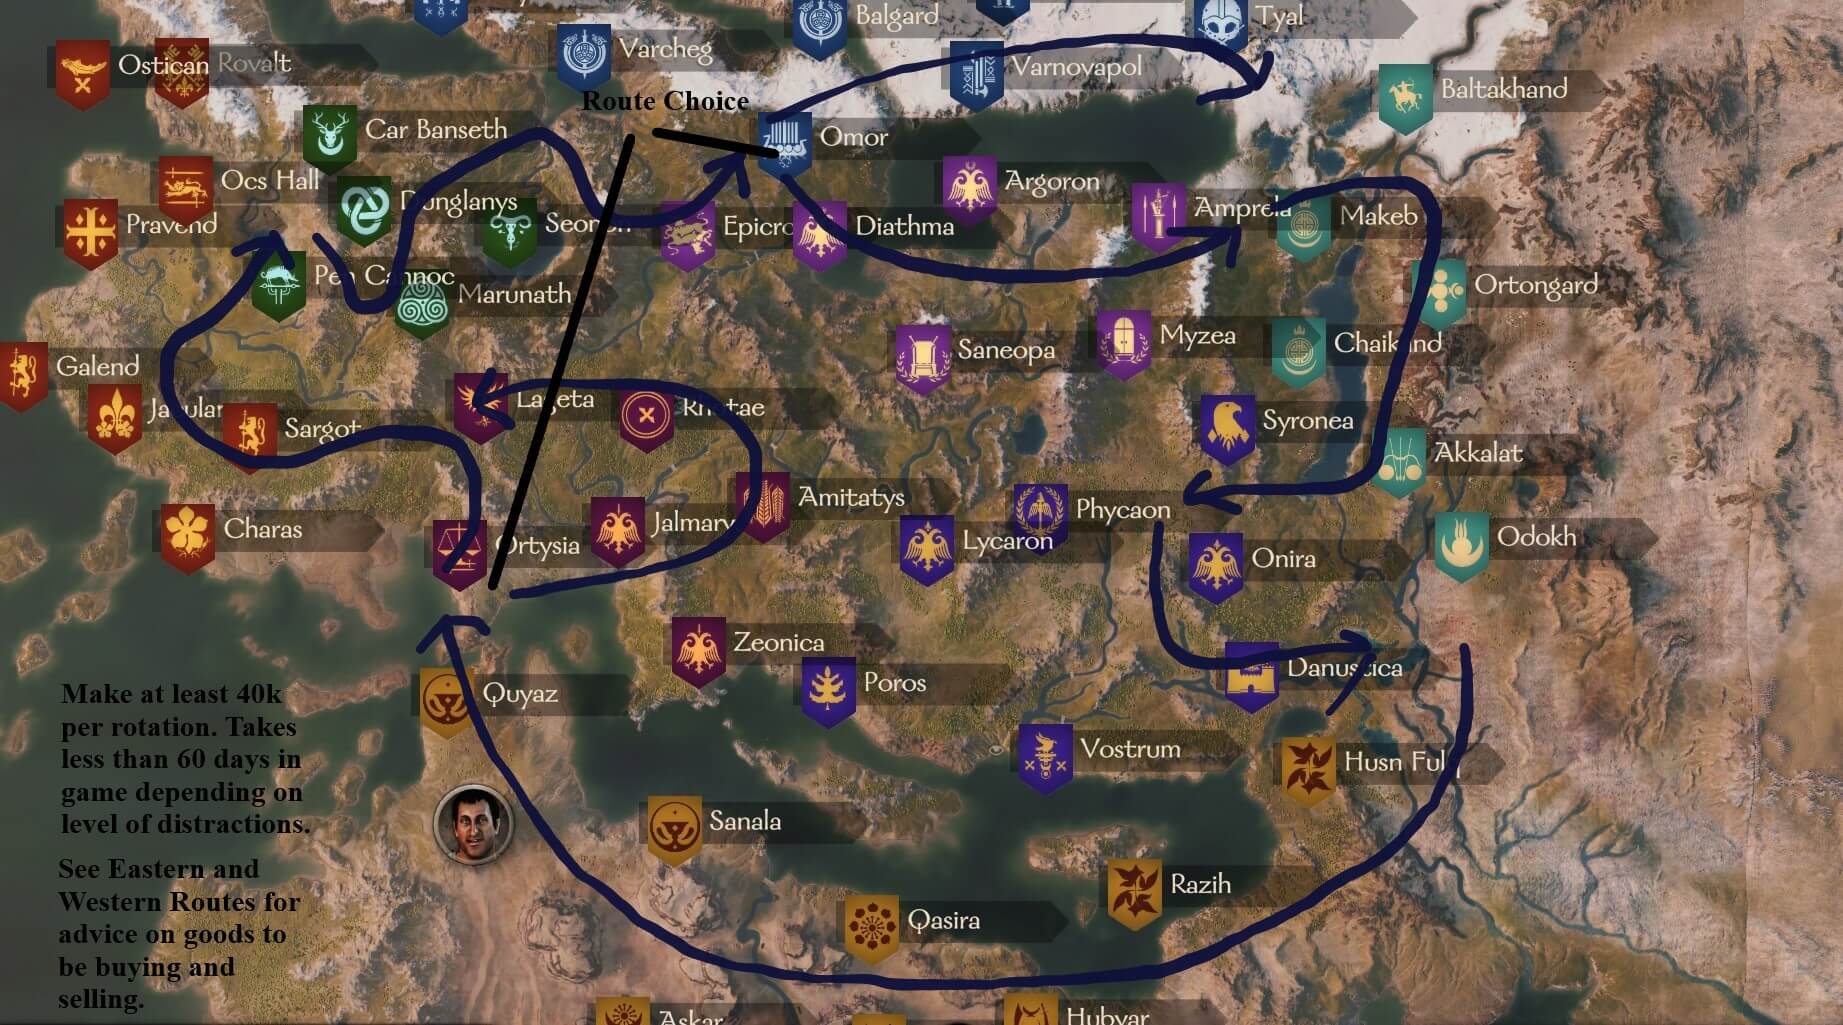
Full Rotation
The last map is my current rotation. It is a combination of both, and allows me to see wars that are going on and tap into profits after sieges the most. However, most importantly it takes you along the edge of the map where there are more variation in good supply and you get access to some goods that other areas completely lack along your route. I make easily over 50k per rotation and it takes me probably an hour in real-time, depending on how many off-shoot routes I take to capitalize on trade rumours.
Beginner Route:
A beginner route is to trade around Poros and Zeonica when you first begin the game. This is a fairly safe area where you can build up some gold to recruit 20-30 troops to keep bandits off your back while you trade in distant lands. The best way to do this is to buy cheap goods from villages and sell them to cities. Pay attention to trade rumours and travel between the local cities lots to keep a sharp eye on prices as arbitrage potential is lower when the cities are so close. I would suggest the next step of trading furs from near Tyal and cattle from Baltakhand down to Husn Fulq and Razih. From there you can move into the full Western or Eastern trade route, and progress to full rotations if you like.
Western Trade Route Map

Eastern Trade Route Map
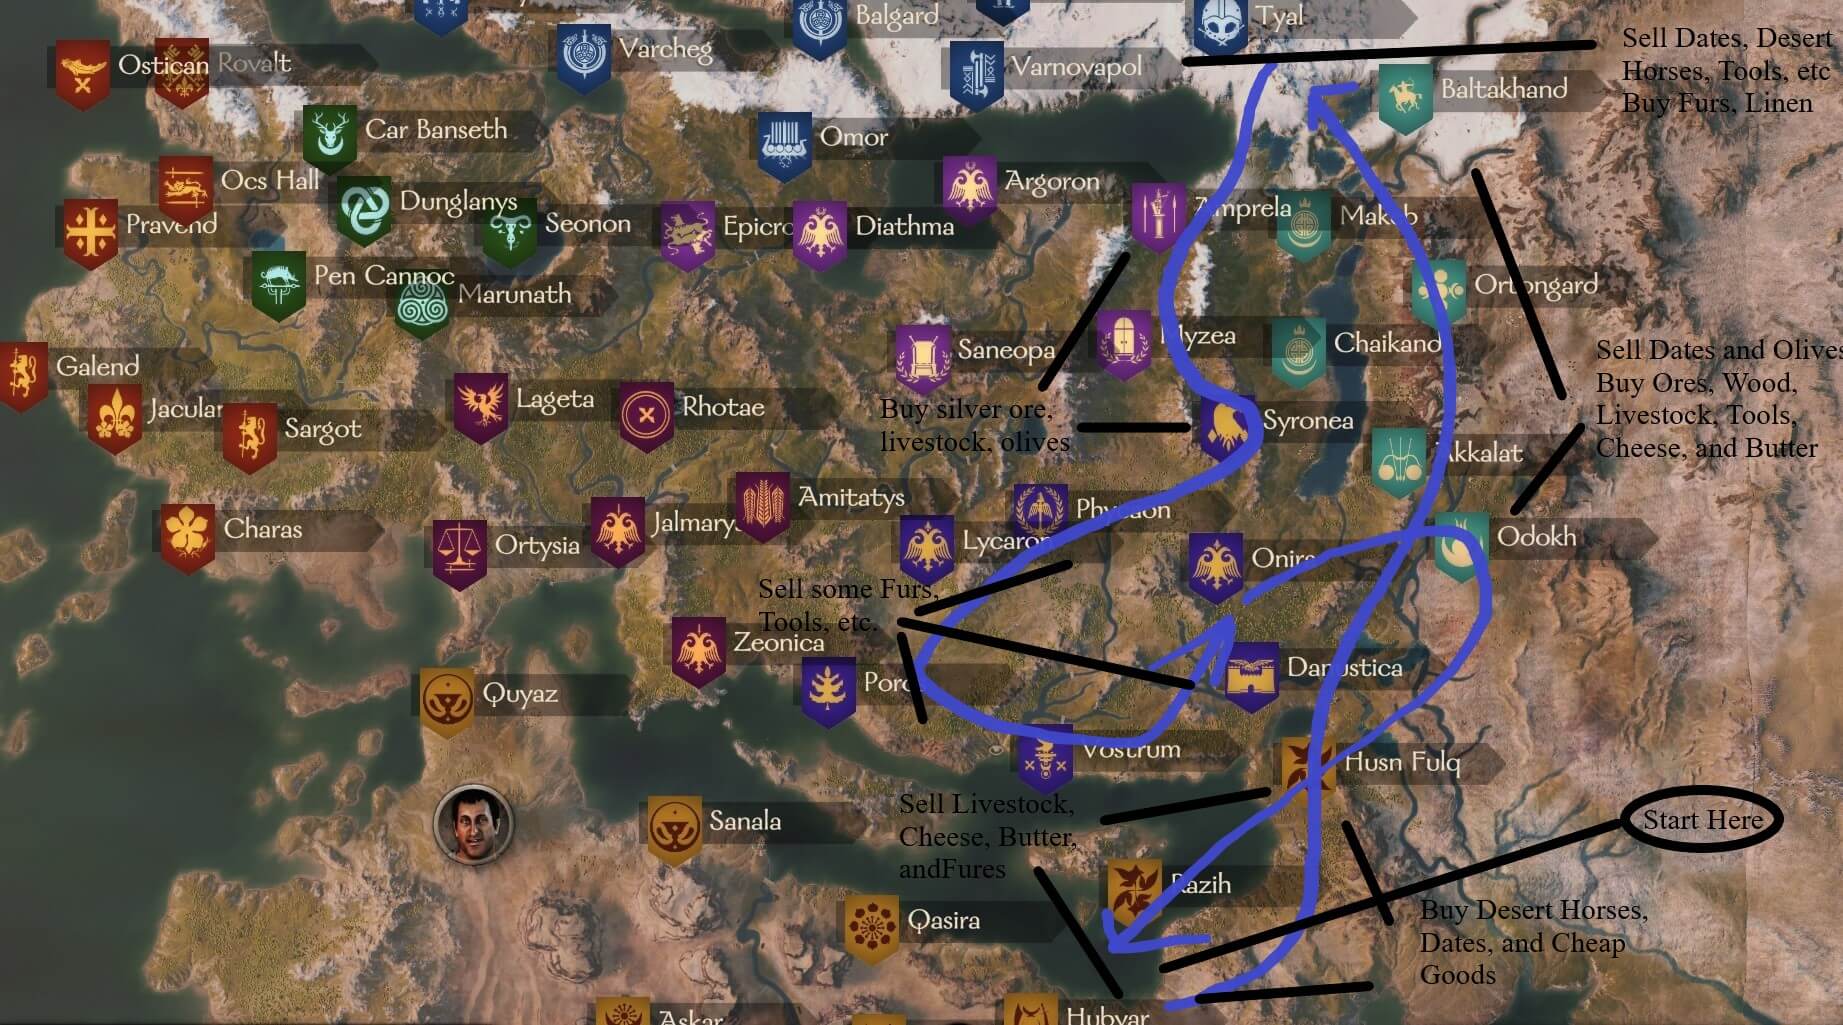
Full – Current Rotation
Fantastic guide, thanks!
I was pondering about income efficiency and you have done well explaining!
Pretty impressive coverage man, beats all the stuff that is on google first page results.
This page is not listed under guides, might want to check that out. Cheers
Thank you for sharing your hard work.
I was trading through entire map and I learnt a few things:
– Aserai horses (buy under 1000, sell above 2000 (especially west and north))
– hogs (buy under 40, sell above 60)
– sheep (buy under 80, sell above 120)
– mule (buy under 100, sell above 150)
– fur (buy under 150, sell above 200)
– silver ore (buy under 180, sell above 220)
– cows (buy under 200, sell above 300)
Why these goods? You can buy/ sell many of them and it’s a big demand of these goods all over the map.
I don’t trade fish, wood, flax etc. , cos I think it’s too few money from them.
I go through all the map, every country. I do a round trip 🙂
Great guide! Thank you. I have a question about a problem I’m having. I have a party of 60 with some higher level troops. my salary cost is almost 500, and if I fully upgrade them all it will be up to 720, It seems like I wouldn’t be making enough in trading to cover my expenses even. Is there anything I can do other than dismiss high level troops that I worked to get?
Be careful. In e 1.3.1, game randomize all workshops. Some prices can be different.
Has the fur trade route been nerfed in the last update everything seems waaaaay out of the previous price ranges by about 20 denars exept for fish grain and a couple of other low level goods
Amazing guide! Thank you and thanks to the other contributors in the comments section!