Tips and Tricks
Getting Started
So You’ve Started the Game
![]()
- WASD to move
- L for flashlight
- Q and E to rise and sink
- Shift + WASD to speed up movement
- Scroll to Zoom in and out
- Press the Scroll Wheel to pivot (I recommend to switch this to Ctrl)
- Ctrl+D to duplicate an object
- M to move an object
- X to open the trademarked precision widget (allows advanced directional and rotational axis control)
- Ctrl+X to duplicate an object and open the widget
- P to pause the simulation (not open the menu) ((I recommend changing this to Space))
- Z to rotate an object
- Shift to adjust the height of objects
Note: There are lots of other hotkeys and I recommend looking at all of them. You can see and change them in the Settings menu under Controls
Starting to Build
- If you’re planning to build something large and complex, pause your game.
- Pay attention the lower right corner when in a building tab, there’s usually useful configurations that you can take advantage of (i.e angle snap, path width, length, barrier length, curvature and window)
- When creating a group of objects or building, pay attention to what is grouped and what is not. In case you have placed something and you want it to be apart of the group, then Shift click the two of them and click the icon that looks like a Tree and a plus sign.
- Objects with a grid background adhere to a grid system and cannot be changed that way but items with a white background are decoration objects and can placed with full control.
- To center a décor item on a wall or anything, press F
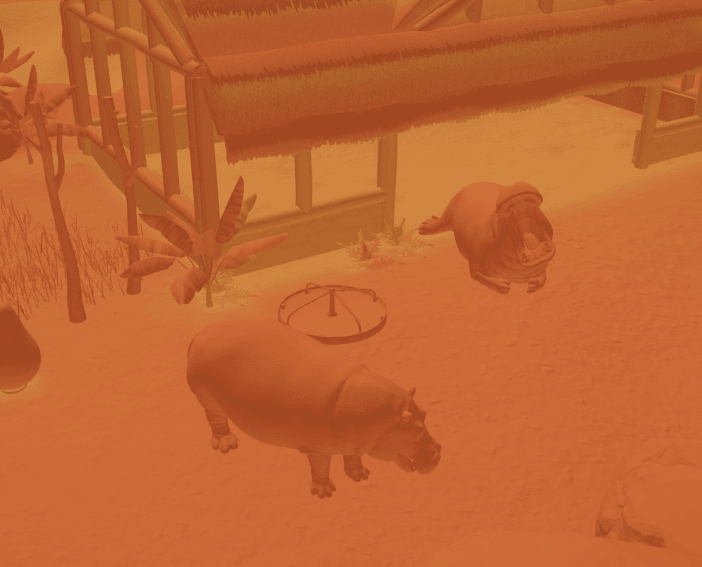
Zoo Beginnings
Before you can really do anything regarding a zoo, you have to have some facilities such as:
- Zookeeper Hut (The only place where a keeper can prepare food)
- Animal Trade Center (Acts as a gateway for animals into the zoo)
- Research Center (Used by Vets to further the zoo’s knowledge regarding animals)
- Workshop (Used by mechanics to perform research)
- Staff Room (Buildings where staff can go to rest and regain energy)
- Veterinary Surgery (Only location for vets to treat animal disease and injury)
- Quarantine (Used to safely isolate sick animals before treatment at a vet surgery)\
- Power (Stuff like solar panels and transformers)
- Water Treatment (Cleans water – works the same way as power and doesn’t have to be touching water)
You need to place at least all of these things to, at the very least, get rid of the alerts demanding them. You should keep in mind that you should keep keeper huts close to exhibits and staff rooms accessible to staff. The staff people will complain if a facility is too far away and guests will complain if they have to be anywhere near a facility.
Your Zoo Tools
There are two important tools you can use in Planet Zoo.
The Zoopedia and The View Modes (or heat map, radar or whatever you wanna call it}
The Zoopedia is your best friend
The Zoopedia has a list of every animal in the game. It displays:
![]()
- General Information (stuff like name, endangerment status, and a general bio)
- Natural Habitat (It shows natural habitat info but most importantly the Minimum Habitat Requirements which is important to keeping animal welfare up)
- Species Data (The more nitty-gritty version of General Info – stuff like social needs, gestation period and whether or not guests can enter their habitat)
- Research Status (This displays everything you’ve researched regarding the species which also coincides with exactly what objects that animal likes and needs)
- Interspecies Enrichment (Any animals displayed in this section will benefit from having this animal in their exhibit and vice versa)
- World Records (Displays any world records you make but only in Franchise Mode)
Long story short, the Zoopedia is worth looking at
View Modes
In the bottom left corner is a radar looking button and clicking that will create a map of your game. At the top middle of the screen, it’ll show the types of data the map will display.
- Animal Welfare (Everything will be white except for the animals where red animals are unhappy and green are happy)
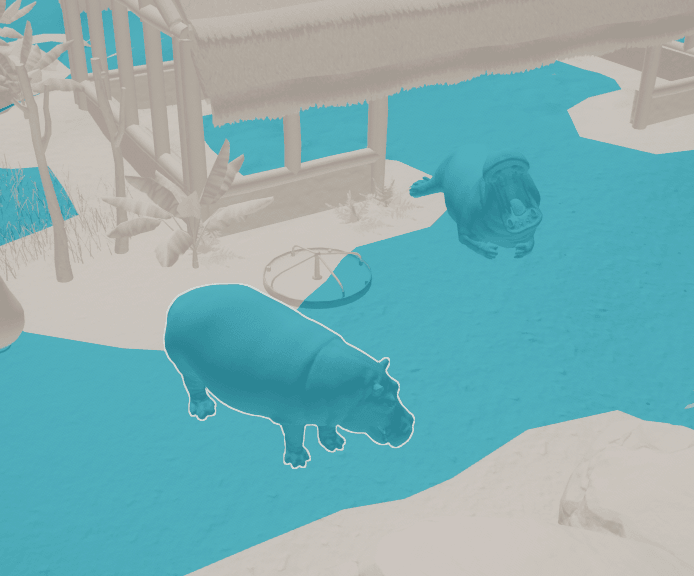
- Habitat (Click an animal to show its traversable area, escape points, and shelter quality)
- Temperature (A literal heat map)
- Water (Shows which water is being treated and which isn’t and which water treatment facilities are working)
- Power (The radius of electricity as in what is powered and what is not along with which power facilities are functioning correctly)
- Building (Displays buildings that are functioning correctly in blue and those that aren’t in red)
- Negative Impact on Guests (Displays guest happiness (blue is good) and staff facilities as red and radius surrounding so if a guest is in that radius, they are being negatively affected by the facility.
- Guest Education (Shows education devices that are powered, powered and with content, or not powered and it shows the range of education speakers)
- Guest Needs (Displays guest needs in colors from red ((bad)) and green ((good)), needs like Happiness, Energy, Hunger, Thirst, Toilet, and Education.)
The Bear Essentials
Animal Trading

These are your typical terrestrial animals: Giant Panda, Aardvark, Saltwater Crocodile. They require a habitat with barriers, food, enrichment and terrain preferences.
The Animal Market shows animals being sold and from my understanding is entirely random except in Sandbox where it displays every animal. It shows their price in dollars or in those green leaves called Conservation Credits and you get those for releasing animals to the wild. (or in offline mode, you have to improve the zoo’s reputation)
When you select an animal, it shows how long that animal is up for gender, name, adoption, size, longevity, fertility, immunity, star rating, and source (like where your buying the animal)
When you adopt an animal, it goes to your Animal Storage and stays in your Animal Trade Centre until you move it and a Vet or Keeper will move it. Other tabs in this menu include your purchase history and rewards where you can access any animals you are rewarded.
Exhibit Trading
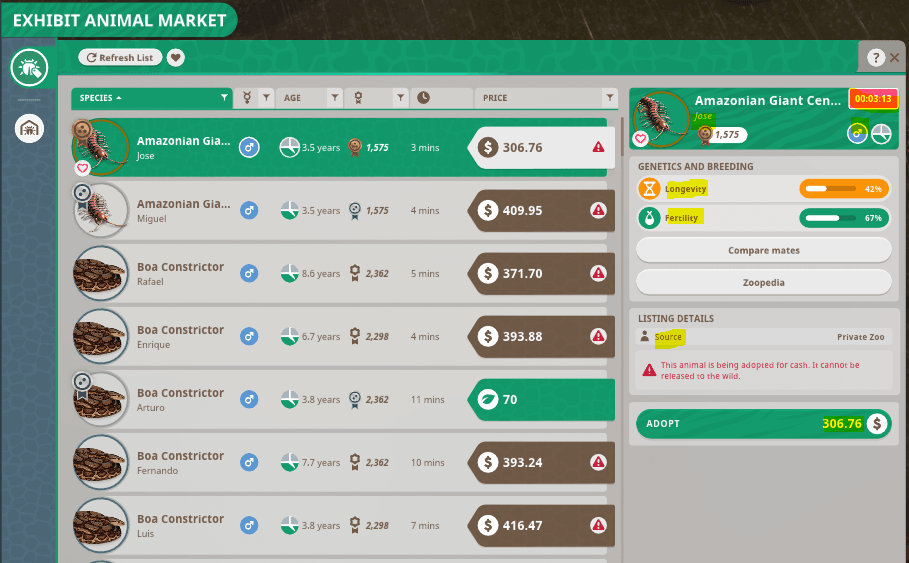
These are the animals that reside in what the game calls an Exhibit. These are located in the Facilities tab and in the Small Animal Exhibits sub-group. The Exhibit Animal Market is similar to the Animal Market except it only shows the animal’s name, star rating, gender, longevity, fertility, and source. These animals don’t need anything in respect to space besides the Exhibit
When you click the Small Animal Exhibit, you can access the animal’s welfare and provide enrichment in the layout tab where (if you have researched it) you can provide rocks and such for the animal. In the climate tab, you can adjust temperature and humidity and it shows the recommended temperature and humidity. In the windows tab, you can open and close all four windows and even create 2 and 3D facades for the animal. The other tabs are Logs (shows upkeep costs) and Mantainence (shows work zone, and time since last visit)
Animal Welfare
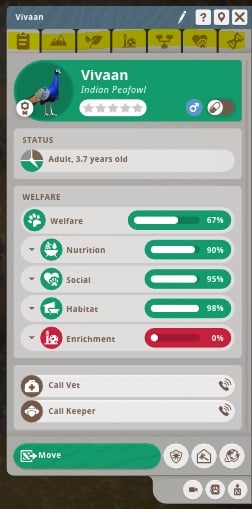
The chief concern of your zoo:
Click on your animal and you’ll see several important info in the tabs:
- Overview (provides an overview of the animal and it’s welfare)
Terrain (shows it’s terrain, climbable area, water and hard shelter needs in the white area. For example, an Indian Peafowl will want no more than about 30% of its exhibit to be rock but less than that is okay too.) - Environment (shows what percentage of the exhibit the animals wants to be plants and the coverage. It also shows the ideal continent for plants to come from and it’s ideal biomes. Lastly, it shows the plants in the habitat and any plants in red are conflicting plants that will negatively impact welfare.)
- Enrichment (shows enrichment welfare and how much each enrichment object contributes to welfare. Placing a million balls for the animals will not improve enrichment. At the very most, it’ll help a little bit but all you really need is one of each object.)
Studbook (shows the source of the animal and it’s timeline) - Social (shows the social welfare of the animal like how many adults it needs in the exhibit to be happy and its current mate.
- Genetics (shows size, longevity, fertility, immunity, appeal, physical stats, and lifetime stats.)
Comparing Mates
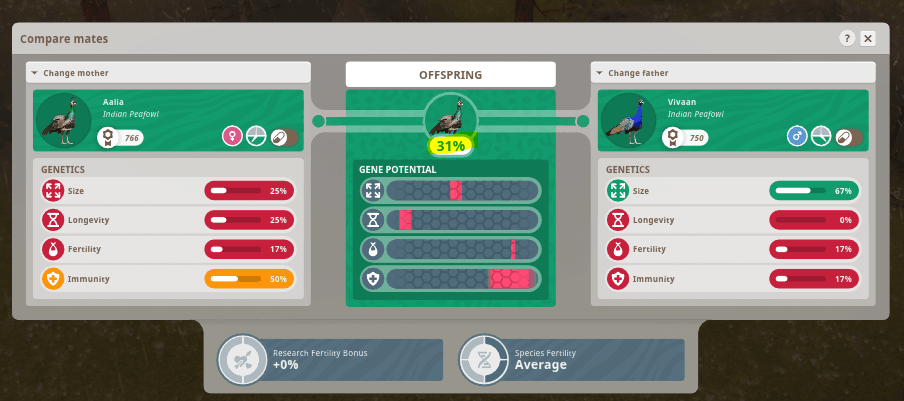
Breeding Programs and Genetics:
- In the genetics tab of an animal, you can click the button Compare Mates where the Breeding Outcome menu will open. This supports the comparison of breeding outcomes for two animals, the mother on the left and the prospective father on the right. After selecting them, in the center will be displayed the predicted genetic outcomes. It also shows the percentage of conception based off of fertility data.
How to Successfully Breed Animals
- The animals must be in the same exhibit and you improve chances by ensuring good welfare, a lack of distraction from other mating partners and veterinary research.
-Note: None of these predictions are exact or guaranteed
Contraception
![]()
- Contraception can be done by physical separation of animals or actual medical contraception. To give medical contraception, go to the Zoo tab and the animals tab and at the far right end of the row is the contraception switch. (or in the animal’s overview tab)
Releasing to the Wild
- Animals cannot be released to the wild if they are: Juvenile, Sterile, Elderly, or Sick.
Releasing an animal to the wild will generate Conservation Credits and boost the Zoo’s reputation. If you, for example, release 8 pea one right after the other, the Conservation Credits generated will decrease so you should space them out.
The Other Stuff
The Other Tabs
The Zoo, Barrier, and Habitat Tabs
(I’m not gonna explain the Nature, Facilities or Construction because they are the most self-explanatory)
The Zoo Tab
The entire overview of your zoo:
The Sub-Groups:
- Zoo Overview – Overview
– Shows Zoo status, opening hours, reputation, ratings, finances, tax, ticket prices, active loans, guest, staff, and animal happiness, number and wages. It also shows current research, loans, and marketing.
Zoo Overview – Graph
– Graph data of pretty much everything I just said - Zoo Overview – Guests
– Guest information like thoughts, needs, spending, and yearly data. - Finances – Finances and Graph
– Shows finance data and it’s respective graph tab - Finances – Loans and Marketing
– Apply for loans for your zoo and pay for marketing campaigns for your zoo - Animals
– Shows all the animals in the zoo and their data, all the habitats and exhibits in the zoo and their data, and all the quarantines in the zoo and their data. - Staff – Staff and Staff Room
– Shows all of the staff and staff rooms in the zoo and their data and the place to hire said staff. - Staff – Work Zones
– Work Zones are zones you can create where you can group areas, facilities, exhibits, and habitats and you can assign staff to them so that they remain the area and work there. This menu manages said work zones. - Facilities
– Shows all staff, guest, power, and water facilities in the zoo and their respective data
Research
Research is critical and that’s why its getting its own information.
What is Research?
If you are in Sandbox Mode then you probably don’t have to worry about this.
Research is the most critical column to creating a good zoo. There are two types of research:
- Veterinary Research
– For every vet you have is every research you can do. Vets can research a specific animal or a specific medical thing like a virus, bacteria, or condition
– Researching an animal will provide new enrichment, nutrition, and more
– Researching a medical topic thing will provide better diagnosis, treatment, and pharmacology (it’ll help when your animals get sick) - Mechanic research
– For every mechanic you have is every research you can do. Mechanics can research a specific theme or a specific construction thing like habitats, barriers, or food shops
– Researching things like habitats, barriers or food shops will yield blueprints, extra objects, and more
– Researching themes will yield scenery and blueprints to that respective theme
The Barrier Tab
- This one is new compared to Planet Coaster but it is relatively easy to understand. The most important thing to note with the barrier tab is the bottom right corner where you can change the Angle Snap, Length, Curvature, Height Snap, Window, Labels, and Camera.
Creating a Habitat
- All you have to do to create a habitat is to build a barrier into a complete circuit and then add a gate. Clicking on a habitat
The Null Barrier

- A lot of times what zoos will do is use natural barriers like cliffs, rocks, or moats instead of fences. The Null Barrier is for this exact purpose. Essentially, it’s an invisible barrier. You can also use Null to let guests enter an exhibit.
The Habitat Tab

- New to the Planet Franchise and very important.
- Inside you can find
- Food and Water (You can find the water and food bowls and troughs) ((If you have researched it, you can change the food quality by clicking on the food container)
- Heaters and Coolers (These require power and the temperature can be adjusted by clicking on the objects)
- Beds and Shelters (In order for an animal’s hard shelter welfare to be benefitted you must include the bedding with some sort of shelter or construction)
- Enrichment Items (There are three types: Food, Habitat, and Climbing. Every animal requires food and habitat while other animals like primates require climbing area.
Important Tip:
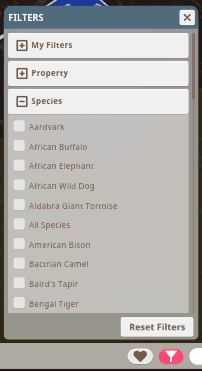
Use the filter button (looks like a funnel) to filter by species so that you can see exactly which objects your animal requires.
Other Stuff
Things that need more Detail:
Education
Education is very important and, believe it or not, your guests want to learn.
You can educate your guests via signs, speakers, and tv’s. They must be powered and then you have to select the content to display by clicking the education device, the dropdown menu and then the animal you want.
Note: Putting one or two signs or speakers isn’t going to cut it for getting that education benefit
Animal Health
There are two ways an animal can become unwell:
- Infection and Physical Injury
Causes of Infection include:
- Contagion from other sick animals in the same habitat
– This can be solved by making sure you put your animals in quarantine instead of immediately in their exhibit. - Dirty habitats caused by dung, rotting food, corpses, guest food, and dirty water
– So make sure your guests don’t litter and your keepers clean the exhibit - Feeding from the ground
– Solved by Food troughs and “Do not Feed” Signs
Injuries are caused by fights between species or by predators.
Treatment
Animals with light injuries and infections may be able to recuperate without intervening but this is dependent on welfare and other factors. Keepers who detect an issue will call vets who deal with the issue. You should note that vets are better at detecting infections than keepers. The vets will take the animal to surgery and attempt to treat it. The duration of this depends on the vet’s training level, the animals immunity, and the severity of the illness. This also applies to physical injuries.
Making Money
- The best ways to make money are:
- Shops and guest facilities
- Donation Boxes (Found in Facilities under Finance)
- Zoo Ticket Sales
- Loans
Just new to zoo this could be silly question but how do you know what barrier to use while animal is in trade center. E.g. Brought two lions built high barrier but when I put them in they jumped out. In zoo tycoon they advised on barrier type before purchase is this option available in zoo planet.