In this guide, we will tell you everything about Treasure of Nadia walkthrough guide. Follow this guide step by step it will be constantly updated. Cape Vedra is a town dynamic with treasure tourism ever since Sofia Vesper, the worlds richest treasure hunter bought a mansion there. We’ve also added the latest Treasure of Nadia updates and bonus content walkthrough to our guide.
Important notes from the author for the guide: This guide I have prepared is for those who want to complete the Treasure of Nadia game 100%. In order not to undermine your enjoyment of the game, I recommend that you only use the guide when you get stuck.
You can use the in-site search using “CTRL-F” to easily find what you are looking for in the guide. By entering the word you are looking for, you will directly reach the section where that word is mentioned. Some items or sections of the guide appear with the same words and characters. Always check that you are in the right section.
Also, if there are things about Treasure of Nadia that you would like me to add to the guide, you can mention them in the comments. I try to update it as soon as possible.
Table of Contents
Treasure of Nadia Guide
Treasure of Nadia is an adventure game including 12 gorgeous women that you will satisfy as you adventure throughout the covert caverns and jungles looking for artifacts to make a name for yourself in the treasure searching world. Let’s start our Treasure of Nadia Walkthrough guide with the first episode.
- Watch / click through the opening scene of the game till you take control of the Main Character inside your house.
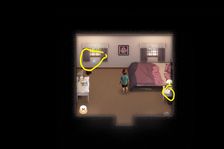
- Go up stairs to the bedroom.
- Read the note on the bed.
- Follow arrows to the library .
- Go inside and talk to Diana.
- Receive Rusty Shovel.
- Go to Estero Key Island.
- Talk to Alia.
- Pick up the Soul Crystal.
- Back in your bedroom, you will meet and chat with Evie.
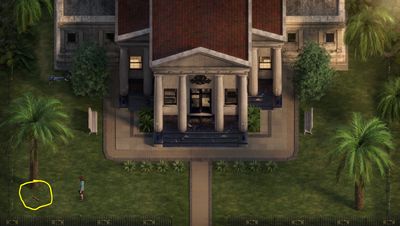
- Go to the Park next to your house and talk to Ranger Michael.
- Pick up your 1st Stone Talisman.
- Go show Diana at the library what you found. (click on Diana, then click Show Diana something. Show her the Stone Talisman. Get 10 bucks.)
- Go to the Lighthouse and talk to Albert.
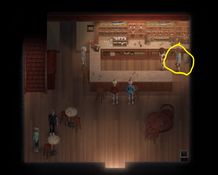
- Go to the Full Mast Bar and talk to Tasha.
- PIck up the Room Key in the lower left of the bar.
- Go to Janet’s House.
- Go to the 2nd floor and talk to Kaley.
- Use the Room key on the door to the right. Pick up your ID and return to the bar.
- Talk to Tasha/Naomi and get Albert his drink. (Dark Rum)
- Walk outside and talk with Naomi.
- Bring the Dark Rum to Albert at the lighthouse. Give Albert the Dark Rum and receive Binoculars.
- Go inside the lighthouse and talk to Albert again.
- Go to Estero Key Island.
- Click on Binoculars. Enjoy scene 1, will be scene 2 in the scene player through the phone.
- Talk with Naomi. (Receive Naomi 1st Heart)
- Go to the doctor’s office and meet Jessica.
- Talk to the lady behind the desk.
- Go to the Church and meet Madalyn.
- Go to SquallMart and meet Emily.
- Go to the park and look for and sell more Talismans to Diana till you have $30.
- Go to Parlor and meet Pricia.
- Get a massage for $30. (Enjoy Scene 2, will be listed as scene 1 in scene player)
- Go to the park and meet Clare.
- Go to the beach and use Binoculars. Enjoy Scene 3 (Brad and Val from LE)
- Talk to Brad and Val on the beach.
- Go to the mansion and meet Sofia.
- Go to the bait shop and meet Jim (fishing aspect of the game, a way to make money)
- Go talk to Janet at her house.
- Go to the 2nd floor and into Kaley’s Room. Click on both blue items. Doesn’t matter the order. Use binoculars to look at Kaley.
- After looking at Kaley, head over to Estero Key Island.
Talk to Alia. - Follow Alia to the east and talk to her again.
- Take the unknown treasure to Diana at the library. Show Diana the unknown treasure item.
- Return to Estero Island.
- Receive Alia Contact information. Receive Alia 1st Heart
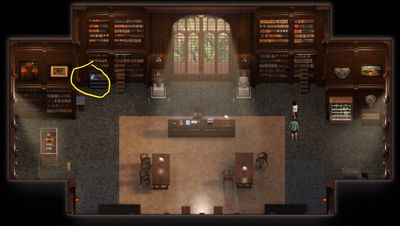
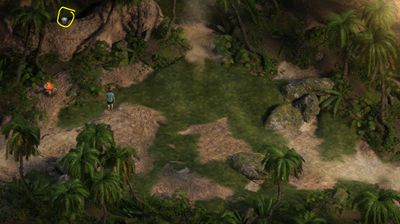
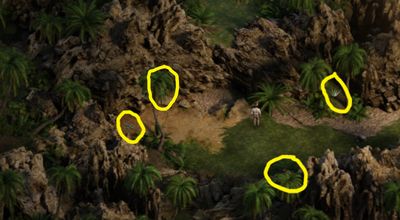
- Go to the park and head west to receive the following items
- Alia’s 1st Chest key
Take the chest key to unlock Alia’s 1st Chest.
- Receive Alia 1st Kama Sutra Page Foolin’ Around (1st)
- Open your phone and select the Booty Call tab and call Alia. You will need to buy some items to fix up your house a little so she isn’t scared away. Buy a basic fence, Garden flowers and basic walkway.
- Enjoy Scene 4
- (As you get more girls’ contact information during the game you will need to buy updates for your house so they will come inside for the booty calls, Also with each booty call you unlock, you’re able to buy an alternative outfit for the girls. Each outfit will cost $400 and are brought at the squallmart on the right side of the store.)
- Go to the Squallmart and buy the field guide for $60.
- Go to the Park and hunt for Talismans till you find a Jade Talisman.
- Bring the Jade Talisman to Pricia at the Parlor.
- Pricia will give you a special message for an awareness boost making it easier to find Talismans in the park for a bit of time. There will be different messages later on in the game that will give you other awareness boosts.
- Receive Pricia 1st Heart.
- Go to the Squallmart and talk to the guy (Ash) outside in the parking lot.
- Receive Photo of Dr. Jessica.
- While your at the Squallmart buy the Lighter($40) and Metal Detector ($70)
- Go to the Park and follow the guys (Corn and Joey) to the West (left) into the park. After the goons are chased away by Ranger Micheal, pick up the Shovel Shaft and light the Torch (1st) with the Lighter.
- Go North (up)
- Pick up Naomi’s 1st Chest Key and get poisoned.
- Go to the Squallmart and buy the Health Insurance card ($60)
- Go to the doctor’s office and talk to the lady behind the desk to make an appointment with Dr. Jessica with your insurance card. She will heal you and give you a check up. After each treatment you receive a int+ boost that will also help you with hunting talismans much like massages from Pricia do.
- After the doctor’s office, go to the park and head east into the cave.
- Pick up the small screwdriver
- (Enjoy Scene 5.)
- After exiting the cave, head over to Janet’s house and talk to her. Go inside and end up on the 2nd floor.
- Click on the bathroom door. ( Enjoy Scene 6)
- Talk with Kaley and Receive Kaley’s 1st heart.
- Click on Janet’s Bedroom door and use the small driver to pick the lock.
- Click on the items in her room, Receive Shoe laces.
Head to the library and talk to Diana about erotic books. Click on the books after talking to Diana.
- Step outside the library and talk to Naomi who is sitting outside on a bench.
- Talk to Naomi again and give her the book that you just picked up from the library called A Sinful Affair.
- Head to the bar and you see Janet leave before going inside. Head inside and talk to Tasha and order a drink to bring to Naomi (Sex on the Beach $50)
- Bring the drink back to Naomi outside the library. Enjoy Scene 7, Receive Naomi contact information as well as Naomi’s 2nd Heart.
- Click on your pants where Naomi put them.
- Go to the doctor officer and talk to Ash who is standing outside.
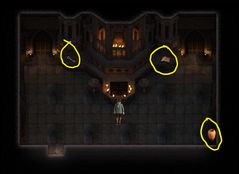
- Head over to the Church and when Ash takes Madalyn off to the side, go up the stairs and inside. Click on the item on the right and receive the Church Key. Then use the chest key you have on Naomi’s 1st Chest on the left and Receive Naomi’s 1st KamaSutra Page Blow Job (2nd)
- After grabbing both items, leave the Church and you and Ash will be back in the parking lot of the doctor office. You will give the Church key to Ash in exchange for a photo of Dr Jessica.
- Go to the park and find Alia, talk to her.
- Take Alia into the cave to the east.
- Follow Clare, Joey and Corn deeper into the caves to the west. There will be talking among everyone.
- Enjoy Scene 8
- Before leaving the cave you should be able to find a Slive Talisman and light the Torch (2nd).
- Take Alia back to the entrance of the Park and you run into Sam (Alai’s Dad)
- Go to the Parlor and give Pricia the Silver Talisman you found for another massage.
- Head to the Squallmart to see Emily. Talk with Emily and she will tell you someone stole some money from the store. Before leaving to look for the guy, buy the pipe wrench ($40) and the shovel head ($80).
- Head to the Parlor and you will see the guy go behind the Parlor.
- Talk to the guy and he will give you the $350 he took from the Squallmart. While you’re behind the Parlor pick up the Shovel Handle there may or may not be random talismans as well.
- Take the money back to Emily at the Squallmart.
- (Enjoy Scene 9)
- You will receive Emily’s contact information and Emily’s 1st Heart
- Head to the Library and talk to Diana about what you found in the cave.
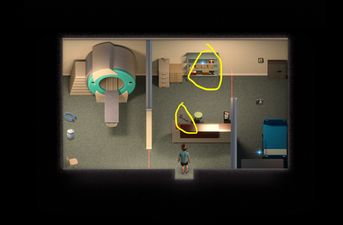
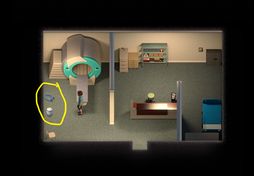
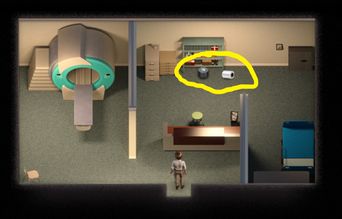
- Go to the doctor officer and click on the bird in the parking lot. Once the lady comes out to look at her car go inside and pick up the MRI room key.
Use the MRI room key on the door to the left to enter the MRI room. Pick up Emily’s 1st Chest Key and the High Power Magnet.
- Bring the magnet to Diana at the library. You will Receive Diana’s 1st Heart.
- Leave the library and speak to Ash who is outside and to the left. You will need $250 to buy a photo of Diana off of Ash.
- Go to Estero Key to speak with Naomi, Sam and Alia. Before chasing after Alia or Naomi go to the cave and use the chest key on Emily’s 1st Chest to Receive Emily’s 1st KamaSutra Page Butt N’ Muff Munch (3rd)
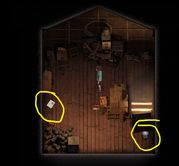
Go to the bar to talk with Naomi and Tasha. Go up the stairs on the left into the attic. Read the book and fix the water leak with the pipe wrench.
- Go back down stairs and talk to Naomi and Tasha. Follow Naomi to the bathroom.
- Enjoy Scene 10
- Receive Tasha’s 1st Heart.
- Head over to Estero Key and light the candle with the lighter.
- After lighting it, talk to Alia.
- Enjoy Scene 11, Receive Alia’s 2nd Heart.
- Go to the library and try to get inside to talk to Diana.
- Go to the Squallmart and talk to Ash.
- Go back to the library and wait for Ash to get rid of the bodyguard before going inside to talk to Diana and Sofia.
- Go to the Squallmart to talk to Ash again. (Will need $100 to buy the photo off him)
- Go to Janet’s house and follow Kaley up stairs to talk to her.
- Enjoy Scene 12
- Go to the library to catch Ash as he exits from the jungle. Pick up the following items that Ash dropped as he ran off. Church Key, Broken Camera and a Silver Talisman.
- Go to the Church and use the Church Key on the lower door to the left of the Stairs.
- Enjoy Scene 13
- After breaking into Madalyn’s room and the scene, light the both Torches (3rd and 4th) and pick up the old map and the Chamber key.
- Use the Chamber Key on the door between the two torches. Have a chat with Madalyn.
- Go to the park and meet with Madalyn. (You found something Expanded Cavern Mop) Receive Madalyn’s 1st Heart.
- While you’re in the cave you can craft the Jade Shovel but combining the Shovel Handle, Shovel Head, Shovel Shaft and a Jade Talisman.
- Since Ranger Michael is at the library you can explore deeper into the Park to the west.
- When you explore more to the west you will find a Ginseng Plant and Tasha’s 1s KamaSutra Page Strip Tease (4th) (No Chest Key/Chest needed)
- Eat the Ginseng Plant to raise your blood pressure and you get a new treatment from Dr, Jessica.
- Go to the doctor’s office and make an appointment to see Dr, Jessica ($140) Once you get the treatment from Jessica. You will be left in the room alone, when you are click the machine that is in the room.
After you are back in the main lobby of the doctor’s office, go back into the MRI room to the left and pick up the following items Camera Base and Loose Screws.
- Leave the office and Jessica will drive you to the bar. After a nice time at the bar you will Receive Jessica’s 1st Heart.
- Tasha and you will then do a drinking game, the trick is to pretend to drink when Tasha is not looking at you. After you win at the drinking game.
- Enjoy Scene 14
- You will also receive Tasha’s contact information.
- Head to the crafting table in the cave and craft A Working Camera with the following items Broken Camera, Camera Base, Small ScrewDriver, and Loose Screws. You will get a photo of Clare when you crafted it.
- Go to the Squallmart to give Ash his Camera back. Then follow him to the Church to talk to him again.
- Watch the meeting between Clare and Sofia.
- Go back to Squallmart and speak with Ash again.
- Then go inside and speak with Emily and some friends from LE.
- Buy the SunScreen ($30)
- Go to Janet’s House and use the pipe wrench to break a pot and pick up a basic Container.
Go to the Library and break another pot that holds Naomi’s 2nd Chest Key.
Take that Chest Key to the attic in the bar to unlock Naomi’s 2nd Chest and receive Naomi’s 2nd KamaSutra Page Tit Fuck (5th)
Go to the Park and head west till you see Clare, Joey and Corn. Follow them north. You will come to a river where you can pick up fishing lures and the Philweed (1st) plant. Also a loose ruin you can move, when you move chase and catch all the roaches (9)

- Go to the squallmart and give the Philweed and Ginseng Plant to Emily.
- Enjoy Scene 15 and Receive Emily’s 2nd Heart.
- Buy the Metal Hook ($90) and Alloy Shovel Head ($200)
- Head to the Library to speak with Diana about a rat problem.
- Go to the lighthouse to talk to Albert and follow him back to the Library.
- Click on the Box and put 5 roches in the box.
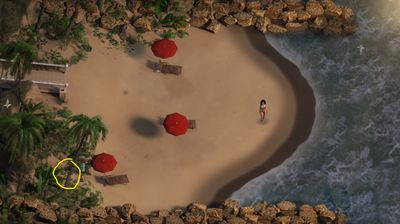
- Head to the beach to talk to Diana while Albert cleans the Library.
- Enjoy Scene 16.
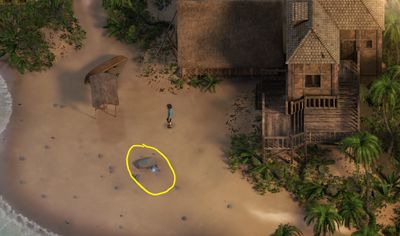
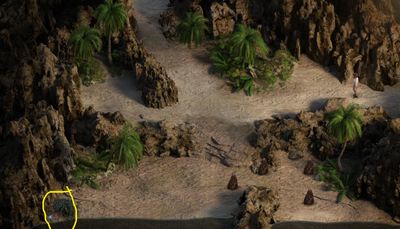
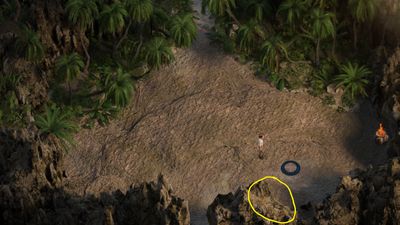
- While at the beach click on the lower left area for Alia’s 2nd Chest Key.
- Head back to the library to check on Albert. Diana will come back and thank you both for your help and Receive Diana’ 2nd Heart.
- Go to the squallmart and talk to Ash. Follow him to the lighthouse and up stairs to see if he was able to get a shot. Pay Ash for the photo.
- Head to Estero Key to speak with Naomi.
- Head to the squallmart to speak with Emily and Pricia.
- Buy the Antacid Tablet at the Squallmart.
- Go to the Parlor (Behind) with a Ginseng Plant. Pricia will give you leather gloves. Plant the Ginseng Plant for Pricia. Go inside the Parlor for a reward.
- Receive Pricia Contact Information and Pricia 2nd Heart.
- Go to the library to speak with Albert and Janet.
- Go to Janet’s House and find Kaley. (out back on the deck)
- Go inside the house. Naomi and Alia will come over.
- Go over and talk to Naomi and Janet.
- Go inside and get the Ice Tea from the Kitchen.
Go up to Janet Room and find the booze.
- Go back outside and give the drinks to Naomi and Janet.
- Follow Naomi inside and up to Janet’s Room.
- Enjoy Scene 17
- Go back outside (backyard)
- Go to the lighthouse and down stairs. To unlock Alia’s 2nd Chest and receive Alia’s 2nd KamaSutra Page Cock Play (6th)
- Also pick up the Damaged Boots.
- Go to Kaley’s Room and speak with her and Receive Kaley’s 2nd Heart.
- Go To the lighthouse and speak with Albert, he has something for you. The code to the chest is 684. You will receive the rare guide book for treasure hunting.
- Head to the squallmart, Emily will chase Ash out. Go inside and buy some Shoe Glue ($40)
- Go to the crafting table in the cave and make some Stompin’ Boots with the following items Leather Gloves, Shoelaces, Damaged Boots, and the Shoe Glue.
- While in the cave smash the pot in the upper left side and pick up another Basic Container.
Go to the bar into the attic and smash some bugs to get Pricia 1st Chest Key. Also pick up the Carbon Shovel Shaft that is right next to the key.

Go into the Park west (once) North (once) then East (once)
- Use the Antacid tablet on the bird to get rid of it and open Pricia’s 1st Chest to receive Pricia’s 1st KamaSutra Page Face Sitting (7th)
- After picking up the Kama Sutra Page, go west (once) and North (once). You will See Clare, Joey and Corn again.
- Enjoy Scene 18
- Pick up the following items, Floppin’ Fish (More Fishing Lures) and Ultra Shovel Handle.

- Go to the library to speak with Diana.
- Go check the Squallmart then come back to the library to speak with Emily. PIck up the four books.
- Talk to Emily again and give her the book titled Perennial’s Of Cape Verda, then go to the Park and meet up with Emily to look for Red Ginseng Plants, you will fall and get injured and taken to the doctor’s office.
- When at the doctor office after getting healed pick up the following items Basic Container and Heavy Cord.
- Open your inventory and click on the heavy cord and then metal hook to tie the two items together to make a Grappling Hook.
- Go back into the Park and head West back to the place where the Red Ginseng was along the way, use the Grappling Hook to pick up the Gaffer Tape.
- After picking up the Red Ginseng, head east to the cave and use the grappling hook to pick up the Wrench Grip.

- Go to the Squallmart and give Emily the Red Ginseng.
- Enjoy Scene 19.
- Go to the crafting table in the cave and make the Pickaxe by using the Pipe Wrench, Grappling Hook, Wrench Grip and Gaffer Tape.
- Go to Estero Key and speak with Naomi, Sam, Kaley and Janet.
- Follow Kaley and Alia to the East.
- Enjoy Scene 20.
- Receive Alia’s 3rd Heart.
- Go back to Alia’s spot and use the Pickaxe to open a hole to the caves.

- Enter the cave and click your way to the Torch (5th). After lighting the torch, pick up the Shaman Staff.
- Clare will come and offer 5K for the Staff, you can take the 5k or reject the offer and she will give you 10K for it. Either way you get Clare’s 1st Heart.
- Since you lit the 5th torch go to the church and pick up Emily’s 2nd Chest Key that will appear now.
- Then go to Madalyn’s room and talk to Madalyn. After talking to Madalyn, use the Pickaxe on this stone pillar.
- Go into the next room to the east that you just opened up.
- Open Emily’s 2nd Chest to receive Emily’s 2nd KamaSutra Page Face Fuck (8th), also pick up the Broken Key(1st) and break the pot with the Pickaxe and get Sliver Talisman, pick up the money on the table as well.
- Go back to the previous room and remove the other two stone pillars and move the rock to the touch pad. Tasha’s 2nd Chest Key will appear where Madalyn is.
- Go to Parlor and speak with Ash.
- Eat a Red Ginseng plant and go see Jessica for a new treatment. ($140)
- Go to the park and follow Clare into the Caves.
- Enjoy Scene 21
- Solve the rock puzzle by doing the following.
- Down
- Right
- Right
- Down Down
- Left X5
- Up X4
- Right
- Rock should be on the pressure plate and chest appears.
- Open the chest (no key needed) to receive Unknown treasure.
- Go to the library and show Diana the unknown treasure. You will run into Naomi and Alia on your way out of the park. You will run into Tasha outside the library.
- Speak to Diana.
- Head back to the park and speak with Tasha.
- Enjoy Scene 22, Receive Tasha’s 2nd Heart.
- Go to the bar and speak to ash as he comes out, Then go to the bar and speak to Tasha and Micheal. You can choose to pay the ticket or not. (really doesn’t make a difference.)
- Go to Janet’s house and up to her bedroom to find Janet passed out on her bed and Receive Janet’s 1st Heart. Leave Janet’s room and speak with Kaley.
- Go to the library and speak with Diana. Read the note that is on her desk.
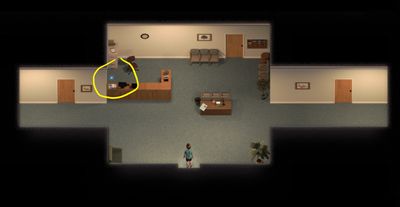
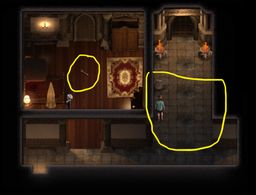
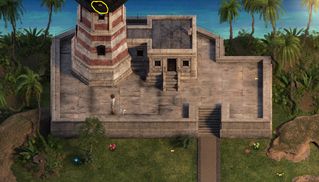
- Hit the red button on the right side so it is Green. Then go outside.
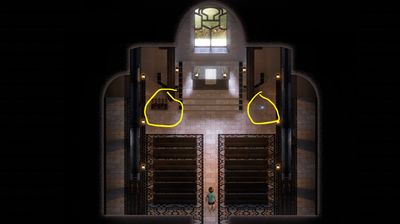
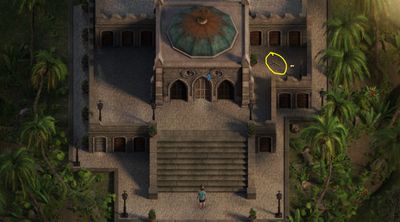
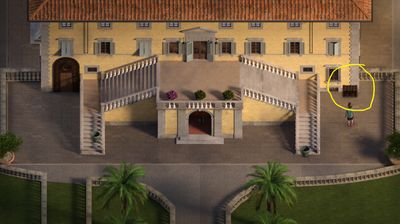
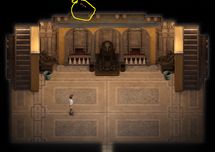
- Upper Right side of the screen there is a chest, click it and use the Secret key on it.
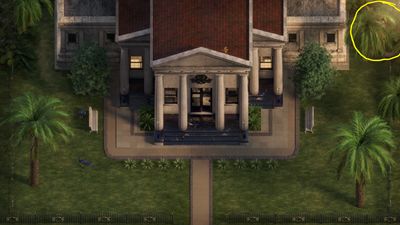
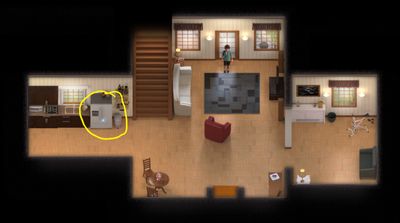
- After the guy picks up the box, go to your house and check on Diana.
- Enjoy Scene 23.
- Go see Madalyn at the Church.
- Go talk to Jessica at her office.
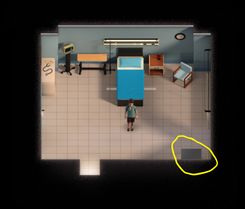
- Go into the MRI Room to the left and click on the box, that in the room.
- Found Nitroglycerine Bottles
- Go to the park where you blow up the bird and go east one time.
- Open Tasha’s 2nd Chest with the chest key you have and receive Tasha’s 2nd KamaSutra Page Mustacheless Ride (9th) also pick up the Broken Key(2nd).
- Go to the crafting table in the cave and make a rock bomb (X2) with Nitroglycerin, Basic Container, Silver and Jade talismans.
- Go west and blow the rocks that are blocking both paths North (up) and south (down).
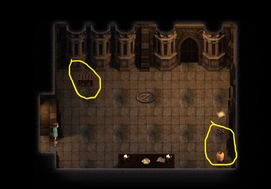
- The room to the north, make your way to the Torch (6th) and light it.
- The room to the south is the room where you need to go where the snake is.
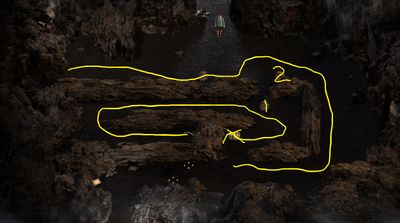
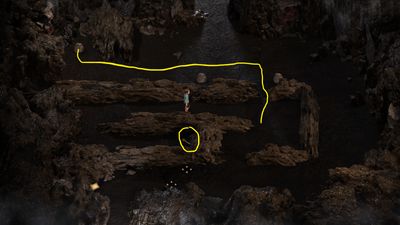
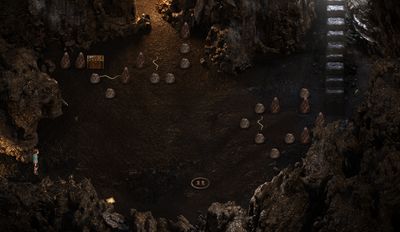
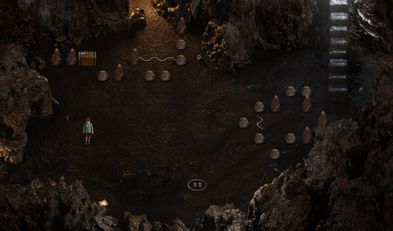
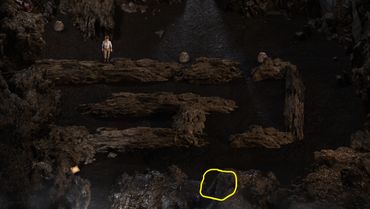
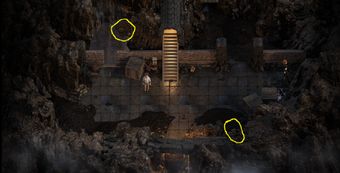
- In order to get the snake into the trap move the number 1 rock down one spot. Move the number 2 rock left once and then down once so it is in the little gap between the logs.
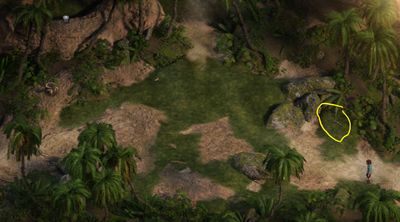
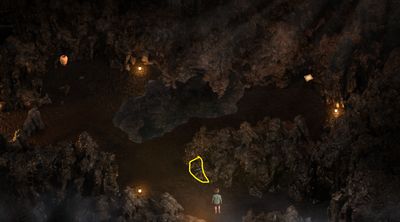
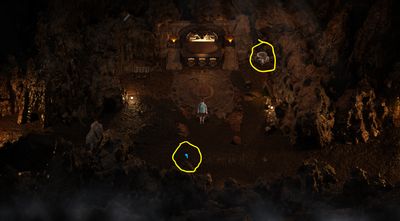
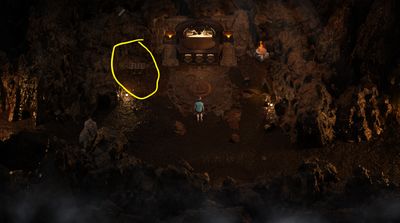
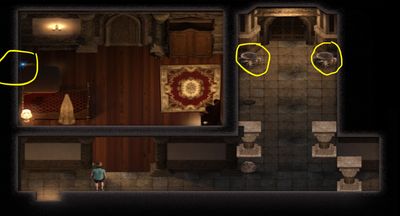
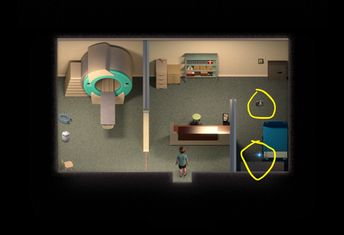
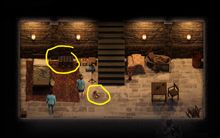
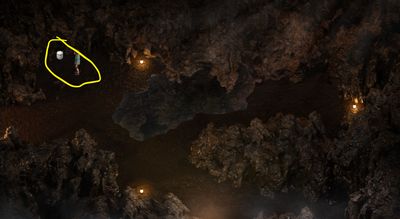
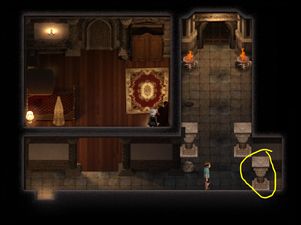
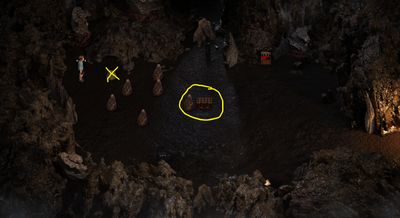
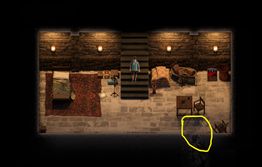
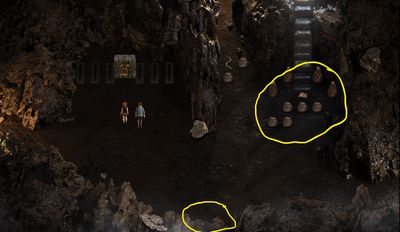
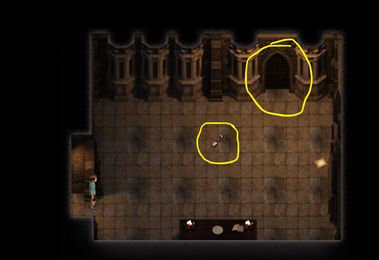
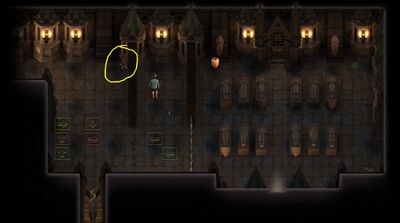
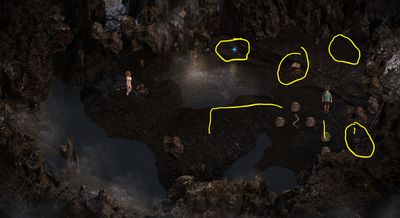
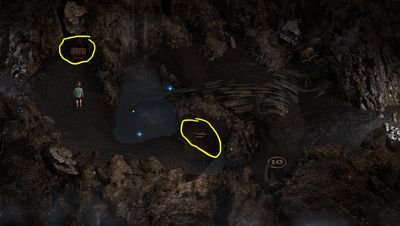
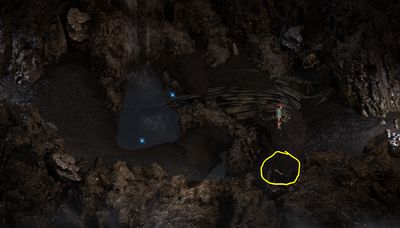
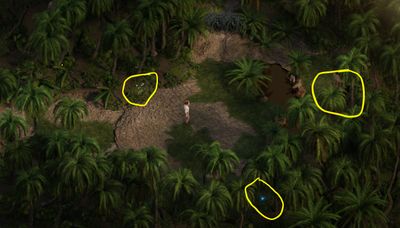
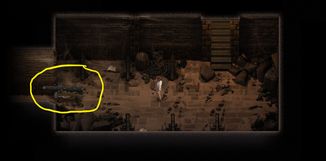
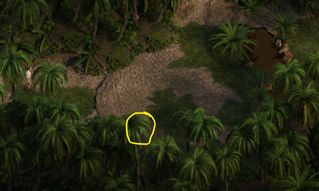
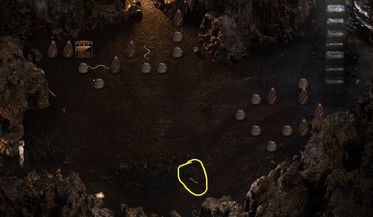
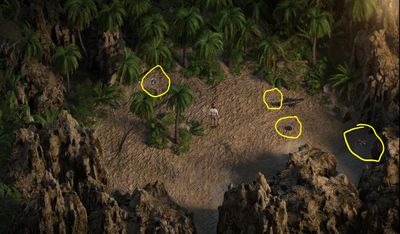
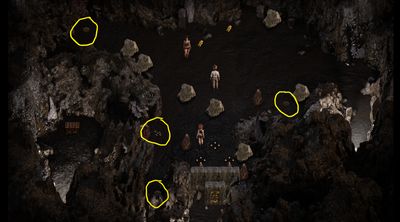
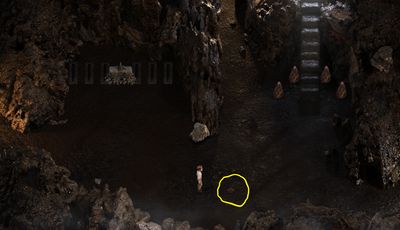
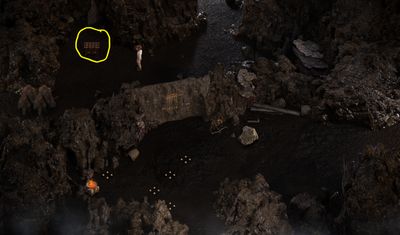
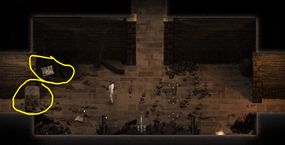
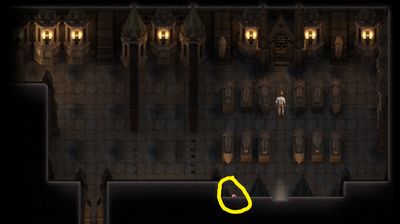
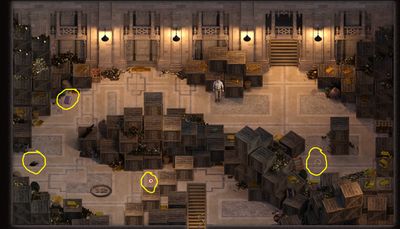
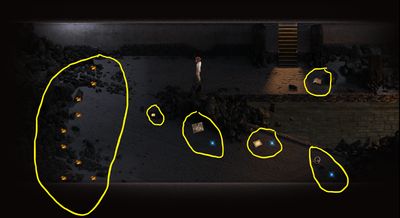
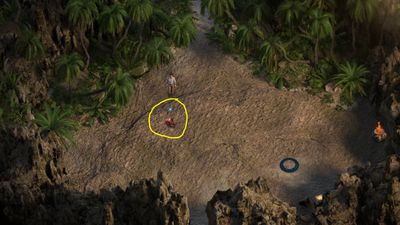
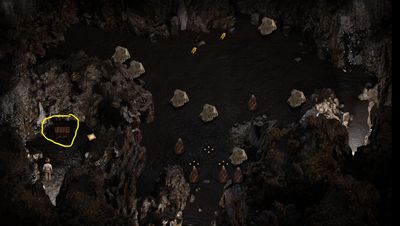
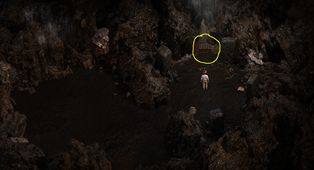
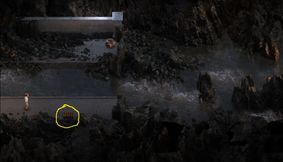
- Once the viper is in the barrel you can click on it and pick it up to take back to Jessica. You can leave the room to reset the rock then push a rock to the pressure plate in the upper left so Kaley’s 1st Chest Key will appear where the snake was. (see photo below)
- Before going back to the Jessica’s Officer, go back to the room that to the north and open Kaley’s 1st Chest with the chest key you just got and receive Kaley’s 1st KamaSutra Page Mutual Masturbation (10th)
- Go to Jessica’s Office and give her the Snake in a Barrel.
- Go see if Kaley is at home, talk to Janet, she will give you a photo of Naomi and Alia from the pool to give to Naomi.
- Go to Estero Key and find Kaley, Naomi and Alia. You will give the photo to Naomi and Receive Naomi’s 3rd heart.
- Go east and find Kaley and Alia at the hole to the caves in Alia’s spot. Follow the girls into the cave, but go craft another rock bomb first since you will need another.
- Use the rock bomb to blow up the rocks and head west deeper into the caves with Kaley and Alia. You will find bones and Alia will run off and out of the cave. Chat with Kaley about her sexual issues then exit the caves, back to Estero Key. You will have a chat with Naomi and Sam.
- Head to the doctor’s office and meet with Kaley.
- Enjoy scene 24, you will also Receive Jessica’s 2nd Heart.
- Go into the cave through the Park entrance and find Kaley near the crafting table.
- Head west (once) and North (once) with Kaley.
- Enjoy scene 25
- After the scene ends the cave collapses and a huge rock will fall from the roof. You also receive a Pirate Medallion. Before you leave the cave, pick up the Pirate Diary.
- Attempt to leave the cave but you run into Clare, Joey and Corn near the crafting table.
- You will exit the cave and be in the Park just outside the cave where you will Receive Kaley Contact Information.
- Head to the library and show Diana the Pirate Medallion.
- Head to Church to show Madalyn the Pirate Dairy.
- Enjoy Scene 26.
- Head to the library and talk to Pricia, you will also chat with Diana.
- Head to Estero Key where Sam and Michael are talking.
- Go to the Squallmart for a Kayak License exam ($250)
- Take the Kayak License exam that answers are Sunscreen, Winds from west at 15+ knots, Beer, and South,
- Give the Kayak License Exam to Michael outside the Squallmart.
- Head to the Park and follow Michael to the west.
- Talk to Michael on the shore of the River.
- Play the Kayak travel game, if you are good enough you can make money along the way but the key is to just avoid the rocks for 60 seconds.
- Click through the little funny Kayak Training scene, till Diana shows up.
- Go South, West and then North till you come to Diana’s Kayak.
- Talk to Diana.
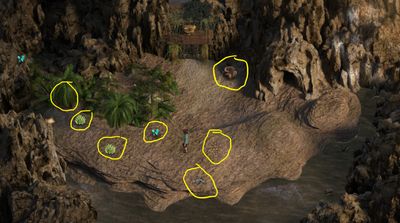
- Break the pot with the Pickaxe to get Gaffer Tape and pick up the Broken Key(3rd). Move the rock in the lower left till it is on the pressure plate to clear a path North.
- Head North once the path is clear.
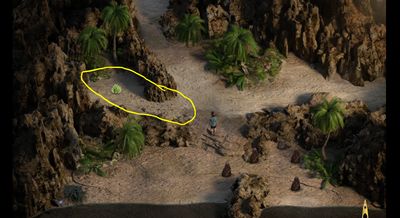
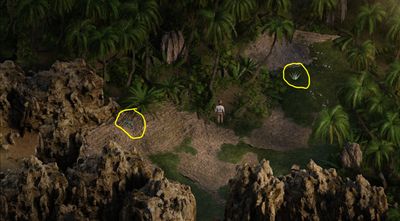
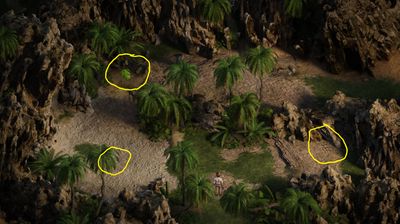
- Stay toward the bottom of the screen and without moving any rocks reach the Maca Plant and the Old Map. Now move the rocks around till you clear a path to the top half of the screen.
- When you clear a path and step into the upper half of the screen Diana will appear. Diana and you will chat and explore.
- Enjoy Scene 27.
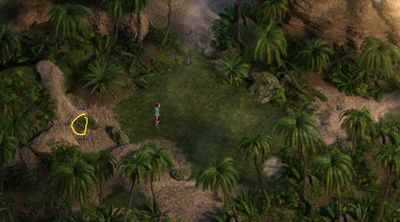
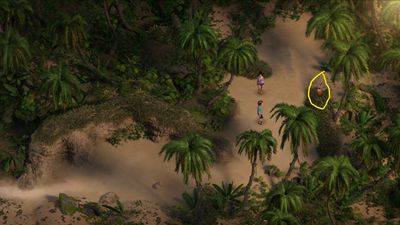
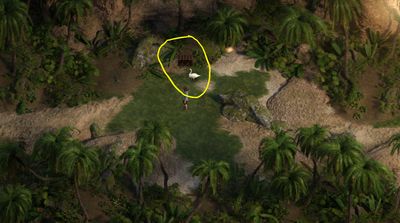
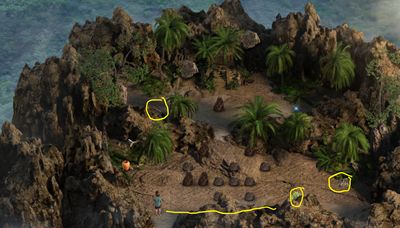
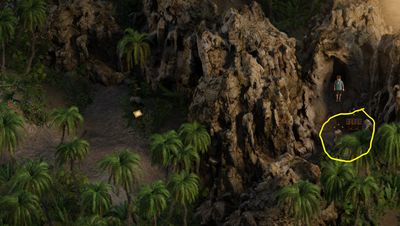
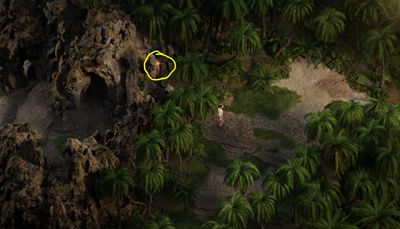
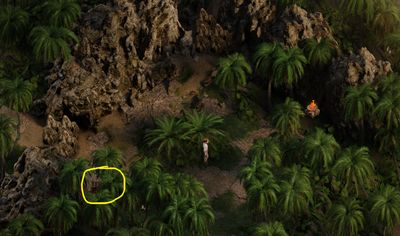
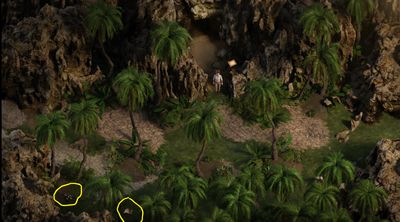
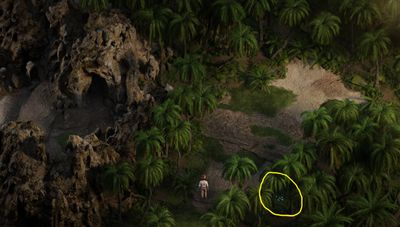
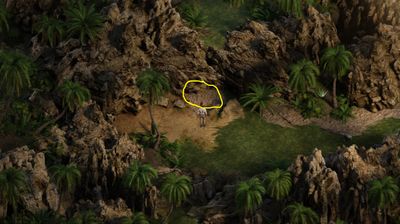
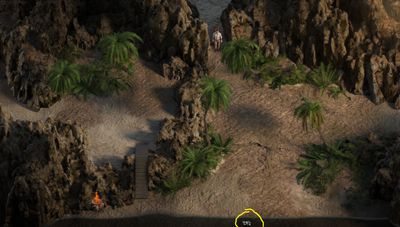
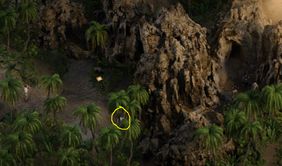
- Pick up the Rusty Key. (see pic above). Avoid the flying bug you can’t get past it and get to the pot at this time.
- Talk to Diana back by the river and cross the river back to Park side. Diana will give you the Tipak Artifact.
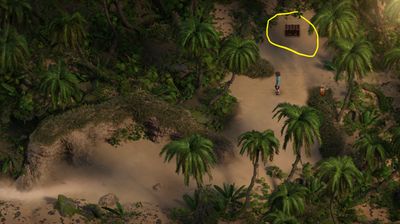
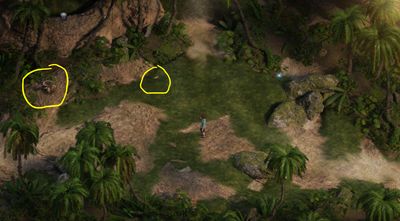
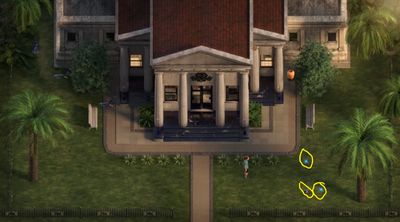
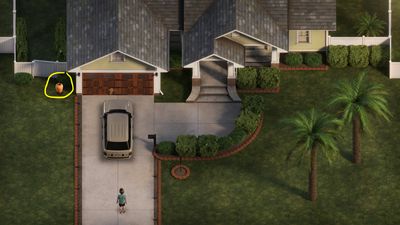
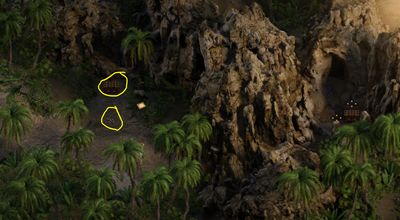
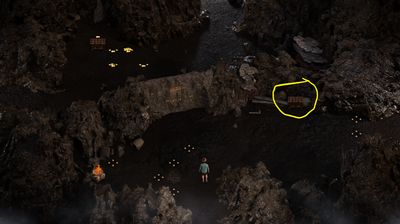
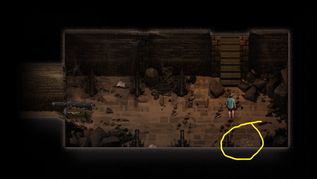
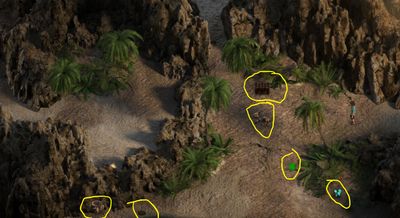
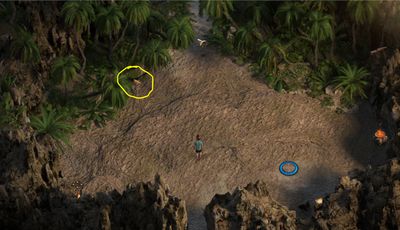
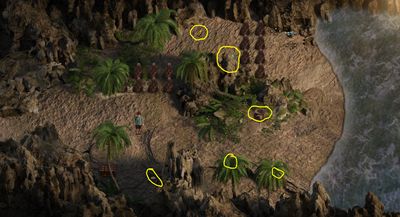
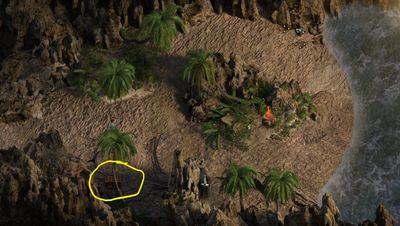
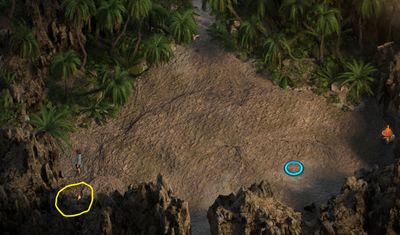
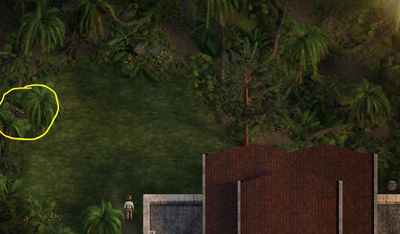
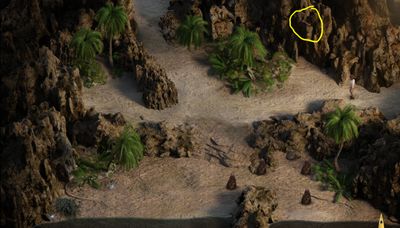
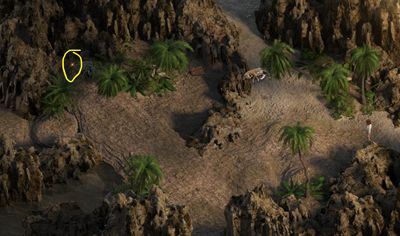
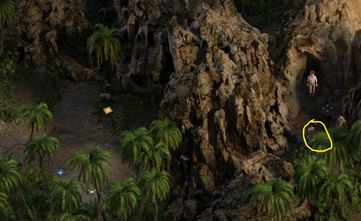
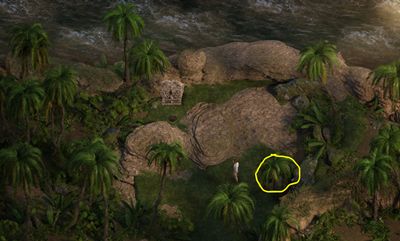
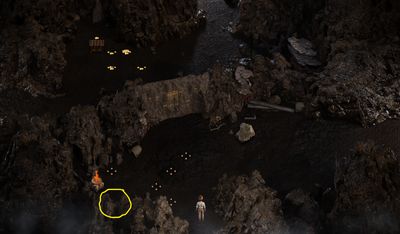
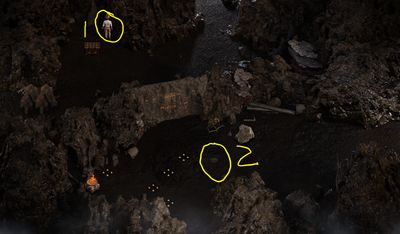
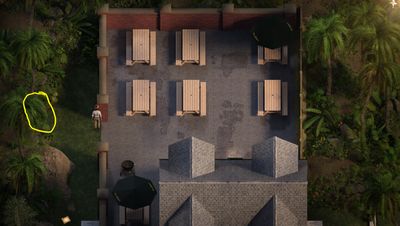
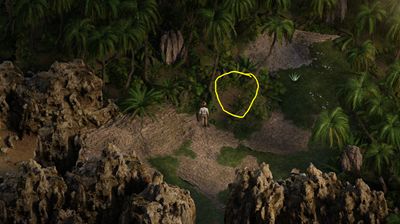
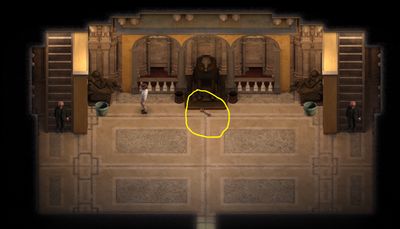
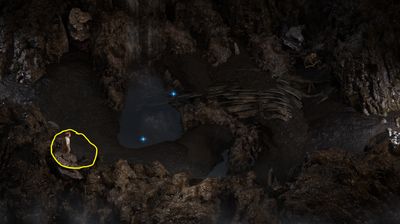
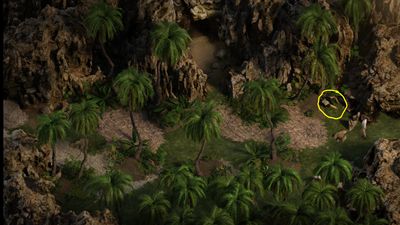
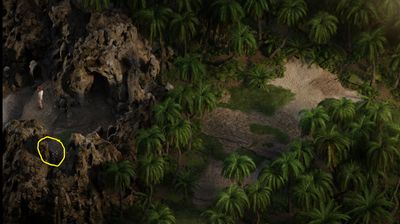
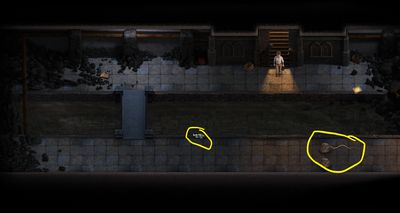
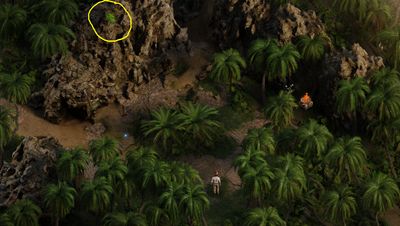
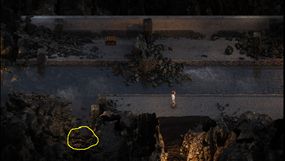
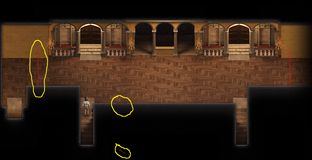
- Go south once and you can find Naomi’s 3rd Chest Key by using your Pickaxe on a weak area of the ground by a palm tree. (see photo below.)
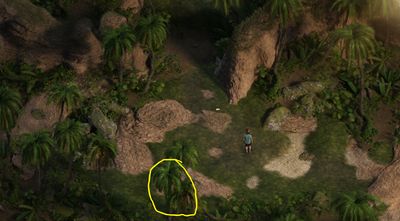
- Take Micheal’s Kayak back across the river and head East to open Naomi’s 3rd Chest, to receive Naomi’s 3rd KamaSutra Page Doggy Style (11th)
- Head to Squallmart to give Emily the Maca Plant.
- Enjoy scene 29 (don’t worry you didn’t miss Scene 28)
- Receive Emily’s 3rd Heart.
- Ash will come in and talk to you when Emily unlocks the store.
- Buy Plastic Wrap ($100) and Alumina ($1000) before leaving the Squallmart)
- Talk to Ash outside the Squallmart. Pay for a photo of Janet.
- Go to the Park to find some Fossilized Algae. You will need your Pickaxe.
- Go to the other shore line to the West to find some Quartz
- Go to the crafting table to make Ant Killer using the following items Fossilized Algae, Quartz, Alumina, and Rusty Key.
- Use the Ant Killer at the foot of Mount Vedra to get the Maca Pant.
- Take the Maca Plant to Pricia behind the Parlor.
- Talk to Pricia, give her the Maca Plant.
- Enjoy Scene 28 and Receive Pricia’s 3rd heart.
- Head over to Sofia Mansion for a meeting.
- Enjoy Scene 30.
- Head to the library and talk to Diana.
- Head over to the bar for rush hour and talk to Tasha.
- Go out back and talk to Albert and the other people and get their drink orders. Go to the bar and pick up the drinks. Tasha out of peanuts you will have to buy some at the Squallmart but drop off the drinks 1st.
- After you serve the drinks head to Squallmart to buy some peanuts ($50), you will end up talking to Diana 1st. Pick up the peanuts and head back to the bar.
- Go inside and talk to Tasha and Peanut guy.
- Enjoy Scene 31 and Receive Tasha’s 3rd Heart.
- Go to the crafting table in the cave to meet up with Diana.
- Walk with Diana in the cave till you see Clare, Joey and Corn. Corn and Joey will leave and you will chat with Diana and Clare.
- Enjoy Scene 32 (not a sex scene)
- Head to Janet’s House for a Rat problem. Talk to Janet.
- Go to the bar and into the men room to catch a cockroach.
- Go out back and break a pot to grab a Basic Container, Click on the grill and use the lighter on it to get some Fly Ash.
- Head to the crafting table in the cave to make a Rat Trap using the following items, Plastic Wrap, Gaffer Tape, Roach and Basic Container.
- Head back to Janet’s House and talk to Janet, use the Rat Trap.
- Place the Rat Trap in the front yard then head inside to talk to Janet again.
- Go outside and check the Rat Trap.
- Janet will come out and you and her will go to the park to release the rat. The rat will bite you and Janet will take you to the doctor office to see Jessica.
- Enjoy Scene 33, you will Receive Jessica Contact Information and Jessica’s 3rd Heart.
- Step outside the doctor’s office and talk to Janet.
- Head to the Bar and talk to Albert and Ash who are outside.
- Go to the lighthouse there will be a Basic Container in the middle of the floor.
- You will now have the items needed to make another Rock Bomb, go to the crafting table in the cave and make it.
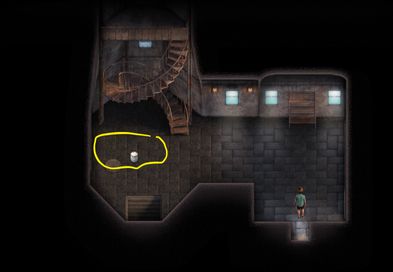
- Go back to the lighthouse and use the rock bomb on the weak wall in the basement.
- Go into the new and Albert will come talk to you.
- After Albert is done talking use your Pickaxe on the weak ground in the fort and find Jessica’s 1st Chest Key.
- Take the Chest Key to the back area of the Bar and open Jessica’s 1st Chest Chest and Receive Jessica’s 1st KamaSutra Page Heart Checkup (12th)
- Go to the Crafting Table and use the following items to make The Swift Shovel, Silver Talisman, Alloy Shovel Head, Carbon Shovel Shaft, and the Ultra Shovel Handle.
- Go to the Squallmart and talk to Emily, Alia, Naomi and Sam will show up as well.
- Buy Alumina before leaving the Squallmart.
- Head to the library to talk to Diana about Clare notebook. Clare will show up as you and Diana are talking.
- Head to the Cave entrance in the Park and follow Clare. Head west in the cave till you see Clare heading to the North.
- Along the way stop and pick up the Dolomite by using your Pickaxe on the weak cave floor, also take note of the drawing on the wall, it will come in handy in a few.
- Follow Clare to the East after she bypasses the spikes trap. Talk to Clare after you save her from a trap. The answer to the puzzle is up, up, down, up, down, up.
- Use the Tipak Artifact you have to open the puzzle.
- Chat with Clare about the Artifact, she will take it and you will Receive Clare’s 2nd Heart.
- Search the bottom of the area till you find Tasha’s 3rd Chest Key then move the rocks out of the way so you can climb the stairs. Pick up the Pirate Diary as you climb the stairs.
- There is a lot of good stuff in this area, make you sure you grab it all. The Floppin’ Fish (more Fishing Lures), the Philweed (2nd), The Maca Plants, open Tasha’s 3rd Chest to receive Tasha’s 3rd KamaSutra Page BlowJob (13th) and light the Torch (7th). Also use the Pickaxe on the weak ground to pick up White Sand.
- On your way out of the cave stop by the crafting table to make Concrete using the following items White Sand, Dolomite, Stone Talisman and Fly Ash.
- Go To Estero Key and follow Sam to the east to the hole that led into the cave at Alia’s Spot.
- Talk to Sam and give him the Concrete.
- You will be moved to the Squallmart and talk to Emily and Alia.
- Make sure you have a Red Ginseng, Philweed and a Maca Pant on you before going to your house.
- Go to your house and talk to Emily and Alia. They will be inside waiting.
- Enjoy Scene 34, You will Receive Alia’s 4th Heart.
- Eat the Maca Plant (should have 1 have on you) Head to the Doctor’s Office to get a new Treatment from Jessica. When you get on the main map of the town you will receive a text from Naomi with a surprise photo.
- Head to the doctor’s Office and make an appointment to see Jessica. ($140)
- Head to the Church and show Madalyn the Pirate Dairy you recently found.
- Enjoy Scene 35.
- Go to Janet’s House and up to Kaley’s Room.
- Enjoy Scene 36.
- Kaley will come and talk to you in her room.
- Follow Kaley downstairs she will leave the house and you talk with Janet and Naomi as they come in from the hottub.
- Go to the lighthouse and talk to Albert and Kaley.
- When you leave the lighthouse Naomi will send you another photo on your phone. Head to the Squallmart and talk to Alia and Emily.
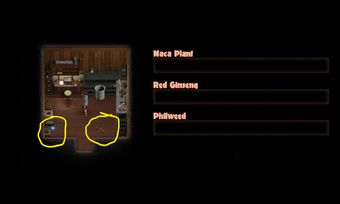
- Pick up the Broken Key (4th) and the Small Screwdriver from the back room of the Squall. ( Also at this time drop off any extra Red Ginseng, Maca Plant and Philweed you find in the bucket, will come in handy later on)
- Go to Janet’s House and talk to Janet. Go up to Kaley’s Room and try to enter, you end up using the small screwdriver to pick the lock.
- Enjoy Scene 37, you will Receive Kaley’s 3rd Heart.
- Head to the library to talk to Diana about Clare.
- Head to the Park and enter the Cave with Diana.
- Take Diana to the Stairs that lead up to where the 7th Torch was.
- Enjoy Scene 38, you Receive Diana’s 3rd Heart.
- A new path will open to the North and you and Diana will come across Clare, Joey and Corn.
- You will end up back in your house, Go back to where Clare was attacked by the Jaguar, you can sneak by it to the West.
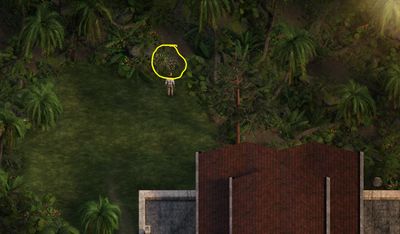
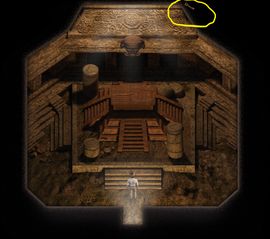
- Once again there are a lot of key items in this area to pick up. Pick up Camera, Scorpion Venom, A Philweed (3rd), step on the pressure plate to make a set of stairs appear, and finely light the Torch (8th).
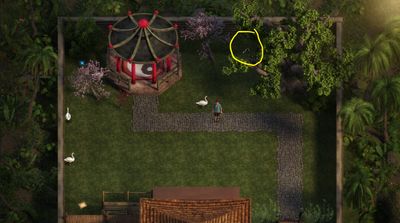
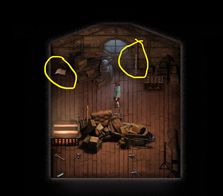
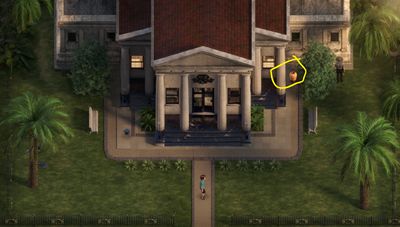
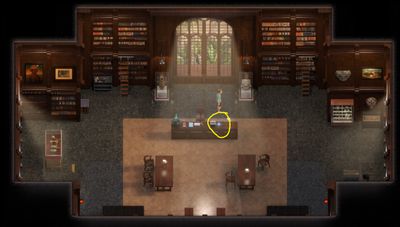
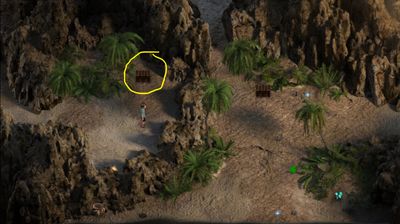
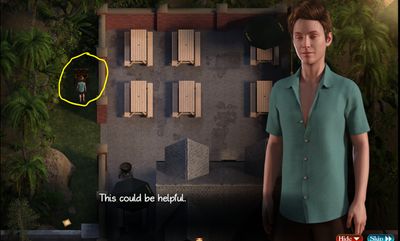
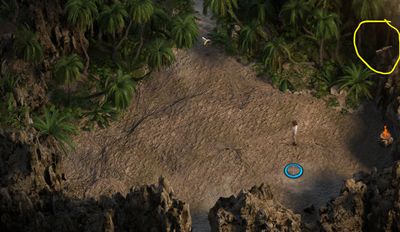
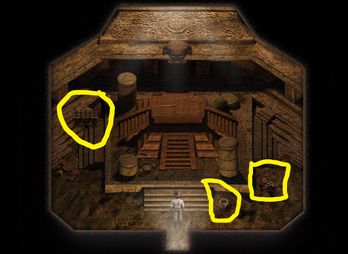
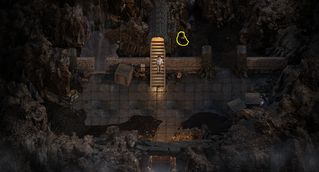
- After lighting the 8th Torch, take the stairs up and head to the west, you will see a peacock, click on the peacock and give it the peanuts that were brought a while back. The peacock will now follow you, bring it to the library. When you get it to the library it will run into a tree and drop downs Alia’s 3rd Chest Key.
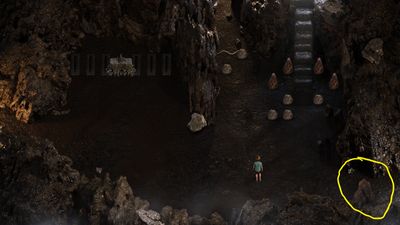
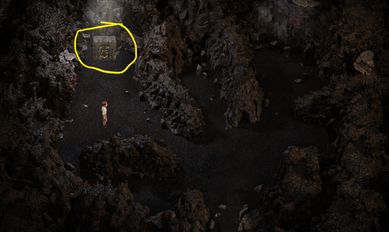
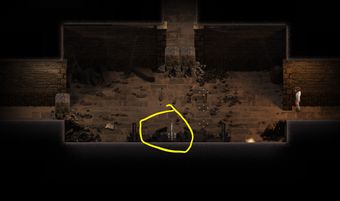
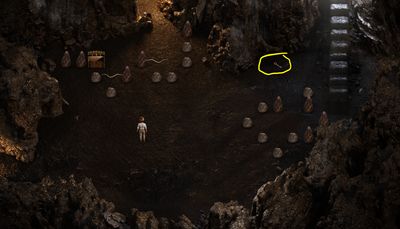
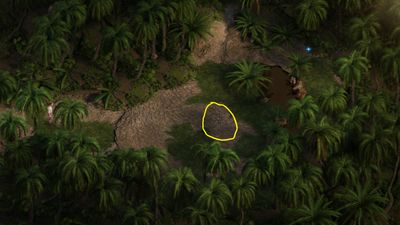
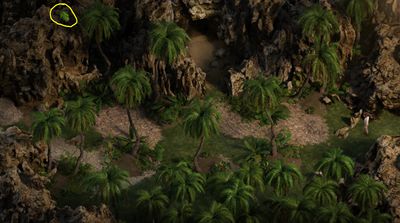
- You can now go back to where the 8th Torch was and open Alia’s 3rd Chest (see photo above). You will receive Alia’s 3rd KamaSutra Page Cowgirl (14th).
- Head to the Squallmart and talk to Alia and Emily. Put a Red Ginseng, Philweed and a Maca Plant in the bucket in the backroom of the Squallmart then talk to Emily. You will receive a Love Potion.
- Head to the library there is a path on the west side that will lead behind it.
- You will see Diana talking to a guy named Vlad.
- Enjoy Scene 39, you will also Receive Diana Contact Information.
- Walk over to the pillar and break it with you Pickaxe.
- Now move the rock along that same path until it is on the pressure plate and make the other rocks disappear, allowing you to grab the Broken Key (5th) and Gothic Key.
- Go to the crafting table in the cave to craft Diana’s 1st Chest Key using 4 of the 5 Broken Key you should have by now.
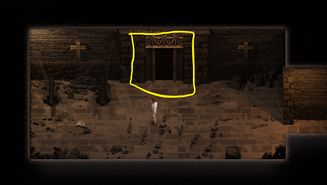
- Head to the Church and the lower left door, head east until you enter this room, grab the Cursed Shovel, Use the Gothic Key on the door in upper right.
- Enter the door you just unlocked and open Diana’s 1st Chest with the Chest Key you just crafted from using 4 Broken Key. To receive Diana’s 1st KamaSutra Page Facetime and Footjob (15th)
- Head east into the next chamber. Grab the Broken Key (6th). Change the green arrows until they look like in the photo below. When the red arrow is facing down click on the rat, it should make it to Safety.
- Try to click the spikes after they come up.
- Watch the short scene and Madalyn will appear. She will let you out and you will chat with Madalyn, grab all the money that appears afterwards.
- Go to Janet’s House to catch Janet and Kaley as they are leaving the house. You will drive with them to the Squallmart. Emily will take you to the back and show you the safe. You can click this now and then for money. Buy the Recipe Chest ($1900)
- Go to the bar to find Janet.
- Go to Janet’s House and enter through the back deck.
- Enjoy Scene 40 and Receive Janet’s 2nd Heart.
- Click on Janet’s phone the password is 123.
- Go to the Parlor, Naomi is buying oils from Pricia.
- Enjoy Scene 41 and Receive Naomi’s 4th Heart.
- Head over to the Squallmart and talk to Kaley as she exits then go inside the Squallmart and talk to Alia, Naomi and Emily.
- Head over to the bar and talk to Tasha about Janet’s drinking problem.
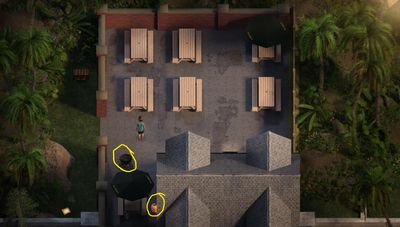
- Head to Sofia’s Mansion with Tasha and over the wall when the security camera and guard are both not looking your way.
- Pick up the Feather,
- When the security guard isn’t looking cross to the other side.
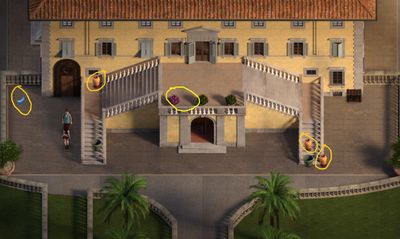
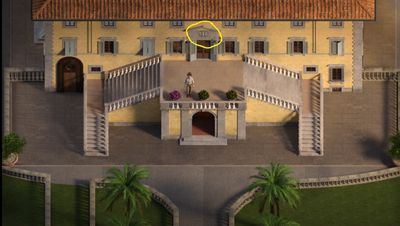
- Break the 1st pot at the bottom of the right stairs to grab Fossilized Algae. Next move the green pot to the left so you’re able to get to break the pot on stairs to grab Quartz. Once to the top check the pink flowers for the hidden key.
- Break the pot on the left side for a gold talisman, before moving the green pot out of the way so you can get back to Tasha on the left side. Use the Hidden key to go inside.
- Enjoy scene 42.
- Chat with Sofia. You will Receive Sofia’s 1st Heart and Tasha’s 4th Heart.
- Head over to the Squallmart to chat with a few people and get a Rusty Key from Albert. Buy the dart ($100) before leaving the Squallmart.
- Head to the crafting table to make some more Ant Killer, ( Fossilized Algae, Quartz, Alumina and Rusty Key)
- Use the Ant Killer here to be able to move North deeper into the jungle.
- I still have trouble and just have to mess around with the rocks to solve this puzzle until you remove all rocks and are able to pick up all the items listed below.
- Break open the pot and get Jessica’s 2nd Chest Key.
- Light the Torch (9th) Which will unlock the use of teleport pad Between this area and the entrance of the park.
- Pick the Philweed (4th)
- Take the Philweed you just picked up and drop it in the bucket in the back room of the Squallmart.
- After you drop the Philweed in the bucket and exit the back room. Some old friends from LE will stop by the Squallmart for a chat with Emily.
- Leave the Squallmart and talk to Emily in the parking lot
- Follow Emily to the Beach.
- Enjoy Scene 43
- Go to Sofia Mansion and hop the wall again.
- Use the Chest Key to open Jessica’s 2nd Chest, to receive Jessica’s 2nd KamaSutra Page Drink it up (16th)
- Head to the Squallmart and buy a Love Potion ($2000)
- Drink the Love Potion and head to the Doctor’s office to see Jessica for a new treatment ($140)
- Go back to the Squallmart and see what is going on. Albert took a love potion. Talk to Emily and Alia about how to stop him.
- Go to Parlor and talk to Pricia.
- Go to the Bar and talk to Tasha.
- Go to the Doctor’s Office to find Albert.
- Go to where the teleport pad take you deep in the jungle and pick the Bamboo.
- Head to the crafting table where you chat with Clare.
- Use the following items: Dart, Bamboo, Scorpion Venom and Feather to make a Blow Dart.
- Go to the Park entrance to locate Albert.
- Go to the squallmart to talk to Alia and Emily.
- You will be transferred to the Park entrance with Alia in her swimsuit as bait for Albert so you can shoot with him with the blowdart. You will get the love potion off of Albert.
- You will be at the lighthouse putting Albert to bed with Emily and Alia. After talking to Emily you will Receive Emily’s 4th Heart.
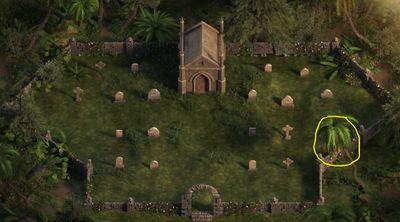
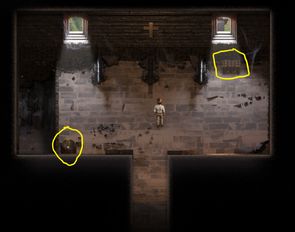
- Head over to the Cemetery one the left side there is a tree click around the tree to find weak ground and use the Pickaxe to find Emily’s 3rd Chest Key.
- Head to the cave through the Park entrance and find Clare.
- Head west as far as you can in the cave, then head south, you will see Clare heading deeper South.
- Enjoy Scene 44.
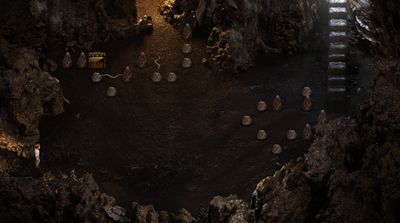
- Pick up the False Talisman and Pirate Diary. Move the two rocks so it traps the snake as seen in the photo below.
- Once the Snake is trapped you can stand on the pressure plate. Stand on the 1st pressure plate and a 2nd one to appear. Clearing a path to move East.
- As you move to the next room to the East you find a Grand Talisman. You will also find the next Chest, use the Chest Key from the Cemetery to open Emily’s 3rd Chest to receive Emily’s 3rd KamaSutra Page Let’s Plow (17th). You will also find Old Wood to bring back to Clare.
- Go back to Clare in the previous room to the West and give her the Old Wood to dry her clothes.
- Follow Clare to the East and talk to her. Keep following Clare to the East and talk to her again.
- You both will exit the caves to Alia’s Spot and talk to Sam.
- Head to the Parlor and give Pricia the Grand Talisman you found in the caves for a new massage.
- Go see Madalyn and show her the Pirate Diary you found in the caves. When you enter Madalyn room and after she strips and goes to another room pick up the Chamber Key and use it on the door by torches.

- Enter the room and grab the Bathroom Key, read the book and break the pot to grab an Basic Container.
- Use the Bathroom Key on the door that Madalyn entered in the previous room.
- Enjoy Scene 45 and Receive Madalyn’s 2nd Heart.
- After leaving the Church, go to the Ancient Temple. After leaving the temple Emily will Text you a new photo.
- Head to the Squallmart to find Kaley. Talk with Alia, Kaley and Emily.
- Buy Master Guide ($19,000) and Plastic Wrap ($100) before leaving the Squallmart.
- Go to the Caves through the Park entrance to find Kaely and Alia.
- Enjoy Scene 46, Receive Kaley’s 4th Heart.
- Corn and Joey will show up after the scene causing you and the girls to head West into the cave.
- Head South following Joey.
- You, Kaley and Alia all head East and exit onto Estero Key at Alia’s Spot. Head west until you meet up with Janet, Naomi and Sam.
- Head over to Janet’s House and up to her room, Janet is in the shower. Take a peek at Janet’s phone on the bed (password 123). You will chat with Naomi through texts for a bit. Before peeking in on Janet in the shower.
- Enjoy Scene 47.
- Kaley will catch you and you will chat with her.
- Go to Estero Key.
- Alia will sneak you into her bedroom to chat. Alia will hide you in the attic when Sam knocks on Alia’s door. While in the attic read the newspaper and pick up the Gaffer Tape.
- After Sam is done talking, go back down stairs to Alia’s room. Naomi will walk in and talk with you.
- Go back to Janet’s house and check in with Kaley and Janet, Kaley will take you up stairs and talk to you more.
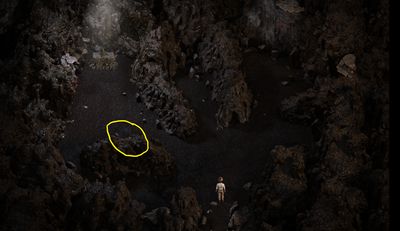
- Go to the caves where the cold pool was and look for a roach you can catch.(see photo below).

- Head to the crafting table to make another Rat Trap, using Plastic Wrap, Roach, Basic Container and Gaffer Tape.
- Head to the lighthouse to catch another Rat.
- Head to the Park and use the teleport pad to go deep into the jungle. From the teleport pad go South then East to where the Jaguar is.
- Use the Rat to distract the Jaguar so you can cross to the East.
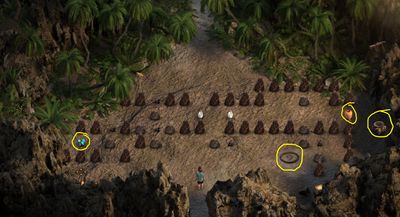
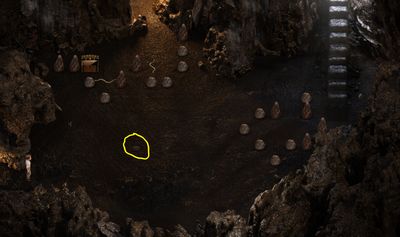
- Pick the Pirate Medaillon and light Torch (10th). After you pick up the Pirate Medaillon two rocks will appear. Move the two rocks to the areas below the Torch. There are two pressure plates hidden by the trees. (see the photo below) Before leaving this area pick the Philweed (5th), and the Tipak Treasure.
- As you’re leaving this area to the West you see a pot to break open to grab the Basic Container.
- Head to the library to show Diana the Tipak Treasure you just found. You will faint and end up in your bedroom.
- Enjoy Scene 48, Receive Diana’s 4th Heart.
- Once you leave your house, Tasha will text you a photo.
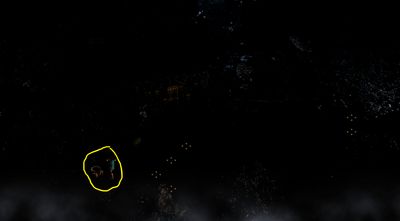
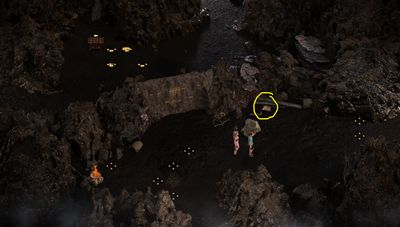
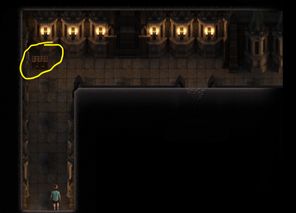
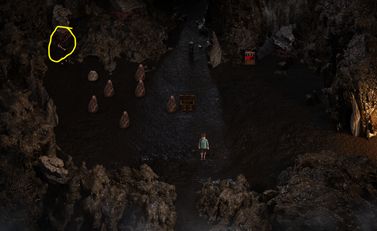
- Now that you lit the 10th Torch, go to the cave where the number 10 was to receive Kaley’s 2nd Chest Key. (see photo below)
- While your in the caves head to the crafting table to make a Pirate Shovel,
- using the following four items Pirate Medallion, Cursed Shovel, Gold and Jade Talismans.
- Head back to where you found the last Tikpak Treasure piece to open Kaley’s 2nd Chest and receive Kaley’s 2nd KamaSutra Page Sixty Nine (18th).
- Go to the Squallmart and talk to Emily.
- Enjoy Scene 49
- You will end up at the Doctor’s Office and receive Nitroglycerin (x2)
- Go to Squallmart and drop the Philweed into the backroom.
- Go to the crafting table and make a Rock Bomb (Silver and Jade Talismans, Nitroglycerin and Basic Container)
- Stop by the bait shop and buy some fishing lures (if you haven’t done so yet)
- Go to the bar to meet up with Jessica. Head to the beach and catch a Fish for Jessica anything will do.
- Enjoy Scene 50, Receive Jessica’s 4th Heart.
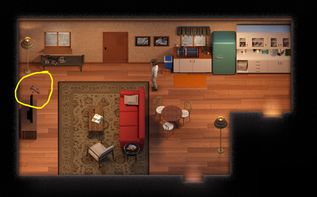
- From your house go to the caves and look for a rock you can blow up. (see photo below)
- Enter the new cave area, you’re just going to break the pot in this room to grab another Basic Container.
- Then hand back to the crafting table and make another Rock Bomb.
- Once you have another Rock Bomb head to the Church.
- Blow the wall in the Church with the Rock Bomb. See photo below.

- In this new area grab the following items, break the pot open to get a Basic Container, Gaffer Tape, Broken Key (7th) and Spike Boots.
- Head to the park and take the teleporter deep into the jungle, break the pot open to grab a Grand Talisman.
- Head to the crafting table to make a Pirate Key with the following items, Broken Key (x2), Grand Talisman, and your Pirate Medallion.
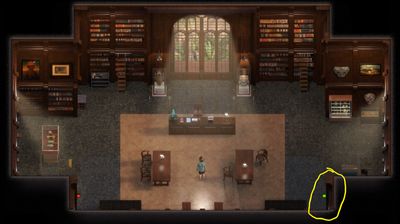
- Head west into the cave grabbing Diana’s 2nd Chest Key along the way
- After you grab the chest key head North (once) and East twice Till you enter room this room (see below)
- Now the 1st thing you want to do here is move up to where you grabbed the Basic Container not too long ago. So those two snakes are both between the rocks. Then move the rock that is below the chest all the way to the right so it traps that other snake in his little area. Then just move the other rock that is by the chest once to the right. If done correctly the room should look like in the photo below.
- Now you’re free to use the Pirate Key on the Chest and grab a Tipak Tablet.
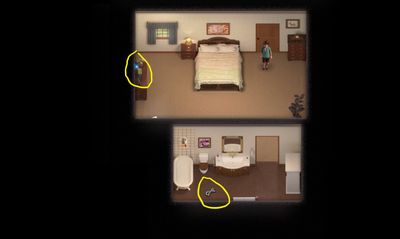
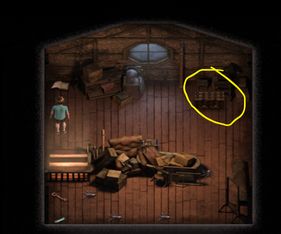
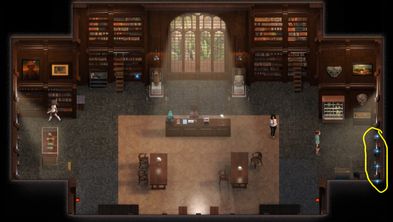
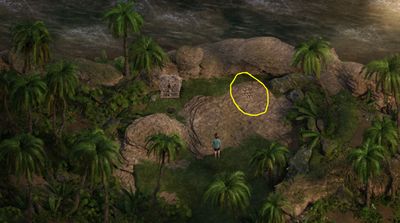
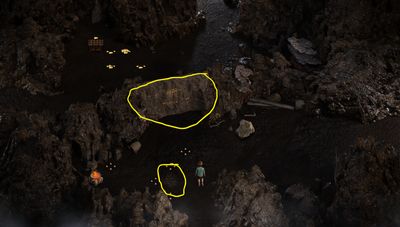
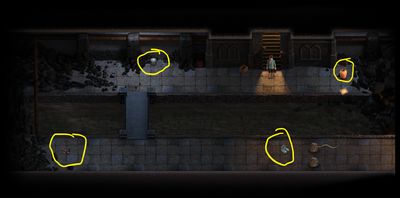
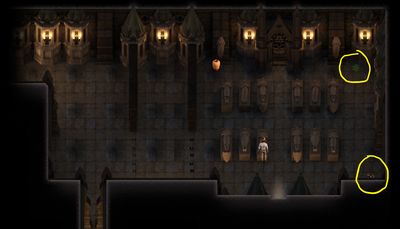
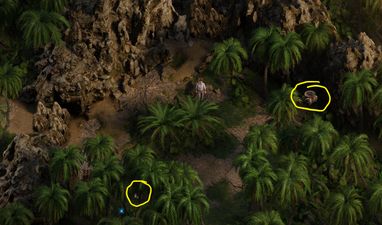
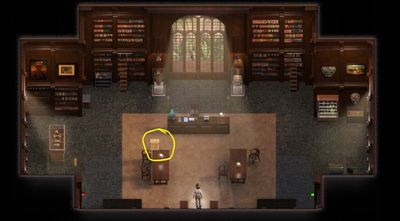
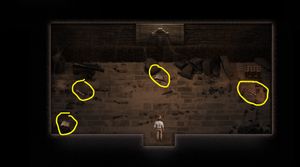
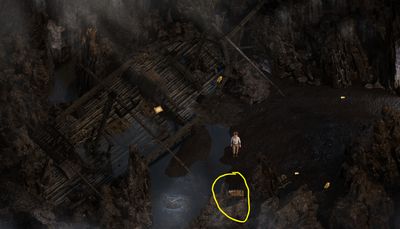
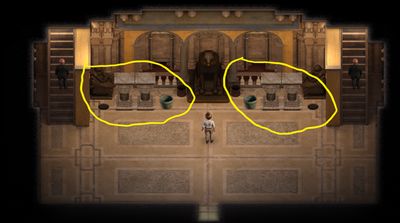
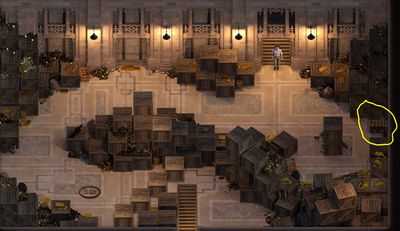
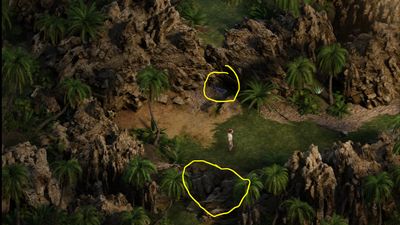
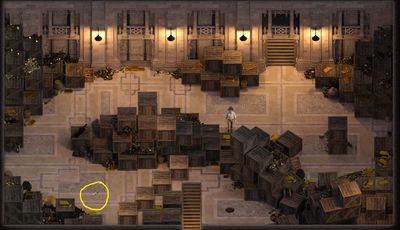
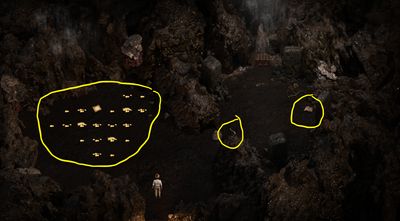
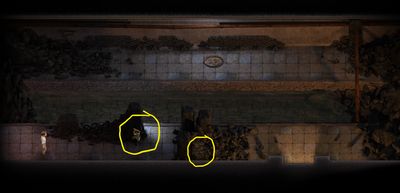
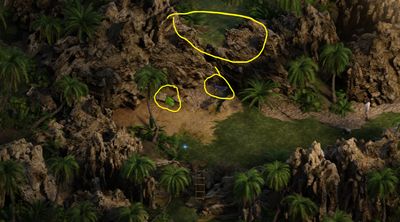
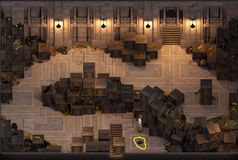
- Now head up the stairs to open Diana’s 2nd Chest and receive Diana’s 2nd KamaSutra Page Seat and Shift (19th) and a Philweed (6th). See photo below, both are within the circled area.
- Go to the library and show Diana the Tipak Tablet. You will run into Vlad again before being able to go inside.
- Take the Tipak Tablet to Sofia at her Mansion.
- Enjoy Scene 51, Receive Sofia’s 2nd Heart.
- Once you leave Sofia’s Mansion Alia will send you a new photo through a text.
- Go to the library and talk to Michael and Diana. Diana will also give you new clothes and you are now able to walk by flying bugs without getting poisoned.
- Go back behind the library and grab Pricia’s 2nd Chest Key. (See photo below)
- Go to the Park and take the teleporter deep into the jungle and then head north.
- You will run into Clare, a lot will happen so just follow along.
- Enjoy Scene 52, and Receive Clare’s 3rd Heart.
- You’ll be at the library when you gain control again. From the library go back where you and Clare jumped into the mud pit. Grab the following items: Jasmine, An Old Bullet and open Pricia’s 2nd Chest to receive Pricia’s 2nd KamaSutra Page Deep Throat (20th). See photo below.
- Go to Janet’s House and talk to Janet. Then had up stairs and into Janet’s Bedroom. You will find Janet’s Dirty Panties.
- You will hear Janet’s moan and head to the room to see what she is doing.
- Enjoy Scene 53.
- Kaley will catch you watching and run off.
- When you’re done cleaning up you will talk with Janet and get your clothes back.
- You will also Receive Janet’s 3rd Heart.
- Go to Estero Key and find Kaley.
- Alia with invite you into her room again
- Enjoy Scene 54.
- Go to Janet’s House and talk to Janet.
- Go up to Kaley’s Room to talk to her.
- Go to the Squallmart and talk to Emily and Pricia. Buy some Soy Sauce ($20)
- Go back to Janet’s house and give her the Soy Sauce. Soon Sam, Naomi and Alia arrive.
- Alia and Naomi head up stairs and you follow.
- Enjoy Scene 55, Receive Naomi’s 5th Heart.
- Sofia comes to get you and you get taken back to her mansion to have a chat, Diana is also there.
- Janet meets you outside Sofia Mansion for a talk.
- Go to the library, Diana has something for you. Receive Satellite Phone.
- Go to Estero Key and talk to Alia.
- Head over to Janet’s House. Front door is locked, walk around back and come in through the back deck.
- Enjoy Scene 56.
- Head to the Cemetery to find Janet. Receive Whip.
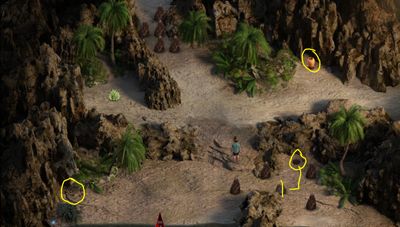
- Head into the jungle there are items you can get with your whip. See photos blow.
- Take the teleport pad from Park Entrance deep into the jungle.
- The 1st item you can get is an Old Musket.
- Open your inventory and click on the Musket then click on the small screwdriver. You receive Gunpowder from the musket. Head North to get Diana’s Profile.
- Then head South twice and West once.
- Use the Whip to get Jessica’s 3rd Chest Key off the Cliff.
- Head to the lighthouse and down to the old fort. Use the gunpowder on the cannon.
- Go west to the new area.
- Open Jessica’s 3rd Chest to receive Jessica’s 3rd KamaSutra Page Pussy Sex (21st). Read the book and grab the Crypt Key.
- Head to the Cemetery and use the Crypt key to open the Crypt.
- Have a talk with Madalyn. While in the Crypt grab the Broken Key (8th) and the Rosa Moss.
- Head to the crafting table use the following items: Rosa Moss, Jasmine, Love Potion, and a Basic Container to make Jasmine Massage Oil.
- Go to the Parlor and give the Jasmine Massage Oil to Pricia.
- Enjoy Scene 57, Receive Pricia’s 4th Heart.
- Go to the park and meet Joey, Corns and the Twins and head into the caves.
- Pick up the machete that Corn dropped.
- Head North to where the mud pit is.
- Meet up with Clare and Diana.
- Use the machete to head deeper north into the jungle.
- Enjoy Scene 58.
- Michael shows up and takes you out of the jungle till day break.
- Once it’s day time again head back into the jungle. Go to where you and Diana spent the night and get a Philweed(7th) off a cliff with your whip. See photo below.

- From here go North then East to grab a floppin’ fish for more fishing lures.

- From Here go West and grab Clare’s Profile from behind a bush, use your machete.
- From here go West twice and grab the Tipak Artifact from behind the bush.
- From here go North and break a pot that holds a Grand Talisman. From there go back to where you, Clare and Diana were North of the mud pit.
- Light the Torch (11th) and read the book. This area is where Jasmine will often appear for crafting purposes.
- Go South and grab a Philweed (8th).
- Go to the caves and go to where the number 11 was, grab Clare’s 1st Chest Key
- Go up the stairs and grab another Philweed (9th).
- Go Back to where the 11th Torch is and you can open Clare’s 1st Chest to receive Clare’s 1st KamaSutra Page Motorboat (22nd)
- Go back into the Cave to where you trapped Sofia’s Team at. After Joey, Corn and the Twins leave, call Diana on the Satellite Phone.
- Go to where the mud pit is. Meet up with Sofia’s Crew and Diana. Sofia’s Crew will leave and go deeper into the jungle.
- You should already have the Tikpak Artifact (if you don’t look above to see where it is.)
- Have back into the caves to where you trapped Sofia’s Crew. There may be Rosa Moss since it appears in the area. There is also a roach you can catch. Use the Tikpak artifact to receive another Tikpak Artifact from the wall. (see photo below)
- Go to the Squallmart to talk to Emily and Jessica.
- Buy Plastic Wrap ($100) Also drop off all the Philweed in the back room. (should have a total of 6 in the bucket at this point)
- Go to your house and meet up with Clare.
- Receive Clare’s Contact Information and Clare’s 4th Heart.
- Go meet Sofia at her Mansion (get there by hoping the wall)
- Show her the Artifact you just found in the cave.
- Enjoy Scene 58, Receive Sofia’s 3rd heart.
- Buy a Basic Container ($300) from Squallmart.
- Go to the Crafting Table and make another Rat Trap.
- Go to where the Jaguar is sleeping and trap the rat.
- Go to the Squallmart and talk to Emily, give her the rat trap.
- Some old friends from LE stop by the squallmart to drop off something.
- Go to the doctors office to see Jessica for a new treatment.
- Go to the cave and grab Emily’s Profile (see photo below)
- Go to jungle and grab Naomi’s Profile. (see photo below)
- Get Alia’s Profile. (see photo below)

- You Should get a call from Diana.
- Go behind the library and find the library key.
- Use the library to enter the library.
- Click on the box inside the library.
- After clicking on the box in the library, head to the Sqaullmart it’s super busy. You talk to Alia and Emily.
- Before leaving the Squallmart buy the Cleaning Oil ($3000) and some Silver Ore ($1000).
- Go outside of the squallmart and talk to Ranger Michael.
- Head to the crafting table, with the following items: Cleaning Oil, Old Bullet, Old Musket and Silver Ore make the Loaded Musket.
- Head to the place where the Jaguar is deep in the jungle. Head North and you will find Ash again.
- After talking to Ash and he runs off again pick up the following items: Motion Detection Camera, Pirate Medallion, Gunpowder, and the Broken Key (9th)
- Bring the Motion Detection Camera to Ranger Michael, outside the Squallmart. (You are now un official Park Ranger)
- Head inside the squallmart and talk to Emily and Alia. You will take Alia to the library to talk to her.You will Receive Alia’s 5th Heart.
- Head to the Bar to the meet up with Alia.
- Enjoy Scene 60.
- Head to Janet’s House to explain what she saw.
- You will talk to Kaley before going inside.
- Go inside and head upstairs to Janet’s Room.
- Enjoy Scene 61.
- Head to the LightHouse and use the gunpowder on a 2nd cannon.
- In the new area pick up the following Items and read the two books: Gothic Chest Key, Broken Key (10th).
- Head to the Church and use the Gothic Chest Key.
- Madalyn will appear and chat with you.
- Enjoy Scene 62, Receive Madalyn’s 3rd Heart.
- Head to the crafting table in the caves to make a Pricia’s 3rd Chest Key with the four Broken Keys you should have at this time.
- Before leaving the caves head to this area (photo below) to Receive Janet’s Profile.
- Take the Chest Key you just made to the below the Lighthouse and open Pricia’s 3rd Chest to Receive Pricia’s 3rd KamaSutra Page On Top (23rd)

- You will receive another phone call from Diana on the satellite phone, telling you she found another entrance to the caves in the north but you need to meet Vlad at the library first. Head to the library to meet Vlad.
- After giving Vlad the talismans head to the deep jungle where the 11th torch was. Sofia’s goons will open a path to the west. Follow the goons to the west into the new deep jungle area.
- The goons are moving in the area, there is no real trick to this puzzle, it just good timing. If it helps increase moving speed to fast in order to help.
- Once you’re in the caves you will meet up with Diana. After talking to Diana and Ash you will end up in the library where Diana will fix up your cut arm.
- Enjoy Scene 63, You will Receive Diana’s 5th Heart.
- Head to the park south of the river to find Clare. Go as far West as you can and then North to find Clare.
- Head to the Bar to meet up with Clare and talk to Tasha.
- Enjoy Scene 64, You will Receive Tasha’s 5th Heart.
- Head back to the north cave entrance. After the talking with Diana and Clare there is a puzzle that involves moving girls around by talking to them. It’s like moving rock, you will need to stand on the opposite side of either Diana or Clare in order to move them so they stand on a pressure plate. There are 3 pressure plates in the room, Diana, Clare and you will each have to stand on one to solve the puzzle. There also Broken Key (11th) to be picked up in this area as well.
- 1st moving Diana, talk to Diana so she moves the following directions, left, up, left, left, up, then left. She should now be on her pressure plate.
- Now talk to Clare so she moves in the following directions, down, left, left, down. She should now be on her plate. Now go stand on the 3rd plate yourself in order to solve the puzzle. (Photo below shows where the girls should be standing before you move onto the 3rd plate.
- The wall will open to the south to a new area of the caves. Go back to the previous area to talk to Clare, Diana and Ash. You will exit the cave where you can now pick up the Broken Key (12th), and read the book that will give you a hint to where a character profile is hidden.
- Head to Squallmart to talk to Emily and something she needs to work on her experiment. Before leaving the squallmart you can buy a jukebox (30,000$) for your house, also pick some Silver Ore (1000$)
- Head to the Bait Shop to talk to Jim about a dehumidifier. Click on the dehumidifier (upper right corner) in order to talk Jim about buying it (5,000$)
- Head to the crafting table with the following items: Broken Dehumidifier, Small Screwdriver, Gold Talisman and Silver Ore to make a Dehumidifier.
- Head back to the Squallmart and give the Dehumidifier to Emily.
- Emily will need a little time so in the meantime head back to the new cave area where the new chest was, there is a pressure plate to be stepped on. After stepping on the first pressure plate where you are standing a second will appear. (photo below)
- Head to the area to step on the second plate, after stepping on the second plate head to the east where the third plate is.
- Then head East again for another pressure plate.
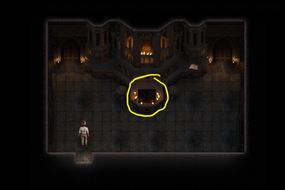
- After stepping on the pressure plate Kaley’s 3rd Chest Key will drop down. (Photo below)
- You can now head back to open Kaley’s 3rd Chest and Receive Kaley’s 3rd KamaSutra Page Pussy Sex (24th). (Photo below)
- On your way back to the Squallmart swing by the Bar to pick up Pricia’s Profile. (Photo below)
- Emily should be ready now, head back to the Squallmart.
- Enjoy Scene 65.
- Head to the Doctor office to see Jessica.
- After talking to Jessica and getting a refill of your pills head over to the Parlor to see Pricia. She will give an item called Shea Butter.
- Head over to the Squallmart to buy some items that you will need. Buy the Prayer of remote offering (30,000). This item will let you access the crafting shrine from anywhere. Also buy four Basic Containers.
- You will need to craft three rocks so it dont have the other items needed, you need to go gather them. Items needed for Rock Bombs: Jade and Silver Taslimens, Nitroglycerin, Basic Container. Craft three Rock Bombs.
- Once you have crafted the three rock bombs head into the deep jungle to where the 11th torch was. Along the way pick up a Tomb Key Segment.
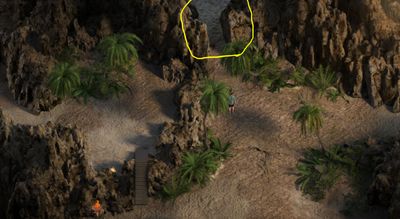
- Continue into the deep jungle. Use a Rock Bomb to open a new path deeper into the jungle. (pic below)

- Once in the new area pick up another Tomb key Segment and the Aloe Plant.
- Head to the lighthouse where you will talk with Albert about Kaley, after chatting with Albert head under the lighthouse and use a 2nd rock bomb to open a new under the lighthouse. You can pick an old map as well.
- In this new area of the Old Fort, you can read a new scroll for the Aloe Lotion and also read a book with a bit of new information.
- You will now need to craft the Aloe Lotion with the following items: Ginseng Plant, Aloe Plant, Shea Butter and a Basic Container.
- Head back to the Doctor’s Office where you give Jessica the Aloe Lotion you just made.
- Head over to Janet and up the stairs toward Kaley Room’s you will bump into Alia in the hall.
- Enjoy Scene 66, You will Receive Kaley’s 5th Heart.
- Head to where you left Clare and Ash in the caves that are in deep jungle.
- There will be a long dialogue between you and several other people.
- After you regain control of the MC, head to Sofia’s Mansion.
- You and Diana will have a meeting with Sofia.
- Enjoy Scene 67.
- Go to the library to talk with Diana.
- Hey to the Parlor to see what Jessica and Pricia are up to.
- Enjoy Scene 68, You will Receive Jessica’s 5th Heart.
- Hey to the Squallmart and check in with Emily.
- At this time you can craft a Pirate Key with the following items, Grand Talisman, Pirate Medallion, and 2 Broken keys.
- Take the teleporter into the deep jungle to find Kaley’s Profile.
- You can open a Pirate Chest with the Pirate Key and find an Tikpak Artifact.
- You can find Clare’s 2nd Chest Key, using your pickaxe (pic below)
- Go to the Lighthouse to open Clare’s 2nd Chest and Receive Clare’s 2nd Kamasutra Page Face Fuck ( 25)

- You get a text message from Janat asking you to come over.
- Head to Janet’s House to give her your opinion on a new dress.
- Enjoy scene 69. You will Receive Janet’s 4th Heart.
- Janet will ask Kaley to take you to the doctor office, Kaley and you will talk outside before heading to the doctor’s. Once at the doctor office you will chat with Jessica, Emily and Kaley about catching a rat.
- Head to the bar to check in with Tasha. There will be dialogue with Tasha, Corn, Joey and Michael. You will also pick up an old bullet that Joey leave Tasha as a tip.
- You and Tasha will then go to the Tikpak Tomb on top of the mountain.
- At this point open your inventory and click on the old bullet to load the musket again. Now head to the northern cave entrance where you found the ship and head west into the jungle you will find the jaguar again and use the musket to scare it away.
- Once in the new area pick up the 3rd Tomb Key Segment, Broken Key (13th),the Aloe Plant and the Philweed (10th).
- Now head back to Tasha, you can use the Offering Prayer to access the crafting table and use it to make the Tomb Key with the following items: 3 Tomb Key Segments and the Tikpak Artifact.
- Now use the Tomb Key to open the tomb with Tasha.
- You will be back at the bar now, go into the women bathroom to catch a roach. After catching the roach into the women’s bathroom, head into the men’s bathroom and talk to the guy, give him the Aloe Planet and he will give you Broken Keys (14th & 15th).
- Now head back to the Doctor’s Office and into the MRI room to pick up the Graffer Tape and Plastic Wrap.
- Now you can craft another Rat Trap using the following items: Roach, Plastic Wrap, Graffer Tape and Basic Container (you can buy one at the Squallmart.)
- Give the Rat Trap to Jessica once you have it made.
- Enjoy scene 70.
- Head over to the Church to see who is visiting Madalyn.
- You will meet Sister Judy ( One of the characters that will be one of the girl in NLT’s upcoming Game 3)
- After talking with Sister Judy head into the church and find Madalyn, she in the tomb area below the church talking with Joey.
- Enjoy Scene 71, You will Receive Madalyn’s 4th Heart.
- Pick up the Eye of Cualli.
- You can head to the front door of the Church and click on it to over hear Madalyn and Sister Judy talking.
- Head back to the Tomb on top of the mountain where you can now pick up a Tiny Rope (1st), and the Broken Key (16th). You can make Diana’s 3rd Chest Key with the four Broken Keys you should have now. Now use the chest key to open Diana’s 3rd Chest and Recive Diana’s 3rd KamaSutra Page Pussy Sex (26th).
- Go to Sofia’s Mansion and show her the photo you took of the tomb.
- After Sofia leaves it time to solve a puzzle. The trick is to destroy the four stone pillars (with your pickaxe) and move the two pots over the pressure plates. You have to do all this when the two body guards have their backs turned to you.
- Once you have completed the puzzle a Hidden Key will appear in the middle, pick it up then head outside.
- Once outside take note of the address number of Sofia’s mansion. (980)
- Use the Hidden Key to unlock the door to the left to get inside Sofia’s treasure room.
- Once inside click on the security system and use the address number as the code to turn the system off.

- Head down the steps into a larger treasure room, for a shocking surprise.
- Enjoy scene 72 and Receive Clare’s 5th Heart.
- Now there is a lot of stuff to pick up in this room. Starting from the right side of the room, pick up the Tiny Rope (2nd), Super Guide, Tasha’s Clothes, and finely another Eye of Cualli. After picking the Eye you would get bitten by a snake it is unavoidable.
- Leave Sofia’s Mansion and you see Sofia’s talking to a someone we haven’t seen before (maybe a link to NLT’s next game coming in 2021.)
- Head to the bar to give Tasha her clothes back.
- Head to the doctor’s office to see about getting healed from your snake bite.
- You and Jessica will head over to the bar for another date. Jessica will get called away but you get to spend time with Janet. You and Janet will head to the beach for swimming.
- Enjoy Scene 73, Receive Janet’s Contact Information.
- You will now be in your bedroom after your time on the beach. Head over to the library.
- Place the Two Eye of Caulli you have into the statue hanging on the wall to unlock a secret compartment within the library.

- Head down the secret compartment.
- There is a lot to pick up here. First read the book for a clue to another character profile (exact location later on), next pick up all the Gold Ore (should be 9 pieces), Caulli’s Coin, Old Map (location of a chest key), False Talismans (x3), a scroll to make a Royal Talisman, and finely a Tiny Rope (3rd).
- Now you can use the three False Talismans and the nine Gold Ore pieces to make three Grand Talismans. Make sure the selling of Talismans feature is turned off on the satellite phone so you don’t sell these when you make them.
- Go ahead and use the Offering of Prayer to make the three Grands. Once you have the three Grands made now use them and the Caulli’s Coin to make a Royal Talisman. Hold onto the Royal you will need it shortly.
- Once all that is done head to the Doctor’s Office to see why Jessica was called away from your date.
- You will see Pricia in the office waiting area, talk to her.
- Head to the Parlor to check on Pricia.
- Go to the park to find Joey and Corn.
- Head back to the Parlor to make sure Joey went.
- Head into the Parlor to talk to Pricia and give her the Royal Talisman to replace the treasure piece that Joey gave her.
- Enjoy a new Massage from Pricia. You will receive a permanent awareness boost and be able to get any past massages for free now. You will also Receive Pricia’s 5th Heart.
- Head into the caves to find Janet’s 1st Chest Key.
- Head back to Sofia’s Mansion to use the chest key on Janet’s 1st Chest and Receive Janet’s 1st KamaSutra Page BlowJob (27th)
- Head over to the Squallmart to buy Janet’s outfit (400$), also buy a Bancroft’s Serum drink and visit Jessica to get your Intelligence Boost back.
- Head Back to the caves to where you trapped Sofia’s team awhile back to find Tasha’s Profile.
- Head to the deep jungle to find a Broken Key (17th).
- Head to the Squallmart to meet Emily’s dad. Chat with Emily’s dad, Emily and Alia. Before leaving the Squallmart buy the guidebook Knot Tying Guide (5,000)
- Step outside the Squallmart to chat with Emily and Alia.
- Head into the deep jungle where the mud pit is to find Ash.
- After talking to Ask, keep heading into the deep jungle. Along the way pick up the Bamboo.
- Keep heading west from here.
- Once here click on the peacock and it will drop a feather for you to grab. At this time use the Offering of Prayer to make a Rope Ladder with the following items: Tiny Rope (X3) and the Knot Tying Guide book. After making the ladder click the south of the screen to use it to climb down the cliff.
- Climb down the ladder and you find Diana.
- Enjoy Scene 74, Receive Diana’s 6th heart.
- After the scene you can pick a lot if items starting from the right side, Light the Torch (12th), Poison Thorns, Broken Camera, Kill the scorpion and get Scorpion Venom, Broken Key (18th).
- From here head east to find another Broken Key (19th).
- Head to the deep jungle teleport pad to meet with Micheal. You and him will setup a trap for the bigfoot (AKA Ash)
- Head to Sofia’s Mansion. Head into the treasure room and you will see Sofia enter a hidden room. You can also pick up the Dart for the torch you just lit.
- Pick up the dart, try to leave the mansion and you will get caught by a bodyguard.
- Enjoy Scene 75.
- Use the Offering of Prayer to make a Blow Dart using the following items: Bamboo, Scorpion Venom, Feather, and Dart.
- Head back to where Michael is waiting by the deep jungle teleport pad. Talk to Michael and give him the blow dart.
- Pick up the Deer Meat and Memory Card.
- Go see Albert, Emily and Alia at the Lighthouse.
- Head to Alia’s House to meet up with Emily and Alia. Click on Emily and give her the Broken Camera, Motion Detection Camera and the Memory Card.
- Before following the girls into Alia’s room, pick up the Broken Key (20th) in the living room.
- Head into Alia’s room and talk to Emily
- Enjoy Scene 76. (You must have Emily’s Booty Call Outfit for this scene.)
- Follow Alia to the Lighthouse.
- Head to the Squallmart to speak with Emily and her dad. Step outside and speak to Emily again.
- Receive Emily’s 5th Heart.
- Use the Offering of Prayer and the four Broken Keys you should have on you to make Clare’s 3rd Chest Key. Then head into the deep jungle down the rope ladder and east to enter the cave. Use the chest key to open Clare’s 3rd Chest and Receive Clare’s 3rd KamaSutra Page Reverse on Top (28th).
- Head to the Church to speak with Madalyn
- Enjoy Scene 77.
- Head over to the bar to see Albert and Tasha.
- Head to the Squallmart to buy some shoe glue ($40), also pick up some Gold Ore($4000).
- Use the following items: Whip, Poison Thorns, A Royal Talisman, and Shoe Glue to craft a Deadly Whip.
- You can finely now kill these snakes and access this part of the cave.
- Head into the new area once you kill the snakes. In the new area pick up all the lovely money, read the scroll, kill the other snake, read the book for some info and remember where the chest is for later.
- Once done, head South, then West to find Alia and Tasha in the cave.
- Enjoy Scene 78, Receive Alia’s 6th Heart.
- Head over to Janet’s House to find Albert trying to sell her a bottle.
- Head inside Kaley is home alone.
- Head up stairs to Janet’s room to find Kaley.
- Enjoy Scene 79, Receive Kaley’s 6th Heart.
- Head over to Alai’s House on Estero Key. Sneak past Alia and Sam to go into the house.
- Speak to Naomi, Janet and Albert.
- After the dialogue, go back into the house to grab the Bumpy Candle.
- Head over to the Doctor’s Office to speak with Ash, Jessica and Michael.
- Head into the tunnel under the Church and use your whip to get past the snake, also pick up the Floppin’ Fish for a new item at the bait shop.
- Once in the new area pick up the Teddy Bear and use your pickaxe to find Janet’s 2nd Chest Key.
- Now head into the deep jungle to find another Floppin’ Fish for another new item at the Bait Shop. With these you can buy two books at the Bait Shop to hopefully help with fishing quests.
- From here head North two times and then East to find some White Sand.
- While you’re in the deep jungle from here head West, South, South, East then North to find Jessica’s Profile.

- You can now use the following Items: Teddy Bear, Gold Ore, Bumpy Candle and White Sand to Craft a Golden Teddy.
- Head back to the Doctor’s Office to give the Golden Teddy to Ash.
- You can now go back to Janet’s 2nd Chest to open it and Receive Janet’s 2nd KamaSutra Page Pussy Play (29th).
- Enter the park and head west to find Ash and Micheal building something. Talk to Micheal / Ash.
- Micheal will give you a new Grappling Hook that will help with getting thing in high places.
- Now head into the deep jungle north of the mud pit.
- Use the grappling hook to get the first of the four Fan Palm Leafs.
- From here end to the West to find the second.
- Head West again to find the third. Also click on the peacock to get it to move so you can use the grappling hook to access a new area of the jungle.
- Collect the fourth and final Fan Palm Leaf, make sure the jaguar’s back is turned so it doesn’t attack you when you pick it up. Also use your pickaxe to pick up a Mysterious Key and the Philweed (11th).
- Now that you have all four Fan Palm Leafs, return to Ash and Micheal and give them the Fan Palm Leafs.
- Head over to Sofia’s Mansion to see what she wants.
- After your chat with Sofia, head over to the Squallmart to check how Emily is holding up with her dad in town. You will find Emily and Alia in the parking lot.
- Follow Albert, Emily and Alia inside the Squallmart.
- Head over to the Lighthouse and make sure Albert keeps Emily’s dad busy long enough for Emily to move the equipment over to the library.
- Talk to Albert and Emily’s dad outside the Lighthouse, a few options will appear click “Have you Shown, Mr. Garner the interior”. You will all head inside.
- Head inside to talk to Albert and Mr Garner some more. More options will appear this time click “ Mr Garner should see the view from up top.”
- Head up the stairs and talk to them again.
- That should have given Emily enough time to move the equipment to the library. Head there to check on Emily.
- Head inside the library to talk to Emily.
- Emily will leave and Madalyn will come to the library looking for a book.
- Enjoy Scene 80, you will also Receive Madalyn’s contact information.
- Emily will come back to check on her equipment and tell you not to touch it but we cant help it so go touch it. Some of the new serum will be released from the tank. Time to go see the doctor again .
- Head to the doctor’s office for an appointment ($140)
- Enjoy a new treatment from Jessica. After this you will have a permanent Int. boost and be able to replay any treatment scene from now on.
- Head over to Alia’s House to see what Sam and Micheal are talking about.
- Once Sam and Micheal head off to check the hole to the caves, head inside to see Naomi and Janet.
- Enjoy Scene 81, you will also Receive Janet’s 5th Heart.
- Head outside to see what Micheal and Sam are doing about the hole.
- Now head to the Tomb on the North side of the river and use your grappling hook to get Madalyn’s 1st Chest Key.
- Now head over to the Old Fort that is under the Lighthouse and use the Mysterious Key to unlock the door.
- Once in the new area you can unlock Madalyn’s 1st Chest and Receive Madalyn’s 1st KamaSutra Page Boobs and Butt (30th) You can also pick up Madalyn’s Profile as well.
- It will get late and you will be taken to the church to meet with Madalyn.
- After your chat with Madalyn you will be inside Sofia’s mansion. Head down the steps to the treasure room. You need to avoid the security cameras to try to search the room for a way into the hidden room below. You will find nothing, so get seen by the camera and then try to exit the mansion.
- Sofia’s goons along with Corn and Joey will be waiting outside. Sofia will come out and take you inside for a chat.
- Enjoy Scene 82.
- You will be put into the dungeon below the mansion and find Clare there as well.
- Time to solve another escape puzzle.
- With this one there are three arrows on the ground that control which direction Clare walks. Use them to get Clare to step on one of two pressure plates, doesn’t matter which one. Whichever one you don’t get her to step on, you go step on the other. Once both pressure plates are activated a path to escape will open up.
- Once in the next area before following Clare to the East, pick up Sofia’s Profile.
- Now head to the Easy following Clare. Talk to Clare.
- You will get a call from Diana. After the call, jump into the river.
- You will end up in the caves in the park.
- Enjoy Scene 83.
- Time to find Sam, head North three times then head East to find Sam trapped by some vipers.
- You take Same back to Estero Key. You will have a group discussion with a few people.
- You will Receive Naomi’s 6th Heart.
- Head to church to warn Madalyn about Sofia. Joey and Corn are at the church, so enter through the cemetery to get into Madalyn’s chambers.
- Chat with Madalyn.
- Enjoy 84 , You will Receive Madalyn’s 5th Heart.
- Madalyn will be needing a hiding spot and you know of the perfect spot. You will take Madalyn there.
- After dropping Madalyn off at her hiding spot, head to the park to see what Micheal and Ash are up to.
- Talk to Ash.
- Head North once and East twice to find the missing boombox.
- Take the boombox back to Micheal and Ash.
- Ash will give you Diana’s 4th Chest Key in exchange for the boombox.
- You can now head back to Sofia’s mansion and step on the pressure plate to gain access back to the lost underground.
- Go back to where you jumped into the river to unlock Diana’s 4th Chest and Receive DIana’s 4th KamaSutra Page Anal Sex (31st).
- Head to the Mansion, go up the stairs and sneak inside. Once inside head up the stairs there is a weak wall you can use your pickaxe on.
- Use you pickaxe on the wall, the first hit should deactivate the laser, then hit it a couple more times till the key disappears.
- Before going pass where the lasser was, head back down the stairs and use your grappling hook to grab Tasha’s 4th Chest Key.
- Now go back up the stairs and head to the left.
- Talk to Sofia.
- Enjoy Scene 85, Also Receive Sofia’s 4th Heart.
- Before leaving the pool area pick up the Ladder Segment.
- When you leave the pool, you should see a Roach follow it to the treasure room and pick it up.
- Now go to the underground area you were in before and pick up another Roach
- Leave the underground area and head to the Lighthouse to find a third Roach. Use the grappling hook to climb and get it.
- You should have three Roaches now.
- Now go into the lighthouse where Madalyn is hiding and talk to her about the meeting with Sofia.
- After talking to Madalyn, she leaves head back into the lighthouse and down into the fort to find another Ladder Segment.
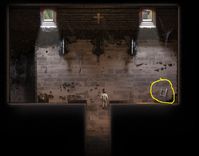
- Now head over to the Squallmart and see what is going one.
- After Talking to Pricia, head back into the squalllmart. You can buy an alter view of Noami’s profile (1000$). You can now view Naomi’s profile where she is nude or in her booty call outfit.
- Head over to the library to talk to Emily about Pricia’s idea.
- Head over to the Parlor and talk to Emily and Pricia. Make sure you have Jasmine oil on you. If not make one (Basic Container, Love Potion, Jasmine Plant and Mosa Ross)
- Once you have the Jasmine Oil give it to Pricia.
- Enjoy Scene 86.
- Head back to the library and talk to Emily.
- You will Receive Emily’s 6th Heart.
- Head to Janet’s House, her and Kaley have a rat problem.
- Head inside and make your way to Janet’s Room, use the Roaches to get by the Rats.
- You will take Janet and Kaley to your house but wait, you have a surprise person at your place.
- Head over to the Lighthouse to enlist Albert’s help in solving Janet’s rat problem.
- Now head to Sofia’s Mansion to see how Janet and Kaley are doing.
- Make your way inside after talking to Sofia.
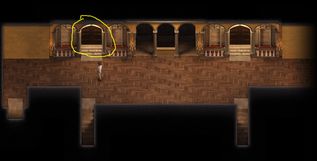
- Enjoy Scene 87.
- After the scene you can unlock Tasha’s 4th Chest and Receive Tasha’s 4th KamaSutra Page Anal Sex (32)
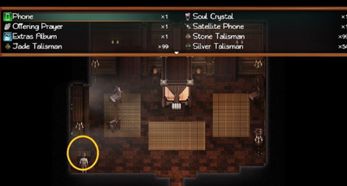
- You should get two phone calls back to back, one from Diana and another from Janet.
- After Janet calls you head to her house to grab her clothes, and Janet’s and Kaley’s toothbrushes.
- Head into Janet’s house and check in with Albert before heading up stairs to Kaley’s and Janet’s bathrooms to grab their items.
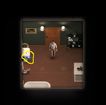
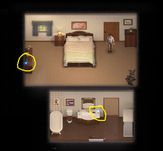
- Once you have Janet’s and Kaley’s items, head to Sofia’s Mansion and give the items to Janet, you can find her at the pool.
- You and Kaley will leave the pool and overhear Sofia and Madalyn meeting.
- After you all have dinner Kaley will wonder off, you can find her in the small treasure room before going down the stairs.
- Sofia will eventually catch you both in the treasure room.
- Enjoy Scene 88.
- The next morning, leave the bedroom and head east once and then into the set of doors to the spa pool room.
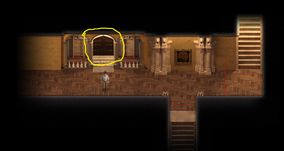
- Grab the third ladder segment.
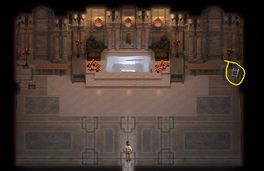
- Head to the Squallmart to buy some Silver Ore if you don’t already have some. You can also buy Alia’s updated profile as well.
- You can now craft a Metal Ladder with the three ladder segments and the Silver Ore.
- Once made head into the deep jungle as far north of the mud pit that you can go. You can use the metal ladder to cross a gap and you will find Clare and Diana.
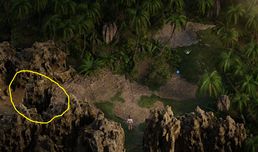
- After you are bitten by the Palm Viper make your way to the Doctor Office as fast as you can. The faster way in through the caves.
- East
- South
- South
- West
- South
- South
- East
- South
- East (into the Cave)
- West
- South
- East
- East
- South (out of the cave into the park)
- Once out of the cave Clare will take you the rest of the way and you arrived at the Doctor’s.
- Enjoy Scene 89.
- After being released from the doctor’s head to Sofia’s Mansion and talk to Sofia, she will be outside by the stairs.
- You will receive a storage key from Sofia.
- Janet will overhear you chat with Sofia and get worried about you.
- You will Receive Janet’s 6th Heart.
- Enjoy Scene 90.
- Leave the bedroom and go back to the spa pool room and open the chest with the Storage key to pick up some AntiVenom.
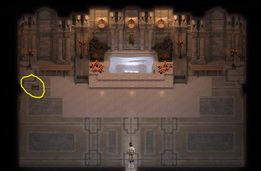
- Head into the lost underground under Sofia’s Mansion, you can use the Metal Ladder to cross the water to Light a Torch (13th).
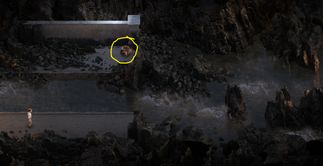
- Now head to the lost underground under the Church to find Madalyn’s 2nd Chest Key.
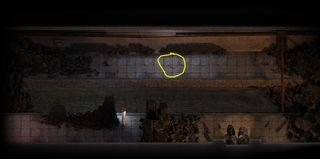
- Now head back to the lost underground under Sofia’s Mansion and use the Metal Ladder to cross the water to pick up the King’s Shovel Head and also unlock Madalyn’s 2nd Chest and Receive Madalyn’s 2nd KamaSutra Page Bite Job (33rd).
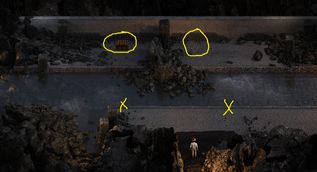
- Also you can head back to the temple entrance and pick up Philweed (11th).
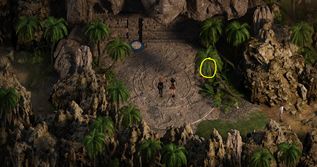
- Head to the Park and talk to Janet.
- Head west into the park and talk to Pricia / Ash.
- You and Janet will follow Pricia into the park
- Enjoy Scene 91.
- Head west to pick up a couple items that Joey dropped.
- Pick up the Key Card and Old Bullet.
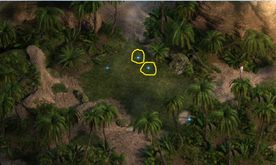
- Open your inventory and click on the Old Bullet to load your musket again.
- Now head into the deep jungle to where you climbed the cliff with the grappling hook before.
- Along the way pick up the 1st of 4 of Clover leafs.
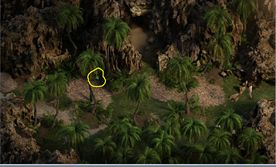
- After scaring the Jaguar away again you can pick up the 2nd Clover Leaf.
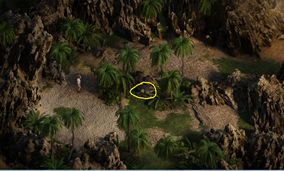
- Head east from here.
- You will see Diana and Clare and find a pressure plate that will open the Temple door, now make your way to the temple.
- Along the way you can pick up the 3rd Clover Leaf.
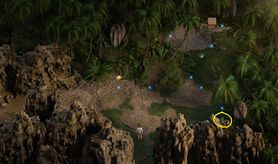
- As you approach the Temple the Jaguar will show back up but don’t worry you have a tasty treat for him.
- You will now head into the temple to talk with Diana and Clare.
- You will need something to open the door. There are 3 items to pick up here, Crowbar, the 4th Clover Leaf and King’s Shovel Handle.
- You can now make a Four Leaf Clover by using the 4 Clover Leafs in the crafting area. Maybe it will bring you some luck.
- The viper on the left is slow moving and it is very easy to avoid him without getting bitten. The viper on the right is moving fast but if you look at the path it takes you can also avoid getting bitten by him as well.
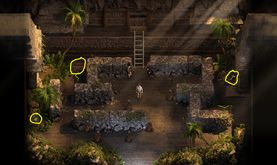
- Once you have the items, use the Crowbar on the temple door to open it.
- Once inside the Temple you Clare and DIana will talk.
- After Clare leaves you can pick the Philweed (12th). It is guarded by a viper and you have to get bit by this one but don’t worry you have antivenom. (you can also chase the rat down toward the Viper and avoid getting bit)
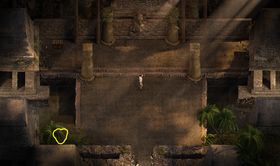
- Now make your way to the Library.
- Along the way you can open this box using the Crowbar.
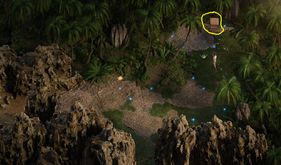
- Now keep making your way to the Library.
- Enjoy Scene 92.
- Now head below the Library to grab a Caulli’s Coin.
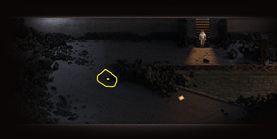
- Head to the Bar to see what Kaley and Alia are up to.
- Follow the girls to the Cemetery
- Enjoy Scene 93. You also Receive Tasha’s 6th Heart.
- Head to Sofia’s Mansion to see what Joey, Corn and her are talking about.
- Head inside now and talk to Clare and Sofia on the 2nd floor.
- Head to the Spa pool room and talk to Sofia. You will Receive her contact information.
- Head back to the Church and you open the box to get King’s Shovel Shaft.
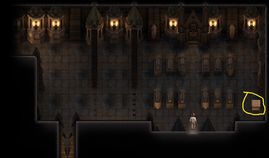
- You can now craft the King’s Shovel but using the following items: King’s Shovel Head, King’s Shovel Handle and King’s Shovel Shaft and the Caulli Coin.
- Now head into the Deep Jungle and find another box you can open with the Crowbar to get Sofia’s 1st Chest Key.
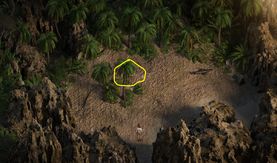
- Now head back to the temple to unlock Sofia’s 1st Chest and Receive Sofia’s 1st KamaSutra Page LegJob (34th).
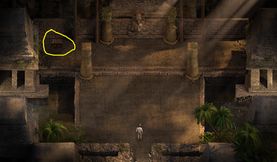
- You can also head into the Tomb that is located in the park on top of the mountain and use the Crowbar to open the Tomb and find the Talisman of the Gods.
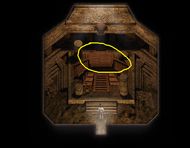
- Don’t forget to stop by the Squallmart and buy the booty call outfit for Sofia (400$) and Diana updated profile (1000$).
- Head over to the mansion to see if Diana is there.
- Head into the mansion and to the second floor to see where Ducan goes.
- Use your crowbar on the security panel.
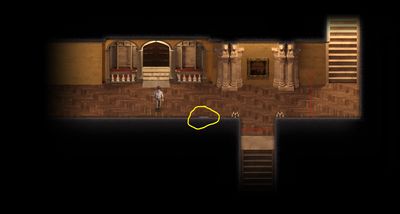
- You will receive System BIOS.
- Head to the bar to talk to Tasha. She will give you an ID Card Writer.
- You will need one last thing from the Squallmart, as you enter the Squallmart you will talk to Emily’s Dad, Naomi and Alia.
- Before leaving buy the Encryption Scanner ($43,000) you can also buy Emily updated profile ($1,000)
- You can now craft the Hacking Tool by using the following items: Key Card, ID Card Writer, System BIOS and Encryption Scanner.
- Head into the park to see what is wrong with Ash and Pricia.
- Head North twice to find Clare.
- Enjoy Scene 94, Receive Clare 6th Heart.
- Head over to the mansion to catch up to Naomi and Alia.
- Head to the pool to talk to Janet and Naomi.
- Enjoy Scene 95.
- Head to the Doctor Office and into the exam room to talk to Jessica.
- Enjoy Scene 96.
- Use the Hacking Tool to open the door in the Doctor Office.
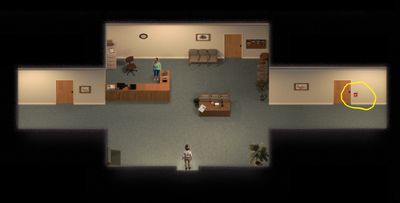
- Pick up the Nitroglycerin. Then you can exit this room to the east to get outside.
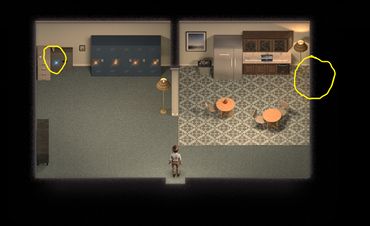
- Pick up Janet’s 3rd Chest Key.
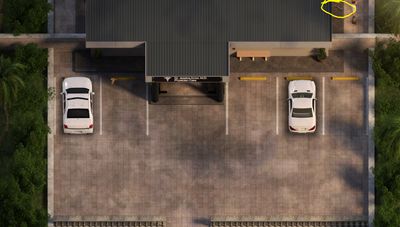
- You can now head back to the mansion and use the Hacking Tool on the security panel and gain access to the third floor.
- Head up the stairs and then click your way through the dark area and use your pickaxe on the weak section of the wall.
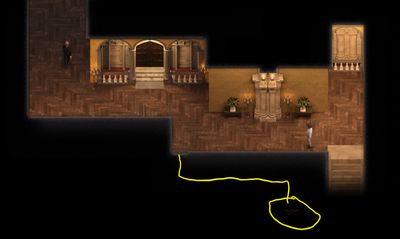
- Head down the stairs back to the second floor and then down the other set of stairs to the dining room.
- Pick up some more Viper Antivenom from the smaller chests and you can also unlock Janet’s 3rd Chest and Receive Janet’s 3rd KamaSutra Page Pussy Sex (35th).
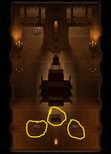
- Head to the Squallmart and talk to Emily.
- Before leaving buy a Basic Container ($300), you can also buy Kaley’s updated profile ($1000)
- Make a Rock Bomb, ( Silver Talisman, Jade Talisman, Basic Container, Nitroglycerin.)
- After making the Rock Bomb head to the Lost Underground under the church. Use the Rock Bomb on these rocks.
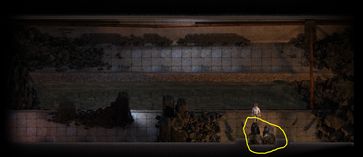
- Make your way through the rock puzzle to the blue spark. Use your Crowbar on the big rock.
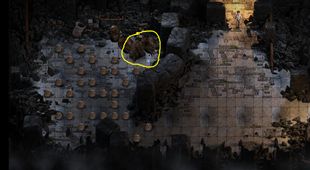
- After the surprise, make your way out of the Lost Underground.
- Enjoy Scene 97. Receive Madalyn’s 6th Heart.
- Once you go back to the main map you will receive a call from Diana.
- Head to the Bar to get Tasha.
- Head to the Park to meet up with Tasha. You will take her to the Temple.
- Enjoy Scene 98.
- Head west to meet up with Clare.
- Study the vipers movements if done right you can make it pass them all without getting bitten. Make your way to the pressure plate that is on the bottom in the middle. After pressing it make your to the table on the left side. There is also a hidden pressure plate on the bottom left then go to the table. You can also break open the vase that holds a Talisman of the Gods.
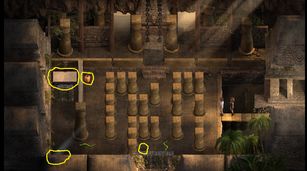
- After finishing, head to the East side where Diana and Tasha went. Do the same thing here. Study the movements of the vipers and you can make it pass them all without getting bitten. The pressure plate is on the top left. The hidden pressure plate is in top right. There another vase with a Talisman of the Gods.
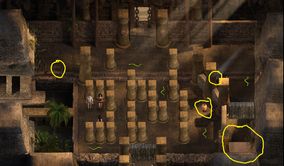
- When done, leave the Temple, if you did everything right you should be able to pick up Sofia’s 2nd Chest Key as your leaving.
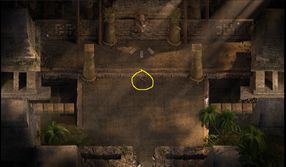
- Head to Alia’s House to speak with her.
- Go to the Squallmart.
- Head to Sofia’s Mansion to find Kaley.
- Follow Kaley to the Library.
- Enjoy Scene 99.
- You can now head to the Lost Underground where the rock puzzle was early, from there go East. You can now unlock Sofia’s 2nd Chest and Receive Sofia’s 2nd KamaSutra Page Snack Time (36th)
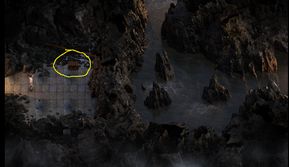
- Head over to the Parlor to see what is going on.
- Head to the Park to meet up with Jessica and Pricia. You will then be moved to the Temple to meet up with Diana, Clare and Tasha.
- Enjoy Scene 100.
- Take note of this blue bars on the temple wall.
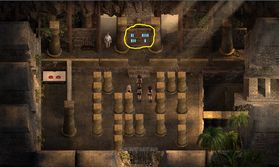
- In this room the first thing you want to do is step on the pressure plates in the right order. Bottom right, Top Left, Bottom Left then Top right. Don’t worry about the vipers they won’t move when you go to step on the pressure plates.

- After you step on the pressure plates now it time to block the vipers.
- The vipers only move side to side, you can be below and above them without getting bitten. So you can move around and between the pillars without the vipers moving to bite you.
- To do this you want to move both the bottom set of rocks up one space.
- Then you want to move the innermost rocks up one space next.
- Now to finish the puzzle you want to move the middle set of rocks up to block the final two vipers at the top.
- If you did the puzzle right it should look like this and you can grab the Temple Key Segment. There is also a Philweed (13th) (You should be able to fill the bucket in the Squallmart with Philweed with this one) and a vase that holds a Talisman of the Gods. In order to grab these items you have to get bitten by the vipers. (there is no way around it) so hope you have some antivenom left.
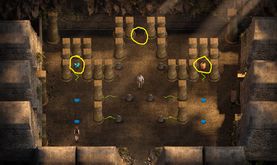
- After you grab the Temple Key Segment you will be moved to the Park and then to the Doctor office where Jessica will give a Nitroglycerin.
- Leave the doctor office and head to Squallmart to see what going on.
- Before leaving the Squallmart buy the Super Goggles ($30,000), you can also buy Tasha updated profile ($1000).
- Now head to the Church to see if Janet is doing ok. You will have a flashback along the way.
- Enjoy Scene 101.
- Head over to Sofia’s Mansion.
- Leave the Mansion you will run into Naomi at the gate, after talking to her head to Estero Key and into Alia’s house. Head into Sam’s and Naomi bedroom.
- Pick up the Painter’s Mask, Pirate Medallion and the Old Map. There is also two newspapers you can read for some information.

- Now head back to the Casula Temple and find some Old Wood to burn and gather some Fly Ash. Now you can craft a Mystical Gas Mask with the following items: Painter’s Mask, Fly Ash, Super Goggles and a Grand Talisman. With the gas mask you can walk into the blue like gas on the left side of the to open a small chest with some Viper Antivenom.
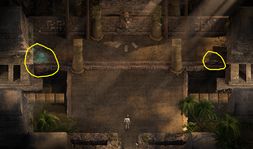
- Now head under the Library and use Mystical Gas Mask to get into Sofia’s Mansion by using the tunnels that you used to espaced with Clare a while back.
- Along the way though you can pick up Madalyn’s 3rd Chest Key.
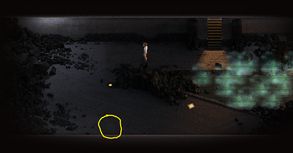
- Now keep heading through the tunnel into Sofia’s Mansion.
- Once inside Sofia’s Mansion head to the second floor and you should find Alia standing in the hallway outside the bedroom.
- Enjoy Scene 102 and you will Receive Sofia’s 5th Heart.
- Head back into the hallway where you found Alia moments ago and speak to Sofia again.
- Head to Estero Key and talk to everyone, then you will be moved to Janet’s house.
- If you have finished the first 30 temple puzzles you can open the first of the three chests there for a special photo and you can also head to the Squallmart parking and talk to this guy for another special prize but it will cost you. ($200,000)
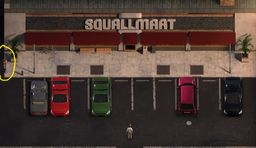
- You can now head back to the Casula Temple to unlock Madalyn’s 3rd Chest and Receive Madalyn’s 3rd Kamasutra Page Piledrive (37th).
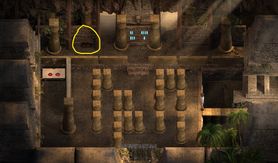
- Head over to the Squallmart to talk to Emily. Before leaving you can buy Clare’s updated profile ($1000)
- Head over to Janet’s to check on how her and Kaley are settling backing into their house.
- Kaley went to the bar to meet with Alia.
- Head to the Park to meet up with Kaley before heading to the Temple.
- You will be moved into the temple for the next ritual.
- Enjoy Scene 103.
- Time to solve another puzzle by moving the girls around. There are four pressure plates that you must step on at the same time to solve the puzzle. The 3 girls plus yourself.
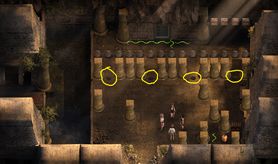
- In order to do this do the following.
- Move Diana Down, Left and Up twice.
- Move Clare Right, Up, Right and Up again.
- More Kaley Up, Left, Down, Left and Up again.
- If you did it right all the girls should be on a pressure plate now and you can go and step on the empty one to solve the puzzle.
- You will chat with the girls about needing a key to open the door.
- Kaley will get a text message from Janet, you and Kaley will run out of the temple and meet Janet in the Park.
- You will take Kaley home at this time.
- Head to the LIghthouse to find a very drunk Janet and Albert.
- You will then take Janet home.
- Enjoy Scene 104.
- The next morning head to the Parlor and give Pricia a Talisman of the God for a new massage scene.
- You will Receive Pricia’s 6th Heart.
- You can now head back to the temple and use your whip to pick up the second Temple Key Segment. There are also four small chests in the upper right that you can open. You can open these up as many times as you want but it will cost you. Each chest holds the following and will cost the following
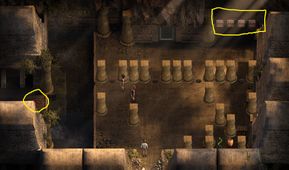
- (From left to right.)
- Grand Talisman – $12,000
- Royal Talisman – $36,000
- Talisman of the Gods – $144,000
- Rock Bomb – Nitroglycerin
- Since you should have a Nitroglycerin on you at this time go ahead and grab a Rock Bomb from the chest. Then move South and blow the wall to open a new area of the Temple.
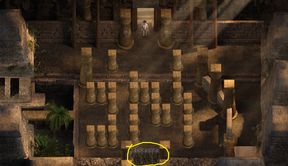
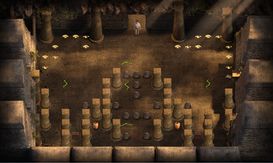
- To Solve this puzzle the 1st thing you want to do is push the rock to the far right in the top row down as far as you can.
- Then wait till the viper is at the top of his path and quickly push the rock at the bottom to the left, trapping the viper. As such.
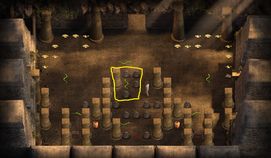
- Now push the middle rock down when the viper is to the left of trapping him in his area. As such.
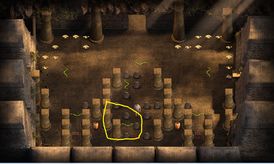
- From here move the rock to your right over and the rock to the right of the key down.
- And you should be able to pick up the third Temple Key Segment.
- Don’t forget to pick up all the money and read the book, It holds a hint to where a chest key is. More on that below.
- You can also break the vases for some Talismans and the two smaller chests for more Viper Antivenom. If you’re quick enough you can do it without getting bitten.
- Now head just outside the Temple to find Sofia’s 3rd Chest Key.
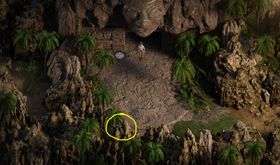
- Now head back into the Temple once again to Open Sofia’s 3rd Chest and Receive Sofia’s 3rd KamaSutra Page Pussy Sex (38th).
- You can also head to the Ancient Temple for another Evie Pin up Photo if you have done enough of the temple puzzle mini games.
- Head to the bar to find Albert.
- You will be given Nitric Acid by Jessica.
- Go to the break room in the Doctor Office to pick up some Soap.
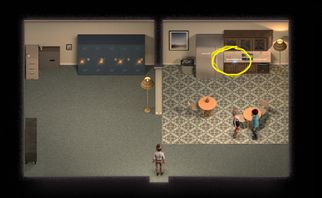
- Head to the SquallMart to buy a Basic Container.
- Head to the entrance of the Casula Temple to find a yellow cloud click on it and gather some Sulphuric Acid.
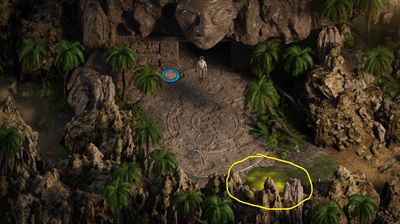
- Use the following items: Soap, Basic Container, Sulphuric Acid and Nitric Acid to craft two Nitroglycerin.
- Head to the Doctor Office and talk to Jessica and give her one of the Nitroglycerin.
- Leave the break room and talk to Jessica in the lobby of the Doctor Office.
- Enjoy Scene 105 and Receive Jessica’s 6th Heart.
- Head to the Casula Temple and open the chest that requires a Nitroglycerin and get a Rock Bomb.

- Use the Rock Bomb to blow up the West wall of the temple that leads South ( or East if you did this side last update, See above to see the East side)
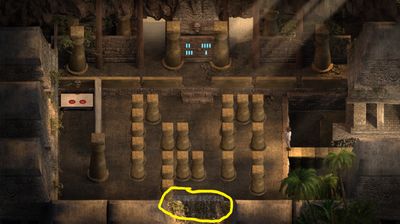
- The West Side is fairly simple, the roaches are the safe spots to stand to avoid the Vipers. So make your way to the bottom to pick up the Temple Key Segment.
- There are also more Viper Antivenom in the small chests in the upper corners. You can also break the vases lining the bottom to pick up various talismans.
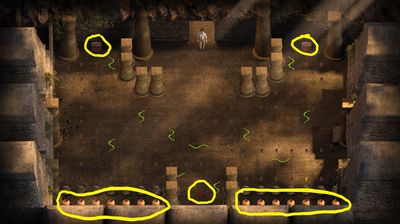
- You can now use the four Temple Key Segments to craft the Casula Temple Key.
- Use the Casula Temple Key to open the gate and open the path to the next room.

- To solve this puzzle you have to move the three MC’s to each of the three pressure plates around the room. In order to do this the left and right MC will stay still. The middle one is the one you can control by moving like normal. Move to the pressure plate at the bottom. Now depending on which way you are facing when you are standing on the plate will determine which way the other two MC’s will move. As long as you’re standing on the plate the two MC’s will continue to move. So you have to step on and off the plate at the right times.
- You first want to approach the plate from the bottom and step on it so you’re facing North so the MC’s will move up. Until they are in the position seen below.
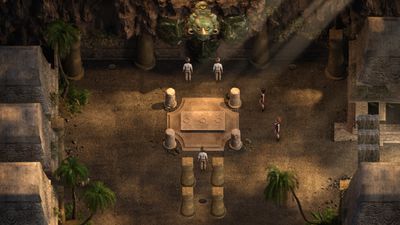
- Now move around so you approach the plate so you’re facing to the West and move the MC’s to the West until the left MC is below his pressure plate. Seen below.
- Now approach the plate from the bottom again so the MC’s move up again. The one MC should be on his plate now.
- Now move around and step on the plate so you’re facing East and move the MC’s till the MC’s are in the following positions.

- Now step on the plate from the bottom again so the MC’s move North. Both MC’s should be just to the right of the plates now.
- Now step on the plate so you’re facing West, both MC’s should move onto the plates and you should be put back into one MC again.
- Go to Janet’s House and talk to her about the rituals.
- Go to Estero Key and talk to Naomi about the rituals.
- Go to the Mansion and talk to Sofia about the rituals.
- Meet the three lovely ladies at the park.
- You will be moved to the Casula Temple ritual room for the ritual.
- Enjoy Scene 106.
- Go to the Mansion and to the 2nd floor and find one of Sofia’s guards he will take to the room where Sofia is trying to do the ritual to cure her.
- Go to Alia’s House and speak to Naomi and Sam and see if Sam will help.
- You will take Sam to Sofia at the Mansion.
- You can now go to the Ancient Temple and open the third chest for another Evie Photo.
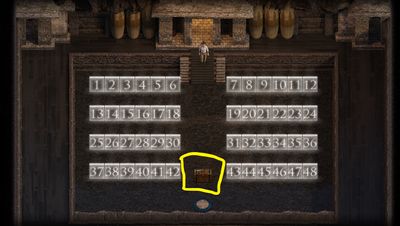
- Can also go back to the final ritual room and pick up all the money and Talismans
- And also light the Torch (14th).
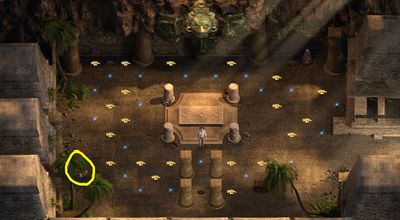
- At the entrance of the Casula Temple you can pick up Naomi’s 4th Chest Key.
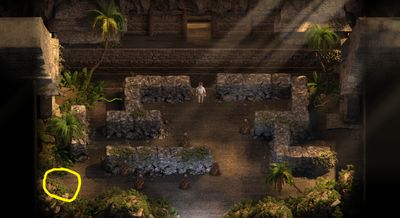
- You can now go back to the final ritual room and open Naomi’s 4th Chest and Receive Noami’s 4th KamaSutra Page Anal Sex (39th)
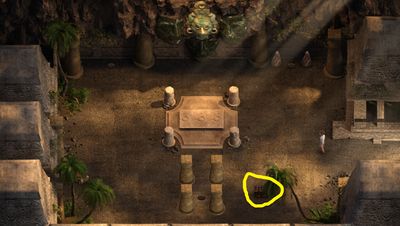
- Head over to the Squallmart and talk to Emily. You can also buy Jessica updated profile ($1000).
- Head to the Park and talk to Ash.
- Find Kaley in the Park, Head West, North, and East twice, should see Kaley up on a cliff.
- Click in this general area and use your Grappling Hook to climb up, then use your Metal Ladder to cross the gap to reach Kaley.
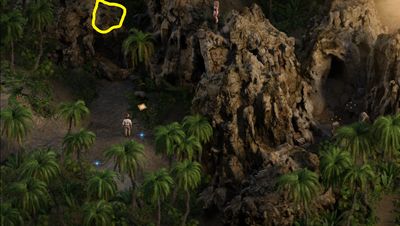
- After Kaley leaves you can climb back and find Clare’s 4th KamaSutra Page Anal Sex (40th).
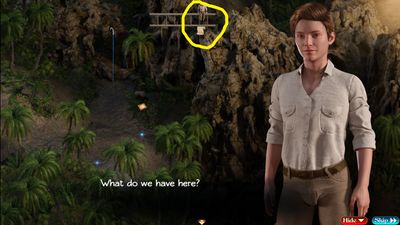
- Head to your house to find Tasha inside in the living room.
- Find Tasha’s Clothes in the following locations.
- Tasha’s Shorts
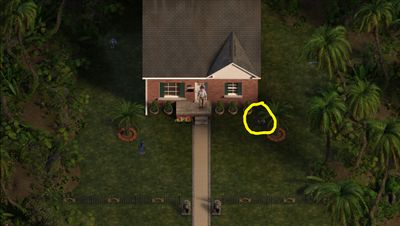
- Tasha’s Top
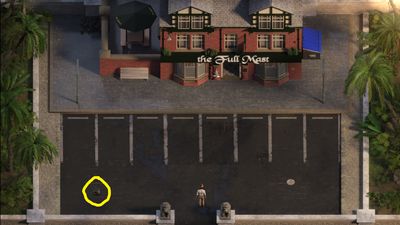
- Head inside the Bar and talk to Michael.
- Tasha’s Boots
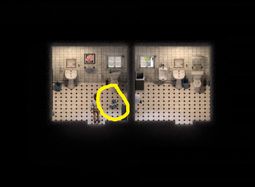
- Once you have all three of Tasha’s clothing items, go back to your house and give them to her.
- Head to the Doctor’s Office.
- Enjoy Scene 107.
- Head to Sofia’s Mansion to talk to her. You can find her on the 2nd floor.
- Follow her to the 3rd floor and go north again and into Sofia’s bedroom.
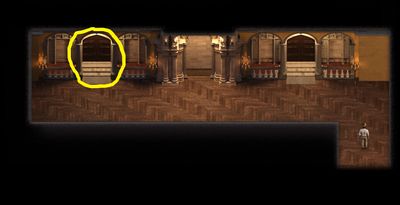
- Enjoy Scene 108, and Receive Sofia’s 6th Heart.
- Head to the Squallmart to find Alia standing outside.
- Go to Janet’s House to find her and Kaley outside talking to Albert.
- Head back to Alia’s House to regroup. You will all end up in Fort under the LightHouse.
- You can now access the teleporter in the Ancient Temple.
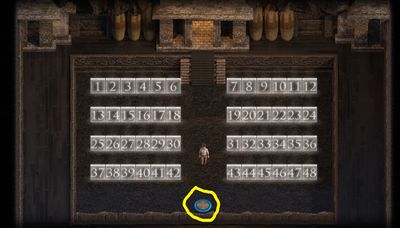
- In order to get Evie’s Profile, you must solve this new Temple Puzzle.
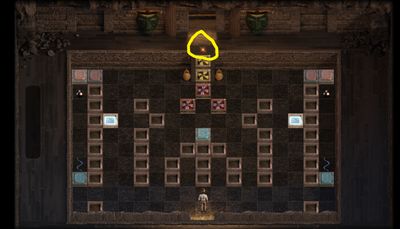
- Head over to the Squallmart, to speak with Emily and some others.
- Enjoy Scene 109.
- Before leaving the Squallmart you can buy Pricia updated profile (1000$), there is also a new item for sale Snake Idols. These cost 200,000$ but can remove snakes from the Temple Puzzles to make them a bit easier for you.
- Also buy a Basic Container (300$) you will need it in a bit.
- Leave the Squallmart and pick up the Transmission Fluid from the car.
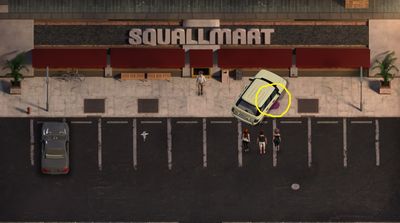
- Find a bottle of Nail Polish Remover. You can find this in many places such as bathrooms, or girl’s bedrooms.

- You will also need an Aloe Plant.
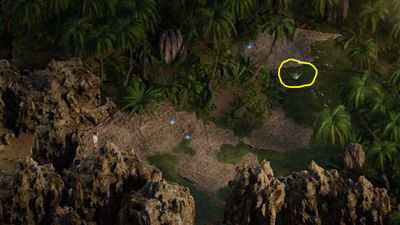
- You can now use the following items: Aloe Planet, Transmission Fluid, Basic Container and the Nail Polish Remover to make Penetrating Oil.
- Use the Penetrating Oil on the gate in the Crypt.
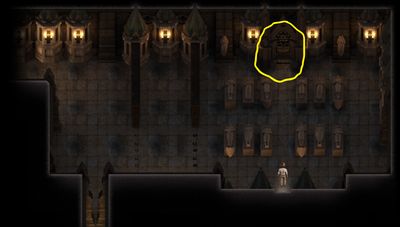
- Enjoy Scene 110.
- You can read the book for some information and also open the Sarcophagus with the CrowBar to receive the Priest’s Compass.
- Head over to the Lighthouse and find the first of four hidden valves.
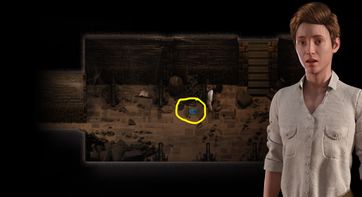
- Head west to find the second.
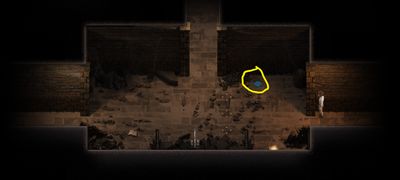
- Head North to find the third.
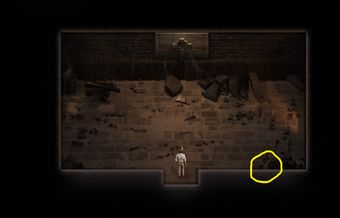
- Head South then West again to find the forth.
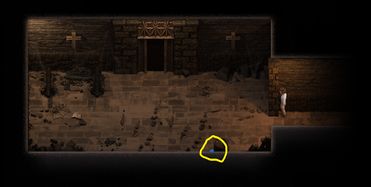
- Now head North to where everyone is waiting.
- Now make your way through the rock puzzle to the blue pressure plate. Like other puzzles in the past, if you don’t get it right away you can leave and come back and it will become easier.
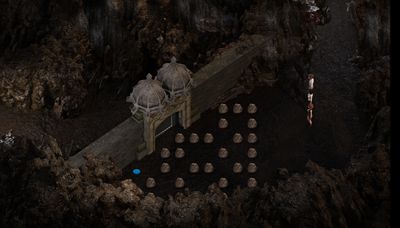
- Once the puzzle is solved, click on the gate and use the Priest’s Compass from your inventory to open the gate.
- Enjoy Scene 111.
- You can go find the piece of the Compass after it breaks apart. The pieces are located at the following locations
- LightHouse
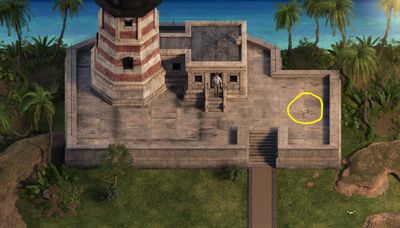
- Squallmart
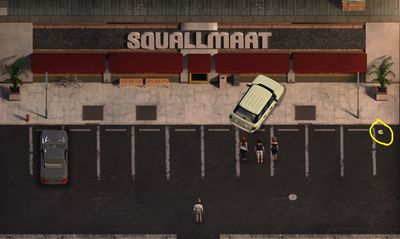
- Church
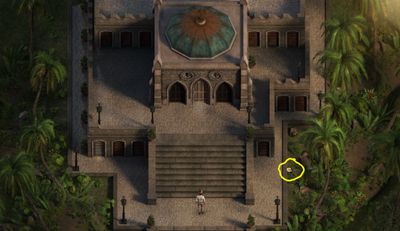
- And Estero Key.
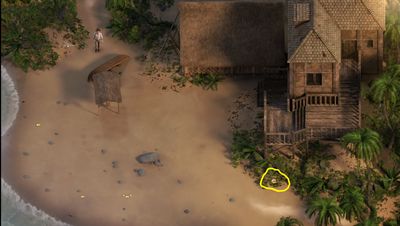
- Once you have all four pieces you can combine them and make the Gold Compass. Now each time you pick up money you get a Gold Talisman instead of 5$ or 100$.
- In addition you will have better luck at treasure hunting in general.
- Now head over to the Park to find a blue pressure plate for a clue for something.
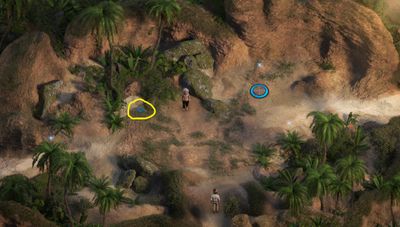
- Follow the clue to the second plate.
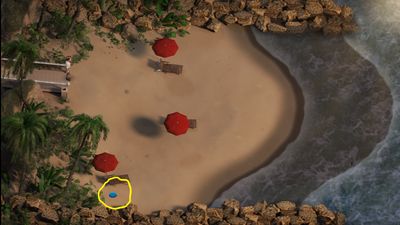
- Then the third.
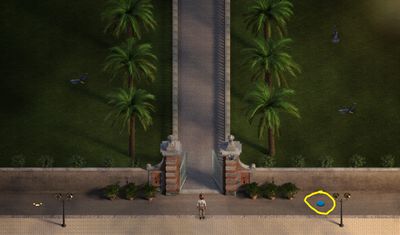
- And finally the fourth.
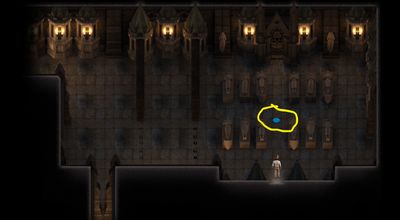
- If done right Madalyn’s brother should drop Alia’s 4th Chest Key.

- Head back to the new cave area under the Lighthouse where Alia’s 4th Chest is open it and Receive Alia’s 4th KamaSutra Page Anal Sex (41st).
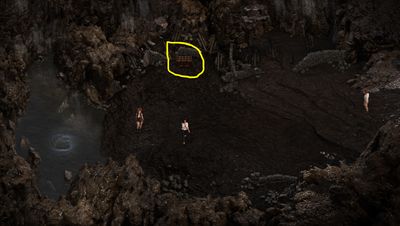
- Head below the Lighthouse to check on the girls.
- A lot of stuff will happen just follow along.
- Enjoy Scene 112.
- Head up the stairs to the treasure room.
- After the cutscene with Joey click on the back pack.
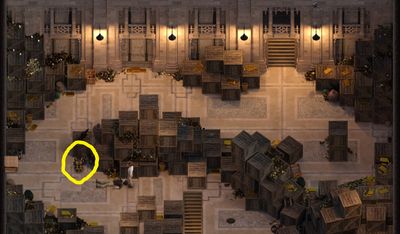
- Then head back down to blow the rock up.
- A lot more stuff will happen just follow along again.
- Enjoy Scene 113.
- You will be in the park when you regain control, leave the park and head to Janet’s house.
- Then head to Sofia’s Mansion 2nd floor.
- Then head to the Doctor’s Office to speak with Jessica.
- Head to the Beach and talk to Jessica again.
- Head back to Sofia’s Mansion to the 3rd floor to find Emily’s 4th Chest Key.
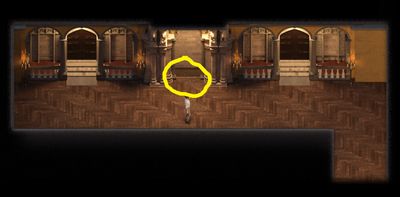
- Head back to the Fountain of Youth by going through the treasure room, there is a lot of money to be picked up in this room now as you can see.
- You can open Emily’s 4th Chest and Receive Emily’s 4th KamaSutra Page Anal Sex (42nd). You can also step on the blue plate for a Talisman of the Gods.
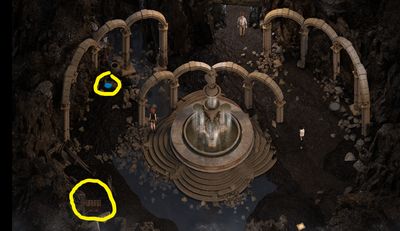
- Head under the Church to where we found Father Matthew a while back, head to the East to find God’s Shovel Handle.
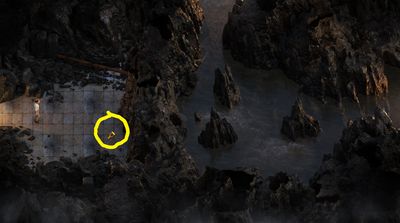
- Head under Sofia’s Mansion and through the mystery gas to get under the Library and up inside the Library to find God’s Shovel Head and yet another Broken Key (21st).
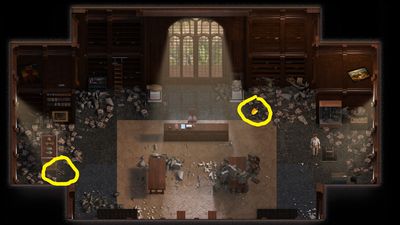
- Finely head to the LIghthouse, you will stop and talk to Albert for a moment. Afterwards make your way under the lighthouse hitting the four valves again as you go to drain the water.
- Find Broken Key (22nd).
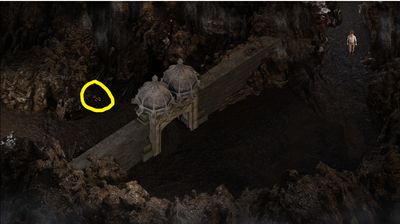
- Head West again to find God’s Shovel Shaft.
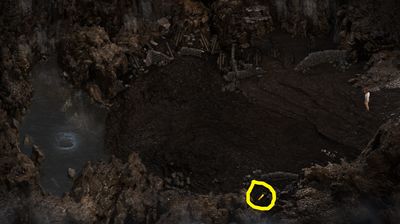
- You can now use the God’s Shovel Handle, Head and Shaft plus a Talisman of the Gods to make the Gods’s Shovel.
- You can head to the Squallmart and buy both Sofia’s and Janet’s updated profiles. ($1000).
- Now head to the beach to meet Jessica for your date.
- Jessica will ask you if you will fuck a girl with a baby bump, you can say yes or no. Depending on how you answer will decide if Alia and Sofia are knocked up in the final scene.
- From here just follow along.
- Enjoy the final Scene, Scene 114.
- After the scene, head to the Dock area. (it is located above the LightHouse.)
- You can pick a Floppin’ Fish and there is a note with a hint to a Chest Key.
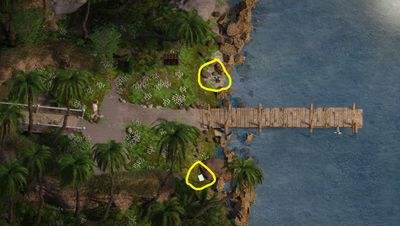
- Head to the Beach and catch a Tuna, you should find Jessica’s 4th Chest Key.
- Once you have it go back to the Dock, you can now open Jessica 4th Chest, and Recieve Jessica’s 4th Kamasutra Page Anal Sex (43rd).
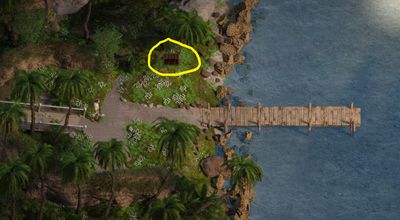
Congratulations! You have successfully completed the Treasure of Nadia main story walkthrough %100. Next up is the bonus content walkthrough guide.
Bonus Content Walkthrough
Welcome to the first bonus content walkthrough section of Treasure of Nadia guide. You will continue from this chapter after completing the main story. (2 KS Pages, 1 Photo, 1 Evie Scene)
- Start off by going to the Squallmart.
- You can buy Madalyn’s updated profile ($1000).
- Now buy the Flippers ($150,000)
- If you haven’t already done so you can craft another Pirate key by using Broken(x2), Pirate Medallion and Grand talisman. That you should have on you.
- Once all that is done, make your way to the pirate ship that is in the cave. ( Use the northernmost entrance.

Along the way you should see a blue pressure plate.
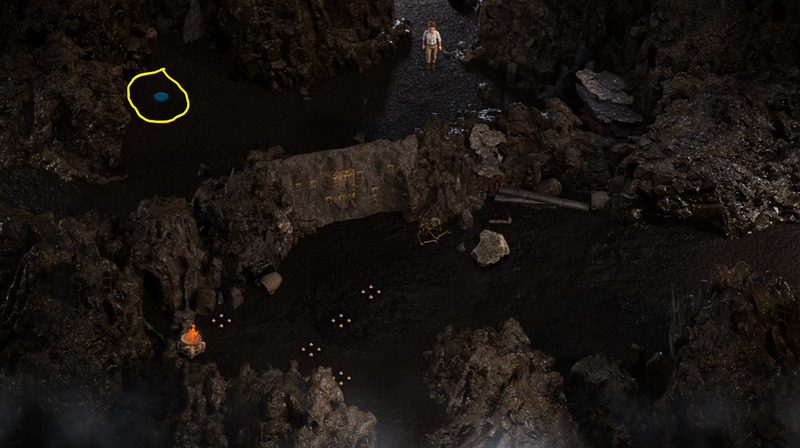
Step on it and you will find, Kaley’s 4th KamaSutra Page Anal (44th).
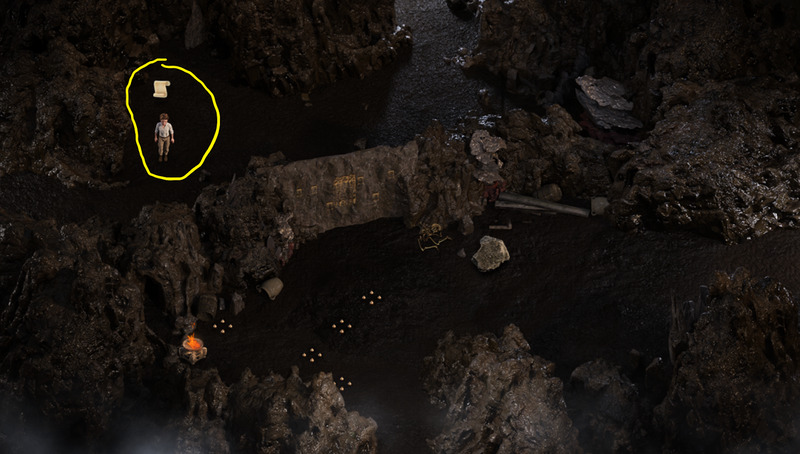
Head west to the pirate ship.
Now jump into the whirlpool and use the flippers to swim. Once underwater you will see two chests. A Pirate chest (upper left) and a normal chest (upper right). Use the pirate key to open the pirate chest and receive a photo of Nadia.
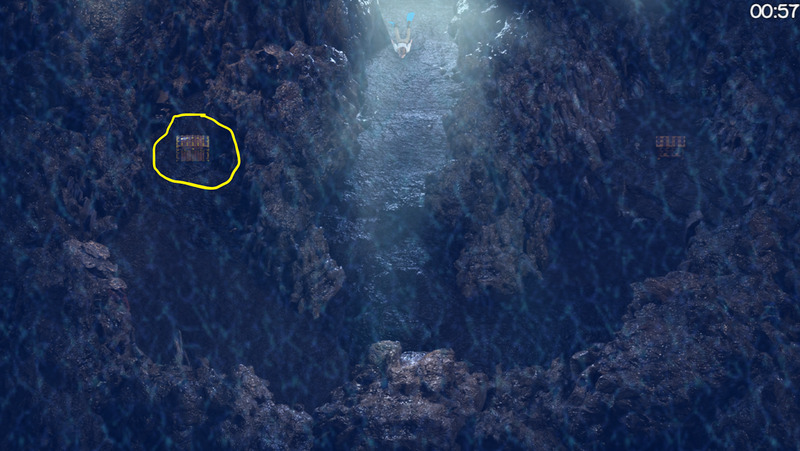
- Now let the timer run so you drown and die.
- You will go to Limbo and meet Evie again.
- Enjoy a bonus Evie Scene. ( To reply this scene just kill yourself again and again)
- After the scene is over you will be about to walk around in the Limbo area. Pick up Janet’s 4th Chest Key in upper left.
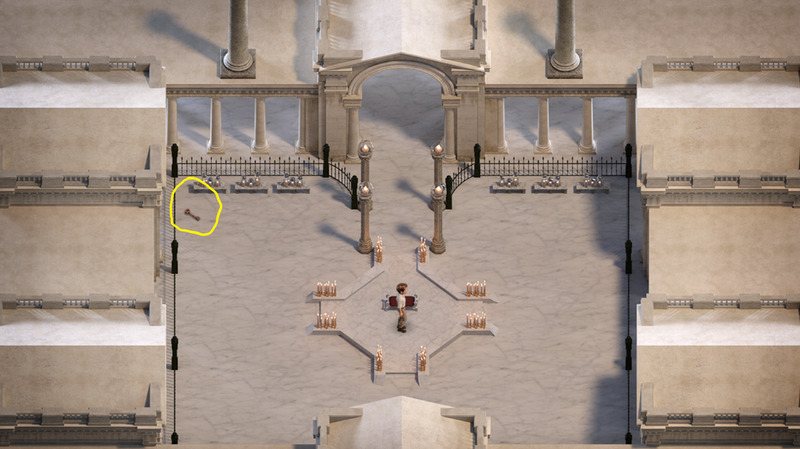
Now leave the limbo area by moving to the top of the and out the gate.
Now you can jump back into the whirlpool and open Janet’s 4th Chest and Receive Janet’s 4th KamaSutra Page Anal (45th).
End of First Bonus Content Treasure of Nadia Update.
Second Bonus Content Guide
2nd Bonus Content Update. ( 2 KS pages, 2 Extras and 1 story scene)
- Start off by finding the four Lockers Keys at the following locations
- Beach (1st Locker Key)
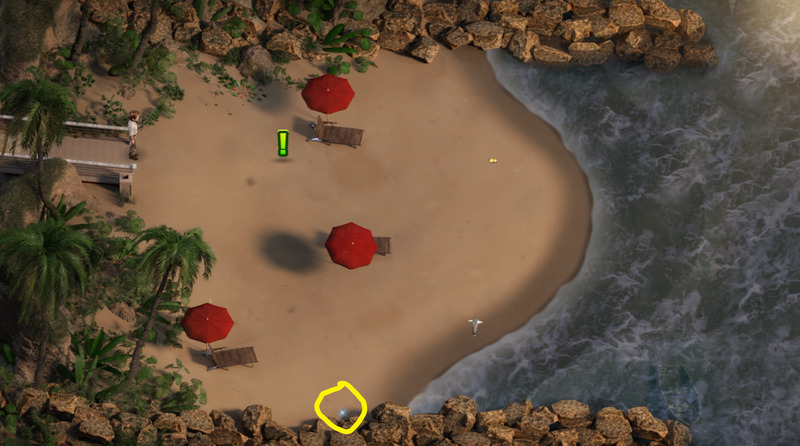
Bar (2nd Locker Key)
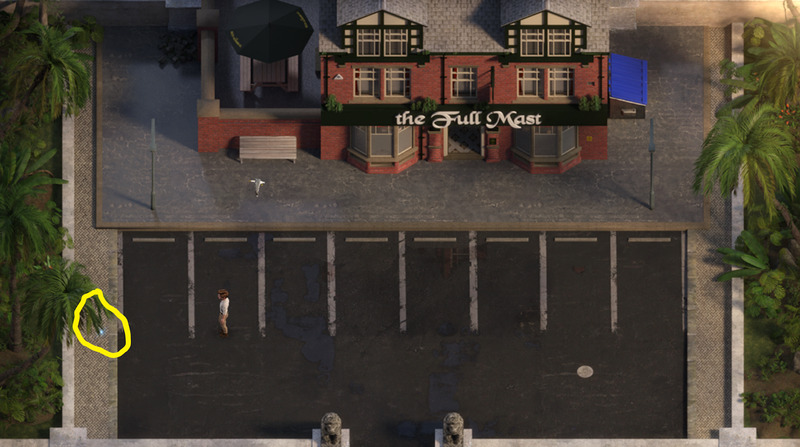
Cemetery (3rd Locker Key)
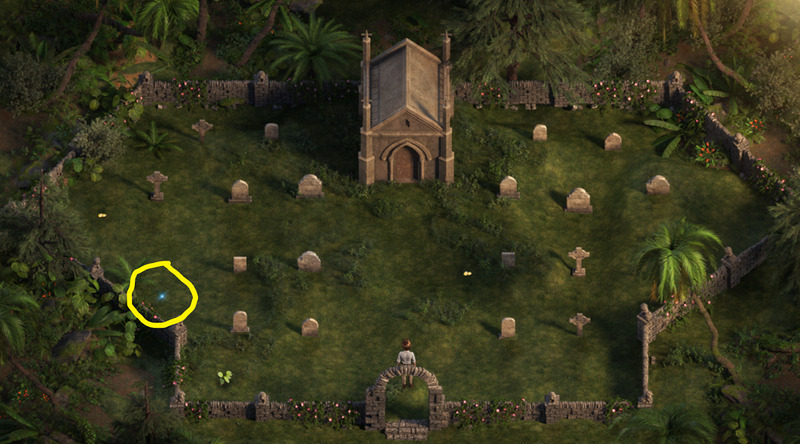
Park (4th Locker Key)
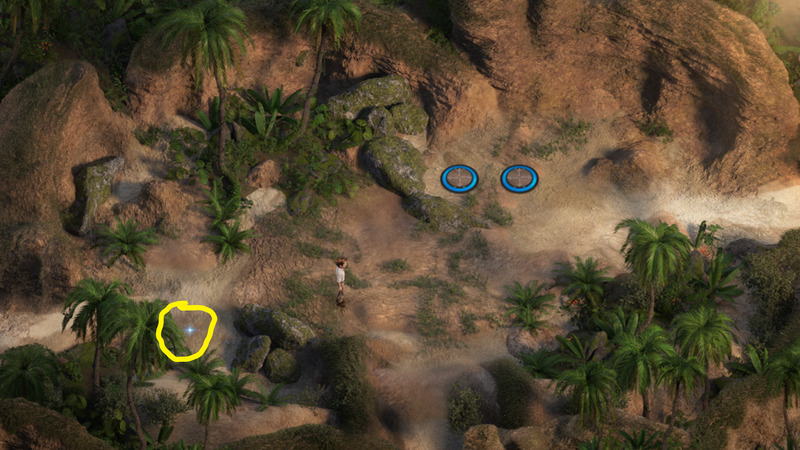
Once you have all four keys go to the Break Room in the Doctor’s Office and open the four lockers.
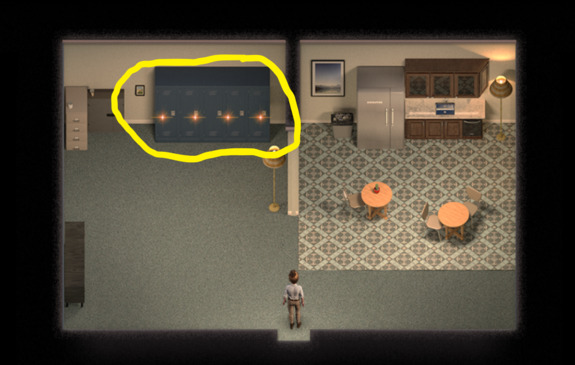
- You will find the following four items.
- Photo of Pricia and Jessica (Extra 1)
- Sofia’s 4th Chest Key.
- Photo of Jessica in College (Extra 2)
- King’s Offering Chip
- Now head to the Casula Temple and make your way to the final room where the final ritual took place in the last room.
- Along the way you see a blue pressure plate.
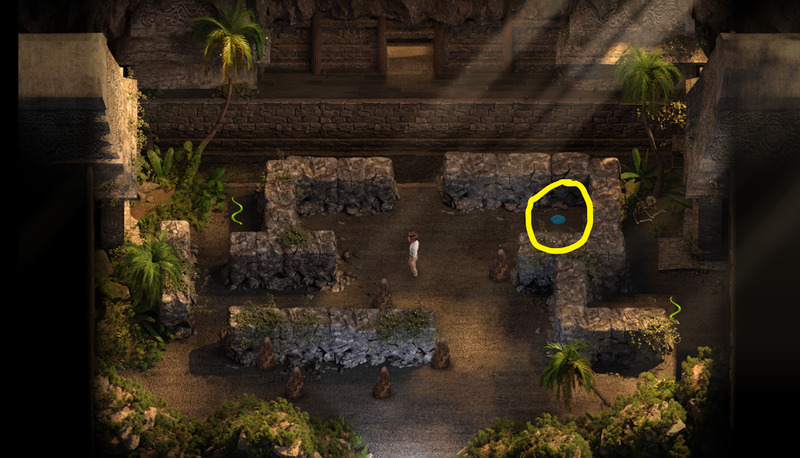
Step on it to find Pricia 4th KamaSutra Page Anal (46th).
- Keep heading to the final room now.
- Step on the Gold Pressure Plate and use the King’s Offering Chip.
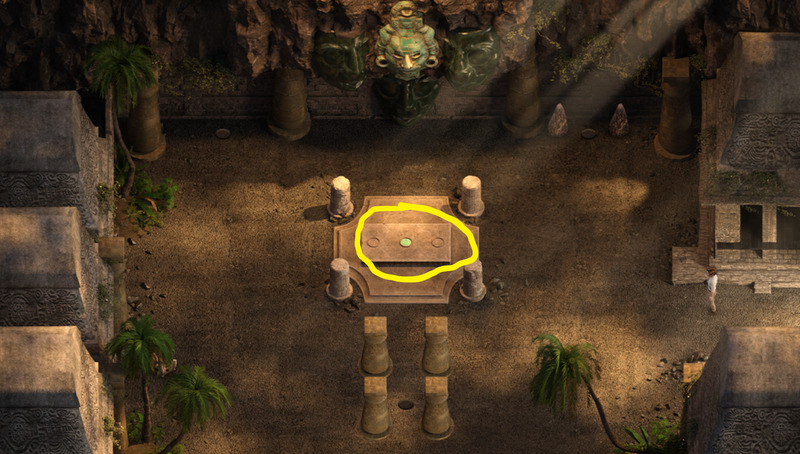
Enjoy Scene 115.
After the scene Madalyn will drop the Skeleton Key.
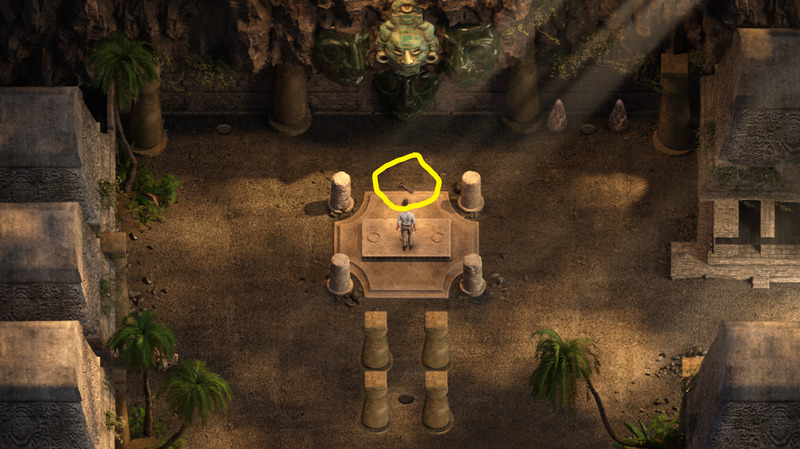
Take the Skeleton Key to this room under the church and use it on either of the two doors, you can also step on the blue pressure plate for a God Talisman.
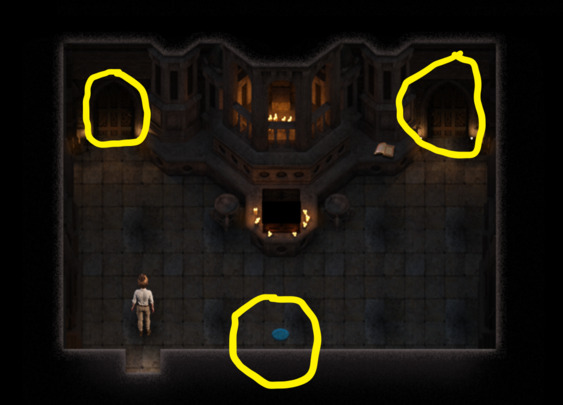
In this room light the Torch (15th) and open Sofia’s 4th Chest and Receive Sofia’s 4th KamaSutra Page Anal (47th). You can also click on the item between the torch and the chest and see what it is.
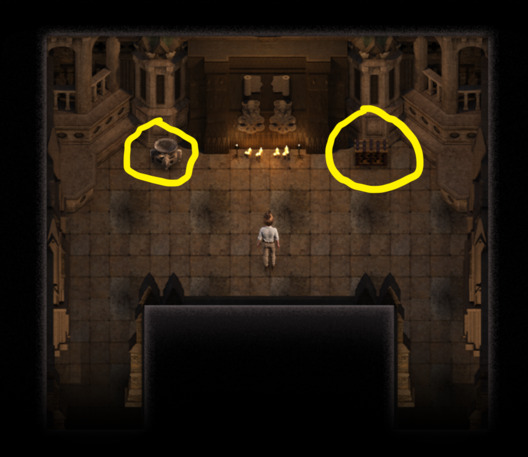
End of second Treasure of Nadia Bonus Content Update.
Third Bonus Content Guide
Treasure of Nadia 3rd Bonus Content Update. (2 Extra, 3 KS Pages)
Start off by going to Sofia’s Mansion 3rd floor to speak with a bodyguard standing outside a bedroom door. He will ask you to make a bedroom key for him.
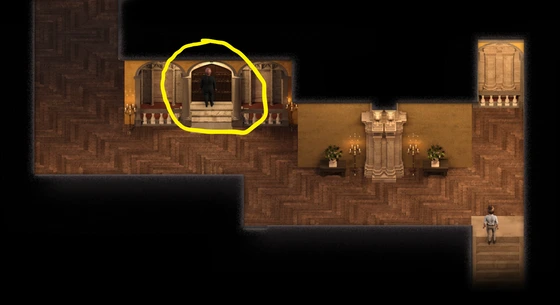
You will need four items for the key, see below.
In this 1st area there 2 things to pick up, 1st a Torn Page (Blue) and the Essence Of Key (use Flippers to swim into the ocean)
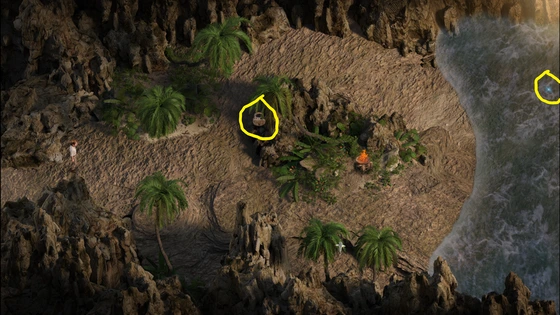
Maca Plant
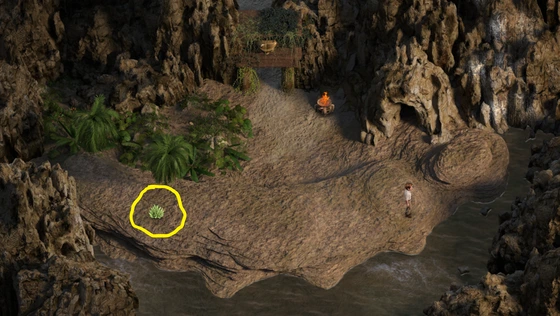
Aloe Plant
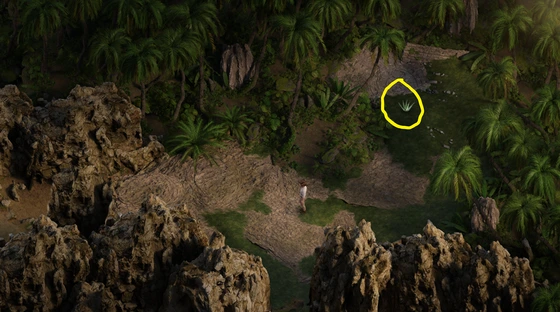
Click on the Sleeping Jaguar to pluck a hair of his.
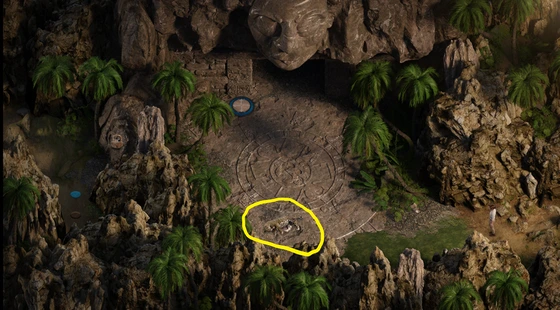
- After you pluck the 1st hair, click on him again to pluck another. This time he will wake up and kill you.
- Sending you to Limbo to see Evie. (Evie Bonus Scene)
- You should have two Jaguar Hair in inventory.
- Before leaving Limbo you pick up Madalyn’s 4th Chest Key.
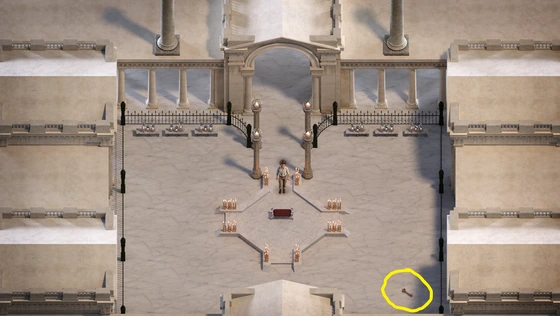
After Leaving Limbo, head back into the deep jungle and pick up two Talismans of the Gods by stepping on two blue pressure plates.

In this area you can also pick up another Torn Page (Blue) as well as another Talisman of the Gods.
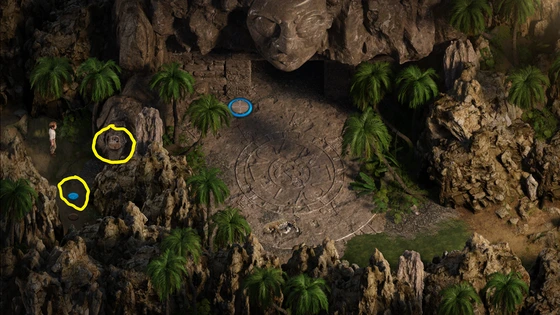
- Now you have everything you need: Essence of Key, Jaguar Hair, Aloe and Maca Plants to craft the Bedroom Key.
- Once you have the key made, unlock the bedroom on the 3rd floor.
- You will find a photo of Alia and Sofia (extra) and also be able to open Madalyn’s 4th Chest and Receive Madalyn’s 4th KamaSutra Page Anal (48th).
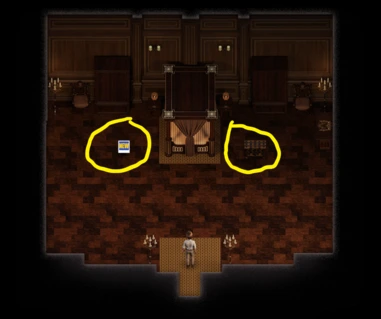
- One more thing to do.
- Use Two Talisman of the Gods and the two Torn Pages (Blue) and Craft Janet’s and Jessica’s 5th KamaSutra Pages Threesome (49th and 50th).
End of 3rd Bonus Content Update.
Walktrough V 03111 (1/2)
- Follow the prompts > meet Diana (Library)
- Go to Estero Key, then Home, then to Estero Park, wherein you need to get the Stone Talisman, then deliver it to Diana
- From now you could accumulate talismans (park) to get a few cash
- Go to the lighthouse and speak to Albert, then visit Full Mast Bar to get a few Liquor (Dark Rum)
- Bar: Pick up the important thing (left), take the ID in Janet’s Home, you may want the important thing (bar) to open the door at the second ground, then locate the important thing withinside the center of the room. When you get the id, deliver it to Tasha (bar)
- Give the Dark Rum to Albert (lighthouse) and get the binoculars in return
- Use the binoculars withinside the seashore, and use them once more in Estero key to get 1 Naomi’s heart
- Meet the ladies in Cape Vedra, then visit Doctor’s workplace (speak to the administration), to the church and to the Squallmart
- Sell the talismans to Diana, then visit the parlor and get hold of a massage ($30)
- Go to the Estero Park and search for greater talismans
V 03111 (2/2)
- Talk to Sophia (Mansion)
- Ask Janet approximately Sophia (Janet’s residence)
- Go to Kaley’s room, have interaction with the window and use the binoculars, then take the empty bottle.
- Talk to Alia (Estero Key) two times to get hold of the Unknown treasure
- Show the Talisman to Diana, pass lower back with Alia and get hold of 1 Alia’s Heart
- To get the chest key: Estero Park > Left, there’s additionally one web page to accumulate
- Talk to Ash (Squallmart)
- Buy the simple walkway ($10), simple fence ($30) and lawn flowers ($20), use them to your residence, and speak to Alia
- Buy a ee-e book ($60) in SquallMart and study
- Find the Jade Talisman (Estero Park) and deliver it to Pricia (Parlor)
- Buy an outfit for Alia (Store)
V 06112
- Go to Estero Park and comply with the two guys (left), then pass upstairs and take the chest key
- Find the Small Screwdriver on the east of the park, in the cave
- Buy the Health Insurance ($60 – SqualMart) and deliver it to the administrator (Doctor’s workplace)
- Get out and speak to Ash
- Go to Janet’s residence, wait iuntil she leaves, get inside, climb the steps, visit the rest room and experience (+1 Kaley’s heart)
- Open Janet’s bed room door with the screwdriver and get the erotic ee-e book Go to the library and ask Diana approximately the ee-e book Take the ee-e book “A Sinful Affair”, speak to Naomi out of doors and deliver her the ee-e book Buy the drink “Sex at the seashore” (Full Mast Bar), and deliver it to Naomi (+1 heart)
- Go to the church, take the church key, open the chest, and take the web page
- Give the important thing to Ash and get the picturegraph
- Buy an outfit ($400) for Naomi
- Also purchase lawn plants ($200)
- Call Alia (calls for 5%)
Ancient Temple Puzzle Solutions
There are a total of 49 ancient temple puzzles, and you may’t get to the following one with out completing the previous one, so if you’re caught on one, you want a guide like this.
Ancient Temple is surely the most difficult area of the game, since it is full of puzzles, there are about 49, and each one more complicated. So to simplify we leave you this video guide, with all the solutions.
- Talk to Alia (Estero Park) and take the Shovel Shaft (left)
- Follow Clare into the cave and experience the scene
- From now you could use the local shrine, provide objects and try and get hold of higher objects in return
- Talk to Emily (Squallmart) and additionally purchase the Shiovel Head ($eighty)
- Go to the Parlor > Backyard > take the cash (guy) and additionally the shovel handle
- Give the cash to Emily (+1 heart)
- Talk to Diana (library) and to Ash (calls for $250 for 1 picturegraph)
- Sell the Stone Talisman to the female at the seashore, in case you reject her provide = $900
- Doctor’s workplace, Diana desires a excessive powered magnet
- Click at the bird (parking), take the MRI Room Key (inside), take the chest key and additionally the excessive powered magnet (left room)
- Give Diana the excessive powered magnet (+1 heart)
- Open the chest withinside the cave
- Native Shrine – use: Jade Talisman, Shovel Shaft, Shovel Head
- and Shovel Handle, and get hold of: Jade Shovel
- Show Pricia the silver talisman, in case you don’t have it, get it from the Native Shrine – use: Silver Ore and three Stone Talisman, and get hold of: Silver Talisman
- Buy an outfit ($400) for Emily, additionally purchase the Discount Sofa ($1,000) and speak to her
Walkthrough V 11122
- Follow Alia (Estero Key)
- Buy a lighter and additionally a Pipe Wrench ($eighty both) in Squallmart
- Use the lighter with Alia (Estero Key) experience the scene and select up the talismans
- Use the Pipe Wrench to interrupt three vases (Library out of doors, Full Mast Bar out of doors and mild residence out of doors)
- Go to Full Mast Bar, upstairs and attach the pipe with the pipe wrench and open the chest with the chest key (in the vase of the Libary)
- Go downstairs, experience the scene
- Talk to the person out of doors the Library, then to Ash (Squallmart), pass lower back to the library and speak to Ash once more (Squallmart)
- Follow Kaley (Janet’s domestic) and experience the scene
Walkthrough V 14011
- Library: Get the Broken Camera, the Silver Talisman and additionally the Church Key
- Church: Open the door (decrease left nook) with the church key. Talk to Madalyn, Take the Chamber Key, and use it withinside the different room.
- Estero Park: Go to the left, and to the left once more, to discover a Ginseng Plant, a crafting recipe, and additionally a circle
- Circle & Fire: You must prompt four fires to prompt the circle. There are 2 withinside the church (earlier than the chamber’s door) and a pair of withinside the Estero park (1 withinside the cave and the remaining one to the proper from the circle). Light the four fires and are available lower back to the circle to get 1 new Kam web page.
- Doctor’s workplace: Eat the ginseng plant and go to the doctor ($one hundred forty), experience the scene and click on at the closet (decrease proper nook). Then take the Camera base and the Loose screws from the left room
- Tasha minigame: Wait till she doesn’t have a take a observe you and click on on the second one preference till you win and get hold of the reward
- Cave – Native Shrine: Small screwdriver, Broken Camera, Camera base and additionally Loose Screws
- Give the digital digicam to Ash (Squallmart), and meet him once more (Church)
- Squallmart: Buy the entirety inexpensive than $2,000, additionally the brand new outfit and the steel detector
- Call Tasha and experience the brand new scene
Walkthrough V 16012
- Church: Talk to Ash, then visit Squallmart
- Estero Park: Go a ways left, comply with Clare, then accumulate Philweed, accumulate Cockroaches and additionally the Ginseng Plant (Forget it if consistent with our walkthrough you have already got it). Finally deliver Philweed & ginseng plant to Emily
- Lighthouse: First speak to Diana (Library), then visit the Lighthouse, get the talisman (wreck the left vase) and have interaction with the chest and the trace of the basement. Find the important thing withinside the seashore (decrease left nook) and open the chest to get a brand new web page.
- Squallmart: Talk to Ash > visit the library and placed the roaches in a field > purchase the suncrean (squallmart) and speak to Diana (Beach) > Talk to Diana (Library), and sooner or later visit the library, clim the steps and purchase the picturegraph
- (There is likewise an additional scene in Estero Key)
Walkthrough V 19021
- Squallmart: Talk to Pricia and Emily, then visit the parlor (backyard), plant a ginseng plant in Pricia’s lawn (you could locate ginseng in Estero Park), and visit the Parlor to speak with Pricia
- Library: Take the ginseng plant (out of doors – decrease left nook), you could promote it to Pricia ($250)
- Janet’s domestic: backyard, then residing room, speak to Janet and Naomi, visit the kitchen and get a few iced tea (refrigerator). Go upstairs > Janet’s room and take alcohol (nightstand) and additionally Shoelaces (bathroom). Give the alcohol to Naomi and Janet, watch the scene and visit Kaley’s room.
- Lighthouse: Get a picturegraph in Squallmart, the visit the lighthouse > Basement, and speak to Albert two times: take the broken boots, the crating web page, and open the chest ( password 684)
- Buy Shoe Glue in Squallmart, and locate the crafting web page in Full Mast Bar > Men’s room
- Cave (crafting): The recipe for the Stompin Boots is: Leather Gloves + Damaged Boots + Shoelaces + Shoe Glue. With the Stompin Boots you could byskip through toxic insects
- Full Mast Bar: Take the Carbon Shovel Shaft and additionally the Chest Key
- Estero Park: Go wherein the scorpions were, and take the Ultra Shovel Handle, a crafting web page and additionally the Golden Talisman. To open the chest you need to through Antacid Tablet (squallmart) and deliver it to the goose
- To entire this replace you want to speak to Diana (library), purchase the outfit for Pricia (squallmart) and invite her (calls for Curtains $2,500) and additionally Yard Trees $four,000)
Walkthrough V 21022
- Talk to Emily (Library) and take all of the books, then deliver her Perenial’s of Cape Vedra
- Go to Estero Park, then take the Heavy Cord (Doctor’s workplace)Buy a steel hook (squallmart), then integrate Heavy cord + Metal hook to get the Grappling hook, and use it to get crimson ginseng, then deliver the crimson ginseng to Emily
- Take the Gaffer Tape (Estero Park – left aspect) with the grappling hook, then get the Wrench Grip (Cave – Estero Park – proper aspect)
- Craft a Pickaxe withinside the Native Shrine: Wrench Grip + Gaffer Tape + Grappling Hook + Pipe Wrench (the crafting web page isn’t anyt any the left aspect of the park)
- Go to Estero Key, watch the scene, then pass deep into Estero Key and use the pickaxe at the rock to go into the cave. Light the bowl (left aspect) with the lighter, then take the torch (higher proper)
- Go to the church, take the chest key and meet Madalyn
- Go to the church once more, undergo the left door, and wreck the column (proper) with the pickaxe. then open the chest and wreck the vase to get the web page and cash
- Meet Ash withinside the ParlorEat Red Ginseng, visit the Doctor and pay $one hundred forty (you could locate the plant at Estero Park)
- Eat Red Ginseng, go to the Doctor and pay $140 (you can find the plant at Estero Park)
Walkthrough V 23031
- Cave > Follow Clare and remedy the puzzleOpen the chest with the unknown treasure and display it to Diana (Library)
- Talk to Tasha (Estero Park), then visit Janet’s bed room
- Meet Ash at Full Mast Bar, then speak to Tasha on the bar
- Meet Diana (Library) and take the notice from her desk, then mild the mild bulb at the proper and go away it became off at the left
- Use the name of the game key at the field out of doors the library (higher proper nook)
- Go for your bed room
- Talk to Madalyn (her room – Church)
- See a stone close to a column?wreck the column with the pickaxe and location the stone at the hole (above), then take the chest key
- Estero park > left – up – proper – proper > open the chest
Walkthrough V 25032
- Doctor’s workplace > Tomography room > take the simple box and the NitroglycerinCraft the Rock Bomb: Basic box + Nitroglycerin + Jade Talisman (Estero Park) + Silver Talisman (Estero Park)
- Go to the west of the Cave and use the Rock bomb with the stone blockading the way
- Light the bowl at the left (lighter), accumulate the cash and wreck the vase close to the go out with the pickaxe to get any other simple box (don’t forget wherein is the chest)
- Craft any other bomb and use it in the front of the preceding one
- Snake’s puzzle: do away with the stone from the passage and near the go out
- Take the barrel and location the stone you located to shut the go out withinside the higher left nook of the screen. Take the chest key and open the remaining chest (close to the cash)
- Give the snake to Jessica (Doctor)
- Talk to Janet (her residence)
- Go to Estero Key and speak with them. You want to craft and use any other Rock bomb there
- Talk to Kaley (Doctor’s workplace & withinside the cave of estero park)
- Go wherein you amassed the cash and take the Pirate Diary
- Show Diana the locket (library), and display Madalyn (church) the pirate diary
- Buy: Outfit for Kaley, a Roofing Job, Recliner and additionally the End Table
- Invite Kaley domestic
Walkthrough V 27041
- Talk to Pricia (Library) > Go to Estero Key > Buy the Kayak License Exam (Squallmart $250)
- Kayak License Exam (inventory) Answer: Sunscreen, West at 15+ knots, Beer and South > deliver the examination to the ranger
- Follow the Ranger (Estero Park) > Talk to Diana (west > as much as the river), then location the stone at the plate to open the passage
- Pick up the objects withinside the new vicinity and pass lower back with Diana
- Return to the island and wreck the rock (rigth aspect) with the pickaxe to get a few quartz
- Go to the northwest aspect of the park and wreck any other rock to get a few Fossilized
- Talk to Emily (Squallmart), and purchase Alumina
- Talk to Ash (Parking Lot) to get a Photo
- Craft the Ant Killer (Cave)
- Go for your inventory, open the Old map and get the Chest Key (below the tree)
- Go to the Island, kill the insects with the Ant Killer and take the Maca Plant. On the east aspect of the island there’s a chest, open it to get a web page
- Give the plant to Pricia (Parlor) > Go to Sofia’s Mansion > Talk to Diana (Library)
Walkthrough V 30042
- Go to the Full Mast Bar > speak to Albert (backyard) > get the drinks (subsequent to Tasha) and deliver:
- Rum: to Albert
- Whiskey: to the left guy
- Beer: to the proper guy
- Margarita: to the center guy
- Mojito: to the man withinside the higher left nook
- Buy Peanuts (Squallmart) and pass lower back to the bar to get a Tasha heart > speak to Albert & Ash (parking lot) to get a picturegraph)
- Talk to Diana (Cave) > visit Janet’s domestic
- Rat Trap Recipe ingredients: Plastic Wrap + Roach + Gaffer Tape + Basic Container
- Plastic Wrap: Buy it at Squallmart
- Cockroach: Catch it (Full Mast Bar > Toilet)
- Basic Container: Break the vase you may locate on the decrease left nook of the backyard
- Talk to Janet > input the residence and speak together along with her once more > test the rat lure
- Now you want to craft a bomb to explode the wall withinside the Lighthouse
- Rock Bomb ingredients: Nitroglycerin + Basic box (locate it withinside the Lighthouse) + Silver Talisman + Jade Talisman
- Use the rock bomb at the basement of the Lighthouse (blow up the wall)
- You can wreck the ground In the front of the steps, do it to get the chest key
- Go to the Full Mast Bar > Backyard > Open the chest to get a web page
- Buy an outfit for Jessica, test the remaining web page you’ve got got found, and invite Jessica domestic
Walkthrough V 32051
- Go to Squallmart > speak to Emily (in case you didn’t earlier than) > Talk to Diana (Library) > Go to the Cave with Clare and remedy the puzzle (see the answer withinside the preceding cave) > sooner or later take the Dolomite with the pickaxe
- Downstairs > pass left and click on at the blocks (there are 6) > insert Tikpak Artifact into the sparkling shape > clean the stones beneathneath the steps to discover a new web page, then take the Pirate Diary
- Upstairs (go away): The chest is hidden below a tree, take additionally the crafting web page, the white sand, the bait, and mild the bowl (pinnacle) with the lighter
- Full Mast Bar > Backyard > ligth the grill (lighter) to get Fly Ash
- Cave: Craft Concrete (Stone Talisman + Fly Ash + White Sand + Dolomite
- Estero Key > Sam > Give him the concrete
- Home >Talk to Emily > deliver her crimson ginseng, phillweed and additionally Maca plant
- After Naomi calls you consume a maca plant > Doctor workplace > pay one hundred forty to the receptionist
- Church > Madalyn’s room > deliver her the Pirate Diary > Take the Cursed shovel from the following room
- End of the present day replace, however you continue to can craft:
- Swift shovel (farm talismans faster): Carbon shovel shaft + Alloy shovel head + Ultra shovel handle + Silver Talisman
- Pirate shovel (even faster): Cursed shovel + Pirate Medallion + jade Talisman + Gold Talisman
Walkthrough V 34052
- Janet’s domestic > Kaley’s room (up) > Squallmart, take the small screwdriver (left) > lower back to Janet’s domestic > Kaley’s room (up) > use the screwdriver on her door
- Talk to Diane (Library) > Cave > River (northern a part of the cave) > Go wherein the tiger become, flip left, raise the digital digicam, philweed plant, and additionally mild the bowl
- Squallmarn > location 3 plants (maca, crimson ginseng & philweed) withinside the box and speak to Emily
- Behind the library (left aspect) > wreck the column and location the stone at the higher proper nook, then take the gothic key
- Park (wherein the tiger become) > pass left > deal with the peacock with peanuts and lead him to the library > sooner or later get the important thing to the chest and additionally the web page
Walkthrough V 36061
- Library > comply with Diana > boost the damaged key
- Church > Madalyn’s room > proper room > open the door (gothic key) > pass proper and take the web page of crating and the damaged key
- Puzzle: make certain that the rat receives into the distance wherein the snake is sitting, however it need to now no longer meet with it. Poke the arrow in case you want to do away with the snake. Solution: The crimson arrow need to be became to the left whilst you faucet at the rat, then take the damaged key (left)
- Janet’s domestic > Squallmart (locate there the remaining damaged key)
- Full Mast Bar > Janet’s domestic (via the lower back yard) > Phone password (third room upstairs > password = 123)
- Parlor > picturegraph > squallmart > purchase the outfit for Diana
Walkthrough V 38062
- Talk to Tasha (Full mast bar) > Sofia’s Mansion: while the protect and the digital digicam aren’t looking, get via the fence > Take the feather (left aspect), wreck the vases and pass the basket (proper aspect), take the important thing (red flowers) and additionally wreck the pinnacle vase to get the talisman (different vases include ingredients, so wreck them too)
- Open the door with the important thing > after the scene visit squallmart and purchase alumina > then craft the ant killer: Fossilized algae + alumina + quartz + rusty key
- Go deep into the island via the cave, take the scorpion venom and additionally use the ant killer on ants
- Solve the Puzzle (it wil be less complicated in case you go away and are available lower back some times) and take the chest key, bamboo and philweed
- Squallmart > Emily’s lab (room on the quit of the shop) > location the philweed withinside the box
- Talk to Emily (seashore) > purchase love potion (squallmart) > drink the affection potion, visit doctor’s workplace and pay for Jessica’s appointment
Walkthrough V 40071
- Go to Squallmart > Parlor > Full Mast Bar > Doctor’s Office > Squallmart and additionally purchase a Dart
- Cave – Craft a Blow Dart: You will want the Dart + Bamboo + Feather + Scorpion Venom
- Go with Emily (Squallmart), then to the cave (northwest), and after the scene take the pirate diary and additionally the fake talisman
- Cave passage: 1st block the passage from the snake with stones, second stand on 2 circles to open a passage to any other vicinity, third Go to the brand new vicinity, take the grand talisman, the vintage wooden and additionally open the chest
- Give the Old wooden to Clare, then Go to the Parlor and deliver the grand talisman to Pricia
- Go to the church and deliver the pirate diary to Madalyn > Take the chamber key > visit the proper room the usage of the chamber key > take the rest room key and visit wherein Madalyn become
- Cemetery: Find the chest key below the palm tree (proper aspect of the cemetery
Walkthrough V 42072
- Squallmart > Cave > Follow Joey (south of the cave) > word the range and mild the bowl, a key will seem there
- Janet’s domestic > her room > verify the password of her phone (123)
- Estero key > Naomi’s House > Attic > take the gaffer tape
- Janet’s domestic > cave > trap a cockroack (it’ll escape) > faucet at the rock
- Craft the rat lure: Plastic Wrap + Gaffer Tape + Roach + Basic Container. purchase the plastic wrap in the shop and take the simple box from the church in case you don’t have it. Craft the rat lure if you have all of the ingredients
- Lighthouse > Park > Teleport > tiger (proper aspect of the island) > proper of the tiger there’s a vase with a simple box
- Go proper and take the pirate medallion, the chest, the bowl, the philweed plant and additionally the Tikpak Treasure
- Move the two stones (will seem while you’re taking the pirate medallion) below the palm trees (stand below them to recognize it)
- Light the bowl and take the chest key from wherein the range (cave) become
- Leave the park (teleport) and display Diana the Tikpak Treasure, go away the residence and get hold of a message from Tasha
Walkthrough V 44081
- Find the crafting scroll on the park: Rock Bomb = Nitroglycerin + Basic box + Silver Talisman + Jade Talisman
- Squallmart > Cave > Craft the Rock Bomb > Go to Full Mast Bar > Catch a fish for Jessica on the seashore (in case you fail purchase bait on the bait shop)
- Next Location > wreck the base, get a simple box and pass lower back to craft any other Rock bomb
- Church > wreck this wall with the rock bomb
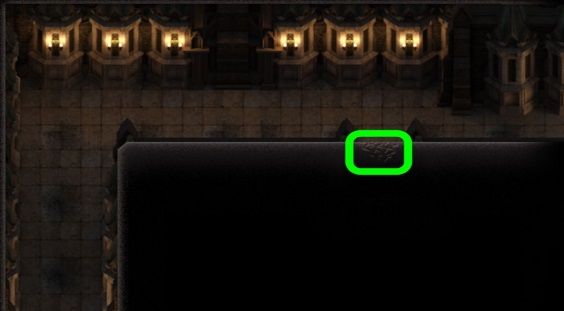
- Go to the vicinity, and take the damaged key and additionally the spike boots from in the vase (wreck it). Then teleport to the park and take the grand talisman from the hidden vase
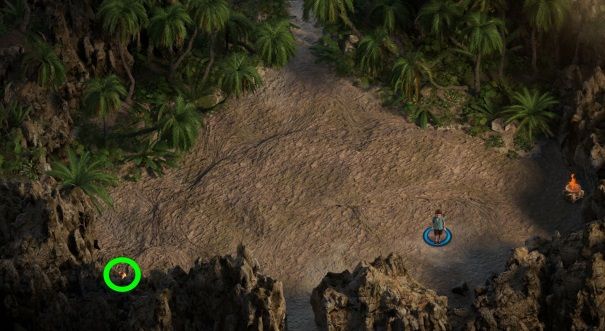
- Take the damaged key (western aspect of the island) and craft the Pirate key = Pirate Medallion + Gran Talisman + Broken Key + Broken Key
- Remember wherein you blew up the stone, now you could open the chest with the pirate key
- Visit Diana > Sofia’s Mansion > Cave Puzzle:
- 1st locate the web page here:
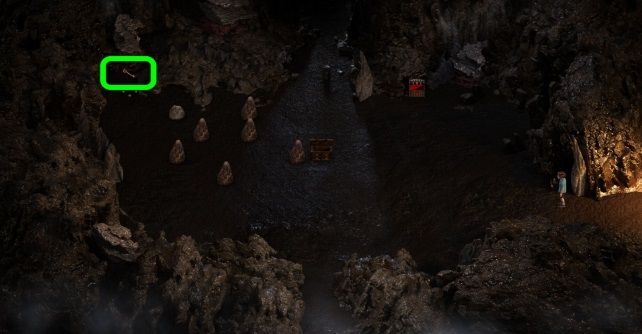
- Second remedy the cave puzzle doing precisely this:
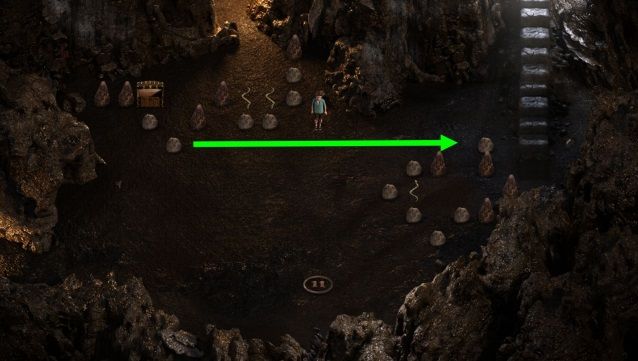
- To entire this replace take the Philweed plant (upstairs, below the palm tree)
V 46082
- Library > Teleport to Estero Park > visit wherein there’s a bonfire at the proper and a direction up and take the direction up
- Library > Behind the library > take the chest key (higher left nook) > Janet’s domestic > her room (second ground) and take a shower
- Estero Key > wherein the Clare occasion become held there’s a web page > get Jasmine, Philweed plant and additionally open the chest to get the web page
- Girls’s profiles (+1 Alia’s profile) > Wester a part of Estero Park (Orange Light)
V 48091
- Janet’s domestic > Kaley’s room > Squallmart (purchase Soy Sauce) > Give it to Janet (Janet’s domestic)
- Library > Estero Key > Janet’s domestic via backyard) > Cemetery
- Estero Park (Teleport) > get the gun the usage of the Whip Janet gave you > Inventory pick Old Musket, then Small Screwdriver to get Gunpowder > Go via the bees (north) > Tap at the orange shining mild and use the Whip > Go to the river (south) flip left > use the whip at the pinnacle rocks to get the chest key
- Teleport to the start of the part > pass left till the quit of the direction > then to the river (up) > click on at the orange mild (below the palm tree)
- Lighthouse > Tap at the gun (cannon) > use gunpowder on it
- Go left (new vicinity) > take the crypt key, study the diary and additionally open the chest with the important thing > dont overlook to select up the crafting web page (to craft Jasmine Massage Oil)
- Cemetery > use the Crypt key (chapel door) > take the damaged key, Rosa moss, and additionally wreck the vase to get a gold talisman
- Craft Jasmine Massage Oil: Jasmine + Rosa Moss + Basic Container + Love Potion > Then deliver it to Prici (Parlor)
V 51092
- Estero Park > Go to the doorway of the park > there may be an scene > take the machete and move Up > take the antique bullet and move Up > Use the machete to reduce the trees and preserve going
- Go to the brand new vicinity withinside the cave (you went there with the team in preceding versions) > enhance 2 Rosa Moss and a Cockroach
- Inventory > Phone > Talk to Diana
- Teleport to the park and move in which the antique bullet was > more than one conferences with Diana and Clare > Go up > take the Gaffer Tape and the Grand Talisman > Light the bowl > Now the important thing to the locked chest is withinside the cave, downstairs
- Go down the river > then left > Use the machete to reduce down the bush withinside the decrease left nook and take the Tikpak artifact
- Cave (in which the stone with the tickpak artifact is) > use the Tikpak artifact to have there
- Go domestic > then to Sofia’s Mansion (thru the fence) and provide her the Tikpak Artifact
- Go to Squallmart > Buy Plastic wrap and additionally a Basic Container
- Cave > craft the Rat trap ( Plastic Wrap + Gaffer Tape + Roach + Basic container)
- GO to the park (in which you distracted the Jaguar with the rat) > Use the machete to take the girl’s profile
- Squallmart > provide Emily the rat trap > Doctor’s office > Squallmart > purchase Multivitamins (use them in a room with girls)
- Buy an ouftif for clare, invite her domestic and use the brand new page
- There is some other Girl’s profile here:
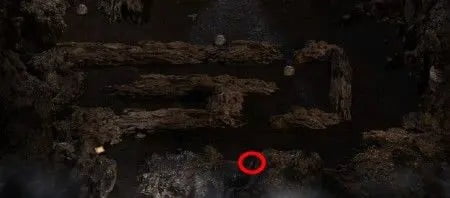
V 54101
- Library (behind > left side), in fron of in which you spawn use the pickaxe to interrupt it > Open the library with the library key
- Squallmart > Talk to Michael (parking) > purchase Cleaning oil & Silver ore > Craft the Loaded Musket: Cleaning Oil + Old Bullet + Old Musket + Silver Ore
- Park (Where the tiger was) > move up an meet Ash to get a photo > Take the Gunpowder, Pirate Medallion, Broken key and additionally Motion Detection Camera
- Parking > deliver the digital digicam to Michael > Squallmart > Meet Alia > Full Mast Bar > Janet’s home (her room) > Lighthouse > move down (basement) > use the Gunpowder at the Gun > Go up, to the opened location > take the Gothic Chest Key, the Broken key and additionally open the chest (Diary + Hint)
- Church > Madalyn’s room > Upper room right > open the chest with the gothic key
- To open the locked chest craft the chest key = x4 Broken keys
- (*) lacking damaged key: After teleport move down and to west till end map (identical in which you arrive with boat), it’s far down close to of water (Thanks to Player1!)
V 56102
- Library > Teleport to Jungle > Go north till you discover a cave > cross left till the third palm tree (beginning from the proper) after which cross up
- Park > Turn left till the end > cross north
- Bar (meet Clare) > Full mast bar > To the left of the building (with the aid of using the palm trees) there’s an orange light, take it (Pricia’s profile)
- Back to the cave > Puzzle: Click on three circles on the identical time to transport Clare down and Diana to the left corner, then stant at the circle > there’s a damaged key at the left, with the aid of using a rock
- Take additionally the important thing to the chest (at the circle to the proper of the chest) > and every other key in every other cave (use teleport), to the left of the stairs
- Squallmart > Bait shop > purchase the pinnacle proper box (costs $5,000), additionally purchase silver othe (in case you don’t have
- Craft: Broken Dehumidifier + Small Screwdriver + Silver Ore + Gold Talisman
- Give Emili the Dehumidifier (Squallmart) > Exit the store, visit every other vicinity and are available returned to the store > visit the store’s parking lot
V 58111
- Doctor’s office > Take the Nitroglycerin from Jessica
- Parlor > Take the lotion from Pricia
- Store > Buy x4 Basic container
- Craft Rock Bombs: Nitroglycerin+ Basic container + Silver Talisman + Jade Talisman
- Teleport to the brand new cave (final update) and blow upthe center rock with the rock bomb > get inner and take the aloe plant, additionally use pickaxe to get a buried chest key
- Get out > cross left > new cave (final update – Clare & Ash) > Teleport
- Lighthouse > Basement > Take Kaley’s profile alongside the way > Blow up a stone block blockading a hallway > Open the chest (buried chest key) and additionally examine the crafting page
- Craft Aloe Potion: Aloe Plant + Shea Butter + Ginseng Plant + Basic Container
- Doctor’s office > Give Aloe Potion to Jessica
- Janet’s home > Upstairs > Sofia Mansion > Library (speak to Diana) > Parlor (Jessica) > Squallmart
Where to Download ToN?
Treasure of Nadia PC Download Link: https://mega.nz/file/wFYikAiK#yEA6TKpDSy-o9_eEba0SJbT0H0G0hzauUc05wYlBZ-Q
In our Treasure of Nadia walkthrough guide, we have explained how to complete all the levels in the game, and we hope we have been successful in doing so. Additionally, we have provided you with illustrated locations of all the broken key fragments and chests in the Treasure of Nadia game. Farewell for now, and we’ll see you in another walkthrough guide for the next steps to follow!
how can i Behind the library (left aspect) > wreck the column and location the stone at the higher proper nook?
plz help me
Good game
The Version is 48 but my Completed is 41% only ?
I am at 52% completion, finished everything that’s available for now. Waiting for the next update.
Give the aloe vera to the dude in the bar toilets. You will get two broken keys V. 60011
I need a tiny rope where do I find that?
Tiny rope #2 can be found in Sophia’s treasure room, and tiny rope #3 can be found back in the tomb at the top of the mountain.
I’m stuck in the part of the “Craft a Broken Dehumidifier” I don’t Have Iron Ore in my items and I can’t buy It in the store.
What a mess I was too close to have the 52% full content at least of the development in game
Behind the bar is a crafting scroll you should read
What is this mean???
behind the bar as a building
I can’t break the pillars behind the library. The option to select a pickaxe to break them doesn’t pop up.
Alguém sabe como faz para conseguir cavar com a picareta lá na fonte da juventude? Toda vez que vou tentar usar , o MC se molha e diz que está frio e tem que sair de lá e não consegue cavar
Move the stone to the left to “brake” de stones and take the 2 items.
Where is the bamboo for the dart?
Is there black powder near the old buried cannon in the park?
I can’t find it• I reach 48•/•in game
Do anyone know when update will come out?
Where are the 3 tiny ropes? I have to and have to build the bridge
How cani find 3 tiny ropes
Any1 elns missing 1x broken key to craft Pirate Key to open the 2nd pirate chest?
Hi all, just completed 63% last update of Treasure of Nadia. Can’t wait for next update…need help?
Same here.
any clues where to find it?
can you tell the locations of 3 tiny ropes.
Cant find 3rd one and am stuck
DALE.
I’m stuck because Clare is with Ash in the cave waiting for rock bombs but I dont have Nitro glicerinre. I have the coontainers, the talismans but not the nitro. Do you know how to get new? There isn’t more in the doctor offices.
Where is scorpion venom to create tranquilizer 2nd time
i have the rock bombs, but can’t find vase use bomb on 2nd wall once I’m thru wall
Where can I find an another ginseng plant? I found a ginseng but the walkthrough said to eat the ginseng and go to the doctor but now I need an another ginseng plant for Emily so can someone tell me where to find some?
I can’t find Nitroglycerin to make a rock bomb. I’m in the new update. Trying to blow up the “weak wall in the upstairs of Sofia’s mansion” I just don’t have Nitroglycerin.
How do you get upstairs? The guard and Joe are standing there
The game says ” Janet is visiting the Park” But when I go to the park, she is not there. I have checked everywhere…. then found a video on youtube showing that she is at the first section as soon as you enter the park at the end of the line to take a picture with Ash. But when I go into the park, she is not there. Am I missing something? I have walked up to every other character in the game and nothing happens.
I can’t see new talismans in the park. I have some bug or what?
I can’t see new talismans in the park. I have a bug or what?
Finished 56%
Where are all the locations for the metal ladder pieces located
More update please:(
I dont have roaches i. Have got all in first how i get now
I’m stuck. Can’t find the machete to get the thing at the base of Mount Vedra.
In my game scenes are not playing
Only scene starting image will come
What can i do
I have found 2 eyes of cauli how to see the secret in the library.
What is the password for the Sophia’s mansion store room?
need the 3 password No. # for mansion store room
I’m missing quite a bit. How do I break the wall in the basement of the lighthouse? Also it appears that there isn’t anything else I can do after giving the pirate diary to Madalyn. I’m not sure what to do…SOMEBODY HELP PLEASE!
I have ahint saying ” break the pillars and put the pots on the switches for secret”
i can not find quartz
I need to find a tripak artifact for tomb key but i do not have. Where can i get that.
I’m in version 32051 I need make concrete but I don’t have any stone talisman left what should I do ??
i have found one ginseng and gave it to emily, but i cant find another and it says i need to eat it. do anyone know where it can be? i found the one where you need the hook
Can Any help i need bird feather but i cant find i know where are the bird but i dont know what to do
Can someone guide me I can’t find the “ROSA MOSS” second time in the game after the shipwreck is found.. and before making aloe lotion for jessica(the doc.).
Cómo optener la cuerda para cojer la flor roja
Es decir lo que se pone dentro de la cueva para crearla
Dónde están los 3 segmentos metal?
I’ve been looking for treasure of nadia walkthrough for 3 days and finally found it. I passed many levels where I got stuck thanks to this up-to-date walkthrough guide. Thank you all….
Your nice comments keep us alive, thank you
Hi guys! can’t find follow guys to the park, don’t see that. Can me help? Thanks
Hola como consigo el 4 cofre de clare y que hago con las hojas rotas de colores?
What’s rhe torn pages for?
When you use rock bombs on the loose boulders by the Fountain of youth, there’s a staircase, and down those stairs is a statue with a lock above it. any idea what it is?
The Naomi’s bra that you get after cleaning Janet’s pool, needs to be put on that statue, in order to move it.
What statue?
There isn’t any library key behind library can someone help me
The location of the library key is marked in the image in the guide.
How should I make another Royal Talisman for Deadly Whip when I got only one Caulli’s Coin which I used for making Royal Talisman for Pricia?
Go down at the very beginning of the episode to find Caulli’s coins.
I only found 2 white hairs. How do I find the third one?
i have pickaxe which is one of the requirements to make is grapping hook, since i make it already i lost the grapping hook, how can i get the items that need to use grapping hook?
WOW, this walkthrough guide has been a lifesaver! I was getting stumped on some of the puzzles in Treasure of Nadia, but this detailed guide has helped me progress through the game with ease. Thank you so much for sharing your expertise!
thx for good comment!
can i ask latest version of the game? mine “completed” at original love potion come and give it to jessica, but here in walk-through further, i play android version btw