Welcome to our UNCHARTED Legacy of Thieves Collection Reduce Installation Size guide. Reduce the installation size by up to 25+ GB by removing unused language packs.
We know that there are people who have a hard time finishing the UNCHARTED Legacy of Thieves Collection game. If you are one of those who find it difficult to finish the game, let’s take you to our UNCHARTED Legacy of Thieves Collection guide.
UNCHARTED Legacy of Thieves Collection Reduce Installation Size
Reduce Installation Size by up to 25+ GB!
Step-by-step
First, run the game to make sure it is not using the audio language from a file you are going to delete, set the game up to your preferences.
Browse through the games installation folders to the following path:
SteamsteamappscommonUncharted Legacy of Thieves CollectionUncharted4_databuildpcmainsound1streams
You will then see two additional folders:
speech (this folder is used for Uncharted 4)
speech-tll (this folder is used for Uncharted The Lost Legacy)
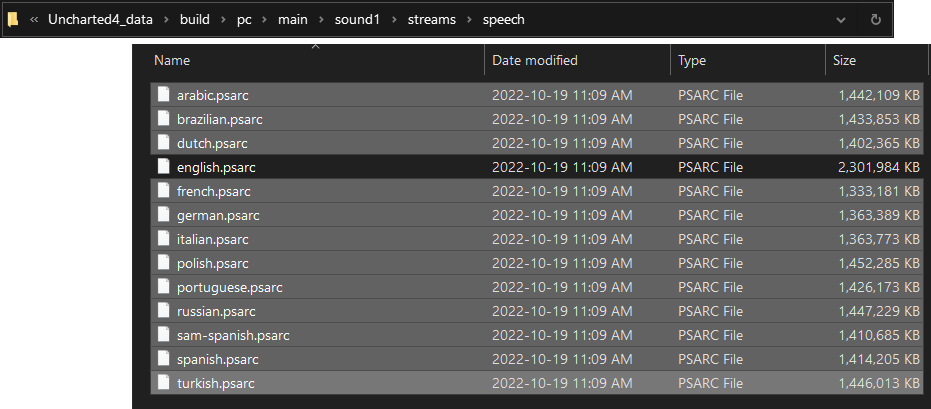
These two folders contain all of the audio packs in all supported languages for each game.
***This has only been tested with English audio, if using another language as your primary audio, I would advise keeping the english.psarc files as a precaution as it’s quite a bit larger than other files, it might have additional sound files that are used regardless of which language is chosen.***
If Spanish will be your chosen language, you should keep both the ‘spanish.psarc‘ and ‘sam-spanish.psarc‘ language files.
You will want to delete the files for all languages you won’t be using in each of these folders.
For example, if you will only be using the English audio, keep english.psarc in both the ‘speech’ and ‘speech-tll’ folders, then delete the other files. If English is the only audio kept, the install size is reduced by 27 GB.

These language files can be re-downloaded at any time by verifying the game files through Steam should any issues arise.
Advanced Step (to prevent possible re-download in future)
There is a chance the deleted files will be re-downloaded automatically next time the game receives a substantial update, which would be an unfortunate situation.
There is a way to help prevent that though, and I will explain it below, do note this can be confusing and/or time consuming for some, but I will do my best to explain it.
Note that manually verifying the game files will still force Steam to re-download and replace these files after doing this.
We are going to replace the original unused language files we deleted with blank text files that have the exact same names and file extensions.
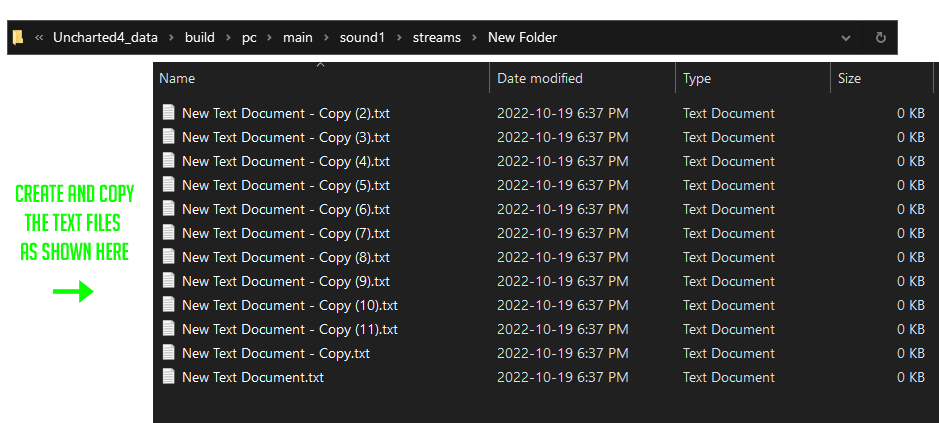
Step 1. Creating empty text documents
- Locate the speech and speech-tll folders again in your game installation folder, create a new folder in this same location, the name doesn’t matter, I left mine titled New Folder.
- Shrink the folder window down so you can see this guide in the background, in particular the screenshot showing the 13 language pack names with file extensions.
- Open this newly created folder, right-click inside it and select New > Text Document
- Right-click this text document and select Copy.
- While still in that folder, press Ctrl+V 11 times to make 11 copies of that text document in this folder.

Once you have the new folder with 12 blank text documents inside it, proceed to the next step.
Step 2. Renaming the text documents
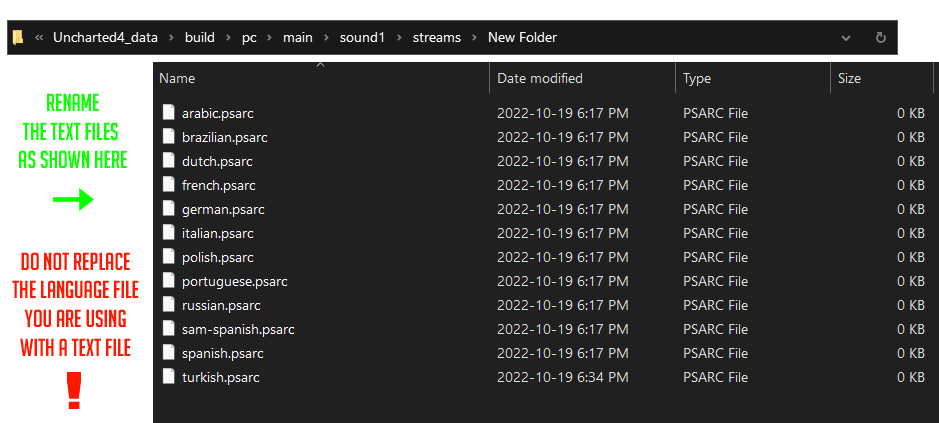
- Using the screenshot found in this guide as a reference (click on them using the middle mouse button if they’re difficult to read) start renaming each text document the same as the language pack files that you will be overwriting or replacing, this includes the .psarc extension at the end. Triple check your spelling when finished.

Once your files are renamed to look like the screenshot above (assuming you are only using the English file) proceed to the next step.
Step 3. Replacing the original language files
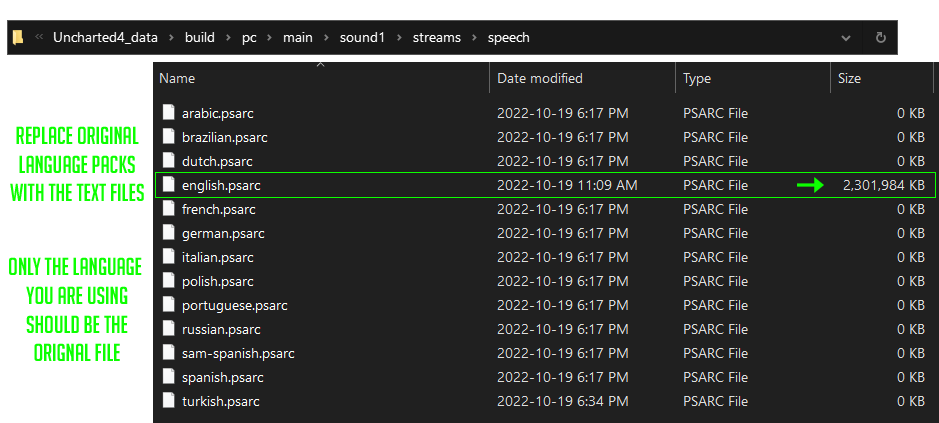
Copy (don’t cut) the renamed text files from your new folder, and paste them in both the speech, and speech-tll folders, do take extra caution here not to overwrite the language file you are using, if that happens, try to right-click in the folder and undo, otherwise verify your game files and start over.

When finished you should see 13 language files in the folder, 12 of them with no file size (If you’re only using the English file) and your original language file as shown in the screenshot above.