Welcome to our guide, which includes all the steps you need to follow, including achievements, to complete Apollo Justice: Ace Attorney 100%. In this guide, you can find all the solutions you need while playing the game and tips if you want to do it yourself. Also, take advantage of our walkthrough guide to get 100% achievements.
Apollo Justice: Ace Attorney Walkthrough
Before moving on to our Apollo Justice Ace Attorney walkthrough guide, I would like to give some information about the Trial parts and Investigation parts.
Investigation Part Guide
This is where you gather information and evidence to build your case.
You’ll typically:
- Visit the crime scene and other relevant locations.
- Talk to witnesses and suspects, learning all you can from their testimonies. Press them for details and inconsistencies.
- Examine your surroundings for clues and evidence. Look for items that might not be readily apparent.
- Build your case based on the information and evidence you collect.
Trial Part Guide
Here, you use the evidence you gathered to defend your client in court.
Your main focus will be on:
- Exposing inconsistencies and lies in witness testimonies. You’ll use the evidence you collected during the investigation to do this.
- Presenting the correct evidence at the right time. This is crucial, as presenting the wrong evidence can damage your case.
- Getting a “Not Guilty” verdict. This is your ultimate goal, achieved by effectively presenting your case and countering the prosecution’s arguments.
- In short, the Investigation Part is about gathering intel, while the Trial Part is about using that intel to win the case.
Here are some helpful tips:
- If you prefer Japanese audio, you can switch from the title menu by selecting Options > Language. Remember, you can’t change the language from within the game or pause menu.
- Ensure that ‘reader’ mode is off to avoid disabling certain achievements.
- Hold the right mouse button to skip through text quickly.
- If you missed an achievement, use the chapter menu to jump to the relevant part. Access it by selecting “Episodes” on the title screen. It’s much simpler than managing multiple saves.
- When fingerprinting, ensure you cover the entire print, especially the edges. If it still doesn’t register, try repeatedly blowing on it. Sometimes it clicks after blowing 5-6 times in a row.
Game Controls

Left side
- Left bumper
- Left trigger/Right trigger
- Right bumper
- Y button – Press a witness about a statement (Cross-Examinations)
- X button – View dialogue history
- D-pad/Left stick – Move cursor / Move forward or back through testimony (Cross-Examinations)
- B button – Confirm/Next message / Go back up one level / Fast-forward dialogue
- View button – Go back one witness statement (Cross-Examinations)
Right side
- Right stick – Look around (when Examining during Investigation parts)
- Menu button – Open the Options menu / Turn Autoplay ON/OFF / Turn Story Mode ON/OFF
- A button – Toggle between the Evidence and Profiles tabs (when “Hide UI Elements” is enabled)
Basic Gameplay
The game is divided into two parts: Investigation Part and Trial Part.
- Investigation Part: Visit the crime scene and other related locations to gather info and evidence. Build your case and head to court.
- Trial Part: Evidence in hand, find and expose inconsistencies and lies in witness testimonies to defend your client. Get a “Not Guilty” verdict to win the trial and close the case.
Talking
- Talk to the people around you. As you do, a check mark (√) will appear on the topics you’ve discussed.
- Learn all you can from witnesses by pressing them on their testimony. Some will even change their tune under pressure, so press early and often.
Examining
- Search your surroundings for evidence you can use. The cursor will turn red when it’s over something you can examine and a check mark (√) will appear over things you’ve examined
- When you discover an inconsistency between a witness’s testimony and the evidence, demonstrate it to the court by opening the Court Record and presenting your evidence.
Presenting
- Presenting the wrong piece of evidence will cause the judge to lose his trust in you. Lose all of his trust and the trial will be brought to a swift end, so take your time to think things through.
Moving
- Move to another location. New locations will gradually become available as the story progresses.
Court Record
- Evidence and profiles of people related to the case are listed in here.
- Some pieces of evidence can be examined in further detail.
Options Menu
- Access the Options menu from either the title screen or during gameplay to do the following:
- Save or load your game
- Adjust various game settings, including text and voice languages
- The game’s text and voice language settings can only be changed from the title screen’s Options menu.
Turnabout Trump Walkthrough
Unmissable Achievements:
 Opening Objection!
Successfully present evidence.
 Turnabout Trump
Finish the first episode.
Trial
The boss asks if you need a refresher on cross-examination, saying no will let you skip the tutorial.
The Competition
- Press on statements 2 ,3, and 4.
- Present the Deadly Bottle on statement 6.
That Fateful Night
- Present Autopsy Report on statement 5.
- Present Crime Photo 2 on statement 4.
Serious Competition
- Press statement 2, then press harder then Add to Testimony
- Present Chips photo on statement 3.
- Choose Both were right.
The Final Hand
- Press statement 3.
- Present Chips Photo on revised statement 3.
- Point out the victim’s cards, on the right.
- Choose view victim’s hand.
- Examine the backs of the cards.
- Choose after the murder
- Choose someone else.
The Best Laid Traps
- Press on statement 4 then press harder.
- When prompted, hit perceive.
- Olga’s neck: present the Deadly Bottle.
- Present Wright’s Cell Phone on statement 5.
- Who thought they were blue: present your resignation letter Kristoph Gavin.
- Naturally, you’ll want to Hear the testimony.
Appetite Before Murder
- Press statement 3.
- In the Court Record, examine the contents of the Deadly Bottle.
- Present the Deadly Bottle on the revised statement 3.
- Present Crime Photo 1 on statement 5.
That Fateful Night
- Press statement 5.
- Say you can Show evidence then present the Bloody Ace.
Recreating the crime scene:
- Point out the victim. Click the swivel chair to turn it around.
- Now who’s in the wrong spot? The killer.
- Where should they be: point out the brown rectangle facing the victim. Click the taller cupboard to move it.
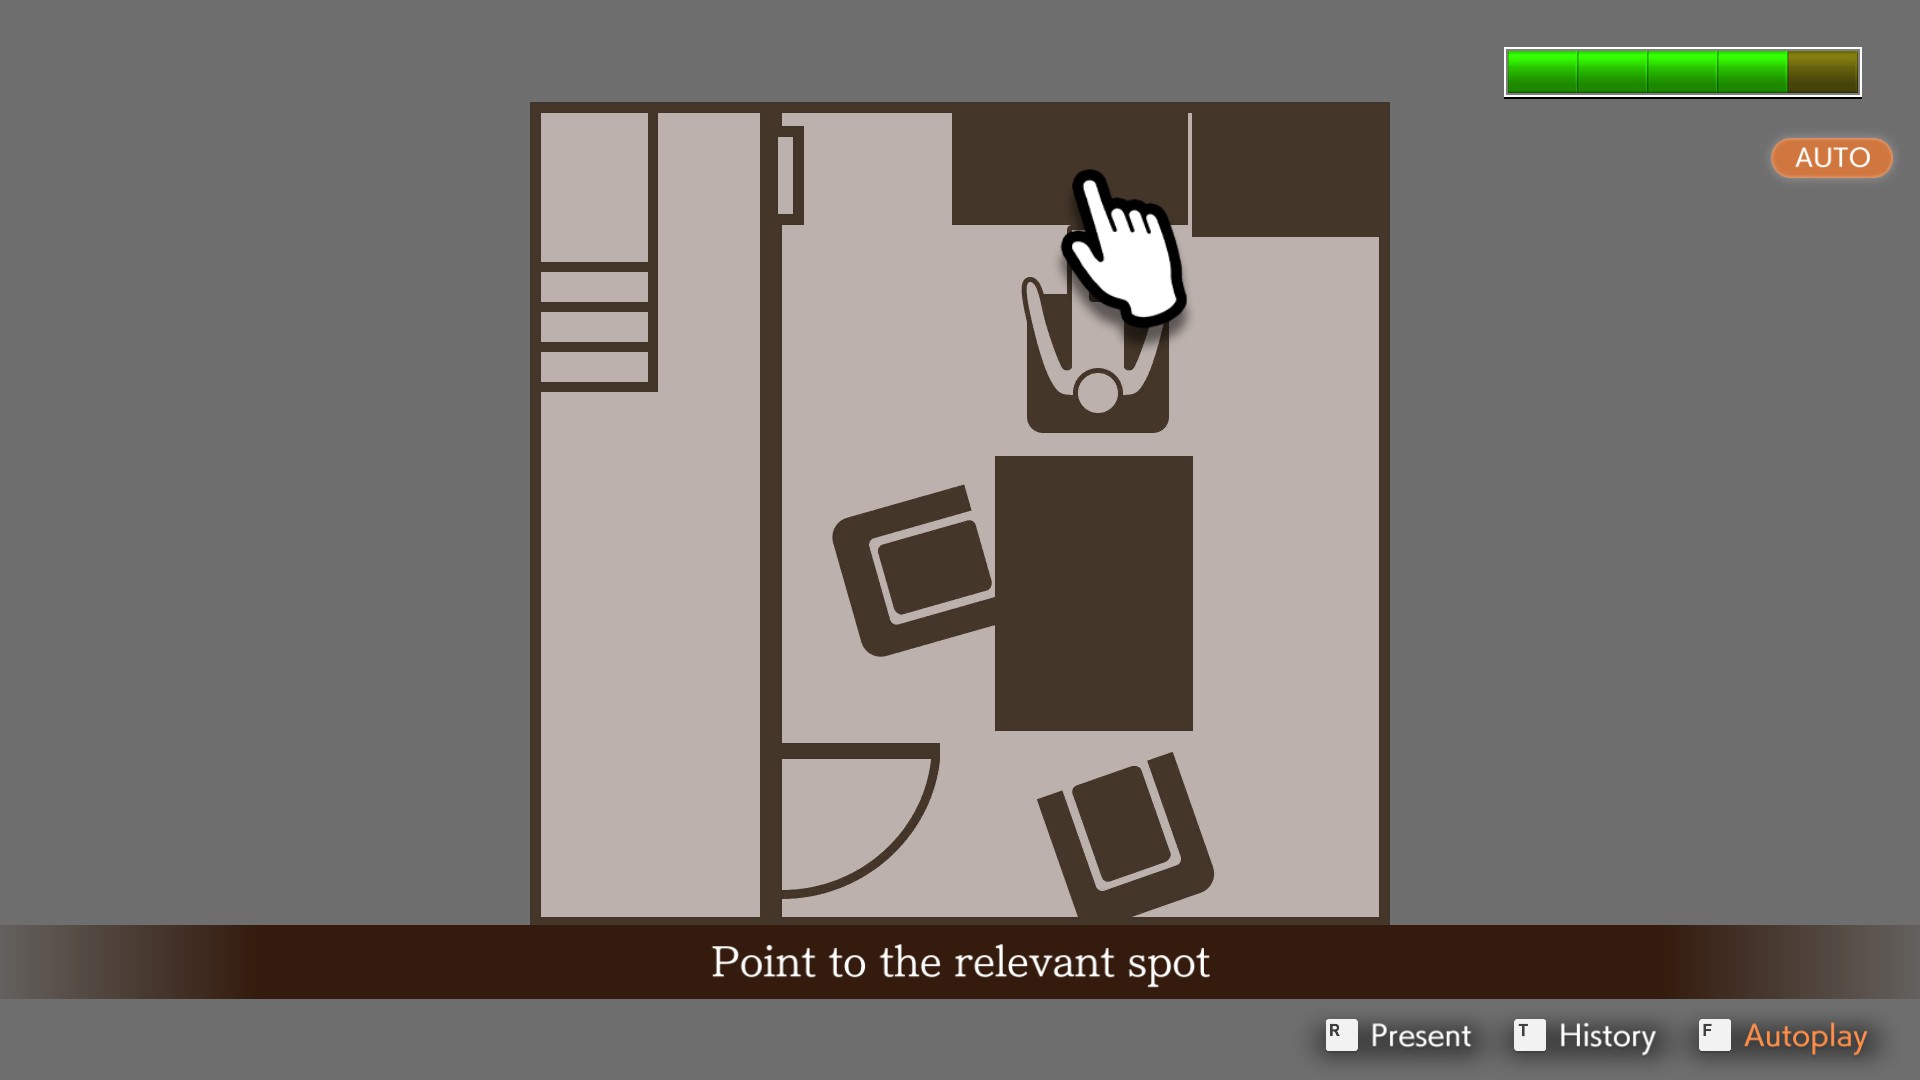
What’s wrong now? Witness #2
About those fingerprints: present Olga’s photo (the one with Wright at the piano). Examine the contents of the bottle.
Post Trial Wrap-Up
Present the Bloody Ace.
Turnabout Corner Walkthrough
Missable:
 Mr. Charley
Examine Charley the plant on Day 1 AND on Day 2.
 Ladders and Stepladders
During the investigation (either day), in the Meraktis Clinic Garage, examine the ladder.
Unmissable Achievements:
 Forensics Expert
Fingerprints and shoeprints.
 Turnabout Corner
Finish the second episode.
Day 1: Investigation
Wright and Co. Law Offices
- Achievement: Examine Charley the plant.
- (You can examine the other objects in the room to learn about Trucy.)
- Talk to Trucy.
Hickfield Clinic
- Talk to Phoenix Wright: Troll King.
- (You can examine the room to learn about Wright and Trucy’s relationship, and the DVD stacks for a rare Maya allusion.)
- Move to the Wright Talent Agency.
Wright Talent Agency
- Talk to Eldoon.
- Move to the Accident Scene.
Accident Scene
- Talk to Little Plum.
- Slide to the right.
- Examine the trash can. Take the mirror.
- Examine the officer standing next to the trash can.
- Talk to Little Plum about the park and ‘a private matter’.
- Move to Scene of the Stand Theft
Scene of the Stand Theft
- Talk to Eldoon.
- Examine the bowl on the ground.
- Slide left. Examine the police car.
- Talk to Eldoon about the clinic.
- Move to the Meraktis Clinic Garage
Meraktis Clinic – Garage
- Achievement: Examine the (step)ladder.
- Click the car to zoom in. Examine the phone and the tailpipe. Examine the remains of the rear-view mirror, then present the mirror you pulled out of the trash can.
- Move to Hickfield Clinic
Hickfield Clinic
- Talk to Wright.
- Move to the Wright Anything Agency
Wright Anything Agency
- Talk to Tiala
- Move to the Kitaki Mansion
People Park
- (Try to) talk to Ema. (She ignores all three questions equally, you only need to ask one.)
- Examine the noodle stand.
- Trek back to Hickfield Clinic
Hickfield Clinic
- Talk to Wright.
- Move to the Wright Anything Agency
Wright Anything Agency
- Examine the silk hat on the shelf.
- Move to People Park
People Park
- Present the White Powder to Ema.
- Talk to Ema about the case. Present Guy Eldoon.
- Talk to Ema about everything else.
- Examine the knife. Ema will ask you to choose a print, click on the darkest one (in fact the only option.) Choose Wocky Kitaki and then hit analyze.
- Examine the trash can.
- Move to the Detention Center
Day 1: Trial
Wocky Kitaki’s “Truth”
Press statements 3, 4, and 5.
A Night in the Park
Present the Autopsy Report on statement 5.
A Night in the Park 2
- Present the Pistol on statement 5.
- Gloves? No way!
- What was thrown away? Present the Knife
From Shot to Call
- Press on everything.
- Back off? Yes.
- In the Lobby: Choose either option.
- Press on statement 3. When prompted, perceive and move to his hand.
- Perceive on I used my cell phone.
- Ask to see his phone.
- Agree to show evidence and present the mirror
Stickler’s “Truth”
- Press on statement 4 and ask about the noodle stand. As always, have it added to testimony.
- Present the noodle stand on revised statement 5, and he saw it right.
- Point to the area above and to the left of the victim.
- Accuse Stickler? Accuse him of another crime.
- Present Trucy’s Panties. It’s gotta be the magic panties, Little Plum’s ordinary panties won’t work.
- Present the final blow to Stickler’s reputation, the Bloomers.
Day 2: Investigation
Wright Anything Agency
- Talk to Tiala
- Achievement: Examine Charley-senpai
- Move to the Detention Center
Detention Center
- Talk to Stickler
- Move to Eldoon’s House
Eldoon’s House
- Talk to Eldoon
- Slide left. After you’ve been shooed away by the officer, move to Kitaki Mansion.
Kitaki Mansion
- Talk to Little Plum
- There’s some amusing dialog if you try to return her bloomers.
- Slide right and examine the trash can to finally claim the slipper.
- In the Court Record, examine paint on the bottom of the slipper.
- Move to the Detention Center
Detention Center
- Talk to Wocky
- Present the gun (or the knife), then ask him about the crime.
- Move to Kitaki Mansion, then, after indulging Gavin’s first-world problems, to People Park.
People Park
- Talk to Ema
- Footprint Analysis: Note: Whenever you’re told to hold the spacebar, you can also just hold the left mouse.
- Choose Wocky Kitaki. Talk to Ema again for more shoeprints, then choose the red print. (You can skip the green ones.)
- Ask Ema about the mystery print, choose show evidence, and present the slippers. If she doesn’t react, make sure you’ve examined the bottom of the slippers in the court record. Ema will then give you access to the Meraktis Clinic.
- Move to Eldoon’s House, then after a chat with the officer, to the Meraktis Clinic.
Meraktis Clinic
- Examine the bowls and the blue sandals on the floor.
- Examine the door on the left side of the screen.
Meraktis Clinic – Office
- Examine the lamp and the safe.
- ChooseI’ve got just the thing! And present the fingerprint powder. Even though you’re only looking for two numbers, you’ll need to cover the whole keypad with powder.
- The code is 7952.
- Examine the envelope sitting on top (the medical chart) and the bullet.
- Move to People Park
People Park
- In the court record, examine the toeprint inside of the left slipper. Do the same for the sandals.
- Present the slippers to Ema.
- Choose Got one right here! And then present the sandals.
- Move to Hickfield Clinic.
Hickfield Clinic
- Talk to Wright
- Move to the Detention Center
Detention Center
- Talk to Wocky
- Present Wocky’s Chart and the sandals to Wocky, then ask him about Alita again.
- Move to Eldoon’s House
Eldoon’s House
- Present Wocky’s Chart then talk to Eldoon.
Day 2: Trial
Wocky’s Plan
- Press on statement 5
- Choose There was another and presentTiala.
- Evidence of a connection: present Wocky’s Chart.
- Evidence she’s still connected: present Alita’s sandals.
The Meraktis Clinic
- Present Wocky’s Chart on statement 4.
- Perceive onstatement 4.
- Focus on her hands when she says “go to the clinic”.
- Present Wocky’s Health Check-Up Report.
- Present the bullet on the revised statement 5.
The Meraktis Clinic 2
- Press statement 5.
- Where were they standing? Someplace else.
- Point to inside the cart.
- Evidence? Well I’ve got it! Present the slippers.
- How could someone fit? Present the bowl.
Tiala’s Explanation
- Perceive on statement 5.
- Focus on her hand on her neck when she says “All I did was talk to him”
- Present the lamp.
- What’d he do next? Present the noodle stand.
- Point out the river (the blue tinted area on the left of the map).
- Why didn’t he use the car? The car didn’t run.
- Why not? Present the Holy Grail Trucy’s Panties.
Post Trial Wrap-Up
Present Wocky’s Chart
Turnabout Serenade Walkthrough
Missable:
Ladders and Stepladders
During the investigation, examine the ladder in Lamiroir’s Dressing Room and the one on the Stage.
Mr. Charley
Examine lil’ Charley during day 2.
 Trucy’s Woes
During investigation day 2, examine the speaker in Lamiroir’s Dressing Room.
Auto:
Forensics Expert
Luminol test.
 Turnabout Serenade
Finish the third episode.
Day 1: Investigation
Gavinner’s Dressing Room
- Talk to Gavin
- You don’t need to examine anything right now, but you can learn a bit about the Gavinners.
- Move to Backstage Hallway
Backstage Hallway
- Listening to Ema gripe about her job is optional.
- Examine the door to Dressing Room 2.
- Move to Lamiroir’s Dressing Room.
Lamiroir’s Dressing Room
- Talk to Ema
- Examine the brooch (the blue diamond on the floor), and the air vent.
- Achievement: Examine the ladder.
- Slide right
- Examine the gun.
- Click the body to zoom in and then examine the blood smear on the floor and his left hand.
- Present the gun to Ema then ask her about the murder weapon.
- Move to the Stage.
Stage
- Talk to Gavin
- The Mixing Board: Ok, this thing’s a pain. When you go to present your answer, make sure you’ve actually highlighted the correct track (and not just the one you last muted…)
- The missed cue is in track 2, section 4.
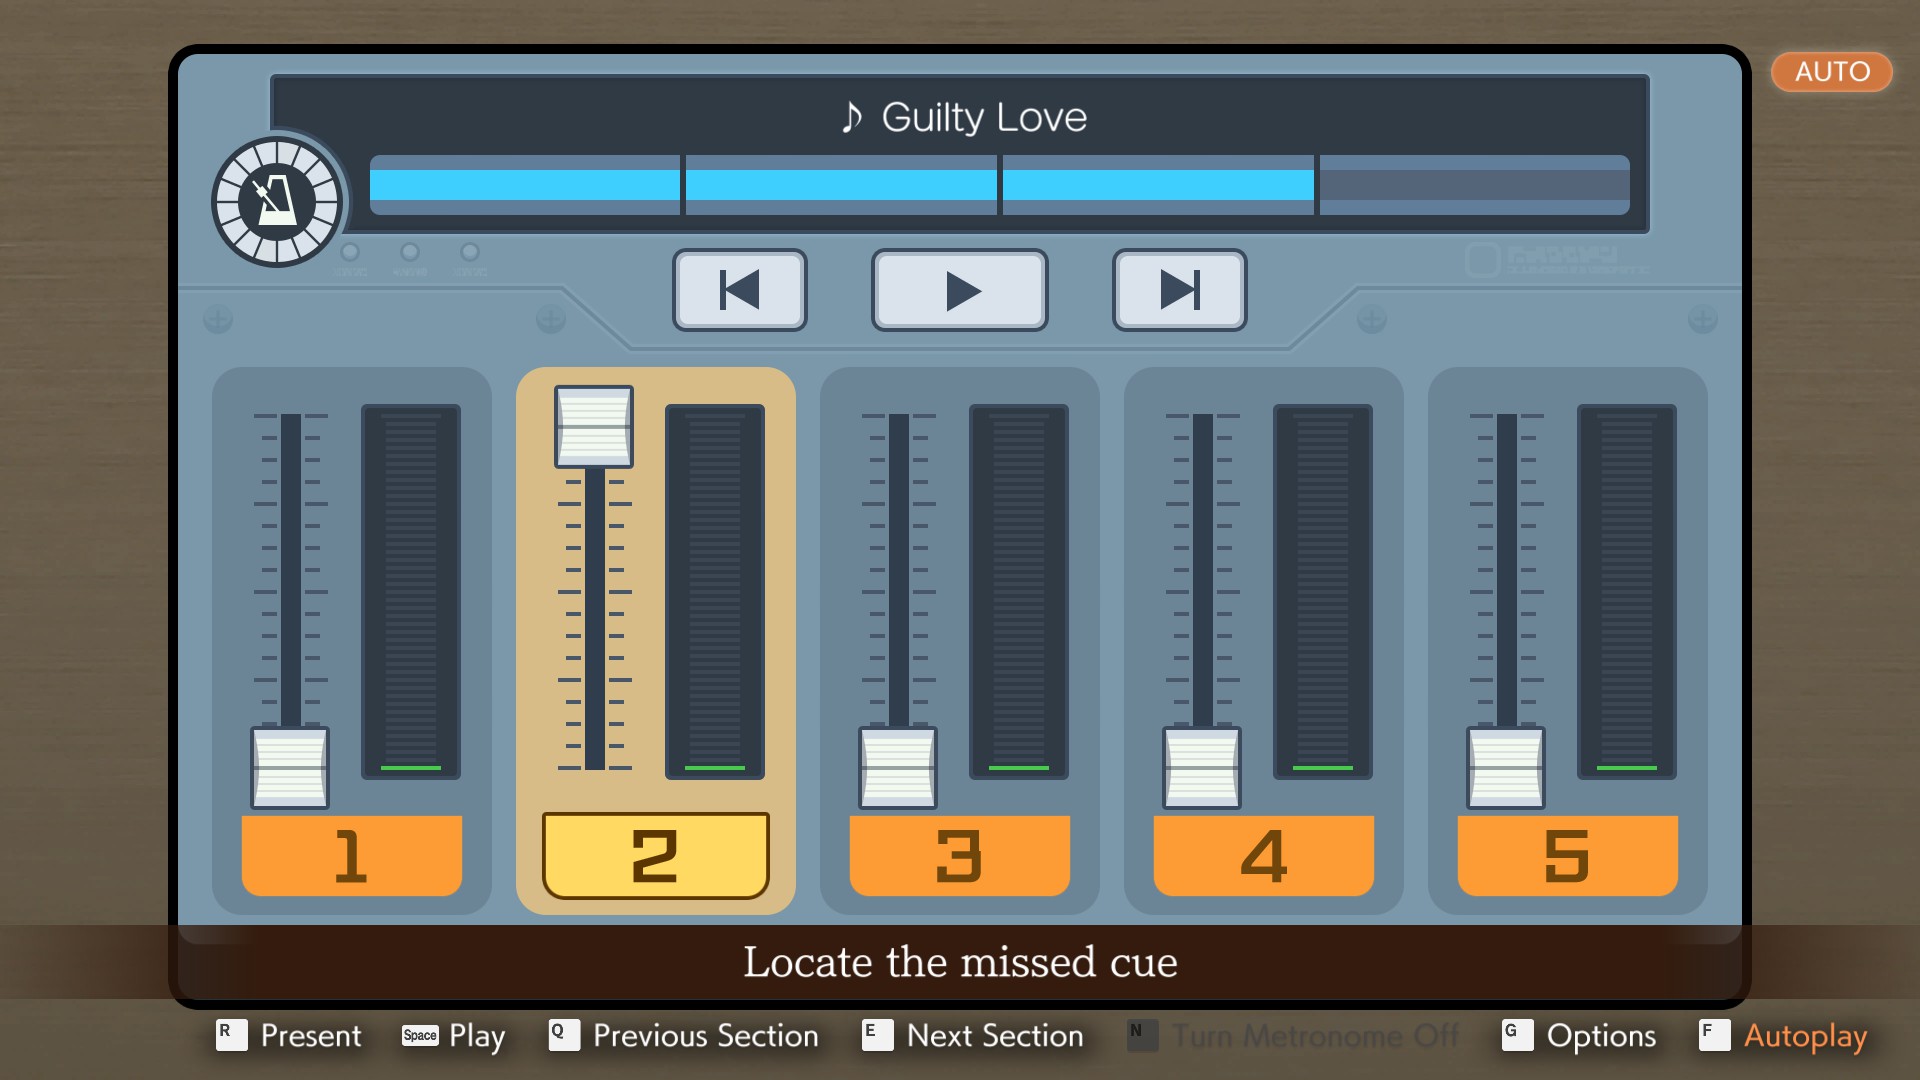
Depending on when you paused the music, the fourth segment may also be highlighted – it should work either way.
- Achievement: Examine the ladder.
- Present the Key-Ring to Gavin then ask about his troubles.
- When asked about the connection: If you say you’ve noticed, you’ll need to present the Lyrics Sheet but you get to show up Daryan. If you say you haven’t noticed, Trucy will feed you the answer.
- Move to the Gavinners Dressing Room.
Gavinners Dressing Room
- Talk to Lamiroir
- Examine the postcards on the table behind her.
- Present the brooch to Lamiroir.
- Move to the Backstage Hallway.
Lamiroir’s Dressing Room
Move to the Stage.
Stage
Examine the tower.
Day 1: Trial
Murderous Circumstances
- Press on everything.
- Contradicting proof? Call a witness.
- Present Lamiroir.
What I Saw
- Present the brooch on statement 3.
- Perceive on statement 4.
- Focus on her throat when she says ”the late Mr. Letouse’s body”.
- Present the Investigation Request.
- Present the Diagram on the revised statement 4.
What I Saw 2
- Press on statement 5.
- The defense’s opinion? It’s contradictory.
The Missing Body
- Press on statement 4. Raise an objection.
- Present the Crime Photo on the revised statement 5.
- Point out the blood on the floor.
- (Here Ema makes you do a Luminol test.)
- Why? Show evidence: present the Postcard.
Lamiroir’s Eyes
Press on statement 5.
Day 2: Investigation
Wright Anything Agency
- Achievement: Check in on Charley.
- Talk to Trucy
- Present the Video Tape to Valant.
- Move to the Detention Center.
Detention Center
- Talk at Machi
- Move to the Backstage Hallway.
Backstage Hallway
- Talk to Lamiroir.
- Present the Video Tape.
- Present the Headset.
- Move to the Stage.
Stage
- Talk to Valant
- (Valant has one of the funnier reactions to being shown random evidence.)
- Examine the piano.
- Move to Lamiroir’s Dressing Room.
Lamiroir’s Dressing Room
- Talk to Ema
- Present the switch to Ema and then talk to her about it.
- Achievement: Examine the speaker.
- Move to Sunshine Coliseum.
Sunshine Coliseum
- Talk to Daryan
- Move to Gavin’s Office.
Gavin’s Office
- Talk to Gavin
- Examine the charred slightly browned guitar and the replica (the lump under the glass dome) then talk to Gavin again.
- Present the igniter.
- Move to Sunshine Coliseum, and after the discussion with Ema, to the Stage.
Stage
Examine the large instrument case.
Hickfield Clinic
- Talk to Lamiroir.
- Present the replica then ask about it.
Detention Center
- Present the replica.
- Talk to Machi.
Day 2: Trial
Proof of Innocence
- Perceive on statement 4.
- Focus on his eyes when he says ”are in English”
- Present the Borginian Newspaper.
- Perceive on statement 5.
- Focus on Lamiroir’s throat when she says “It was I who explained”
- Present Machi.
What I Heard
- Press on statement 2.
- A different angle: What were they talking about?
- Present the Remote Trigger on revised statement 3.
- Present the Headset.
- Evidence of the link: Present the Igniter.
- How could she hear? She was somewhere else.
- Point out the translation error/air vent (slide left).
Above the Ceiling
Present the Video Tape on statement 4.
The Big Illusion
- Press on statement 4.
- Present the brooch.
- Press on revised statement 5.
Daryan’s Rebuttal
- Present the Burnt Fragments on statement 4.
- Present the Mixing Board on revised statement 4.
Return of the Mixing Board:
- Track 1 is the vocals, track 2 guitar, 4 piano, tracks 3 and 5 irrelevant.
- Select track one, at the beginning of segment 2.
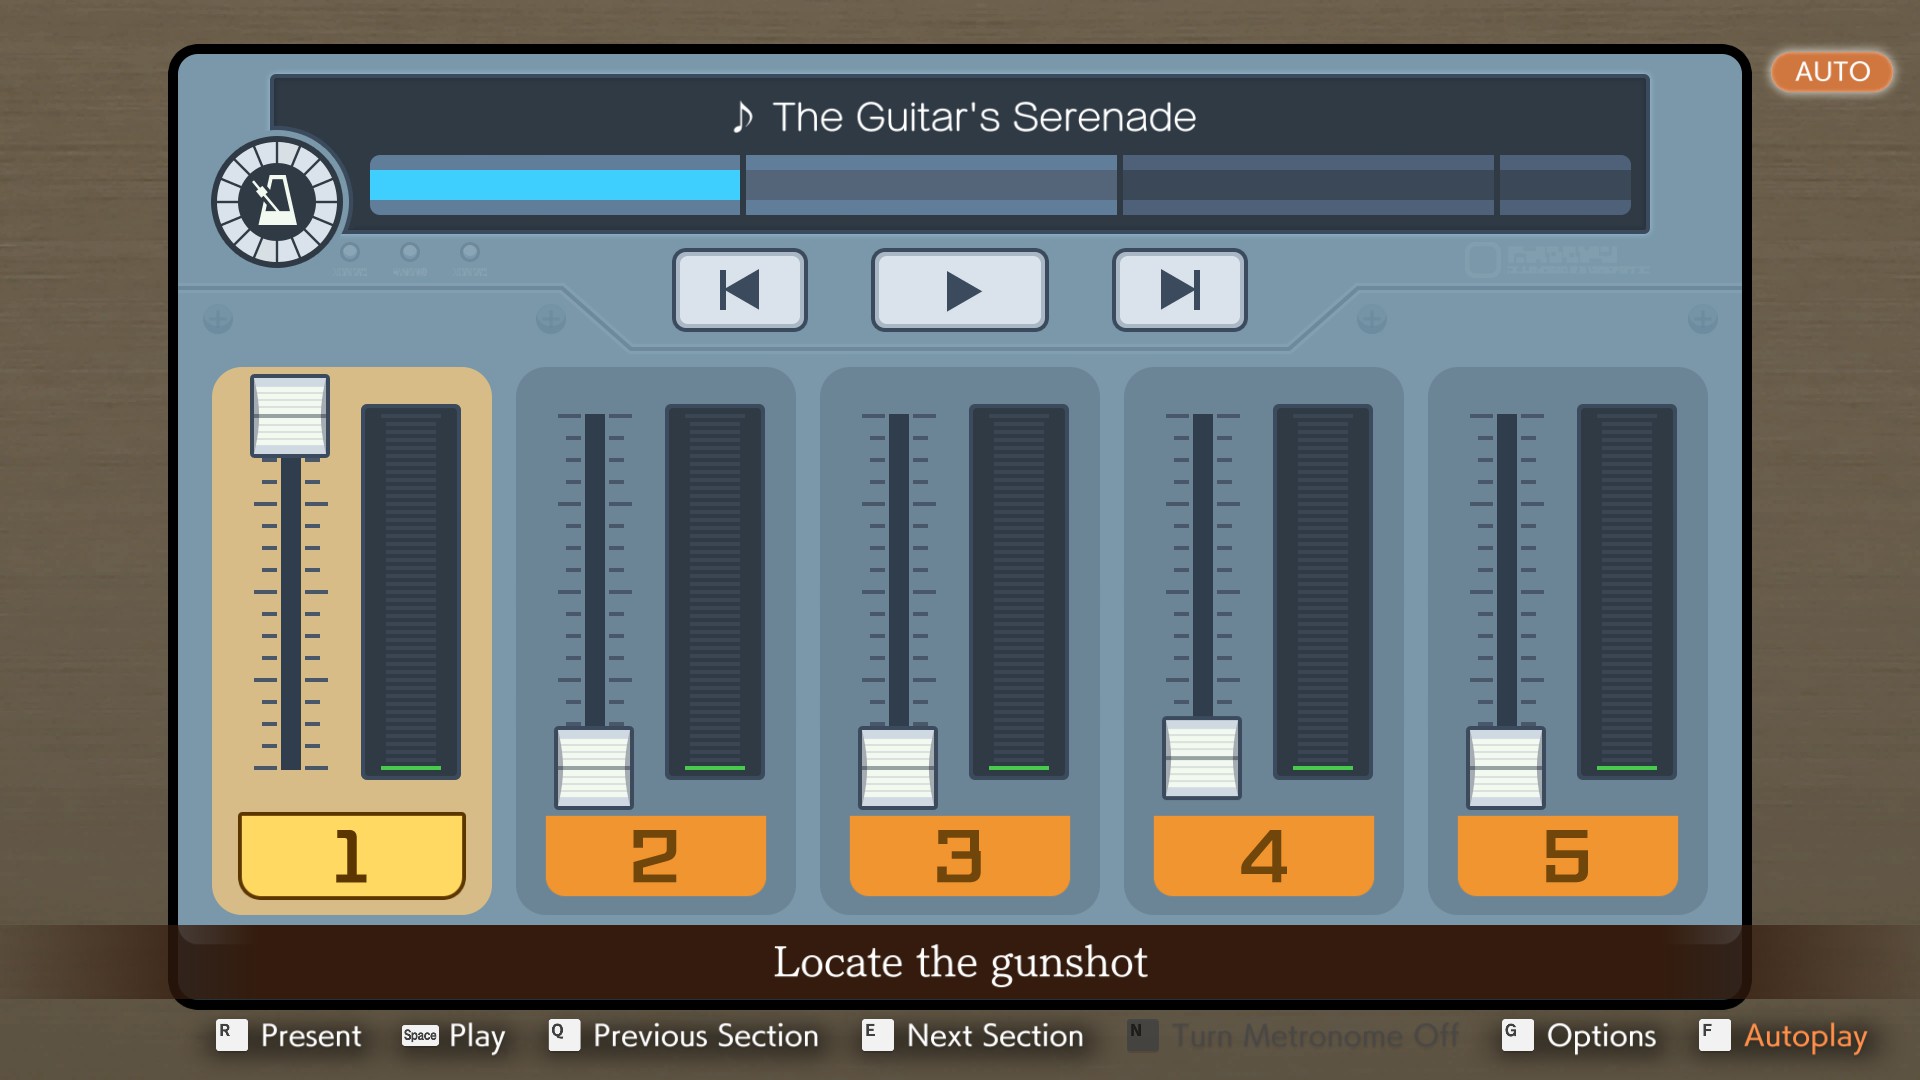
Again, depending on when you paused, the second segment may or may not be lit up.
Proof of Innocence
Present the Replica on statement 5.
Cocoon Smuggling
- Present the Newspaper article on statement 4.
- Present Prosecutor Gavin’s Guitar on the revised statement 3.
- The accomplice: present Machi.
- Can you prove it? Yes.
- Present the Mixing Board.
Revenge of the Mixing Board:
This is a different part of the song but the tracks are the same: Track 1 vocals, track 2 guitar, 4 piano, tracks 3 and 5 irrelevant.
- Hint: You should be looking for the more complex arrangement in another verse. If you need to orient yourself in the music, try listening for the gunshot in track one.
- Solution: Track 4, Segment 1.

Daryan’s igniter: Call a witness.and present Machi.
Turnabout Succession Walkthrough
Missable Achievements:
Mr. Charley.
Examine Charley on day 1 and seven years in the past.
 One Jurist’s Verdict
Get the bad ending by choosing ‘Guilty’ when playing as the jurist.
Unmissable Achievements:
Forensics Expert
Atroquinine test, X-Ray.
 Turnabout Succession
Finish the fourth episode
Day 1: Investigation
Wright Anything Agency
- Talk to Wright
- Achievement: Examine the loyal Sir Charley.
- Move to the Detention Center.
Detention Center
- Talk to ???
- Move to Drew Studio.
Drew Studio
- Talk to Ema
- Examine the coffee cup and the painting behind the dresser.
- Slide Right
- Click the desk to zoom in. Examine the red envelope in the drawer.
- Talk to Ema about forensic science.
Poison:
- In the Court Record, examine the blue stain on the coffee cup.
- Present the coffee cup to Ema.
- Spraying for poison: Spray as much or little as you want, there’s nothing to find. Hit Z/right click to back out, then spritz the tiny square frame.
X-Ray:
- Present the Red Envelope.
- Left click and run your cursor over the screen till the blue dots are gone. Rotate the dial until more blue dots appear. Rinse and repeat.
- Note: On the sample lottery ticket, you’ll need to rotate upwards once from where Ema starts you then down several times.
Move to Sunshine Coliseum.
Sunshine Coliseum
- Talk to Valant
- Present Brushel’s Card then ask about him.
- Present the Gramarye Envelope.
- Move to the Detention Center.
Detention Center
- Talk to Brushel
- Move to Drew Studio
Drew Studio
- Present the Hidden Painting (the one from behind the dresser) then ask about it.
- Present any of the three paintings off the easels (the portrait, acrylic and landscape). You’ll need to x-ray all three.
Day 1: Trial
The Journalist’s Story
- Press on statement 4.
- Ask about “the “star’s” coffee” and have it added to testimony.
- Present the Coffee Cup on revised statement 4.
What Brushel Noticed
- Press on statement 2. Add to Testimony.
- Present the Red Envelope on revised statement 3.
- Could it be? That’s impossible.
The Scent of a Story
- Perceive on statement 5.
- Focus on his armpit (screen left, his right) when he says ”but Drew’s talent”.
- Present the Hidden Painting.
The Interview: A Recap
- Press statement 4.
- What left? Just one thing.
- Present the Letter Box.
- Press on statement 3. I can prove it.
- Where’s your evidence? Present the Tiny Frame.
- Intent: Present the Red Envelope.
- Ema’s test: The residue is in the lower righthand corner.
- The fake? Drew Misham
- The real one: Present Vera Misham.
The Red Envelope
- Press on everything.
- Present the Magic Show Ticket on statement 6.
7 Years Ago: Trial
The Circumstances
- Press on statement 3.
- Clearly, he shot something else.
- Point out the clown with a hole in its head.
- Press statements 4 and 5.
- Present the Stage Pistol on statement 6.
The Night of the Crime
- Press on statement 4.
- Let me ask about something else: the number of pistols.
- Is it Important? Quite Important.
- Present the Stage Pistol on revised statement 4.
Who Shot What
- Press on statement 4.
- Is it important? Very important.
- Press on revised statement 5.
- Lucky color: There’s a contradiction.
- Present the Crime Scene Photo.
- Point out the IV Bag.
- Because He’d seen it before.
- The prop was the Small Syringe.
- Show evidence? No matter what you say, you’ll eventually have to present the Notebook Page.
A Mystery Across Time
This section reintroduces the magatama and Psyche-Locks. If you start on a lock and realize you don’t have the answer, you can back out with no penalty using Z/Right mouse.
Move to Wright & Co Law Offices (Past)
Wright & Co Law Offices (Past)
- Achievement: Vibe with Charley.
- Talk to Trucy
- When discussing “the professional” say Please show me.
- Move to Defendant Lobby #2 (Past)
Defendant Lobby #2 (Past)
- This is the only opportunity in the series to examine the Defendant’s Lobby – there are several callbacks to previous cases.
- Talk to Meekins
- Present the Magatama.
Meekin’s Psyche-Lock
- First lock: Present Trucy.
- Second lock: Present The Amazing Mr. Hat.
- Talk to Meekins again.
- Move to the Borscht Bowl Club (Present).
Borscht Bowl Club (Present)
- Talk to Zak
- Present Trucy’s Locket
- Move to Solitary Cell 13 (Present)
Solitary Cell 13 (Present)
- Talk to Kristoph
- Examine the Nail Polish Bottle.
- Move to Drew Studio (Past).
Drew Studio (Past)
- Talk to Misham
- Slide right.
- Click the table to zoom in, then examine the Tiny Frame with the stamp in it.
- Present the Notebook Page.
- Present the Magatama.
Misham’s Psyche-Lock
- First Lock: The forger
- Second Lock: Present Vera
- Talk to Misham again, and then choose talk to Vera.
- Present the Commemorative Stamp to Vera.
- Keep the conversation going: Great magicians, aren’t they.
- Talk to Vera
- Present the Magatama
Vera’s Psyche-Lock
- First Lock: Present the nail polish.
- Second Lock: Present Kristoph Gavin.
- Talk to Vera about the client.
- Move to Detention Center (Past).
Detention Center (Past)
- Talk to Valant
- Present the Magatama
Valant’s Psyche-Lock
- First Lock: Present the Stage Pistol.
- Second Lock: Present Trucy’s Locket.
- Third Lock: Present the Commemorative Stamp.
- Fourth Lock: I’ll prove it with a person then present Thalassa Gramarye.
- Talk to Valant again.
- Move to Drew Studio (Present)
Drew Studio (Present)
- Talk to Brushel
- Present Trucy’s Locket then ask about Thalassa.
- Move to Borscht Bowl Club (Present).
Borscht Bowl Club (Present)
Present the Magatama
Zak’s Psyche-Lock
- First Lock: Present the Stage Pistol
- Second Lock: Present Apollo then the Portrait of Thalassa.
- Talk to Zak again.
- Move to Sunshine Coliseum (Present)
Sunshine Coliseum (Present)
- Talk to Valant
- Present the Magatama.
Valant’s Second Psyche-Lock
- First Lock: Present the Transferral of Rights.
- Second Lock: Present Zak’s Confession.
- Talk to Valant again.
- Move to Solitary Cell 13 (Present).
Solitary Cell 13 (Present)
- Examine the yellow envelope.
- Spray the stamp.
Day 2: Trial
Start by proving how. Present the Nail Polish. Accuse Kristoph Gavin.
Poisoning Vera
- Perceive on statement 5.
- Focus on his hand when he says ”her father, too”
- How he did it: present the Commemorative Stamp.
- Motive: present the Notebook Page.
- Proof of the request: present the Letter From Misham (the yellow envelope).
Achievement: The most efficient way to do One Jurist’s Verdict is to vote ‘Guilty’ the first time, read the (short) bad ending, then load the auto-save which will take you back to the jury instructions. Alternatively, save during the culprit’s final meltdown – saves are disabled during the jury instructions and the closest chapter selection will make you redo the whole cross-examination.
Select Not Guilty then Confirm.
By the end of this game, you should have seven achievements (four for completing episodes, as well as Opening Objection, Trucy’s Woes, and One Jurist’s Verdict).
On the multipart achievements, you should have:
- Forensics Expert: 5/8
- Mr. Charley: 5/8
- Ladders and Stepladders: 3/7
- (You can check this in the Accolades section of the museum.)
And that’s that! Spot any errors? Any place a clarification, a formatting change, or a screenshot would be helpful? Let me know in the comments.