Infographics with full progression map, items and their scaling with brutality, tactics and survival for your builds and some in-depth details about how game works together with a farming method.
Dead Cells Scrolls and Item Scaling

There are 3 tiers of stats that we can pick up during our progress in form of scrolls. Brutality, Tactics and Survival – red, violet, green respectively. Melee and ranged weapons as well as shields and skills fall to one or two of those categories. The more points in each tier you have, the more powerful your item will be. For those weapons that scale with two tiers it scales only with your highest stat. So for example having 10 brutality and 5 tactics for a Cursed Sword will scale only with Brutality and investing in Tactics won’t strengthen it (unless you reach 11 tactics).
Every stat improved by 1 gives you +15% damage for item with its respective color. Aside from that you get +X% health for each stat spent. The health bonus gets smaller as you keep investing on a single stat. But if you decide to start investing in a different stat you will add a lot more to the health pool. The idea here is that mono-tiered builds are rather glass canons (high damage, low health), 2-tiers builds are balanced, 3-tiers build have a lot of health but low damage. Have in mind that Survival gives the most health starting at +60%, next is Brutality starting at +50% and the last is Tactics starting at 40%.
Now let’s move to the infographic. There’s currently 60 weapons and 31 skills = 91 items total. 48 of them are scaling with brutality, 49 with tactics and 30 with survival (those numbers include items that have two-tier scaling). Following image shows you exactly which item belongs to which tier.
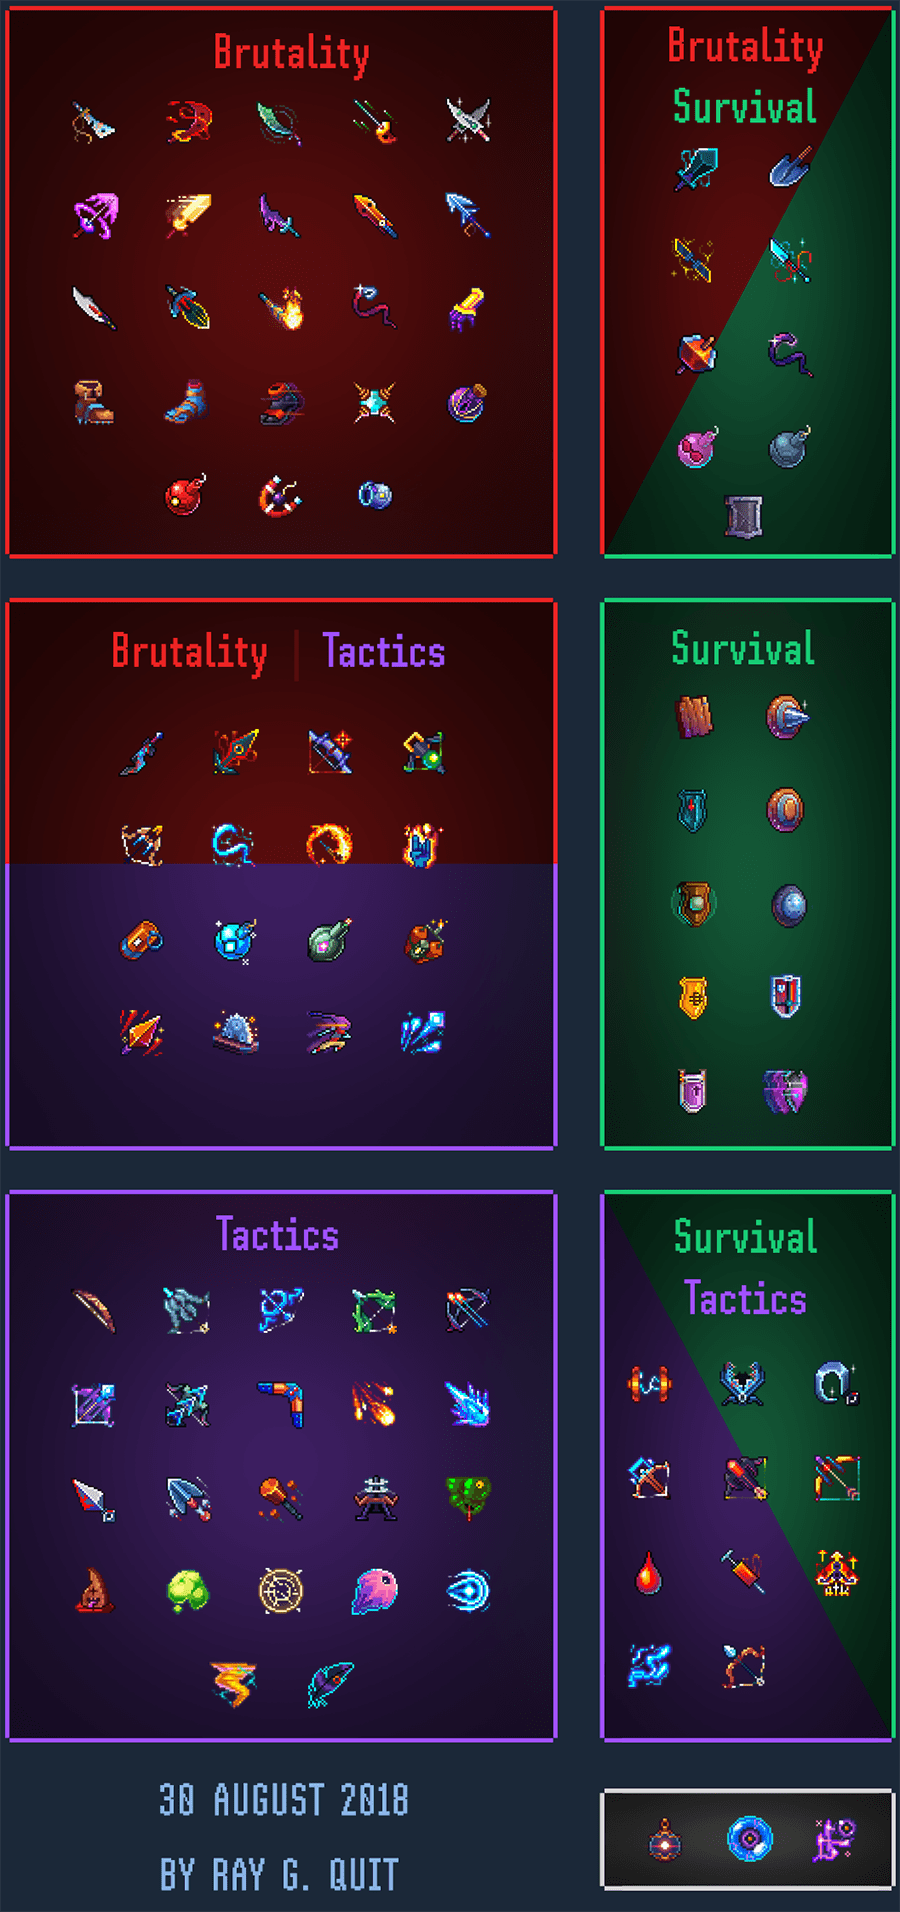
You have only icons here, mainly because they’re easier to manage and update later if needed.
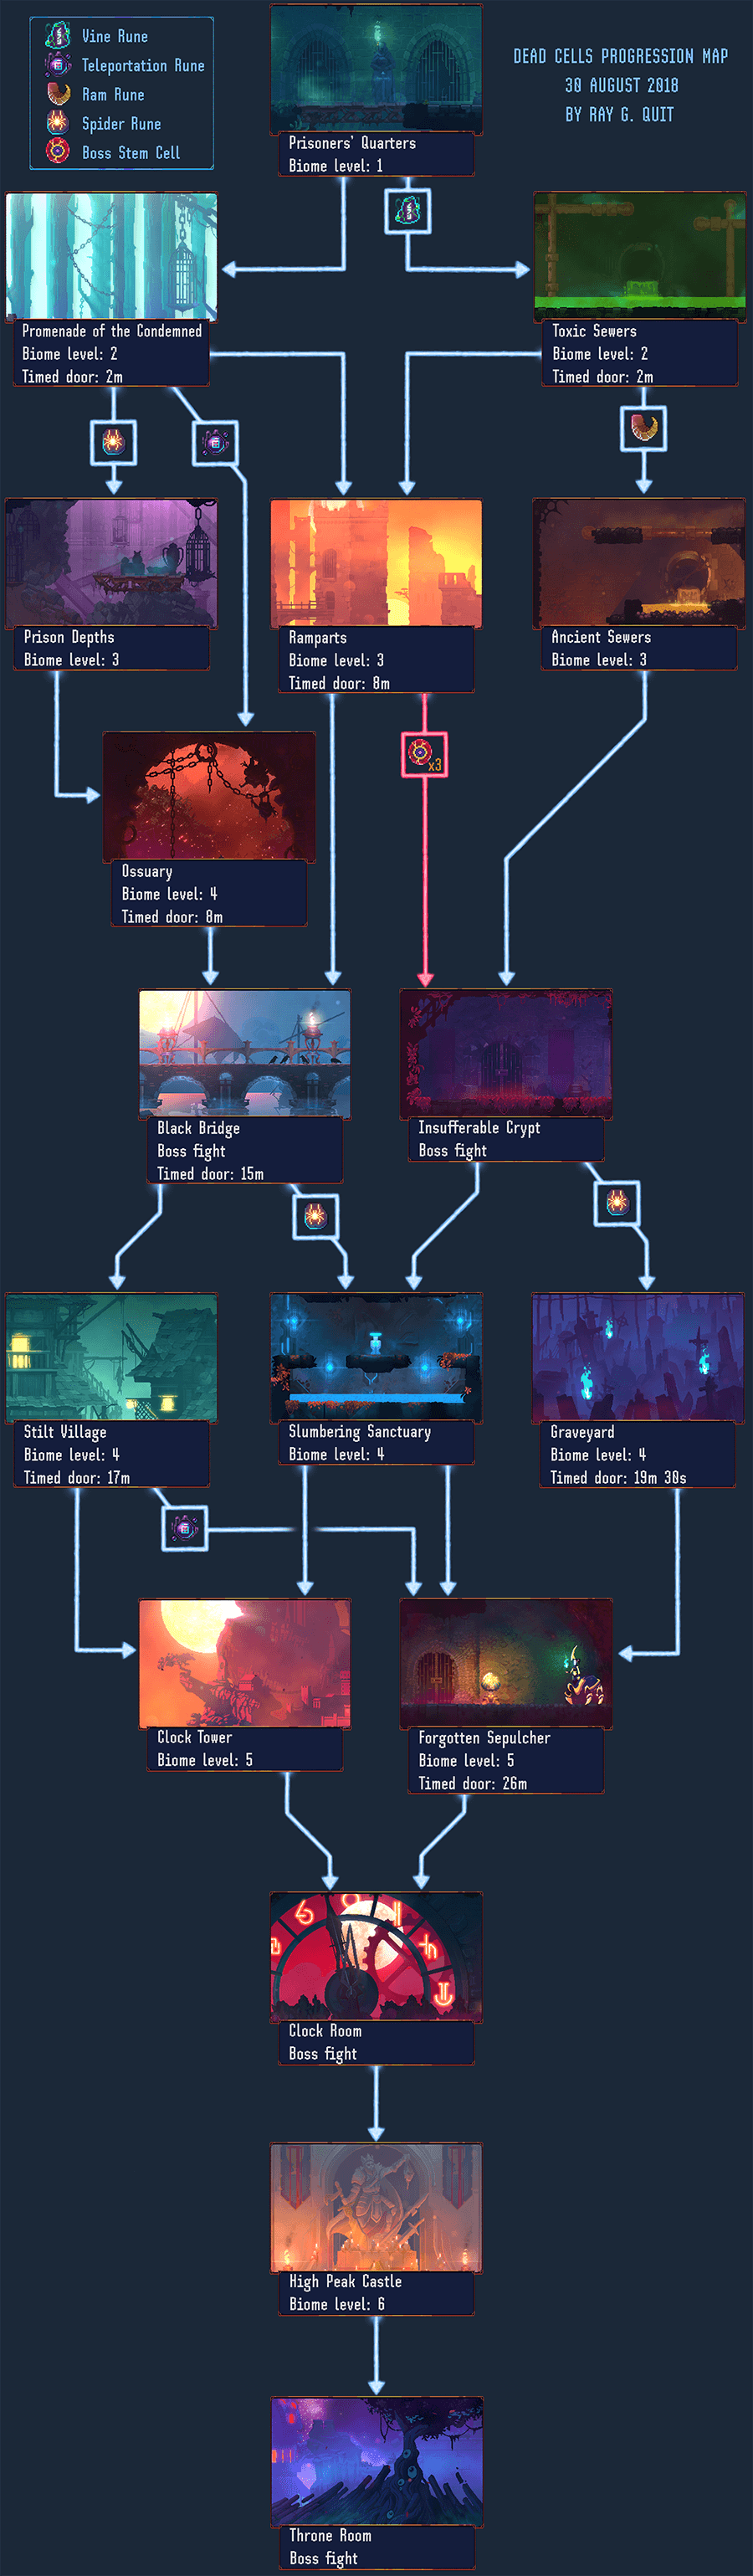
Dead Cells Progression Map
Here you have a full progression map showing you all possible routes you can take. Progressing trough all paths require acquisition of the runes (which I will explain later on).
Dead Cells Loot and its Level

On my progression map you’ll notice that every biome has a biome level. That level influences items that you’ll get inside that biome. There are sets of rules that have an effect on the item. Add the number to the biome level according to the condition to figure out how it works:
0 – for items found loosely on the ground
0 – dropped from a monster
0 – behind a paywall (golden door)
+1 – bought from the merchant
+1 – regular chest
+1 – cursed chest, together with a gem and scroll of power, additionally the item will be colorless (scales with your higest tier regardless of its original scaling)
+2 – from elites
+2 – reward for completing a challenge secret area
Additionally if you’re playing on 3 Boss Stem Cells difficulty add +2 to your items level and on 4 Boss Stem Cells add +4.
Dead Cells The Runes

Runes are permanent unlocks that will give you access to locked parts of the map – including whole new biomes. You will want to get them as soon as possible to not skip any possible loot on your way.
Vine Rune can be picked up in the Promenade of the Condemned by fighting with an elite Undead Archer (tip: dodge its double arrow)
Teleportation Rune in the Toxic Sewers unlocked by fighting with an elite Slasher (tip: bring a shield or something to stun or immobilize him with)
Ram Rune in Ossuary by fighting with an elite Slasher yet again.
Spider Rune in Slumbering Sanctuary by fighting with an elite Orb Caster (tip: bring a ranged weapon)
You can’t get them all in one swoop, so once you’ve unlocked one either carry on or die and start from the beginning. If you’re in a hurry to get them all your routes would be:
Prisoners’ Quarters > Promenade of the Condemned
Prisoners’ Quarters > Toxic Sewers
Prisoners’ Quarters > Promenade of the Condemned > Ossuary
Prisoners’ Quarters > Toxic Sewers > Ancient Sewers > Insufferable Crypt > Slumbering Sanctuary
There’s also Challenger’s Rune that unlocks daily runs in the starting zone and can be found after defeating the boss in Black Bridge. And the final rune is Homunculus Rune that can be aquired by beating the final boss that allows you to reattach your head to do some shenenigans. Those two aren’t needed for progression and you’ll get them eventually.
Dead Cells Legendary Forge

Legendary Forge (also known as Foundry) can be found after each of the bosses and only then. In there you can permanently upgrade chances for your weapons to drop with +, ++ and S quality. Each of those quality levels will add to the weapon or skill extra damage, stronger and additional affixes (the effects like +100% damage on burning enemies). Aside from that ++ upgrade guarantees you +1 to the tier (Brutality, Tactics or Survival) to which this item belongs and S upgrade will give you +2. In case of items that belongs to two tiers the tier bonus will be randomly generated within those two tiers – for example for [Cursed Sword S] you can get +2 tactics or + 2 brutality or +1 tactics and +1 brutality.
You can upgrade gear by spending cells which goes as follow:
1000 cells for 100% chance for + quality gear
3500 cells for 60% chance of ++ quality gear
8000 cells for 30% chance of S quality gear
Those are permanent progress bars so you’ll be able to have benefits from those every time you spend enough cells to reach each 5% milestone (as in 5%, 10%, 15% and so on). You can’t exceed the 60% cap for ++ nor 30% for S quality gear.
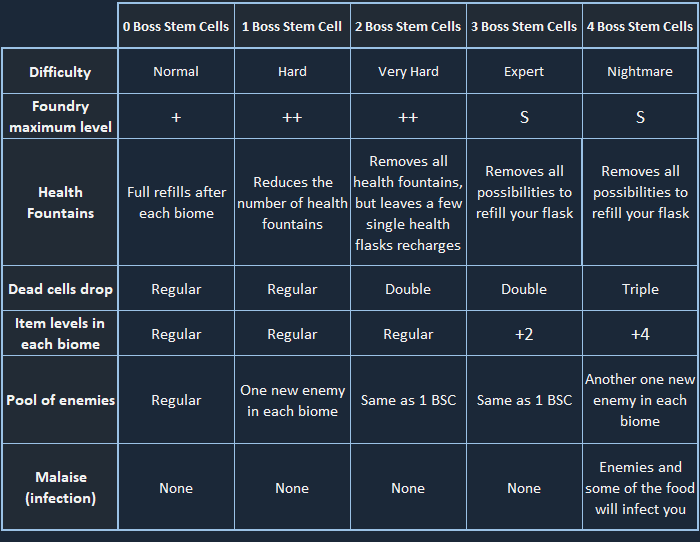
Dead Cells Boss Stem Cells

Boss Stem Cells (BSC) are permanent unlocks that can make the game harder and more rewarding. They can be obtained by defeating the current final boss. Once you defeat him, you’ll receive a Boss Stem Cell which will allow you to play on next level of difficulty where you have to defeat that boss again to gain access to the next difficulty and so on until you reach 4 cells. Each difficulty will make your enemies hit harder and have more HP. Starting from 1 BSC difficulty you’ll notice new enemies that weren’t present in the biome that you’re in – and that enemy-loadout will continue up to 3 BSC. On 4 BSC you will notice yet another kind of enemies added to all biomes.
On top of that these are changes that are affected by the Boss Stem Cells:
Dead Cells Farming Cells

So you want to farm cells? Fine, I’ll tell you how. Read up because there is quite a bit information here. Mind you that’s a method for people that have some decent experience in the game.
STEP 1: Get those upgrades
Healing Potion and Gold Recovery upgrades with at least level 3, but feel free to push it at level 2. Those are just basic needs that you should prioritize for your game overall, not only for farming runs.
Restock – which will help you to reroll your choices at the shop.
Merchandise Categories – this one is a pain in the butt to get, but it will insanely help you in your game experience so it’s very much worth getting. You get it by finding Architect’s Key in the Graveyard that is located randomly somewhere in Graveyard’s walls. Just go to youtube and search for a video on how to get Merchandise Categories or Architect’s Key, I’m sure you’ll manage. What does it do? Once you reach a merchant you usually get a weapons’ or skills’ merchant – this is random. What isn’t random with Merchandise Categories is that you now how a choice of 3 categories before merchant will show you his wares. Melee, ranged and shields for weapons’ merchant and grenades, turrets and powers for skills’ merchant. That is pretty awesome control over RNG.
Unlocked skills like Powerful Grenade, Cluster Grenade, Infantry Grenade and Ice Grenade – for brutality build or Knife Storm, Wave of Denial, Death Orb, Tornado, Laceration Aura for tactics build. You don’t need them all but you want to have more than half unlocked for your specified build.
STEP 2: The Difficulty
The most optimal difficulty for farming are 0, 2 and 4 boss stem cells since they give regular, double and triple cell drops respectively. Take a note that farming on 0 and 1 boss stem cells isn’t really that great, you may want to get to the 2nd boss cell difficulty first. But you do you.
STEP 3: The Build
To speed up farming you want to get either brutality or tactic based build (get some other stats for health). My scroll choices are usually distributed on a scale [3:1:1], “3” being the main stat. Your first mutation should be the one that reduced cooldown on your skills. Pick whatever mutations you like after that. Skills are going to be your primary source of damage becuase some of them can destroy enemies without you even stopping and we will be going fast here.
If you’re going with brutality build then take Fireworks Technician so you will be able to spam grenades to your heart’s content. The grenades you will want to use are Powerful Grenade, Cluster Grenade and Infantry Grenade. Ice Grenade is also useful (just don’t go double Ice). The rest not so much since we want to insta-kill everything.
If you’re going with tactics build then you’re going to take Efficiency mutation to improve skills from Miscellaneous category (also known as Powers category) – like Knife Storm, Death Orb, Wave of Denial, Laceration Aura, Tornado. The order is not accidental here, the first three are the most powerful, Aura and Tornado are secondary in power. Those will help you along the way, any other from this category won’t be of much use.
STEP 4: Final notes before we get to it
And in case you don’t understand how to get those specified skills on a run even when you have them unlocked then you clearly missed Step 1 and you don’t have Restock and Merchandise Categories – get to it, I can’t stress enough how good those are. And no, we don’t want any turrets, turrets are for weaklings. They also slow us down and we don’t want that on a speedrun.
Other than that feel free to pick up any weapon you want. If you want a tip: Ice Bow is really strong as a secondary weapon to slow things down when it gets nasty and it will give you some damage taken reduction just by holding onto it.
On a side note this build can be used for a progression run, just remember that it’s a rather glass cannon build. You might want to take Ygdar Orus Li Ox (YOLO) mutation if you want to clear the whole game and Ice Bow + a decent amulet so you can have some damage taken reduction for your defense and for your offense [3:1:1] stat distribution and picking up every scroll should provide very high damage.
STEP 5: The actual run
Now why do you want a speed run for every timed door instead of going for clearing the areas? Because it’s faster, more efficient and you’ll be much less frustrated if you die on a 15 minute run instead of a much longer one. On top of that you’ll get some extra scrolls which will improve your damage with your skills.
The route goes like this. You start at Prisoners’ Quarters – skip every enemy, pick up 2 scrolls, visit a merchant and get to the loot chest. You should leave on 1:30 to Promenade. Feel free to reset if you lost too much health or you won’t make it in time. Pick up the cooldown reducing mutation now.
Promenade of the Condemned – reach the timed door at 2:00. You probably won’t be able to clear up every enemy but you should be able to clear half if you’ve found some skills from the list above. If you haven’t found any yet, keep on skipping until you do in the Promenade and then start clearing. Also try to prioritize having everything found over everything killed (but you should be able to kill a lot if you have those insta-kill skills). Leave the Promenade at 7:00-7:15.
The Ramparts – find the timed door at 8:00 asap since it’s not always at the start of the zone. You should be able to clear whole or most of the zone now. Obviously get every chest, scroll and visit every merchant along the way. Leave at 13:00-13:30. You need at least 1 and half minute to deal with final boss.
The Black Bridge boss – kill it. Reach the 15:00 door in the transition zone with the Collector. After this point do whatever you like. You can reset your run and do it again which should be one of the most efficient ways of farming cells.
Alternatively do what I do and go for 17:00 door in Stilt Village and clear the village out and then go for Sepulcher’s door at 26:00 which you can now clear out on your own pace since there are no more doors. Or go for the Clockwork if you don’t like Sepulcher. Kill the second boss. If you’re farming for the Forge upgrades then you can reset now (there’s no Forge past the second boss). If you really want to push it then go to Castle and kill final boss, do whatever you want, I don’t care at this point. The longer route can be risky on 4 stem cells but on 2 it can be easily farmed with some practice.
So this is how I do it, which is one of the best ways (but there are probably other variations) that I farmed my way to unlock everything in the game. I’ve been writing this method over and over again on the forums so I finally decided to write it down comprehensively here, so next time I’ll just link it to the next person that asks. Good luck.