Welcome to our FIFA 23 Ultimate Team Best Formations guide. Looking for the best formations and special tactics for FUT in FIFA 23? This guide will help you!
FIFA 23 Ultimate Team Best Formations
The best formations for FUT in FIFA 23 will largely depend on the Players available and exactly how you want to play on the pitch. If you’re more of a defensive player then you might want to consider going with a back five, which will help prevent teams from scoring against you, but at the expense of you being able to attack effectively.
4-4-2
| Formation | Pros | Cons |
|---|---|---|
| 4-4-2 | A foundational formation that’s great for any newcomer looking to get to grips with 4-4-2.Impressively versatile, and can be setup to be as offensive or defensive as required. | Can be overrun in midfield by more adventurous formations. |
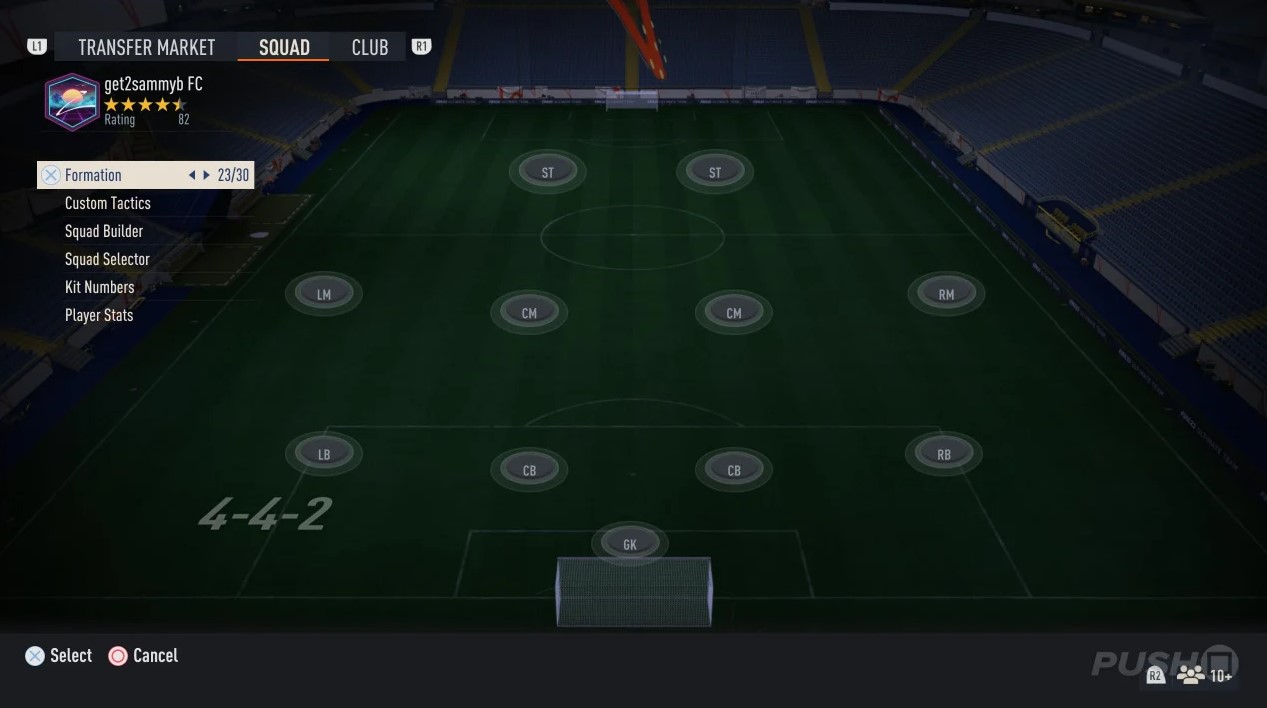
The foundation of English football, the 4-4-2, is a rock solid option in FIFA 23, and probably the best formation for you to get your feet wet in FUT 23. This year’s game is slower and more deliberate, so it actually pays to play it a little safe and go back to basics in many ways.
The goal with this formation is to have two central midfielders building a base in central midfield, with two overlapping fullbacks covered by a couple of wingers who are willing to get back on defense. We like to ensure our forwards stay central, but it’s good to have one pacey workhorse who helps out in defence and is also willing to run in behind, and then partner him with a second forward who stays forward and can hold up the ball.
Winning the ball back high up the pitch can also be effective with this formation, and as this year’s game allows for five substitutions, you don’t need to worry too much about running out of stamina — as long, of course, as you have a strong bench. Obviously, you may want to tone down your tactics if you want to conserve energy, but this is up to you.
4-4-2 Custom Tactics and Instructions
As alluded to above, your Defensive Style is going to be determined by how gung-ho you feel with regards to winning the ball back. Personally, we’re having success with Press After Possession Loss, but this is a stamina hog, so that’s something to keep in mind. If you want to be a lot more conservative, you could look at the 4-4-2 Holding formation as an alternative to simply sit off opponents and block off their passing lanes. Even with the traditional 4-4-2, we’d still recommend you play Long Ball to setup those counter attacks. But remember, if you lose possession and you are going to press immediately as discussed previously, keep your Depth quite high to really try and win the ball high up the pitch.
Ideally, you’ll want your CMs to Cover Center to provide that foundation in the middle of the pitch, but instruct your fullbacks to Overlap to provide additional attacking potency when you’re on the offensive. Instructing your wingers to Come Back on Defence can help plug any gaps. We like having a pacier striker to both Get in Behind and Come Back on Defence, while leaving a target man on Stay Forward to help pick up Long Balls and hold up the play.
Defence
- Defensive Style: Press After Possession Loss
- Width: 60
- Depth: 60
Offence
- Build Up Play: Long Ball
- Chance Creation: Balanced or Direct Passing
- Width: 50
- Players in Box: 6
- Corners: 2
- Free Kicks: 2
Here are some Instructions for your Players that you may want to consider based on the information above. The key thing is that your CMs build a base for everything that you do, and your fullbacks supplement the attack while still receiving defensive support from your wingers.
| Position | Instructions |
|---|---|
| GK | Saving on Crosses: BalancedSaving Outside Box: Balanced |
| LB | Attacking Runs: Stay Back While AttackingInterceptions: Conservative InterceptionsRun Type: OverlapDefensive Position: Stick to Position |
| Left CB | Attacking Support: Stay Back While AttackingInterceptions: Normal InterceptionsDefensive Position: Stick to Position |
| Right CB | Attacking Support: Stay Back While AttackingInterceptions: Normal InterceptionsDefensive Position: Stick to Position |
| RB | Attacking Runs: Stay Back While AttackingInterceptions: Conservative InterceptionsRun Type: OverlapDefensive Position: Stick to Position |
| LM | Defensive Support: Come Back on DefenceChance Creation: Balance WidthSupport Runs: Get in BehindSupport on Crosses: Get into the Box for CrossInterceptions: Normal Interceptions |
| Left CM | Attacking Support: Balanced Attack or Stay Back While AttackingSupport on Crosses: Get into the Box for Cross or Stay on Edge of Box for CrossInterceptions: Normal InterceptionsDefensive Position: Cover CentrePositioning Freedom: Stick to Position |
| Right CM | Attacking Support: Balanced Attack or Stay Back While Attacking Support on Crosses: Get into the Box for Cross or Stay on Edge of Box for CrossInterceptions: Normal InterceptionsDefensive Position: Cover CentrePositioning Freedom: Stick to Position |
| RM | Defensive Support: Come Back on DefenceChance Creation: Balance WidthSupport Runs: Get in BehindSupport on Crosses: Get into the Box for CrossInterceptions: Normal Interceptions |
| Left ST | Support Runs: Stay CentralAttacking Runs: Get in Behind or Mixed AttackInterceptions: Normal InterceptionsDefensive Support: Come Back on Defence or Stay Forward |
| Right ST | Support Runs: Stay CentralAttacking Runs: Get in Behind or Mixed AttackInterceptions: Normal InterceptionsDefensive Support: Come Back on Defence or Stay Forward |
4-2-3-1 – FIFA 23 Ultimate Team Best Formations
| Formation | Pros | Cons |
|---|---|---|
| 4-2-3-1 | A great foundation formation that you can use at the beginning of games or when you’ve built up a lead and are looking to steadily see out the remainder of a game.Impressive defensive cover from CDMs who can help to shield your centre backs and protect your backline. | Can lack width without energetic fullbacks.Requires attacking midfielders to get in the box and make runs in order to support lone striker. |
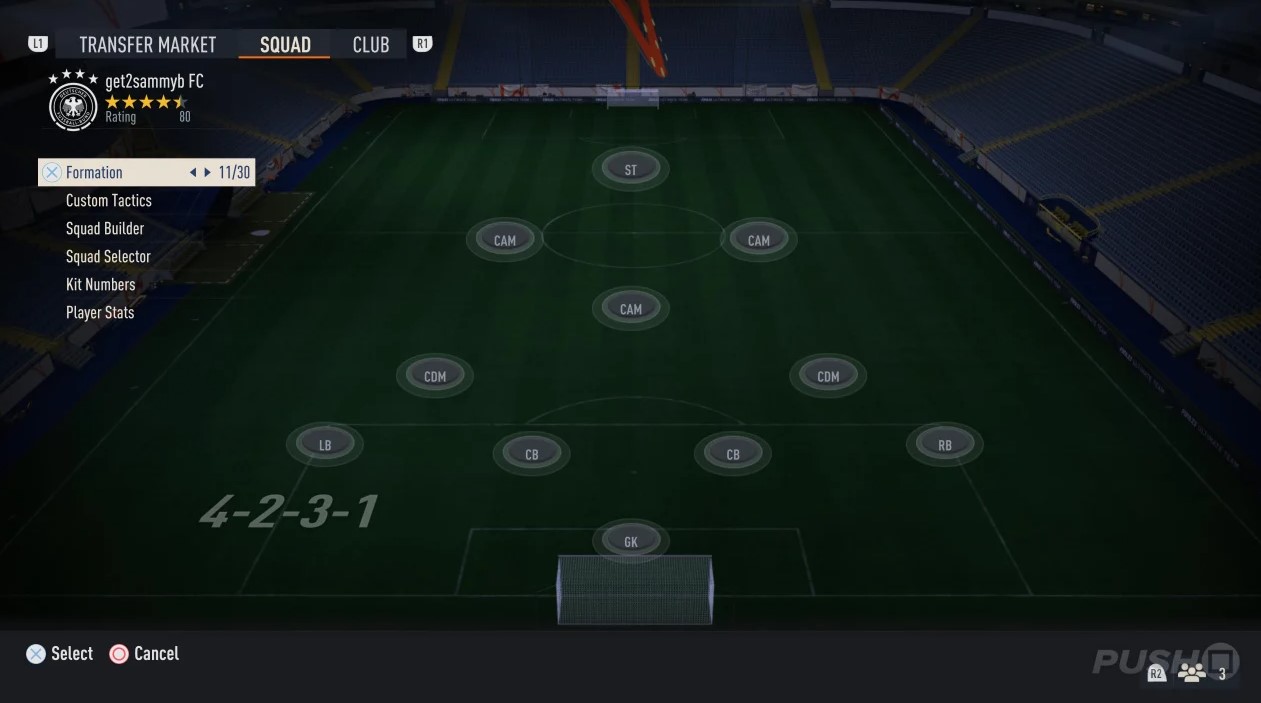
If you’re struggling to shut out opponents in FIFA 23, then the 4-2-3-1 can be a great formation to utilise in order to give you a lot of defensive stability. Due to the way the game’s designed, you’re going to get a lot of support from your CDM players, who will shield your back four, assuming you’ve got your Custom Tactics assigned appropriately. This makes it a great formation to start out in or to switch to when you have a lead or are comfortably in front.
The downside is that you may not get much width from your attacking midfielders operating behind the striker, but you can offset this by using energetic fullbacks who can get up and down the pitch. Remember, you’ll still have those two CDMs in front of your back four who can help you to mop up any potential counter-attacks should the situation arise. Alternatively, you can opt for the 4-2-3-1 Wide formation, which will give you a bit more width at the expense of some stability in the centre of the park.
Perhaps the only problem with this formation is that it can feel a little toothless in attack at times, but again you can offset this by encouraging your attacking midfielders to push forward or even hold their position up the field, helping you to break out more easily. Given how potent crossing can be, you’re going to want to instruct your wide attacking midfielders to get into the box, giving you options from your striker both in front of goal and at the far posts.
4-2-3-1 Custom Tactics and Instructions
There’s one major decision you’ll need to make with your Custom Tactics for the 4-2-3-1: how defensive do you want to be? If you’re primarily looking for stability at the back, then we’d recommend you keep your fullbacks in position during offensive possessions, and the same with your CDMs as well. If you’re looking for a little more offensive potency, then you can put your fullbacks’ Attacking Runs to Balanced, and even instruct one of your CDMs to get forward during attacks. If you do adopt these kind of tactics, however, make sure the other CDM stays back to give you some insurance.
Here are some of the Custom Tactics you should consider for the 4-2-3-1 formation. You can also tinker with the offensive width if you’re looking to spray the ball about more, but do keep in mind that this will leave some gaps in the centre of the park if you do lose possession:
Defence
- Defensive Style: Balanced
- Width: 50
- Depth: 50
Offence
- Build Up Play: Slow Build Up
- Chance Creation: Forward Runs or Balanced
- Width: 60
- Players in Box: 5
- Corners: 2
- Free Kicks: 2
In addition, here are some Instructions for your Players that you may want to adopt as a starting point for the 4-2-3-1 formation. As always, feel free to play around with these Instructions and see what works best for your personal playstyle. As mentioned above, a lot of this will depend on how defensive or offensive you want to be:
| Position | Instructions |
| ST | Support Runs: Balanced WidthAttacking Runs: Mixed AttackInterceptions: Normal InterceptionsDefensive Support: Stay Forward |
| Right CDM | Defensive Behaviour: Balanced DefenceAttacking Support: Balanced Attack or Stay Back While AttackingInterceptions: Normal InterceptionsDefensive Position: Cover CentrePositioning Freedom: Stick to Position |
| Right CB | Attacking Support: Stay Back While AttackingInterceptions: Normal InterceptionsDefensive Position: Stick to Position |
| Right CAM | Defensive Support: Basic Defence SupportSupport on Crosses: Get into the Box for CrossPositioning Freedom: Stick to PositionInterceptions: Normal Interceptions |
| RB | Attacking Runs: Balanced or Stay Back in AttackInterceptions: Normal InterceptionsRun Type: Mixed AttackDefensive Position: Stick to Position |
| Left CDM | Defensive Behaviour: Balanced DefenceAttacking Support: Balanced Attack or Stay Back While AttackingInterceptions: Normal InterceptionsDefensive Position: Cover CentrePositioning Freedom: Stick to Position |
| Left CB | Attacking Support: Stay Back While AttackingInterceptions: Normal InterceptionsDefensive Position: Stick to Position |
| Left CAM | Defensive Support: Basic Defence SupportSupport on Crosses: Get into the Box for CrossPositioning Freedom: Stick to PositionInterceptions: Normal Interceptions |
| LB | Attacking Runs: Balanced or Stay Back in AttackInterceptions: Normal InterceptionsRun Type: Mixed AttackDefensive Position: Stick to Position |
| GK | Saving on Crosses: BalancedSaving Outside Box: Balanced |
| Centre CAM | Defensive Support: Basic Defence SupportSupport on Crosses: Balanced Crossing RunsPositioning Freedom: Stick to PositionInterceptions: Normal Interceptions |
4-4-2 Holding

| Formation | Pros | Cons |
|---|---|---|
| 4-4-2 Holding | Tons of defensive stability provided by the two CDMs in the centre of the park.Wide midfielders can effectively overlap, creating overloads in attack.A balanced and flexible formation that has no real weaknesses to expose. | Can be a little too conservative and overrun in midfield, leaving forwards isolated and wide players ineffective. |
While the 4-4-2 may be quite old-fashioned in the modern game, the 4-4-2 Holding formation is brilliantly balanced and gives you versatility in both defence and attack. While this is unquestionably a more conservative formation, with its second bank of four anchored by two CDMs, if you can use your wide midfielders to stretch the pitch it can be deadly offensively while still commanding more than enough defensive stability to avoid ceding easy opportunities to your opponent.
You’re probably going to want to instruct your fullbacks to stay back, especially if you’ve got your wide midfielders pushing forward to complement your attack, but you should have more than enough defensive cover from your CDMs to break up any potential counter-attacks.
There are a number of permutations of the 4-4-2 you could experiment with, including the 4-2-2-2 which is a lot more offensively minded at the expense of width. This alternative can be a little narrow and so will rely on your fullbacks providing options out wide, but it’s flexible and with a couple of creative CAMs up front will result in a ton of goal scoring potential if you prefer to build up slowly and play through the middle.
4-4-2 Holding Custom Tactics and Instructions
The conventional 4-4-2 is quite adaptable, meaning that you can make it as offensive or defensive as you like with your Custom Tactics. But if you’re opting for the 4-4-2 Holding then there’s a good chance you’re looking to keep it tight at the back. Defensively, you should be pretty safe, but getting the ball up the pitch when in possession can be quite laboured, so we’d recommend opting for Long Ball as your Build Up Play style.
If you feel you’re not getting enough options upfront, even with the two strikers, then you can instruct your LM and RM players to Cut Inside, but you will lose width this way and may have to instruct your LB and RB to Overlap in order to offset it. Just be warned that this will leave you exposed in wide areas, and if you’re up against an opponent who has pacey wingers then they will punish you. We’d recommend you instruct your fullbacks to hold their position during attacks, and try to rely on the natural width that your wide midfielders provide:
Defence
- Defensive Style: Balanced
- Width: 50
- Depth: 50
Offence
- Build Up Play: Long Ball
- Chance Creation: Balanced
- Width: 55
- Players in Box: 5
- Corners: 2
- Free Kicks: 2
With all that in mind, here are some Instructions for your Players that you may want to tinker with if you’re planning to use the 4-4-2 Holding formation. As discussed already, you should mess with these Instructions and see what works best for your personal playstyle. We’d always recommend starting out with Balanced on everything and then tinkering to your tastes. With the CDMs, you can allow the more offensive minded player to stray forward, as long as you keep one to Stay Back While Attacking:
| Position | Instructions |
| GK | Saving on Crosses: BalancedSaving Outside Box: Balanced |
| LB | Attacking Runs: Stay Back While AttackingInterceptions: Normal InterceptionsRun Type: Mixed AttackDefensive Position: Stick to Position |
| Left CB | Attacking Support: Stay Back While AttackingInterceptions: Normal InterceptionsDefensive Position: Stick to Position |
| Right CB | Attacking Support: Stay Back While AttackingInterceptions: Normal InterceptionsDefensive Position: Stick to Position |
| RB | Attacking Runs: Stay Back While AttackingInterceptions: Normal InterceptionsRun Type: Mixed AttackDefensive Position: Stick to Position |
| LM | Defensive Support: Basic Defence SupportChance Creation: Balance WidthSupport Runs: Balanced SupportSupport on Crosses: Balanced Crossing RunsInterceptions: Normal Interceptions |
| Left CDM | Defensive Behaviour: Balanced DefenceAttacking Support: Balanced Attack or Stay Back While AttackingInterceptions: Normal InterceptionsDefensive Position: Cover CentrePositioning Freedom: Stick to Position |
| Right CDM | Defensive Behaviour: Balanced DefenceAttacking Support: Balanced Attack or Stay Back While AttackingInterceptions: Normal InterceptionsDefensive Position: Cover CentrePositioning Freedom: Stick to Position |
| RM | Defensive Support: Basic Defence SupportChance Creation: Balance WidthSupport Runs: Balanced SupportSupport on Crosses: Balanced Crossing RunsInterceptions: Normal Interceptions |
| Left ST | Support Runs: Balanced WidthAttacking Runs: Mixed AttackInterceptions: Normal InterceptionsDefensive Support: Basic Defence Support |
| Right ST | Support Runs: Balanced WidthAttacking Runs: Mixed AttackInterceptions: Normal InterceptionsDefensive Support: Basic Defence Support |
You can find all EA SPORTS FIFA 23 Guides here:
- EA SPORTS FIFA 23 Guide
Check out our other EA Sports FIFA 23 Guides: