Welcome to our Legendary Tales 1 Walkthrough, where we will guide you through the exciting journey of this legendary adventure game. Legendary Tales 1 is an immersive and challenging game that takes players on a thrilling quest filled with epic battles, puzzles, and quests to complete. In this walkthrough, we will provide you with step-by-step guidance to help you overcome the various challenges and obstacles in the game. Whether you are a seasoned gamer or new to the world of adventure games, our guide will provide you with valuable tips and strategies to help you progress through the game smoothly.
Our Legendary Tales 1 Walkthrough will cover all aspects of the game, including character customization, combat techniques, puzzle-solving, and quest completion. We will also provide you with valuable insights into the game’s storyline and characters, allowing you to fully immerse yourself in this captivating adventure. So, if you are ready to embark on a journey filled with excitement, mystery, and adventure, then join us on this thrilling ride as we guide you through Legendary Tales 1.
February 23, 2024: Legendary Tales 1: Stolen Life updated!
Legendary Tales 1 Stolen Life Walkthrough
Get ready to explore the fascinating world where a werewolf is in danger and seek your help to get free. Evil forces (witches) rule the peaceful world and you are chosen to bring them to justice while fighting for peace on earth. Legendary Tales: Stolen Life offers you adventures combined with hidden objects and mini-games containing a series of puzzles to solve and unforgettable characters to interact with to advance the storyline. You can check out the game’s Steam page here.
Help Lucia to Save her Brother Ulf
Legendary Tales 1: Stolen life features a well-written storyline revolving around a female character who was enjoying a beautiful life along with her parents and younger brother. Both characters have started to work and live in a Tavern after the disappearance of their parents and the death of the guardian. Everything changed when the protagonist’s younger brother turned into a werewolf and was kidnapped by a witch. Now, the player needs to help the protagonist find her brother as she doesn’t know where the witch took her brother.
Follow the Wagon
As mentioned above, a girl needs your help to save her brother before it’s too late. The path isn’t easy as every corner is full of thrilling puzzles, creepy creatures, and mind-blowing riddles. To get help, read Legendary Tales 1 Walkthrough and get all solutions and answers. Besides, your first objective is to Follow the Wagon by finding hidden objects and clues. You can use the hint system when you see any object challenging to discover.
First off, pick up a stone from the ground and add it to your inventory. You will discover a bucket near the hut’s door, pick it up from the spot and keep it to inventory.

Select the bucket, attach it with the rope, and drop it into the well to bring some water.

- After collecting a bucket full of water, head to the right side to discover a kettle and break the lock using the stone from the inventory.
- Select the bucket full of water and keep it forth the horse. Leave the area for a while to search for the horse equipment.
- Tap the back button to leave the kettle area and get into the house after going through the doorway on the left side.
Enter the Pub
Going through the doorway may lead you to a pub, where lots of chairs and other stuff are available at the scene.

Tap the counter on the left side and pick up an Oiler from the drum. Next, slide the bowl to discover a Wolf Figurine and pick it up from the spot.

Afterward, hit the back button, tap the painting on the front wall, and add Wolf Figurine to start a mini-game.
You have to play the mini-game three times to unlock the locker; therefore, try to connect pipes to move them to another side.
1: Connect Pipe

2: Connect Pipe
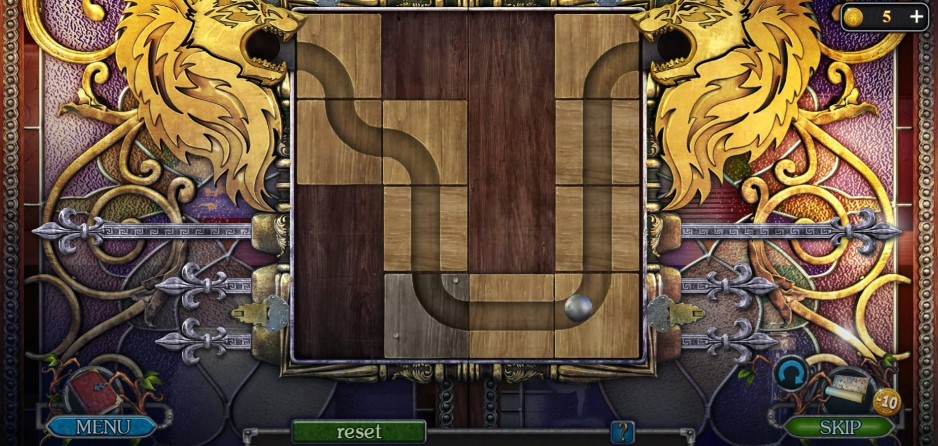
3: Connect Pipe

As you solve the puzzle, the game unlocks the cabinet holding lots of stuff for you to discover the hidden object like Oil Lamp.
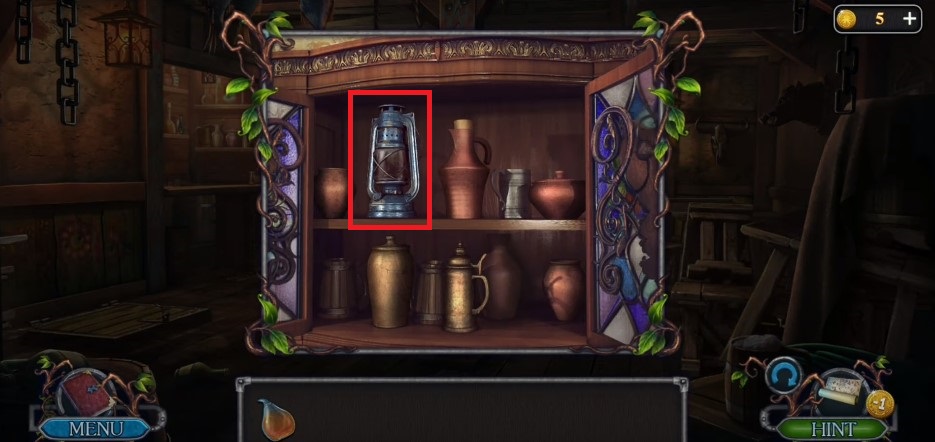
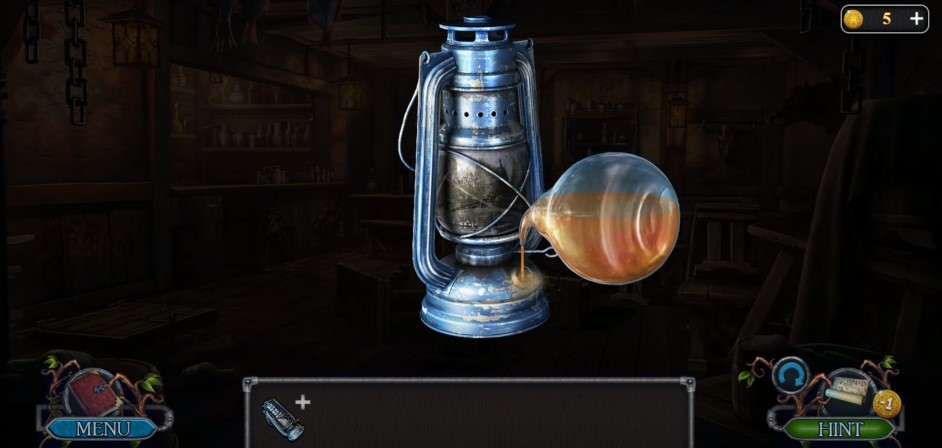
Now, head to your inventory, select the Oil Lamp, choose the Oiler, and add some oil to the lamp.
Select the Oil Lamp from the inventory and bring it close to the fire burning on the pillar. Keep the Lit Oil Lamp back to your inventory and tap the trapdoor on the left side. Tap the wire tied to the trapdoor and keep it back to your list.

After that, select the wire and tap on it to get a piece of wire; now, head to the floor on the right side and use the wire that you have turned into a hook to bring the key out of the crack.

Visit the Small Hut
Hit the back button to leave the pub and tap the small hut on the right side. Use the key from the inventory to unlock the door and go through the doorway to get into the house.

Open the door to discover a ladder and Horse Equipment as you need the ladder to go down in the basement from the trapdoor you found in the pub.
Return to the PUB
Go back to the pub, use the ladder to reach the basement with the help of a trapdoor on the left side, and start finding hidden objects.
Basement
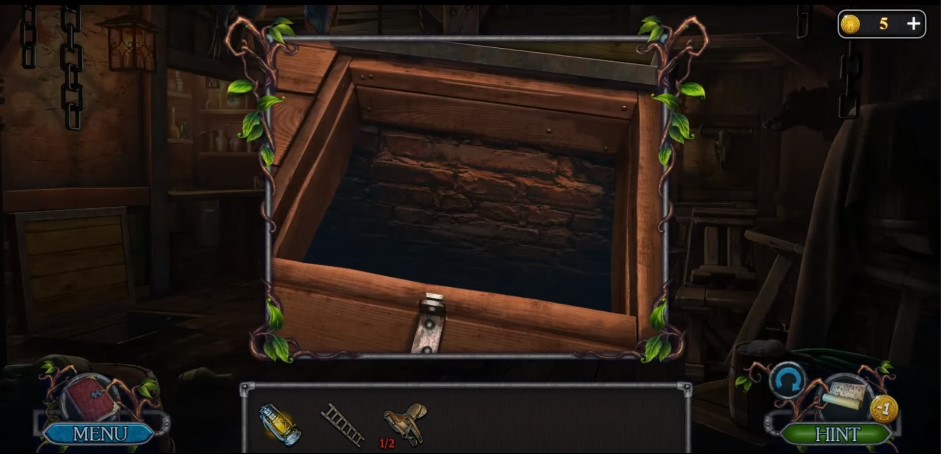
Use the ladder to get into the basement and discover the chest of the protagonist’s brother. Your next objective is to search for hidden objects and get the horse equipment.
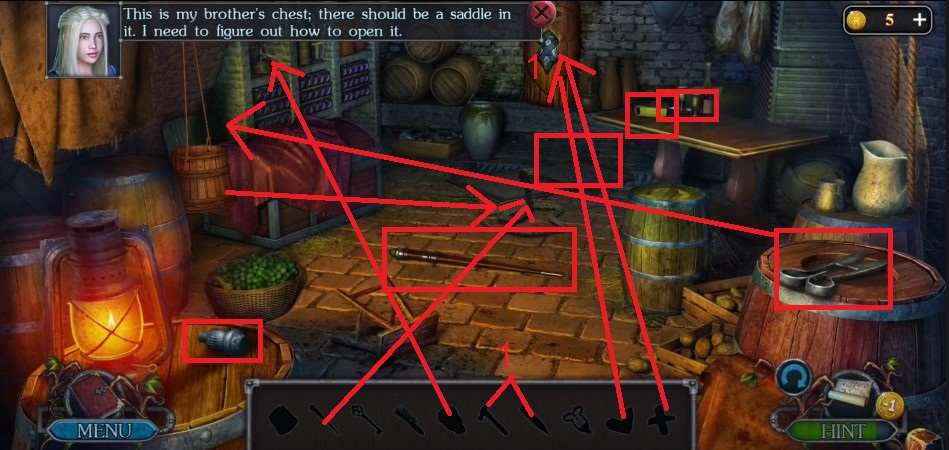
Find Hidden Objects
First off, you have to discover hidden objects following the image below and then solve tricky puzzles.
In the end, use the key to unlock the chest and receive a note. Before leaving the scene, don’t forget to receive horse equipment.
Return to Barn
After collecting horse equipment, you should return to Horse Barn and equip the horse with the equipment you collected to follow the wagon.
Puzzle Solutions
This guide will not mention each time you have to zoom into a location; the screenshots will show each zoom scene. Hidden-object puzzles are referred to as HOPs. This guide will not show HOP solutions. It will identify the location of the HOP and the inventory item acquired.
This guide will show solutions for non-random puzzles. Please read the in-game instructions for each puzzle. In this game, you will sometimes have to select the new scene to trigger dialog, cut-scenes, or tasks prior to interacting with the scene.
The Yard of the Tavern Puzzle
- Initial Steps:
- Acquire STONE and BUCKET (A).
- Place and select BUCKET; obtain BUCKET OF WATER (B).
- Use STONE (C) to open the gate.
- Apply BUCKET OF WATER (D).
- Head left.
- Wire and Figurines:
- Take WIRE (E).
- Select WIRE multiple times to earn a HOOK.
- Move the bowl; collect 1/2 WOLF FIGURINE and OILER (F).
- Utilize HOOK; earn a KEY.
- Move the stein; take 2/2 WOLF FIGURINE (G).
- Place WOLF FIGURINE; select (H).
- Part 1 solution: (L-R)-(M-O)-(I-L)-(P-S)-(U-P)-(Q-T)-(N-U)-(P-Q)-(K-N)-(J-K).
- Final: (V).
- Unlocking the Yard:
- Part 2 solution: (I-C)-(H-F)-(J-H)-(E-J)-(D-E)-(A-G)-(E-D)-(B-A).
- Final: (K).
- Part 2 solution: (I-C)-(H-F)-(J-H)-(E-J)-(D-E)-(A-G)-(E-D)-(B-A).
- Completing the Rune Sequence:
- Part 3 solution: (S-X)-(T-W)-(Q-S)-(O-T)-(N-Q)-(M-O)-(L-N)-(P-L).
- (R-P)-(U-R)-(V-U)-(W-V)-(S-W)-(T-S)-(Q-T)-(O-Q)-(N-O).
- Final: (Y).
- Part 3 solution: (S-X)-(T-W)-(Q-S)-(O-T)-(N-Q)-(M-O)-(L-N)-(P-L).
- Moving Forward:
- Take OIL LAMP (A).
- Open OIL LAMP; use OILER.
- Use OIL LAMP; earn LIT OIL LAMP (B).
- Walk down.
- Use KEY; open the door; take LADDER and 1/2 HORSE EQUIPMENT (C).
- Go left.
- Secrets Below:
- Open the trap door; use LADDER and LIT OIL LAMP (D).
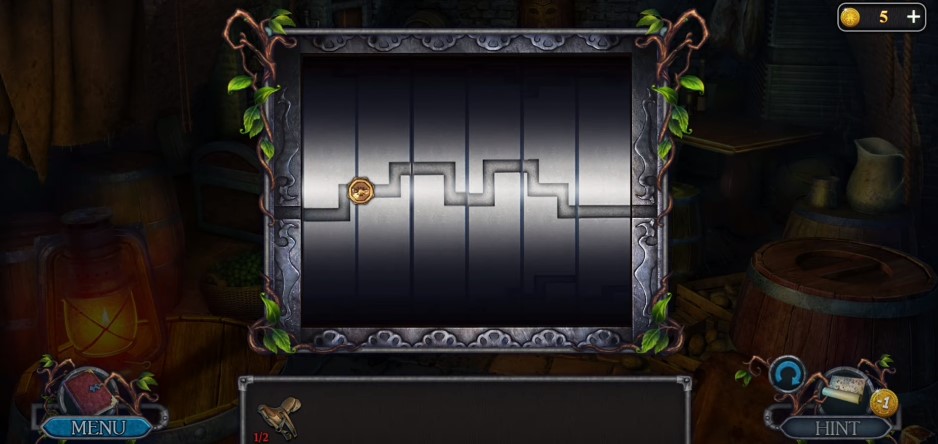
- Play HOP.
- HOP mini-game solution: (E).
- Open the chest, read the note, and take 2/2 HORSE EQUIPMENT.
- Walk down.
- Use HORSE EQUIPMENT (F).
- Gathering Tools:
- Move the blanket; take MATCHES and CORKSCREW (G).
- Take STICK (H).
- Go right.
- Figurines and Stones:
- Take 1/2 ANVIL FIGURINE (I).
- Take 1/3 STONE OF DREAMS (J).
- Walk down, left.
- Go (K-L-M-N-O).
- Take 2/3 STONE OF DREAMS (P).
- Use STICK; open the pouch; take 2/2 ANVIL FIGURINE (Q).
- Go forward.
- Crafting and Unlocking:
- Use ANVIL FIGURINE; take PLIERS and HAMMER HEAD (A).
- Select; take the BOX; use PLIERS; earn FANG (B).
- Walk down twice.
- Runic Stones and Crafting Continued:
- Use FANG; earn VINE (C).
- Use PLIERS; earn 1/4 RUNIC STONE (D).
- Use PLIERS; earn 2/4 RUNIC STONE (E).
- Go left.
- Use VINE (F); earn 3/4 RUNIC STONE.
- Walk down, right.
- Completing the Runic Stones:
- Use STICK; earn 4/4 RUNIC STONE (G).
- Place RUNIC STONE; select (H).
- Solution: I-J-K.
- Go (L).
- Revelations and Recipes:
- Talk; earn PROTECTIVE TORCH RECIPE (M).
- Take OVEN FORK and POKER (N).
- Use OVEN FORK; earn FIGURINE OF A LIZARD (O).
- Take LITTLE HORSESHOE (P).
- LITTLE HORSESHOE on BOX; select the box.
- Solution: 1-9 (Q).
- Read the note; take UNLIT SUN STONE and CHISEL (R).
- Go forward.
- Gathering Supplies:
- Take an APPLE (A).
- Take HAMMER HANDLE (B).
- HAMMER HANDLE on HAMMER HEAD; earn HAMMER.
- Take FIGURINE OF AN ARCTIC FOX (C).
- Walk down.
- Creative Crafting:
- Use APPLE and POKER; earn FIGURINE OF A DEER (D).
- Walk down.
- Use CHISEL and HAMMER; select the lever (E).
- Go left.
- Stone of Dreams and Ropeladder:
- Select; take 3/3 STONE OF DREAMS (F).
- Play HOP; earn ROPE LADDER (G).
- Use OVEN FORK; earn FIGURINE OF A SNAKE (H).
- Walk down, right, and forward.
- Preparing for the Final Steps:
- Place ROPE LADDER and select doors (I); play HOP.
- HOP mini-game 1 solution: (J).
- HOP mini-game 2 solution: select 1-5 (K).
- Take TORCH (L).
- Select (M).
- Place ROPE LADDER and select doors (I); play HOP.
- Completing the Runes and Gathering a Knife:
- Place STONE OF DREAMS; solution N-S-O-S-R-Sx2-Q-S-P.
- Take KNIFE (T).
- Walk down.
- Final Figurine Arrangement:
- Use KNIFE; earn FIGURINE OF AN OWL (A).
- Place FIGURINE OF A LIZARD, FIGURINE OF AN ARCTIC FOX, FIGURINE OF A DEER, FIGURINE OF A SNAKE, and FIGURINE OF AN OWL (B).
- Solution: Cx2-D-Cx8.
- Take EMPTY JAR (E).
- Walk down 2x, go left.
- Torches and Juices:
- Use TORCH; earn TORCH WITH WEB (F).
- Walk down, right, left.
- Use KNIFE; earn CATTAIL (G).
- Walk down 2x, go left, forward.
- Bugs and Crafting the Torch:
- Use CATTAIL, MATCHES, and EMPTY JAR; earn BUG IN THE JAR (H).
- Walk down.
- Open the plant and use BUG IN THE JAR.
- Open the plant; use TORCH WITH WEB; earn TORCH IN THE JUICE (I).
- Walk down; go right 2x.
- Final Torch and Unlocking the Cupboard:
- Use TORCH IN THE JUICE; earn PREPARED TORCH (J).
- Go forward.
- Give PREPARED TORCH; earn KEY TO THE CUPBOARD (K).
- Use KEY TO THE CUPBOARD; read the book; take POTION RECIPE.
- Take DOOR HANDLE, BOARDS, and CALDRON (L).
- Walk down 2x.
- Use CALDRON; earn CALDRON WITH WATER (M).
- Go left.
- Remove old boards; place BOARDS (N).
- Go forward.
Pirate Ship Puzzle
- Gathering Steering Wheel Parts:
- Grab 1/3 STEERING WHEEL PART (O).
- Utilize the HAMMER to obtain 2/3 STEERING WHEEL PART (P).
- Proceed forward.
- Securing Essential Tools:
- Use the HAMMER to earn a HOOK (A).
- Collect the remaining 3/3 STEERING WHEEL PART (B).
- Place the STEERING WHEEL PART, triggering the appearance of a SCROLL (C).
- Use the KNIFE on the SCROLL, unrolling it to reveal the SWAMP MAP.
- Unlocking the Swamp Secrets:
- Acquire the PICKLOCK (D).
- Walk down.
- Implement the SWAMP MAP (E).
- Navigating Through the Swamp:
- Solve the revealed puzzle (F).
- Head left.
- Use the KNIFE to earn a ROPE (G).
- Combine the ROPE with the HOOK to create a GRAPPLE HOOK.
- Clearing the Path:
- Remove debris and collect PART OF THE MECHANISM (H).
- Continue clearing debris to find SUN FINIAL and HACKSAW HANDLE (I).
- Attach the SUN FINIAL to the UNLIT SUN STONE, obtaining the SUN STONE.
- Employ the PICKLOCK on the designated handle (J).
- Go forward.
- Collecting Precious Items:
- Move items around and acquire an EMERALD (K).
- Utilize the PICKLOCK again to open a crate, obtaining a SHOVEL and HACKSAW BLADE (L).
- Combine the HACKSAW BLADE with the HACKSAW HANDLE to create a HACKSAW.
- Select (M).
- Unlocking the Mechanism:
- Place the PART OF THE MECHANISM (A).
- Move (B-C)-(D-E)-(F-G).
- Open a crate and proceed (H-I).
- Continue the journey (J-K)-(L-M)-(N-O)-(P-Q)-(R-S).
- Utilize (T-S) and use MATCHES (S).
- Walk down three times.
- Crafting the Magic Flower Core:
- Use SUN STONE and KNIFE; collect THE CORE OF A MAGIC FLOWER (V).
- Walk down and head right.
- Employ SHOVEL and KNIFE to acquire GINGER ROOT (W).
- Go forward.
- Place GINGER ROOT (X); use (Y-X); take GROUND GINGER.
- Go down twice, left, and forward twice.
- Unlocking the Grate:
- Use HACKSAW (A).
- Open the grate and collect SAPPHIRE (B).
- Solve the provided solution K-G-D-C-F-E-I-J-G-F-E-I-J-G-D-H.
- Obtain the KEY (L).
- Unlocking Doors and Crafting:
- Use KEY (M).
- Play HOP (N).
- Solve HOP mini-games 1 (O), 2 (P), and 3 (Q).
- Earn the SPYGLASS.
- Walk down.
- Advancing with Keys and Items:
- Place EMERALD and SAPPHIRE; take SMUGGLER’S KEY (R).
- Go left and forward.
- Place the SPYGLASS; select three times (S).
- Move down and slightly right (T).
- Walk down.
- Select and use the GRAPPLE HOOK; earn BLACK LILY (U).
- Walk down three times.
- Unlocking the Smuggler’s Secrets:
- Use SMUGGLER’S KEY; collect STATUETTE and CORKED BOTTLE (A).
- Apply the CORKSCREW on the CORKED BOTTLE to obtain a BOTTLE OF RUM.
- Combine THE CORE OF A MAGIC FLOWER, GROUND GINGER, BOTTLE OF RUM, and BLACK LILY on the POTION RECIPE; earn POTION INGREDIENTS.
- Go right.
- Use the DOOR HANDLE; open doors. Move (B-C); use MATCHES.
- Place CALDRON WITH WATER and POTION INGREDIENTS (D).
- Use (E-D); earn MUG WITH THE POTION.
- Go forward.
- Completing the Potion and Rune Sequence:
- Give MUG WITH THE POTION; earn RUNES (F).
- Walk down three times.
- Move foliage and place RUNES; select (G).
- Move (H-I)-(J-K)-(L-M)-(N-O)-(P-Q)-(R-S).
- Go forward.
- Gathering Brushes and Crafting Tools:
- Collect 1/3 BRUSH (A).
- Use GRAPPLE HOOK (B).
- Play HOP (C).
- Solve HOP mini-game (D).
- Earn CROWBAR.
- Opening Cages and Gaining Access:
- Use CROWBAR and HAMMER; earn GEAR (E).
- Open the cage, move items, and collect 2/3 BRUSH (F).
- Place the GEAR; select the lever (G).
- Go forward.
- Obtaining Essential Items:
- Collect a BOTTLE (H).
- Use KNIFE; earn CLOTH (I).
- Use CROWBAR (J).
- Go right.
Groom’s Hut Puzzle
- Doll and Figurine Crafting:
- Use HAMMER; take 1/3 DOLL and DISH (K).
- Use DISH; earn BOWL OF DIRTY WATER (L).
- Take PITCHFORK and 3/3 BRUSH (M).
- Walk down.
- Use PITCHFORK; earn 2/3 DOLL (N).
- Place BRUSH; solution (O).
- Take FIGURINE (P).
- Use KNIFE and FIGURINE: take FUNNEL (Q).
- FUNNEL, CLOTH, and BOWL OF DIRTY WATER on BOTTLE; earn WATER BOTTLE.
- Walk down.
- Give WATER BOTTLE; earn 3/3 DOLL (A).
- Go forward, right.
- Place DOLL; solution; take KEY (B).
- Use KEY (C).
- Unlocking the Case:
- Use CROWBAR; select the case (D).
- Use KNIFE; open the case; select (E).
- Select pairs; earn LOCKPICK (F).
- Walk down 2x.
- Give LOCKPICK (G).
- Go forward.
- Play HOP (H).
- HOP mini-game 1 solution: (I).
- HOP mini-game 2 solution: 1-7 (J).
- Move the silver pieces as shown; drag (K-L).
- Go forward 3x.
- Obtaining the Scythe:
- Take SCYTHE (M).
- Take FLOWER OF PURITY; use HAMMER and KNIFE (N).
- Place FLOWER OF PURITY; select (O).
- Solution: (P).
- Go forward.
- Tower Key and Fishing:
- Move flowers; take 1/7 TOWER KEY (A).
- Take EMPTY BUCKET (B).
- Use KNIFE; take FISH (C).
- Walk down.
- Use EMPTY BUCKET; earn BUCKET OF WATER (D).
- Go forward.
- Use BUCKET OF WATER; take FISH-SHAPED KEY (E).
- Use FISH-SHAPED KEY; take FISHING ROD (F).
- Walk down.
- Use FISHING ROD; earn 2/7 TOWER KEY (G).
- Go forward 2x.
- Use HAMMER; earn 3/7 TOWER KEY; take GEAR (H).
- Completing the Tower Key:
- Give FISH; take STICK and 4/7 TOWER KEY (I).
- KNIFE on STICK; earn WOODEN DOWEL.
- Use KNIFE; take 5/7 TOWER KEY (J).
- Use SCYTHE; earn WHEEL (K).
- Walk down 2x.
- Use WHEEL, WOODEN DOWEL, and HAMMER (L).
- Select (M).
- Use KNIFE; open the window; take 6/7 TOWER KEY (N).
- Go right.
- Paper and Coal Crafting:
- Take PAPER (O).
- Take COAL (P).
- Walk down, forward.
- Use PAPER (Q) and COAL (R); earn HINT.
- Walk down.
- Use HINT (S).
- Solution: Bx5-Cx5-Ex5-Gx5-Dx4-Fx5-Bx5-Ax5-Dx2.
- Final Tower Key and Library Exploration:
- Take FIRE RESISTANT GLOVE and 7/7 TOWER KEY (H).
- Go forward 2x.
- Use TOWER KEY (I).
- Go forward.
- Remove items; take SHOVEL (J).
- Use GEAR and HAMMER; select the wheel; earn CELL KEY (K).
- Use CELL KEY and open the door; use KNIFE; take CHIP (L).
- Select (M).
- Place CHIP (N); move the chip along the path to (O).
- Play HOP (P).
- Open; take COMBUSTIBLE MIXTURE (Q).
- Use COMBUSTIBLE MIXTURE and MATCHES (R); earn LIBRARY KEY.
- Walk down.
- Blacksmith’s Key and Library Exploration Continued:
- Use SHOVEL; take 1/2 BLACKSMITH’S KEY (A).
- Walk down.
- Use LIBRARY KEY (B).
- Go left.
- Take BOOK (C).
- Open the book; take RULER and 1/4 BARRIER KEY (D).
- Use RULER; take 2/4 BARRIER KEY (E).
- Completing the Barrier Key:
- Place BOOK; solution (F).
- Take 3/4 BARRIER KEY and WOODEN DETAIL (G).
- Select (H).
- Place WOODEN DETAIL; set blocks as shown; drag (I-J).
- Take 4/4 BARRIER KEY (K).
- Use BARRIER KEY (L).
- Select (M).
- Use (N-O); take KEY SKETCH and PLIERS.
- Walk down 2x.
- Blacksmith’s Key Crafting:
- Use PLIERS; earn 2/2 BLACKSMITH’S KEY (A).
- Go right.
- Use BLACKSMITH’S KEY (B).
- Play HOP (C).
- HOP mini-game solution: (D).
- You earn BELLOWS.
- Select (E).
- Library Sketch and Combining Items:
- Place KEY SKETCH; solution (F).
- Place STATUETTE (G).
- Use COMBUSTIBLE MIXTURE and MATCHES (H).
- Place and select BELLOWS (I).
- Select (J).
- Use FIRE RESISTANT GLOVE; earn BAILER WITH METAL (K).
- Use BAILER WITH METAL and HAMMER; take KEY (L).
- Walk down 4x; go left.
- Select (M).
- Place KEY (N).
- Solution (O-P-Q); take SARCOPHAGUS KEY.
- Walk down; go right 2x. Go forward.
Waterfall Puzzle
- Tridents and Token Movement:
- Talk (R).
- Use KNIFE; earn 1/3 TRIDENTS (S).
- Move foliage; take 2/3 TRIDENTS and BOARD (T).
- Place BOARD (U).
- Take NET (V).
- Use NET; earn 3/3 TRIDENTS (W).
- Place TRIDENTS (X).
- Move the token on the indicated path (A).
- Go left.
- Mining and Ruby Collection:
- Take SPLINTER (G).
- Use SPLINTER; open bag; take KEY and HANDLE (H).
- Use HANDLE; earn 1/2 PICKAXE (I).
- Use KEY; take 2/2 PICKAXE and STRAINER (J).
- Use STRAINER; move 3 rubies; take MEDALLION (K).
- Walk down.
- Use PICKAXE (L); select M-N-O-P.
- Select Q-R-S-T.
- Take SPIKE (A).
- Go right.
- Talk; earn BAG KEY (B).
- Take BAILER (C).
- Take STICK (D).
- STICK on SPIKE; earn SPEAR.
- Use SPEAR; take SICKLE and HAY (E).
- Walk down.
- Miller’s Bag and Crafting Ointment:
- Use SPEAR; take MILLER’S BAG (F).
- BAG KEY on MILLER’S BAG; select; take OINTMENT RECIPE and ROPE.
- Use SICKLE (G); play HOP; earn FLOWER.
- Walk down; go left.
- Use SICKLE; earn RESIN (H).
- Use ROPE (I).
- Play HOP; earn FROST ROWAN (J).
- Take SNAIL (K).
- FLOWER, FROSTY ROWAN, and SNAIL on OINTMENT RECIPE; earn INGREDIENTS FOR OINTMENT.
- Walk down.
- Place BAILER and RESIN; earn 1/3 SIGN (L).
- Place INGREDIENTS FOR OINTMENT; earn MEDICINAL OINTMENT (L).
- Go forward, right.
- Use MEDICINAL OINTMENT; earn KEY (M).
- Library Key and Detonating the Barrier:
- Use KEY (N).
- Play HOP (O).
- HOP mini-game solution: (P).
- Move (Q-R).
- Take DETAIL (S).
- Walk down.
- Place DETAIL (T).
- Go forward (U).
- Take KEY OF THE ARCHWITCH (V).
- Use SPEAR; move items; take ROD.
- Place and select MEDALLION (W).
- Solution: B-F-D-A-C-E-B-F-D-A-C-F.
- Take MAGNETIC ORE and 2/3 SIGN (G).
- Go right.
- Broom and Carriage Key:
- Take BROOM (H).
- Turn handle; open door (I).
- Use KEY OF THE ARCHWITCH; take SCISSORS (J).
- Use SCISSORS; take PIECE OF CLOTH (K).
- Select; take ROPE (L).
- Open MAGNETIC ORE; add ROPE; take MAGNET ON A ROPE.
- Use MAGNET ON A ROPE; earn CARRIAGE KEY (M).
- Use PIECE OF CLOTH; earn OILED FABRIC (N).
- Place HAY (O).
- Use CARRIAGE KEY (P).
- Play HOP (Q).
- HOP mini-game solution: (R).
- Earn WITCH ROBE.
- Use WITCH ROBE (S).
- Walk down.
- Preparing the Sword and Activating Golem:
- Use OILED FABRIC; select; take SWORD OF THE GOLEM (A).
- Use SCISSORS; earn 1/2 CRYSTAL (B).
- Go left.
- Take FLASK WITH ALCOHOL (C).
- Use FLASK WITH ALCOHOL; take 3/3 SIGN (D).
- Place SIGN; use ROD (E).
- Take 2/2 CRYSTAL (F).
- CRYSTAL on SWORD OF THE GOLEM; earn ACTIVATED SWORD OF THE GOLEM.
- Walk down.
- Golem Sword and Final Steps:
- Use ACTIVATED SWORD OF THE GOLEM (G).
- Solution: (H).
- Go left.
- Select (I).
- Use BROOM; take STAMP (J).
- Walk down 2x; go right.
- Use STAMP; take BOOK (K).
- Walk down, left, forward.
- Select (L).
- Place BOOK (M).
- Solution: (N).
- Use ACTIVATED SWORD OF THE GOLEM (G).
Congratulations! You have completed Legendary Tales 1.
When you put solutions for puzzles like for the ball puzzle – “Solution Bx5-Cx5-Ex5-Gx5-Dx4-Fx5-Bx5-Ax5-Dx2.”, what do these letters respond to please. I know the numbers mean how many times each get turned but no idea about the letters.