The Coffin of Andy and Leyley Creating Fan Translations guide will explain how to edit language files to change text, font faces, images, add lines of dialogue and more, as well as tool options. Check out our guide for information on how to use the new translation tool to create fan translations!
This is the guide Nemlei Dev and 1 collaborators it was created by. You can find the author’s link at the end of the guide.
The Coffin of Andy and Leyley Creating Fan Translations
If you are looking for information about how to use the new translation tool to create fan translations, our Coffin of Andy and Leyley Creating Fan Translations guide will help you!
Locating the Translation Tool
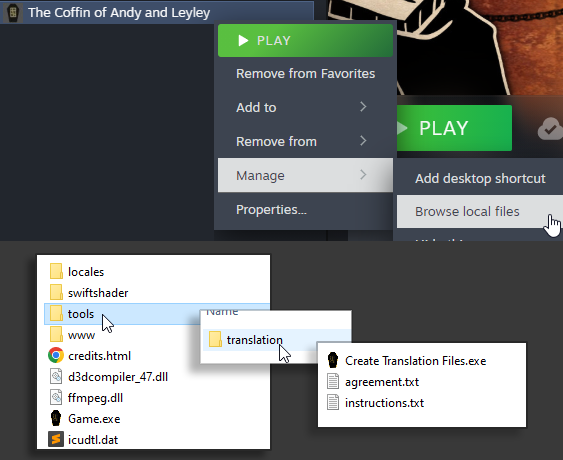
A quick way of finding the tool is by going to the game folder through the Steam Library.
- Right-click the game and from the menu: Manage > Browse local files
- Then navigate the folders: tools > translation
Inside is the Create Translation Files.exe, which is what you’ll need to generate a translation folder. Also included is the user agreement, and a simple text version of the instructions.
NOTE: By using the tool, you are accepting the terms of the agreement.

Using the Program
What it Does
The “Create Translation Files.exe” will create a new folder with all the translation materials. It creates either a CSV or TXT file with all the game dialogue, actor names, menu labels, etc.
Optionally, it can also extract some images from the game that contain text, if translation of these images is desired.
How to Use

Simply fill in your choices and press “Create Folder”.
The program is very basic and offers 3 options.
- Language Name
- Desired Format
- Include Images
Language Name
The language name will be the folder it creates. It will be in the same folder as the tool.
Desired Format
The desired format is a choice between CSV or TXT. There are pros and cons to each. Read more below.
Include Images
The checkbox option is to include and modify the game images that contain text.
Create Folder
Once everything is chosen, click this button to create the folder. It is made in the same folder as the tool. After creating the folder, the program will close.
Caution: File Layout Requirements
This tool is primarily a developer tool, and does not have many safeguards or error checking. Care must be taken to follow the format laid out as it appears. Misplaced fields or symbols can cause errors or other bad effects in game.
There are ID numbers that appear like #x86GCl9v. These are important to preserve, as they are how the game will find the labels and lines being translated.
The dialogue also does not appear in a very meaningful order. This is a side effect of how the maps and content were laid out in game. It can be highly fragmented at times and difficult to follow.
Lastly, there are a handful of points when text is duplicated. This is also another side effect of the game’s internal layout, and these duplicates must be translated as well.
(Example of duplicate lines with different IDs and display locations.)
#rql709H4 (Narrator)
: The guy will be back for the other cart soon.

#T6WtDWfD (Narrator)
: The guy will be back for the other cart soon.
Text Styling
Example
There are special formatting tags that are used within the dialogue lines that should be preserved when and where its possible. Stylized text will appear as follows.
"fi Sigh..... frc[1]"

This example has three formatting commands.
- fi – Format italics.
- fr – Format reset.
- c[1] – Color #1.
The line first sets italics, then resets formatting to end that italics. However, reset will remove the text color too. The character’s color has to be restored when more text follows.
Commands
- fi – Italics text.
- fb – Bold text.
- fr – Reset formatting.
- { – Font size increase.
- } – Font size decrease.
- c[#] – Font color number #.
Font Colors
- c[1] – Andrew / Andy
- c[2] – Ashley / Leyley
- c[3] – Dad
- c[4] – TV
- c[5] – ??? / Lord Unknown
- c[6] – Mom / Lady / Cultist / Julia
- c[7] – Leader
Adding Additional Dialogue Lines
There can be at most 2 lines of dialogue that get displayed at once within the in-game text box. This can present a display limitation for some languages. To work around this issue, the language files can be modified to insert new lines that will follow after existing dialogue.
The game will handle the extra lines by displaying two lines per text box. If there are more than two, it will continue to open additional boxes afterwards, displaying all inserted lines in pairs of two until they have all been presented.
Each file format has its own method for doing this, and are explained in the CSV and TXT sections below.
Translating in CSV Format
About CSV Files
When using CSV (Comma Separated Value), the language file created for the translation folder will be named: dialogue.csv
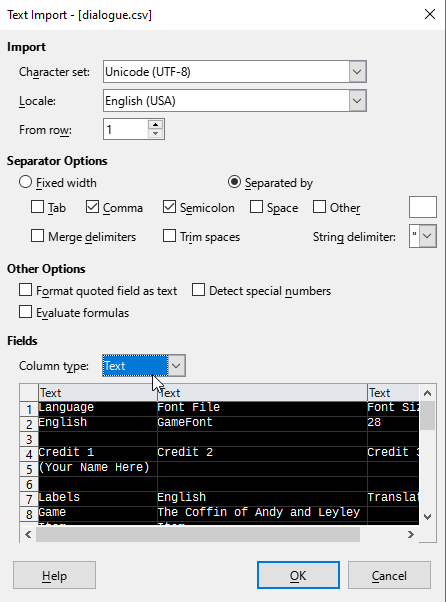
CSV files are best modified with some type of spreadsheet software.
An advantage of this format is that it also keeps a copy of the original text side by side for reference.
Some disadvantages are that spreadsheet software can take time to become comfortable with, and you might also have to make sure that all data is imported and exported correctly. The text should be provided in UTF-8 encoding, and some software require additional configuration to do this.
Translating Info and Config Sections
The first few rows deal with information about the translation itself, and some configuration options.
First Row Set
- Language: Name of the language as it should appear in game.
- Font File: The font face to use. See the Custom Font Section for more info.
- Font Size: Default size of the chosen font.
Second Row Set
This row contains three cells for author credits.
 (First and second row set.)
Translating Labels Sections
The next few sections deal with UI labels, actors, item names, and descriptions.
For CSV there is a “Translation” column for each. This is where the translated text will go. If
it is left empty, the game will fallback to what appears in the “English” column.

NOTE: Not all item descriptions are used, and the empty entries will work fine as they are.
Translating Dialogue Sections
Game dialogue is contained in CommonEvents and Map sections. Just like before, enter translations into the Translation columns.

Adding Dialogue Lines
To insert new lines into an existing set of lines, just create new rows below the desired set of lines. Then make sure to copy the ID number associated with those lines.
 (An example of inserting two new lines into a CSV translation file.)
Software Notes
Microsoft’s Excel
Later versions of Excel probably work fine, but haven’t been confirmed. Older versions of Excel, such as 2016 have issues exporting CSV as UTF-8 encoding, even when the option is applied.
Libre Office’s Calc
When using Calc, during CSV import, be sure to select all cells and set them to Text format. You might get unexpected results with their default cell format.

Google Sheets
Another alternative is Google. Their spreadsheet tool so far has not had any issues with its encoding format.
Translating in TXT Format
About TXT Files
When using the text file format, the language file created for the translation folder will be named: dialogue.txt
The advantages of a a text file is its simplicity. It can be opened easily with any text editor of choice. The format is straight forward, and the encoding often never has to be set manually.
A disadvantage to this format is that once original text is replaced, it is gone. In order to reference the original content later, a copy will need to be kept and used for comparison.
Info / Config Section
The first three sections are information about the translation, and configuration options.
[LANGUAGE]
English

[FONT]
File : GameFont
Size : 28

[CREDITS]
1 : (Your Name Here)
2 :
3 :

With text files, the relevant content is written in English, or has a blank space.  To translate, replace that text, or fill in the empty spaces that appear after colons (:).  Sections are indicated with headers that use braces, IE:  [SECTION].

[LANGUAGE]
Replace "English" with the language name as it would be written natively.

[FONT]
Contains settings for the font face and size.  For choosing custom fonts, see the Custom Font Section.  The size is the default size for the chosen font.  Replace the values that appear to the right of the colon (:).

[CREDITS]
Provides three lines for author credits.  Keep the lines as short as possible, the in game menu isn't very wide.

(An example of how this might be filled out.)
[LANGUAGE]
Español

[FONT]
File : MyFont.ttf
Size : 22

[CREDITS]
1 : Author
2 : Editor 1 / Editor 2
3 : Proof Reader
Label Sections
The next sections are used to translate labels for the UI, actor names, and item names.  Here the format is mainly the content type or content ID, followed by the content text written in English.  Replace everything that appears after the colons (:), while leaving one space before the content text.

(Samples of these sections.  Replace text right side of the colon.)
[LABELS]
Game : The Coffin of Andy and Leyley
Item : Item
File : File

[MENUS]
New Game    : New Game
Continue    : Continue
Items       : Items

[SPEAKERS]
#t1mR4QYN : TV
#S78FX5bH : Dad
#zrjGb3vm : Guy

[ITEMS]
#Q64WLbpK : Axe
#5YBRrwwM : Gun
#tfJBRzjg : Key
Descriptions Section
This section handles item descriptions.  It has a format layout similar to the dialogue sections that will follow it.  The same applies as the above labels, however the colon (:) will appear on a line under the ID and item name.  Some descriptions were not used, and appear blank, these will not cause an issue being left empty.

(Some item descriptions.  Last example shows a blank entry.)
[DESCRIPTIONS]

#Q64WLbpK (Axe)
: CHOPPY CHOP CHOP CHOP!!!!!!!

#5YBRrwwM (Gun)
: PEW PEW PEW!!! Or maybe it's BANG BANG!!

#tfJBRzjg (Key)
:
Dialogue Sections
Game dialogue is contained in CommonEvents and Map sections, and the formatting rules are the same as the item descriptions above.  The main difference is that there will be multiple lines following the the ID and actor name.

(Sample of dialogue lines.  One is single line, another has two lines.)
[CommonEvents.json]

#hpjNPckX (TV)
: "Good news once again!"

#MT195j9V (TV)
: "Some of you maaaaay have heard from your loved ones, that
: there's been supply shortages in the quarantined households."
Adding Dialogue Lines
To insert new lines of dialogue, find the entry where extra dialogue lines are needed.  Insert new lines starting with a colon (:) and followed by a a space.  Fill in the additional text that is needed.  Make sure there are no gaps between the new lines.

(An example of inserting new lines into existing dialogue.)
#nYgs9txc (Ashley)
: "Nope! I've decided I'll hold onto
: them! We might need them later."
: NEW LINE ADDED
: ANOTHER ADDED
Image Text Translation

The tool provides the option to extract game images that include text that you might want to translate. These are provided as is, with no clean ups. The folder names also must be kept intact for the game to find these edited image replacements.
All image replacements are optional. You do not have to include every image. If there are any you want to exclude, simply delete them.
Custom Fonts
A “fonts” folder is also generated for the translation package. If you decide to include a custom font, it has to be put in this folder.
It’s also recommended that you include any font licensing information along with your package.
If you’re not using a custom font, it is also safe to delete the folder.
Built-in Fonts
You can also choose from the following built-in fonts. Just write in one of these names for your choice of font face. (The default font is GameFont.)
- Dotum
- SimHei
- Heiti TC
- sans-serif
- GameFont
- AppleGothic
Supported Types
The framework supports these font extensions.
- TTF
- SVG
- OTF
- EOT
- WOFF
- WOFF2
Installation
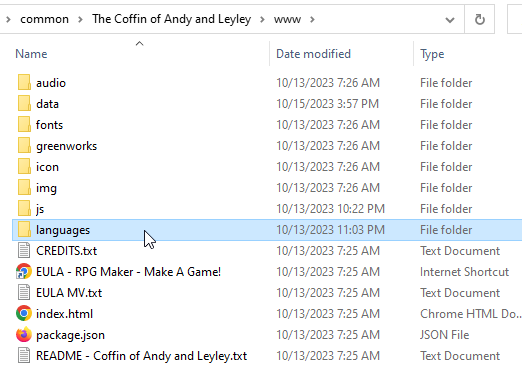
Once you are done with your translations, or if you would like to do some basic testing first, you can install the package by copying the folder to game’s language folder.
- Return to the Game folder.
- Locate the “www” folder.
- Inside is a “languages” folder.
- Copy and paste your folder there.
- Re-launch the game.

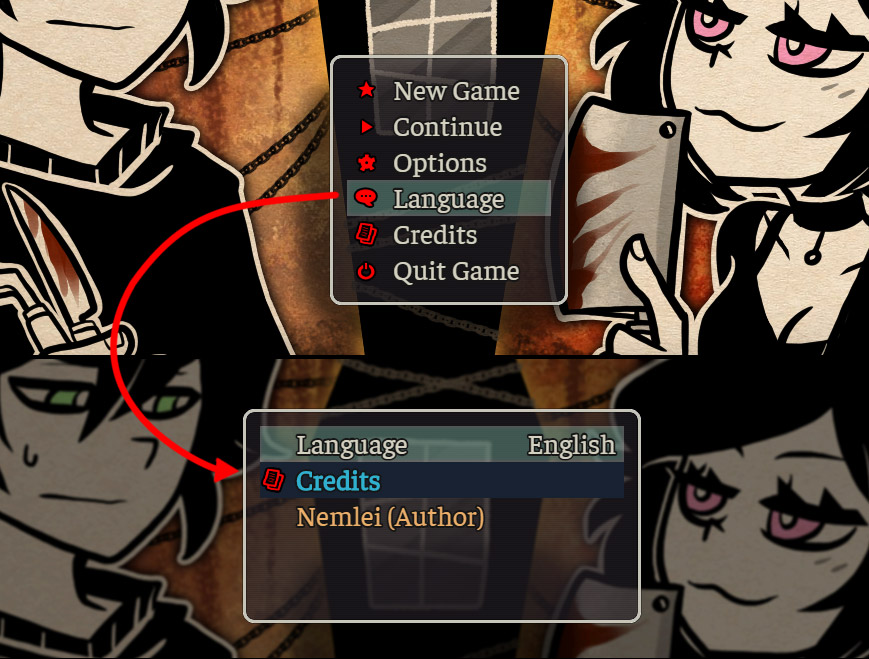
If there are no problems, and the it loads successfully, a new menu option should appear with the label “Languages”. Navigate there, the translation should be displayed in the list with the information it was provided.

Navigate to the translation and exit the menu, no need to press OK / Enter. All data, images, and fonts are applied when the language is chosen.
Distribution
After verifying everything is working, to distribute your translation, simply package the folder and all its contents. It’s recommended that a translated set of installation instructions be included as well.
Before using the tool, review the agreement text file that is found in the tool’s folder. Using the tool means you’ve accepted and understood the developer’s agreement. Also be sure to clarify the unofficial status wherever the files are hosted.
Troubleshooting
Unable to Locate Data
If the tool is ever relocated from its current folder, it will not be able to find the data it needs to generate translation packages.
The tool should prompt with an option to locate and assign the game data folder. This is located in the game’s subfolder “www/data”.