You can find detailed information on how to use Flowey’s Time Machine in Undertale in this guide.
How To Use Flowey’s Time Machine
To keep it short, Flowey’s Time Machine (FTM) is a program used to edit your UNDERTALE save file. It’s through this program that you can give yourself items, select certain spawnpoints, and much more. Overall, the program isn’t that hard to use once you get the hang of it.
Without further a do, let’s start.
Learning the Layout
Let’s focus on the top row, right where the logo is located:
On the left side, you should see “Built-in Presets” and on the right you should see “Your Presets.”

Built-in Presets (shown below) are what they say they are – presets that the creator already made for you. It’s defaulted to the start of the Ruins; just after you meet Toriel. Upon clicking on “Ruins Start,” you should see a drop down list of more presets.

These presets include:
| Preset Name | Description |
|---|---|
| Sans Battle | Places you in the Judgement Hall on a Genocide Route, just before Sans’ fight. You have Butterscotch Pie, Snowman Piece x3, Face Steak, and Legendary Hero x3. |
| Undyne the Undying | Places you just before Waterfall’s bridge on a Genocide Route, before you encounter Monster Kid. You have Snowman Piece x3, Astronaut Food, Abandoned Quiche, Sea Tea x2, and Butterscotch Pie. |
| Asgore (normal) | Places you in the barrier about to fight Asgore on a NEUTRAL route. You have Face Steak, Nice Cream x2, Butterscotch Pie, and Legendary Hero. |
| Asgore (true ending) | Places you in the barrier about to fight Asgore on a TRUE PACIFIST route, after befriending everyone and doing True Lab. You have the same items as the normal Asgore fight. |
| Omega Flowey | Places you in the Omega Flowey fight, trapped in Flowey’s World. |
| True Pacifist Ending | Puts you in the True Pacifist epilogue AFTER the fight with Asriel. |
Yeah, six presets is pretty generous! It should also be noted that “sys_info_962” and “sys_info_963” are here – these are just if you want to apply the Genocide consequences to your save file. If you erased your world, you would see “system_information_962.” If you sold your soul, you would also see a file called “system_information_963.”
Once you select your preset, hit “Load” to access the preset.
Now, let us focus on the right side of the screen – the “Your Presets” section:

Again, pretty self explanatory – once you adjust your settings to your liking and want to save it for later, just hit save and give your preset a name! New is for, well, new presets. Export is for sharing your preset with others. You should understand the other buttons.
Now, below the logo, we are met with this section:

This section allows you to change your name, FUN value, and the room you currently reside in (Location doesn’t matter; it’s automatically adjusted accordingly.) This is part of the “undertale.ini” file and will persist throughout MULTIPLE playthroughs. It’s also through here you can adjust Omega Flowey’s status (like where you are in the fight/if you’ve already defeated him) and if you dodged the credits at the end of the True Pacifist epilogue (which unlocks the secret door in Snowdin.) If you want to play through UNDERTALE with an edited save file, keep the filter untouched. If you want to see some inaccessible rooms, choose the filter option then “All rooms.”
Now, we have complicated looking bottom row, made to edit “file0”:
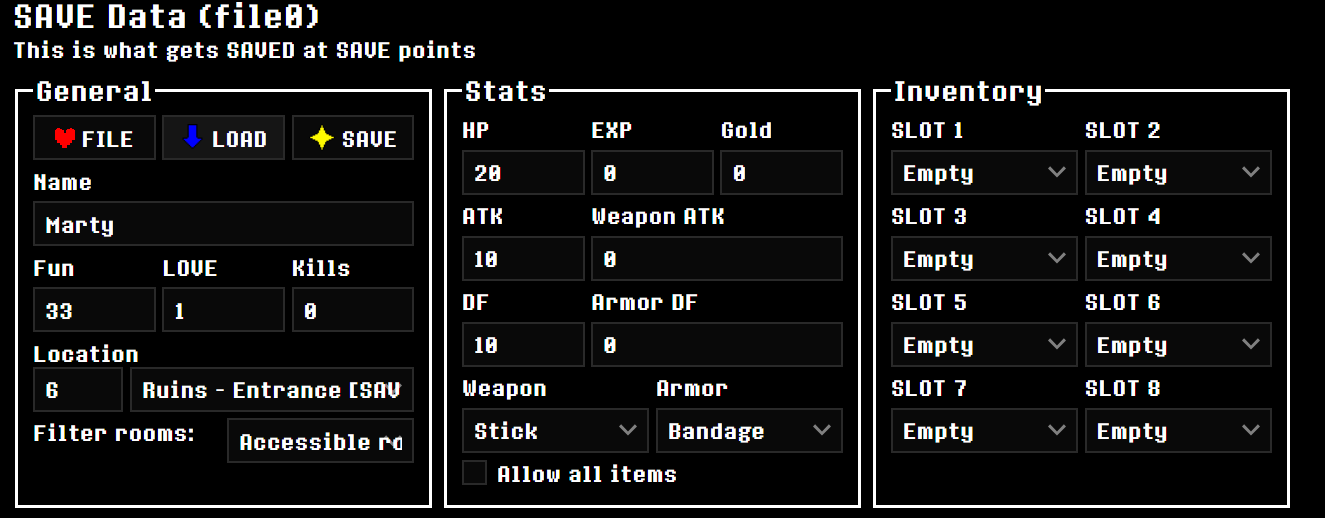
Yes, this is ALL for file0. file0 is a file that stores UNDERTALE save data (NOT PERSISTENT DATA) at select SAVE points. From here, you can change who was killed, what items you have, you level, your armor, and much more. In the section regarding your armor and weapon, you DO have a checkbox to allow every item that can be picked up to be selectable for your defense (ranges from Nothing to the Bad Dream, possibly more) however there is a high chance that a normally unselectable item in your armor/weapon will crash the game or not do anything.
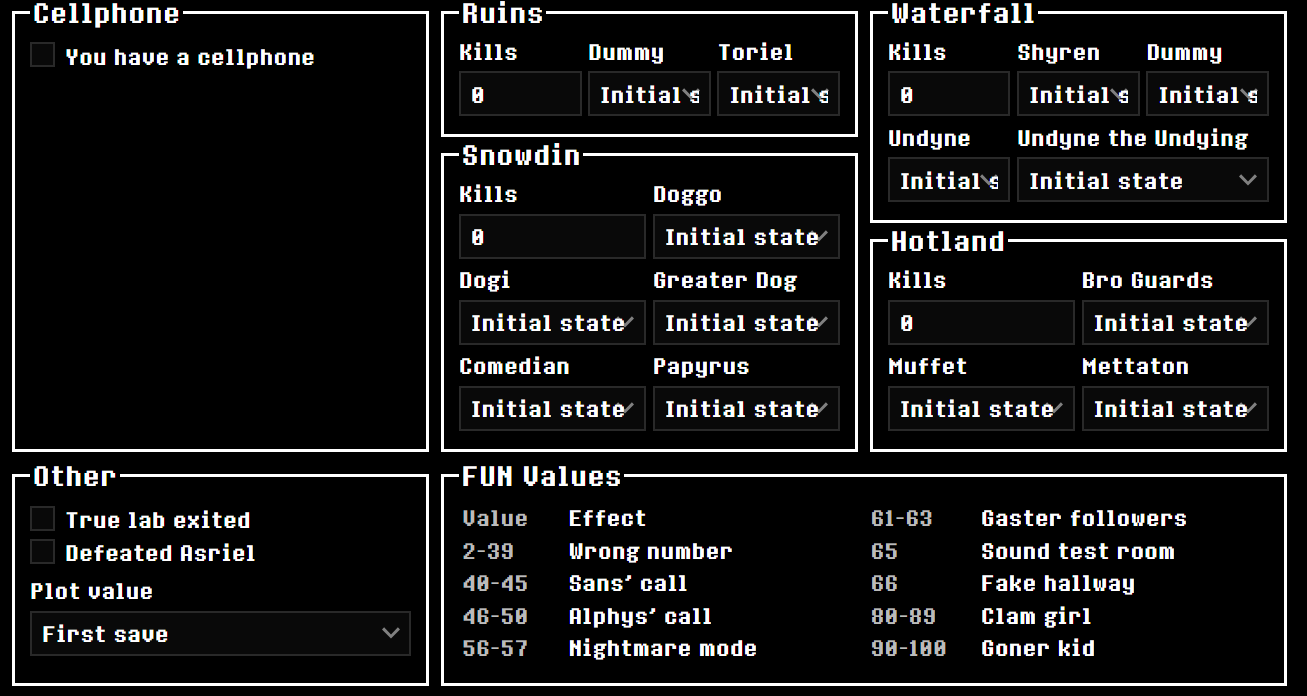
The cellphone section is pretty self-explanatory. If you check that you have a cellphone, it will open up an array of 8 slots, where you can give yourself the response prompts for Toriel, her phone number, or Papyrus’ phone number. Do note that, at the bottom of this 8-slotted array, there is a check box if you also want to have Undyne with Papyrus (enables Papyrus and Undyne, after you normally date her).
In “Other,” you can toggle if you had just exited True Lab and/or you defeated Asriel. The “Plot value” reveals a drop down menu with a lot of options. If you are not sure what this does, you can ignore it. If you want to know what it does, it basically is the checkpoint flags menu. Flags are a point in the game where certain events update and save according to your choices, and what you did or did not do. TL;DR: it just tells the game where you are in the story, which is common in story games, though do not that this is NOT considered an autosave. Still save at regular save points to save your data. If you set these flags too far forward or too far back, it’s possible your game can just return an error. For example, telling the game you just exited True Lab while having your plot value still at the beginning of Snowdin, it will likely confuse the game and cause it to crash.
The “FUN” values area is just a guide to what FUN values do what. It is recommended to keep the FUN value in file0 and undertale.ini the same.
There is also an “Advanced” section at the very bottom of the whole page, which goes over VERY specific flag points. DO NOT USE THIS IF YOU DO NOT KNOW WHAT YOU’RE DOING! I don’t have the best “EXP” with the Advanced section, but I’ll try to explain it as best as I can at the end of this guide.
Applying Your Changes to UNDERTALE
Once you are done calibrating your files to your needs, simply hit “SAVE” on both files (I don’t know if the effects take place with only ONE file downloaded. Do both to be safe).
In your download, you should see “file0” and “undertale.ini” in your browser’s download queue.
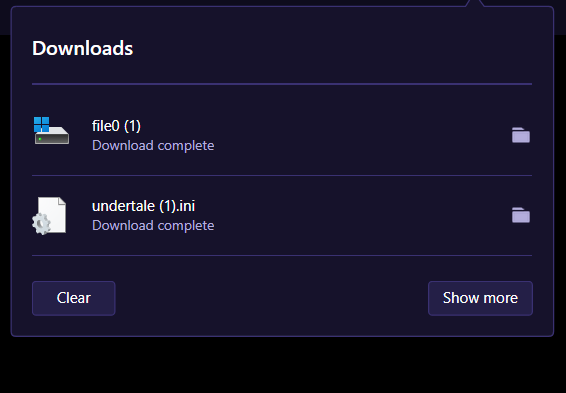
(There is a (1) on my files because I’ve done this process before.)
Now, this is where this can get finicky, as it depends what operating system your using. In my case, I’ll demonstrate Windows first. I’ll probably get some information wrong with Mac 🙁
Windows
- Navigate to your UNDERTALE save data. The file path for this is defaulted to
“C:\Users(your user)\AppData\Local\UNDERTALE” The red dot is where your username will show (though I’m on Windows 11 so it looks a little different, but the file path shouldn’t change).
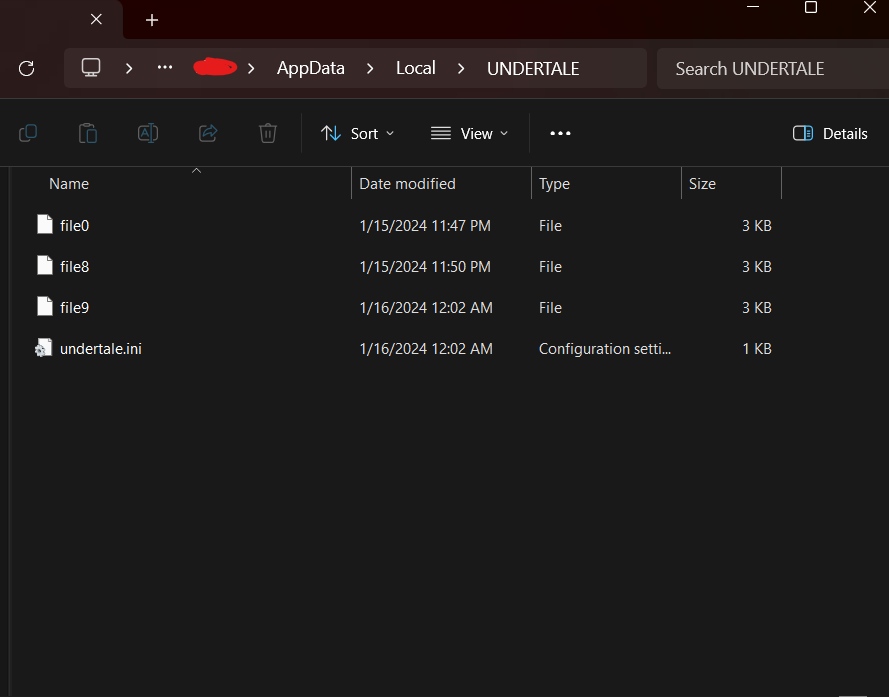
- If you would like a clean save, which I recommend, delete the files in the UNDERTALE save folder.
- Take your newly downloaded file0 and undertale.ini files and put them in the UNDERTALE save folder.
(IMPORTANT: MAKE SURE THERE IS NOT A (1) OR (2) OR ANYTHING LIKE THAT AT THE END OF THE NEW FILES! THIS WILL RENDER THEM USELESS! INSTEAD, MAKE SURE file0 IS LABELLED EXACTLY THAT AND undertale.ini IS LABELLED EXACTLY THAT!)
- If you did everything correctly, UNDERTALE should boot according to your save file!
Mac
Again, do note that I do not have visuals of this process for Mac, as I do not own a Mac/never used one before.
- Install your files like in Windows.
- Go to Finder, then Go to Folder, and paste this in: ~/Library/Application Support
- Open the UNDERTALE folder. (com.tobyfox.undertale)
- Replace all the files with your newly downloaded ones and launch UNDERTALE. You should be set!
ADVANCED: Modifying Individual Flags
THIS SECTION INVOLVES SOME COMPLICATED STUFF. EVEN I DO NOT KNOW HOW TO MODIFY THESE FLAGS FULLY. PLEASE PROCEED ONLY IF YOU KNOW WHAT YOU’RE DOING!
There is a (somewhat) hidden section at the bottom of the site. Clicking “Show,” you met with a bunch of words and numbers. Maybe something like this:
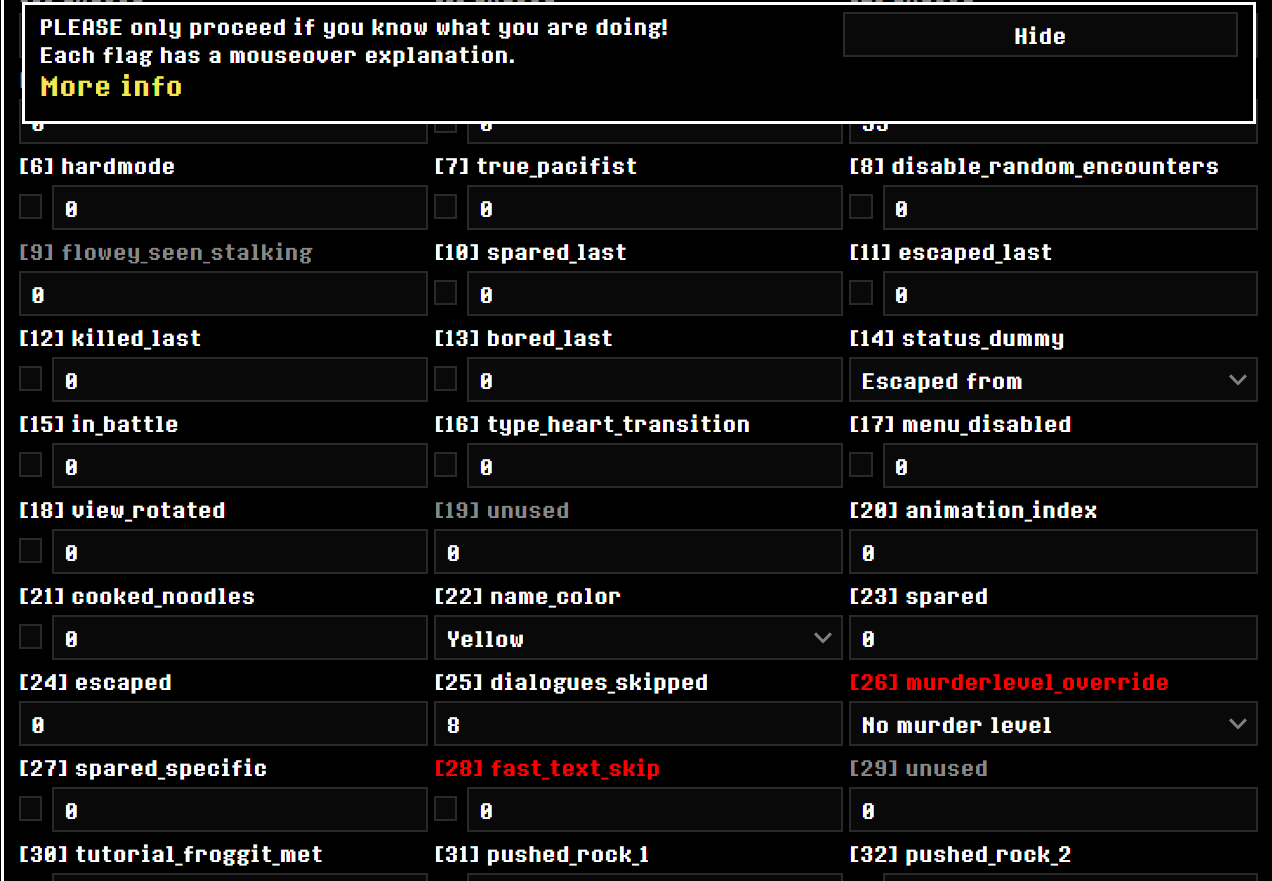
…yeah, a lot to take in. “More info” actually has an extremely good explanation of what flags do, and the main points are below.
The majority of Undertale’s save file is stored as a series of 512 “flags” containing extremely varied and specific information, from your preferred pie flavor to whether you remembered Heats Flamesman’s name.
Flags the game never normally accesses are grayed out, and flags the game never sets are highlighted in red. ( dont touch them >:( )
Many of the most important flags to various routes are more easily editable from the basic interface.
A few certain flags are actually special, as they are more interesting. These include:
| Flag(s) | Description |
|---|---|
| 26 | The Genocide Route can entirely be controlled using the basic menu, but if you don’t want to fill that out (nor use a preset to do it for you), flag 26 is a debugging flag that can jump you to any point in the route. Note, however: it will ignore further progress and lock you at whatever value the flag has. |
| 88, 389, 493, 7 | The Pacifist Route has several key points determined by flags. Flag 88 tracks your progress in Papyrus’s date; flag 389 tracks dating Undyne; and flag 493 tracks Undyne’s Letter, Alphys’s date, and the True Lab. Finally, flag 7 (accessible in the basic menu) activates the post-Asriel epilogue. |
| 300-324 | Flags 300-324 contain the contents of your Dimensional Boxes. If you want to hack in more than eight items, use these. |
| 130-156 | Flags 130-156 control a great many of the yellow credits for sparing enemies in the right way. If you want an all-yellow-credits run (or to analyze one), look here first. |
| 452-454, 481-484, 497 | The status of your keychain is contained in flags. Asgore’s keys are flags 452-454; True Lab keys are flags 481-484; and Sans’s room keys are flag 497. |
Most of the time, you may see some flags be indicated with a 0 or 1. In binary/computer language, this is usually a False/True statement. If a flag has a 1, then it is in use/active. If it has a 0, it is not currently active. Note that modifications to flags, if you do not know what they do, CAN BREAK YOUR SAVE FILE! Do be wary modifying the flags.
Like the description said, you can access most, if not all, of these through a friendlier interface. Only use these flags if you know what you’re doing/ want to experiment with the ones listed in the table.