Are you annoyed of endless night in your hangar? Just change it. Custom hangar installation tutorial included.
Find your game location
If you are using Steam like me, it should be something like:
“D:\SteamLibrary\steamapps\common\War Thunder”
or commonly “C:\Program Files (x86)\Steam\steamapps\common\War Thunder”
Where:
“C:” is your partition sign.
“\Steam\” or “\SteamLibrary\” is folder where your Steam is installed or its external library (like my)
“steamapps\common\War Thunder” is the next sequence of folders, in “common” you have all of your games installed on this partition
Download and install a decent looking custom hangar
- You can find them on:
https://live.warthunder.com/feed/locations/?q=#hangar - Start typing #hashtag here: Search “hangar” for full custom hangar skins.
If you don’t know how to install any custom hangar just follow these few steps:
- Download any custom hangar files from post on live.warthunder.com
- Extract its files anywhere
- Paste “content” and “hangarname.blk” into your game folder, commonly “C:\Program Files (x86)\Steam\steamapps\common\War Thunder”
- Give a permission to replace files if you will be asked
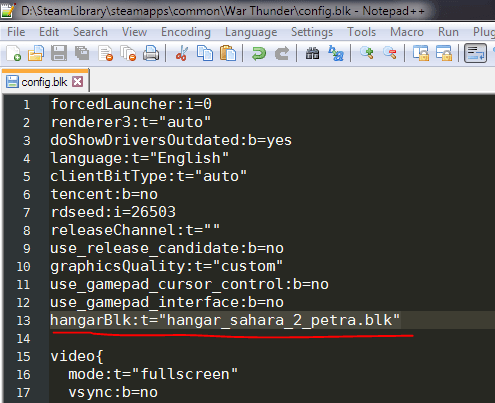
- Open your “config.blk” file in main War Thunder folder
- Add a new line somewhere in code with your custom hangar file name ended with “*.blk” , it should be something like: “hangarBlk:t=”hangar_custom.blk”, I preffer to add this before “video” class, so just at the end of first sequence of config, so in example, if you download Sahara 2 Petra hangar, it should be like: “hangarBlk:t=”hangar_sahara_2_petra.blk”
- Save “config.blk” file
It should look like this:
Change daytime and weather in custom hangar config file
In the main folder of War Thunder you have installed your custom hangar, its config file and you’ve added an line into config.blk that tells the game, which hangar you are actually using. We can finally change our daytime inside hangar.
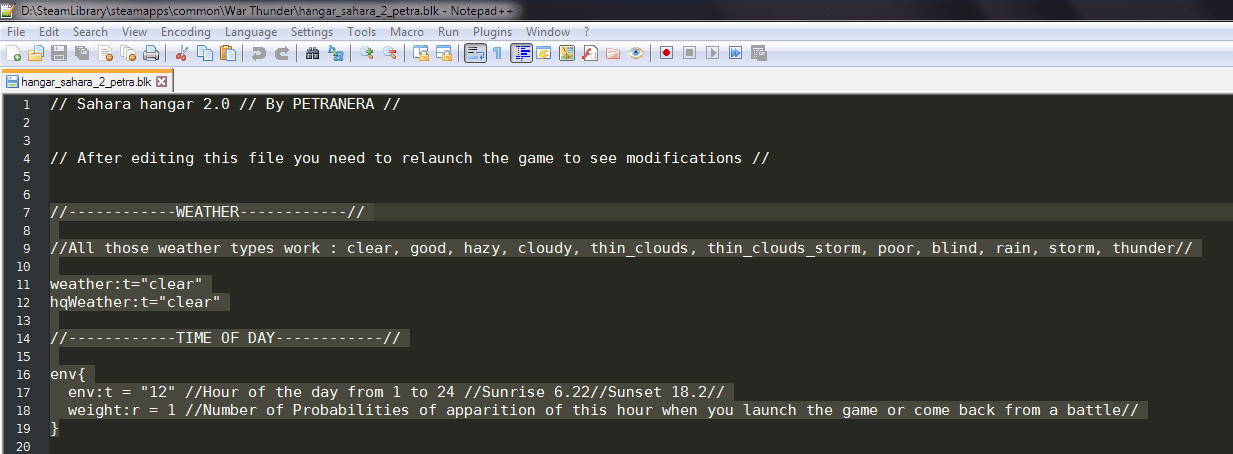
- Open your custom hangar config file, as I said in the previous section, it should be like “hangar_custom.blk”, for me it’s “hangar_sahara_2_petra.blk”
Not every config file is the same, so we are looking for few variables:
weather:t, hqweather:t, env:t and weight:r.
It should looks like:
Now, the weather:t=”” and hqWeather:t=”” variables are responsible for low and high quality weather inside your hangar, you can change them to:
- clear, good, hazy, cloudy, thin_clouds, thin_clouds_storm, poor, blind, rain, storm, thunder
I am always using clear one becouse usually in hangar you want to look on your vehicles or inspect new ones, so you don’t need any specific weather there. You don’t even need any custom weather, becouse how could you customize your vehicle in storm (if it’s not storm of sekrit Yak-3P ammo)?
If you’ve changed your weather now it’s time for our daytime. I preffer the static one – it means that only one propability in my hangar is to have an 12p.m. time. “env{}” is the class which is responsible for that, in my example it looks like:
env{
env:t = “12” //Hour of the day from 1 to 24 //Sunrise 6.22//Sunset 18.2//
weight:r = 1 //Number of Probabilities of apparition of this hour when you launch the game or come back from a battle//
}
So actually the “env:t” is the daytime, and “weight:r” is the number of probabilities to have this one. You can change them in any way you want. If you want any other propabilities for other daytime, just add another “env{}” class under the main one. But remember to change previous weight:r to something above 1, becouse you will still have static time. If you want to have both 12 p.m. and in example 8 a.m., just change weighr:r in your env:t=”12” to anything above 1 and create new env{} with weighr:r higher than 1.
env{
env:t = “12” //Hour of the day from 1 to 24 //Sunrise 6.22//Sunset 18.2//
weight:r = 3 //Number of Probabilities of apparition of this hour when you launch the game or come back from a battle//
}
env{
env:t = “8”
weight:r = 4
}
I hope this tutorial was usefull for you.