Scavenger Mechanics and Strategy Guide
This is a brief guide explaining essential scavenger mechanics and strategy.
This guide is aimed to help both new and old players understand the basics of how to play as a scavenger in the Blood Harvest release. It will explain core game mechanics and the basic strategies you should be following when playing as scavenger.
This guide only briefly touches on abilities and perks; I recommend reading Manta’s Deathgarden Manual if you want full explanations of what each ability/perk/bonus does. Please be aware that this guide was created before the official release of Death Garden: Blood Harvest, so there may be some minor discrepancies due to balance changes, as I cannot update the guide instantly.
Scavenger Objectives
Scavengers have 2 main objectives: gathering blood and escaping the garden. There are also optional objectives in the form of missions.
Gathering Blood:
- Your aim is to deliver as much blood as possible while in the garden.
- You collect blood by interacting with blood altars. You can carry 10 blood collected from blood altars at a time.
- You deliver the blood you have collected by interacting with blood banks.
- Any undelivered blood you are carrying when you escape via exit gates counts towards your final delivery total.
Escaping the Garden:
- In order to escape you must trigger the end game. Once the end game is triggered the exit gates begin to spawn – it currently takes about 10 seconds for them to spawn. Enter the exit gates once they are fully spawned to escape.
- After 8 minutes of play time the end game will automatically trigger.
- If there is only one scavenger left alive the end game will trigger.
- If 125 blood is delivered the end game will trigger.
Rewards and Upgrades:
- You are rewarded with currency and experience based upon how much blood you deliver, whether or not you escaped, and actions you performed while in the garden.
- The currencies are iron, blood cells, and ink cells.
- Iron is used to unlock new characters and to upgrade perks and abilities.
- Blood cells are used to unlock and upgrade perks.
- Ink cells are used to unlock and upgrade abilities. Ink cells are called “gold” or “honey” by some players.
- Experience automatically progresses the experience bar of the character you are playing as. When you completely fill the experience bar that character levels up.
- You must complete missions before you are able to unlock and upgrade perks and abilities. For example, you may be required to cling to a wall for x seconds before you have the option to upgrade a particular perk. Missions are optional, but it is important to complete them to advance through the progression system.
Core Mechanics
Health:
- Scavengers have 3 health bars. You lose health when you are shot. The amount of health lost depends upon the gun you are shot with and your proximity to the gun.
- You naturally recover health over time up to a maximum of 2 health bars. You must use a health crate to restore the 3rd health bar.
- If you lose all three health bars then you enter a downed state. A bleed out timer begins once you are downed, which will kill you once it runs out. The bleed out timer is shorter every time you are downed, until it reaches a minimum length of time.
- You can be revived from the down stated by interacting with a health crate, by having another scavenger interact with you, or by having a health bolt shot at you. You are revived with 2 bars of health.
- The hunter can execute you while you are in a downed state, which will instantly kill you.
If you run off the edge of the map you will instantly die. This death is permanent – you will not respawn as you used to in the old version of Death Garden.
Basic Abilities:
- Scavengers have the ability to crouch, jump and dodge roll.
- Crouching reduces your visibility, allowing you to hide in various areas of the map.
- If you jump onto a vertical surface you will cling to it for a few seconds before falling off.
- You can do 3 vertical jumps in a row, after that your character will fall.
- Dodge rolling makes you move faster and lowers you to the ground, but it doesn’t make you invulnerable to damage. You can use the dodge roll to avoid taking damage and travel across the map more quickly than running. Dodge rolling uses stamina, which naturally regenerates over time. You may do 5 consecutive dodge rolls with a full bar of stamina.
- Scavengers also have the ability to shoot bolts…
Bolts:
- Scavengers have access to normal and ability bolts.
- You can use the normal bolts to mark objects, revealing that object to other scavengers.
- You can carry a maximum of 20 normal bolts at a time.
- Ability bolts will have different effects depending on the ability. You can carry a maximum of 3 ability bolts (or “power cores”) at a time.
- You can use both types of bolts to destroy constructs. Ability bolts do more damage than normal bolts.
Each character has unique perks, which will give you unique advantages. This guide is not going to explain what each ability bolt and perk does; check out Manta’s Deathgarden Manual for more information on that.
Objects
Crates:
Yellow crates provide 10 normal bolts. Some players may refer to bolt crates as “bananas”.
Blue crates provide 3 power cores. Power cores give you shots of your ability bolt. Some players may refer to power core crates as “blueberries”.
Red crates will heal you. You can use red crates to heal yourself to full health when you are in your normal state. When you are in a downed state you can use red crates to revive you to a normal state, but you will be revived with only 2 health bars. Some players may refer to health crates as “cherries”.
Golden crates will spawn at random times. When activated by a scavenger, the golden crate provides all scavengers with unlimited normal and ability bolts for 30 seconds. When activated by the hunter, the golden crate provides the hunter with unlimited stamina and ammo for 30 seconds.
If a crate has a glowing red pattern covering it then it has been hacked by the hunter. If you interact with a hacked object you will be revealed to the hunter.

Bolt Ccrate

Power Core Crate

Health Crate
Golden Crate
Objective Points
The piles of corpses are blood altars. You interact with these to gather blood. You can only carry 10 blood at a time.
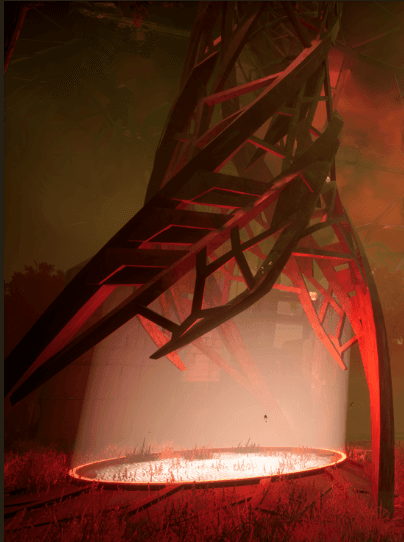
The tall black pillars are blood banks. You can interact with these to deliver blood. The Hunter will be notified when someone is delivering blood, but your character outline is not revealed.
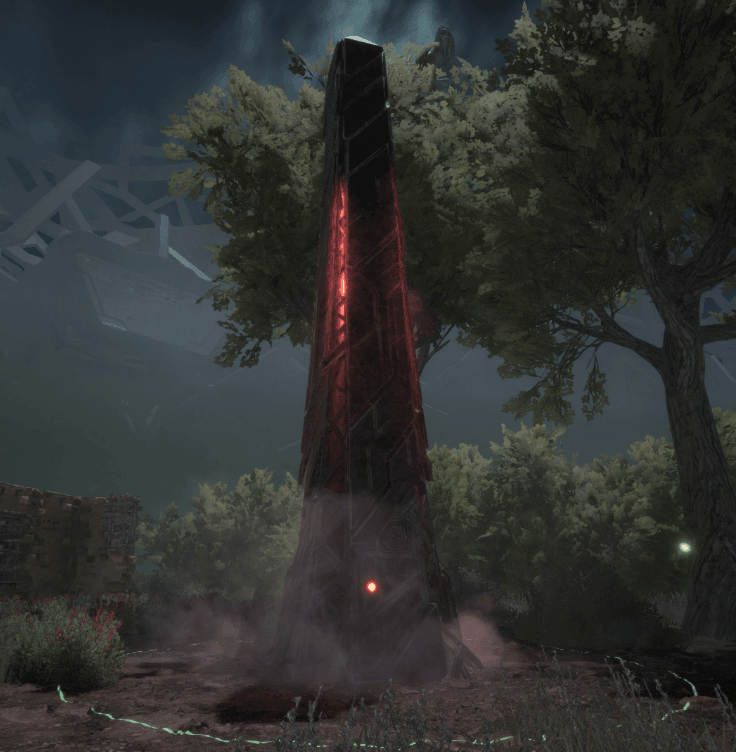
The tall, spiral columns are exit gates. You must enter an exit gate in order to escape the garden. Once the end of the game is triggered, the area from the exit gate spawn point outwards is gradually revealed until the entire map is revealed. If you are within the revealed area, you character is revealed (outlined in red) to the hunter. Once the entire map is revealed the exit gates will have fully spawned and you may escape.

Blood Altar
Blood Bank
Open Exit Gate
Constructs
- Constructs are objects which the hunter can use to create disadvantages for scavengers.
- All constructs can be destroyed or temporarily deactivated with bolts. Ability bolts do more damage to constructs than normal bolts.
- The big metal constructs dotted around the map are drones. At the start of the match these will be inactive; the hunter must activate them using power cores. When a drone is activated it will cover an area of the map in a red light which reveal any scavenger who enters that area to the hunter. Constructs are only temporarily deactivated when you shoot them down. You must shoot bolts consecutively to deactivate active drones, as activated drones heal damage over time.
- Some hunters have the ability to place turrets. Turrets will shoot at you if you are in their line of sight, even if you are hidden in a bush. Turrets are permanently destroyed when shot down.
- Some hunters have the ability to place mines. Mines will explode if you get too close to them, causing you to lose health and be briefly stunned. Mines are permanently destroyed when shot down.
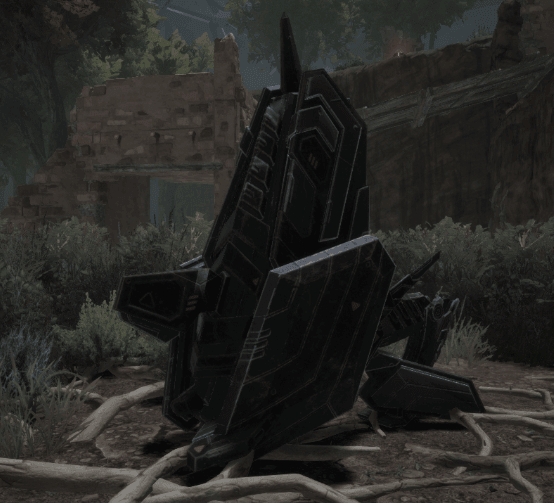
Inactive Drone

Active Drone
Notes:
- Credit to M4I3X for crate images.
- I intend to replace the crate and drone images soon.
- I intend to add turret, mine, and hacked crate images soon.
Basic Strategies
Staying Alive
As an inexperienced player you should stay hidden from the hunter. If you are coming from Dead By Daylight you may be used to engaging with killers without too much risk; this is not the same in Death Garden. You are unlikely to escape a chase unless the hunter messes up, so you should be prepared for most chases to result in you being downed. When you are downed there is a high chance the hunter will instantly execute you; the only reason a hunter wouldn’t instantly execute you is because they want to farm you. For this reason you should make it your top priority to avoid being found by the hunter until you understand the core gameplay better.
Hunters can hear you moving, so if the hunter is nearby you should aim to minimise your movement to avoid being found. Similarly hunters can hear/see you shooting bolts, so don’t shoot bolts when the hunter is nearby.
Crouching in a bush makes you essentially invisible to the hunter. Hunters can use their stun ability to check bushes, but often don’t due to the overwhelming number of bushes on the maps. This makes bushes one of the best places to hide.
If you stay still for too long then you will be revealed for the hunter. This means you cannot spend too long hiding in bush. A way to circumvent this issue is to hide in a grouping of bushes, so you can crouch walk around within the bushes. This movement should prevent you from being revealed.
Avoid areas of the map which have a lot of active drones. While it is possible to temporarily deactivate drones the hunter will be aware that a drone has been deactivated, thus alerting the hunter that someone is probably in that area. You can use this to your advantage by shooting down drones which are on the opposite side of the map, potentially tricking the hunter to investigate that area.
Similarly, if the hunter is spending a significant amount of time in one area of the map you should avoid that area of the map. It can be tempting to stay in that area of the map if you have gotten familiar with it since you don’t want to waste time travelling to and learning the layout of another part of the map. But you’ll also be wasting time having to hide from the hunter in that area, and there is little to gain from the additional risk.
The invisibility ability bolt will prevent you from being revealed by hacked crates and revealing light. This is allows you to pass by a revealed area without shooting down a drone, meaning you can traverse the map in a more stealthy manner. It also allows you to stay hidden during the end game when the entire map is gradually revealed.
It may be a bad idea to run straight towards the exit gate when the end of the game is triggered. This is because the area closest to the spawn gates is revealed first and it takes several seconds for the exit gates to spawn, meaning you will be revealed to the Hunter without any means of escape for several seconds if you immediately head towards the exit gates. It may be better to wait a few seconds, then dodge roll towards the exit gates once they are almost fully spawned.
Teamwork
The best time to deliver blood is when the hunter is occupied with another player. If you can see the hunter is boosting over to another player delivering blood or that another player is getting chased, then you should deliver blood. The hunter can only focus on one scavenger at a time, so they can’t chase you if they’re busy elsewhere.
Try to help other scavengers. The more scavengers that are alive the more potential distractions the hunter has, which will make it easier for you to deliver blood. If you can see someone is getting chased near you, consider using your ability bolt to help them.
Shoot down drones whenever possible, even if they are on the other side of the map. Shooting down drones helps other scavengers traverse the map more easily and is an easy source of XP.
It is possible to revive downed players using the heal bolt. The timing to achieve this before the hunter executes a downed scavenger is precise, but possible. Staying close to someone with the heal bolt can be a good idea as a new player.
It is difficult to escape when you are the only scavenger remaining, as the hunter will make a beeline towards you the moment you are revealed during the end game. Try to keep your team-mates alive for the entire match, if only so the Hunter may go for them instead of you during the end game.
Teamwork actions (such as reviving downed players) rewards you with a lot of XP compared to other actions (such shooting down constructs). If you want to level up quickly try to stay close to your team mates and help them whenever possible.