Umbrella Laboratory
1. Ada will give you the ID wristband, after which use it to gain access to the labs, and head straight to the security room, collect…
- Shotgun shells
- Map from the desk
2. Cross over the reception hallway, and head to the “Cafeteria” where you will collect the following items…
- Fuel Canister
- 9mm ammo
Head up the ladder and through the air duct, and drop into the “Kitchen” area…
leave the kitchen, turn right into the “nap room” …
2. In the “nap room” do the following tasks:
- Collect the “electronic chip” from the arm hanging out the central bunk, and combine it with your “ID wristband” to upgrade your security clearance.
- Search the lockers, and combine the “regulator” with your “chemical flamethrower”
- Collect the shotgun shells from the desk
Then return to reception area, head out onto the main shaft and activate the bridge using your upgraded “IDwristband” proceed to the “East Area” which is accesed by activation another terminal from the central lift…
3. Head through the corridoors, into the “lobby” past straight through into the “presentation room” and then into the “lobby corridoor” and pick up the “high grade gunpowder” and continue into the “greenhouse control room” here take the “Dispersal Cartridge” from the dispenser machine…
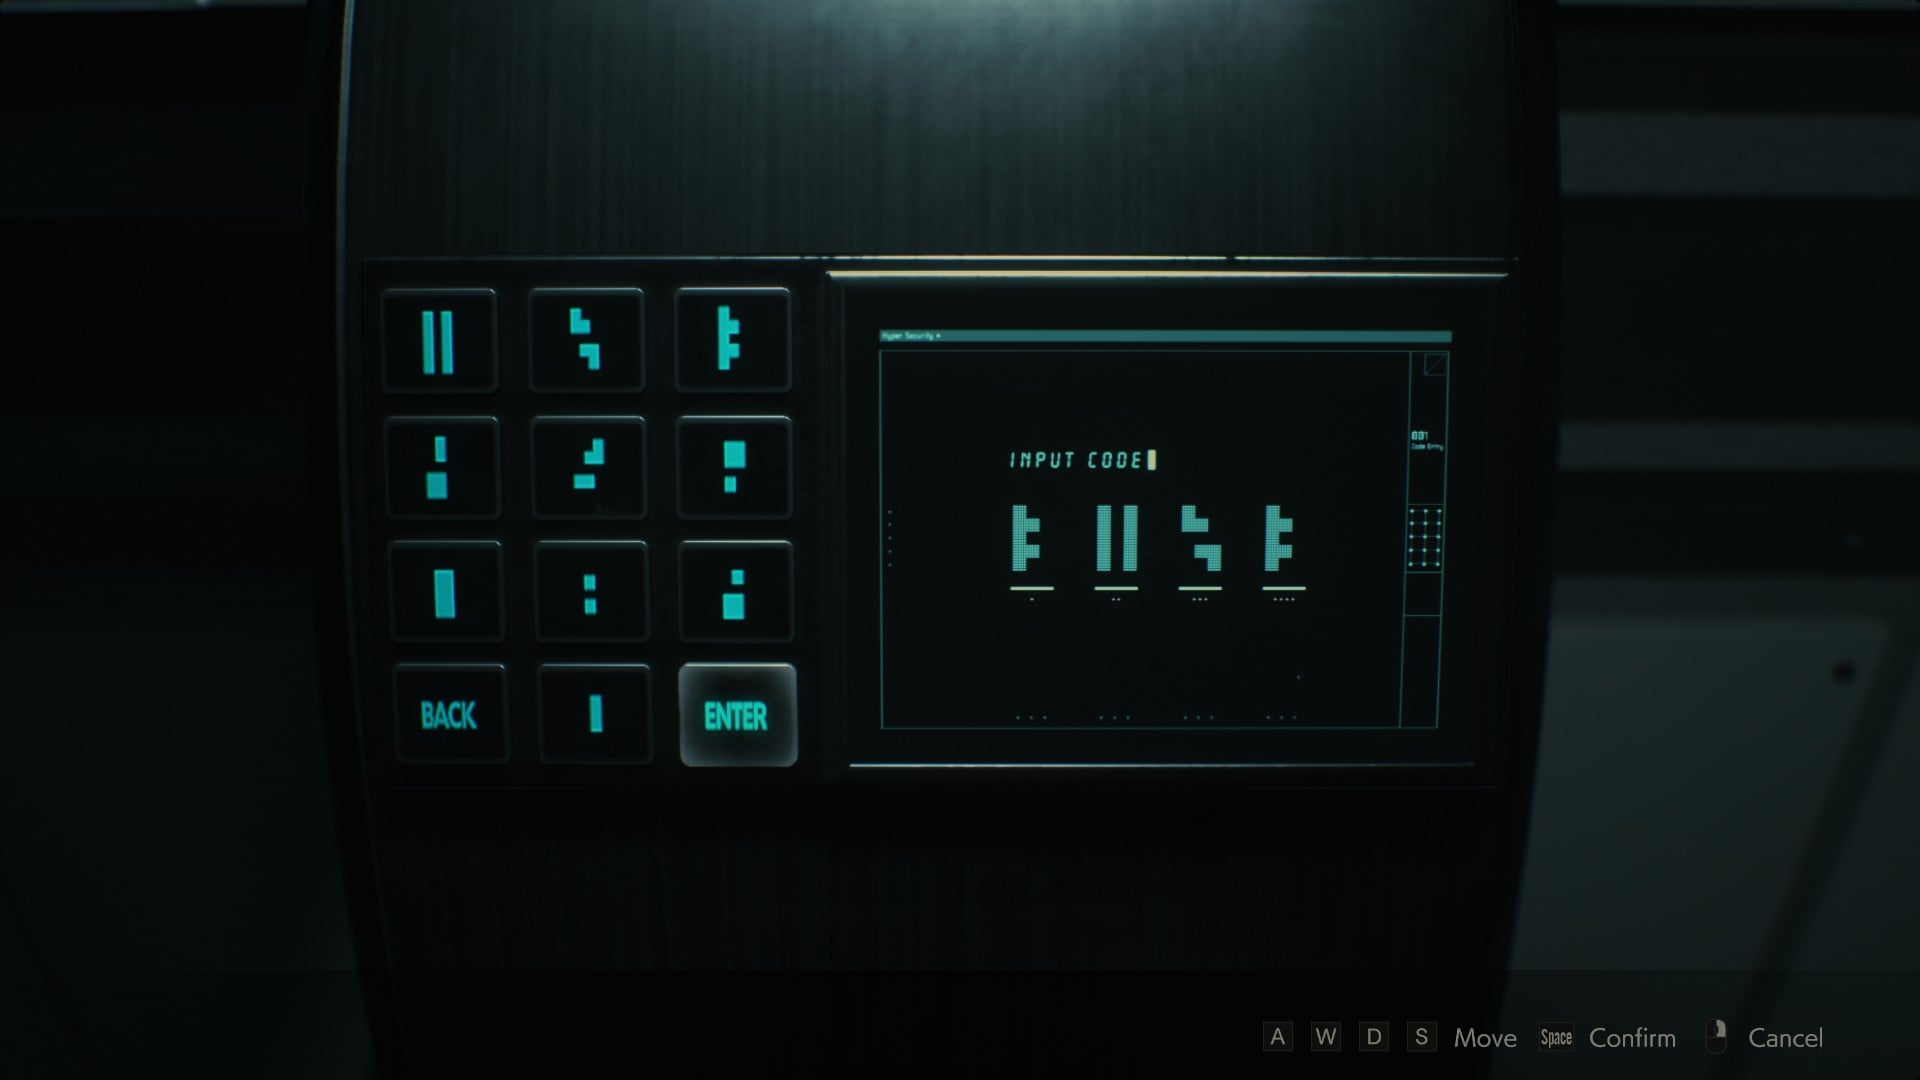
And enter the following codes into the security terminal…
Code A

Code B
4. heading through the greenhouse, go to the “drug testing lab” and place the “Dispersal Cartridge” into the machine and press the following combination sequence:
- Red
- Green
- Blue
- Red
- Green
- Blue
- Red
- Green
Take the solution cartridge, and head out of the “testing lab” dropping down the hatchway in the greenhouse into the lower tunnels on the left as you leave the room and re-enter the greenhouse…
5. In the opposite corner to the only exit from the tunnel, you can grab the map for this section, take it and then go through the exit door into the “lounge” in here you will find some shotgun shells, on the bench by the carboard boxes in the eating area, collect these then “WALK” to the corridoor at the far end of the “lounge” be advised, you have limited time to avoid conflict with the licker that drops in at this stage, because it wakes the zombies up behind you which close the gap…
6. Once in the corridoor proceed forward, up the staircase, into a new room where you can do the following tasks
- Combine “high grade gunpowder” with the other, to make MAG bullets
- Combine the MAG ammo to create an empty inventory slot
- Collect the 9mm ammo from the storage lockers
- Collect the “Signal Modulator” from the wall socket
- Unlock the door leading back to the “lobby”
7. Leave the “east area” back along the “main shaft” and return to the “north area” navigate back to the “nap room” and use the “Signal Modulator” to turn on the power at that location where you can then collect
- Hip pouch
Note: Examining the “Signal Modulator” will allow you to set its frequency (using QE-WASD keys) to match the codes on each wall socket, in order to activate power in that location
8. Return to the “east area” as you enter the “lobby” turn right and navigate back down to the “lounge” where you can use the “Signal Modulator” on the far wall to activiate power in this area,
They will be two lickers and zombies in this room now, feel free to take out the lickers with your shotgun. and the zombies with the handgun if required…
Once power is restored, collect the “green herb” from the “lounge” on the bench…
Then collect the fuel canister from the “Server Room” and then head to the “low-temp testing labs” where you can cool the solution in the “Dispersal Cartridge” and retun it to the dispensing macine in the “greenhouse control room” collecting the “red herb” from the greenhouse just before hand, which can be combined with the “greenherb” in your inventory and used to heal yourself now…
9. Once the liquid has been dispensed, quickly run into the greenhouse and go around to the back where you can collect the final “electronic chip” and combine it with your “IDwristband” giving you maxium security clearance
Run back to the “greenhouse control room” and back towards the “main shaft” and activate the terminal to access the “west area” on you way out pick up the “greenherb” from the “lobby” area for use later…
10. When you enter the “west area” you can collect the
- Cassette from the special forces corpse,
- And the grenade from the same location
Then… activate the power using the wall panel near the item box…
Once the power is turned on do the following things:
- Watch the video and then disgard both the “Cassette” and the “Signal Modulator” from your inventory slots…
- Collect the high grade gunpowder from the changing room
- Head to the “P4 testing lab” via the “bioreactors room”
- Collect the high grade gunpowder (combine it with the other one in your inventory)
- Collect the redherb (combine it with the greenherb in your inventory)
- Reload all your weapons
- Collect the vile
Proceed out the Labs…