Atlas Other Guides
- Atlas – Harvesting Guide
- Atlas – Crafting Guide
- Atlas – Ship Building Guide
- Atlas – Taming Guide
- Atlas – Cooking Guide
- Atlas – Health and Vitamins
- Atlas – Skills System
- Atlas – Character Stats
- Atlas – Crew Guide
- Atlas – Raft Guide
- Atlas – Pirate Ships and Loot Boxes
- Atlas – Relative Bearing
- Atlas – Pirate Battle Tactics
- Atlas – How to Find Drinkable Water
- Atlas – How to Claim Land
- Atlas – How to Build Brigantine Ship
- Atlas – Ghost Ships [Ship of The Damned]
- Atlas – How to Make a House
- Atlas – Where to Find Fiber ?
- Atlas – How to Get Flint
- Atlas – How to Get Wood
- Atlas – Fishing Guide
- Atlas – How to Tame Creatures?
- Atlas – How to Level Up Ships and Rafts
- Atlas – Armor Crafting Recipes
- Atlas – Tool Recipes
- Atlas – Disable Auto Target Lock
Making you first House or a Base in Atlas is important because it will allow you to store items in boxes, not be attacked by animals or enemies on PvP servers and you will have a higher temperature which will help you deal with hypothermia, a common early game character killer, as well as hyperthermia (staying on the sun for a long time). In this Atlas Guide you will learn how to build your first starter House, what resources you’ll need and how to craft and place each of the House parts.
How to Make a Starter House in Atlas MMO Game
There are a few prerequisites you will have to meet in order to be able to build any structures on a land. The first one is that you’ve claimed a piece of land on an island, if you don’t know how to do it go check our Atlas Land Claiming Guide. After you’ve got that out of the way, you will need to unlock some Skills: The Basics, Construction, Basics of Building– this will unlock all of the basic Thatch House parts.
If you’ve got extra character Skill points, travel to the Secrets of Building node, this one will allow you to get much stronger House Parts (blueprints made out of wood) so they will last much longer. To spec into Secrets of Building you will need to unlock Weaving first.
The blueprints, materials and resources you’ll need to craft a Thatch or a Wooden house are:
- Thatch Wall – 26 Fiber, 50 Thatch, 15 Wood
- Thatch Floor – 26 Fiber, 60 Thatch, 18 Wood
- Thatch Roof – 26 Fiber, 50 Thatch, 15 Wood
- Thatch Ceiling – 26 Fiber, 50 Thatch, 15 Wood
- Thatch Door – 18 Fiber, 40 Thatch, 12 Wood
Ladders and Bed are optional but very useful so you should consider making these as well.
All of these can also be their wooden counterparts.
Once you’ve crafted all of the House parts we mentioned above, it’s time to start placing them. In order to be able to build and place them, you’ll need to move the item into your hotbar and then select that key number.
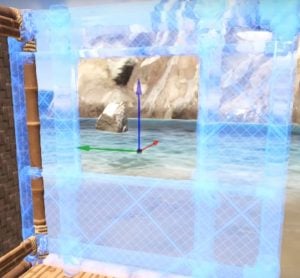
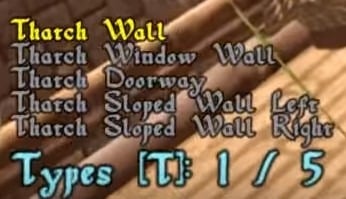
Start by placing the Thatch flooring, continue onto Walls, and fill with Roof and the Ceiling. Remember that each of these blueprints has a different model, you can cycle through the model types by pressing the “T” button on your keyboard. By doing this, you’ll be able to make a Thatch Window Wall for example, which will leave a square where you can then place a window. The same goes for a Doorway, cycle through the model types and find Thatch Doorway and place it down.
Once you build everything, you’ll notice you are missing windows and doors. You can build windows and doors by using a Thatch Door blueprint (or Wooden). The Door blueprint will fit anywhere and automatically cycles to a Window if the hole you’re building it in is a square.